2013 BMW 335I CONVERTIBLE change time
[x] Cancel search: change timePage 106 of 308

105
Technology for driving comfort and safety
Controls
the airbag retention system from the vehicle. Do
not modify the individual components of the
system or its wiring in any way. This includes
the upholstered covers on the steering wheel,
instrument panel, seats and roof posts, as well
as the sides of the roof lining. Do not attempt to
remove or dismantle the steering wheel.
Do not touch the individual components imme-
diately after the system has been triggered,
because there is a danger of burns.
In the event of faults, immobilization, or after the
airbag system has been triggered, have the
testing, repair, or disassembly and scrapping of
gas generators performed only by your BMW
center or a workshop that has the required
explosives licenses. Unprofessional attempts to
work on the system could lead to failure in an
emergency or to undesired airbag activation,
either of which could result in personal injury.
<
Warning notices and information about the air-
bags can also be found on the sun visors.
Automatic deactivation of the front
passenger airbags
An analysis of the impression in the front pas-
senger seat cushion determines whether and
how the seat is occupied. The front and side air-
bags for the front passenger are activated or
deactivated by the system accordingly. The indicator lamp above the interior
rearview mirror shows the current status
of the front passenger airbags, deactivated or
activated, refer to Status of front passenger air-
bags below. <
Before transporting a child on the front
passenger seat, read the safety precau-
tions and handling instructions under Trans-
porting children safely, refer to page 56.
The front and side airbags can also be deacti-
vated by adolescents and adults sitting in cer-
tain positions; the indicator lamp for the front
passenger airbags lights up. In such cases, the
passenger should change his or her sitting
position so that the front passenger airbags are
activated and the indicator lamp goes out. If the
desired airbag status cannot be achieved by changing the sitting posi
tion, transport the rele-
vant passenger on a rear seat. Do not attach
seat covers, seat cushion padding, ball mats or
other items to the front passenger seat unless
they are specifically recommended by BMW.
Do not place any items under the seat which
could press against the seat from below. Other-
wise, a correct analysis of the seat cushion is
not ensured. <
Status of front passenger airbags
The indicator lamp for the front passenger air-
bags shows the functional status of the front
passenger front and side airbags in accordance
with whether and how the front passenger seat
is occupied. The indicator lamp shows whether
the front passenger airbags are activated or
deactivated.
>The indicator lamp lights up when a child in
a specially designated child restraint sys-
tem is detected, as intended, on the seat.
The front and side airbags for the front pas-
senger are not activated.
Most child seats are detected by the
system, This particularly applies to
child seats that were required by NHTSA at
the time of manufacture of the vehicle. After
mounting a child seat, ensure that the indi-
cator lamp for the front passenger airbag is
lit. It indicates that the child seat has been
detected and that the front passenger air-
bags are deactivated. <
> The indicator lamp does not light up as long
as a person of sufficient size and in a correct
sitting position is detected on the seat.
00320051004F004C00510048000300280047004C0057004C005200510003
Page 117 of 308
116
ControlsClimate
directed toward the windshield, the side win-
dows, the upper body and the footwell.
Pressing the AUTO button automatically
switches on the cooling function.
At the same time, a condensation sensor con-
trols the program so as to prevent window con-
densation as much as possible.
The program is switched off when the air distri-
bution is set manually or the button is pressed
again.
Intensity of the AUTO program
With the AUTO program switched on, auto-
matic control of the air volume and air distribu-
tion can be adjusted:
Press the left side of the button to
reduce the intensity. Press the
right side of the button to increase
it.
The selected intensity is shown on the display
of the automatic climate control.
Convertible program
The Convertible program is active when the
hardtop is open and the AUTO program is
switched on. In the Convertible program, the
automatic climate control is optimized for driv-
ing with the hardtop open. In addition, the air
volume is increased as vehicle speed increases.
The effectiveness of the Convertible pro-
gram can be enhanced considerably by
installing the wind deflector. <
Adjusting air volume manually
To be able to manually adjust the air volume,
switch off the AUTO program first.
Press the left side of the button to
reduce the air volume. Press the
right side of the button to increase
it.
The air flow rate is lowered or switched off
entirely to reduce the drain on the battery. The
display remains the same.
Automatic recirculated air control
AUC/Recirculated air mode
You can respond to unpleasant odors or pollut-
ants in the immediate environment by tempo-
rarily suspending the supply of outside air. The
system then recirculates the air currently within
the vehicle.
Press the button repeatedly to
select an operating mode:
> LED off: outside air flows in continuously.
> Left-hand LED on, AUC mode: a sensor
detects pollutants in the outside air and
controls the shut-off automatically.
> Right-hand LED on, recirculated air mode:
the supply of outside air is permanently
shut off. If the windows fog over, switch off
recirculated air mode and increase the air
volume, if necessary. Make sure that air can
flow onto the windshield.
The recirculated air mode should not be
used over an extended period of time;
otherwise, the air quality inside the car will dete-
riorate continuously. <
Via the button on the steering wheel
You can switch quickly between the recircu-
lated air mode and the previous mode using a
button on the steering wheel, refer to page 11.
ALL program
Press the button.
The current temperature setting
on the driver's side is transferred to
the front passenger side.
If the temperature setting on the driver's side is
changed, the temperature on the front passen-
ger side is changed as well.
The program is switched off when the setting is
adjusted on the front passenger side or the but-
ton is pressed again.
00320051004F004C00510048000300280047004C0057004C005200510003
Page 118 of 308
117
Climate
Controls
Defrosting windows and removing
condensation
Press the button.
Quickly removes ice and conden-
sation from the windshield and
front side windows.
For this purpose, also switch on the cooling
function.
Switching cooling function on/off
The passenger compartment can only be
cooled while the engine is running.
Press the button.
The air is cooled and dehumidified
and – depending on the tempera-
ture setting – warmed again.
Depending on the weather, the windshield may
fog up briefly when the engine is started.
Pressing the AUTO button automatically
switches on the cooling function.
Rear window defroster
Press the button.
The defroster is switched off auto-
matically after a certain time.
Depending on your vehicle's equipment, the
upper wires serve as an antenna and are not
part of the rear window defroster.
Switching the system on/off
Switching off
With the blower at its lowest set-
ting, press the left side of the but-
ton to switch off the automatic cli-
mate control.
All displays are cleared except for the rear win-
dow defroster if it is switched on.
The outside air supply is blocked when
the automatic climate control is switched
off. If the air quality deteriorates or the window
fogs over, switch the system back on and
increase the air volume. <
Switching on
Press any button except the ALL or the rear
window defroster button to reactivate the auto-
matic climate control.
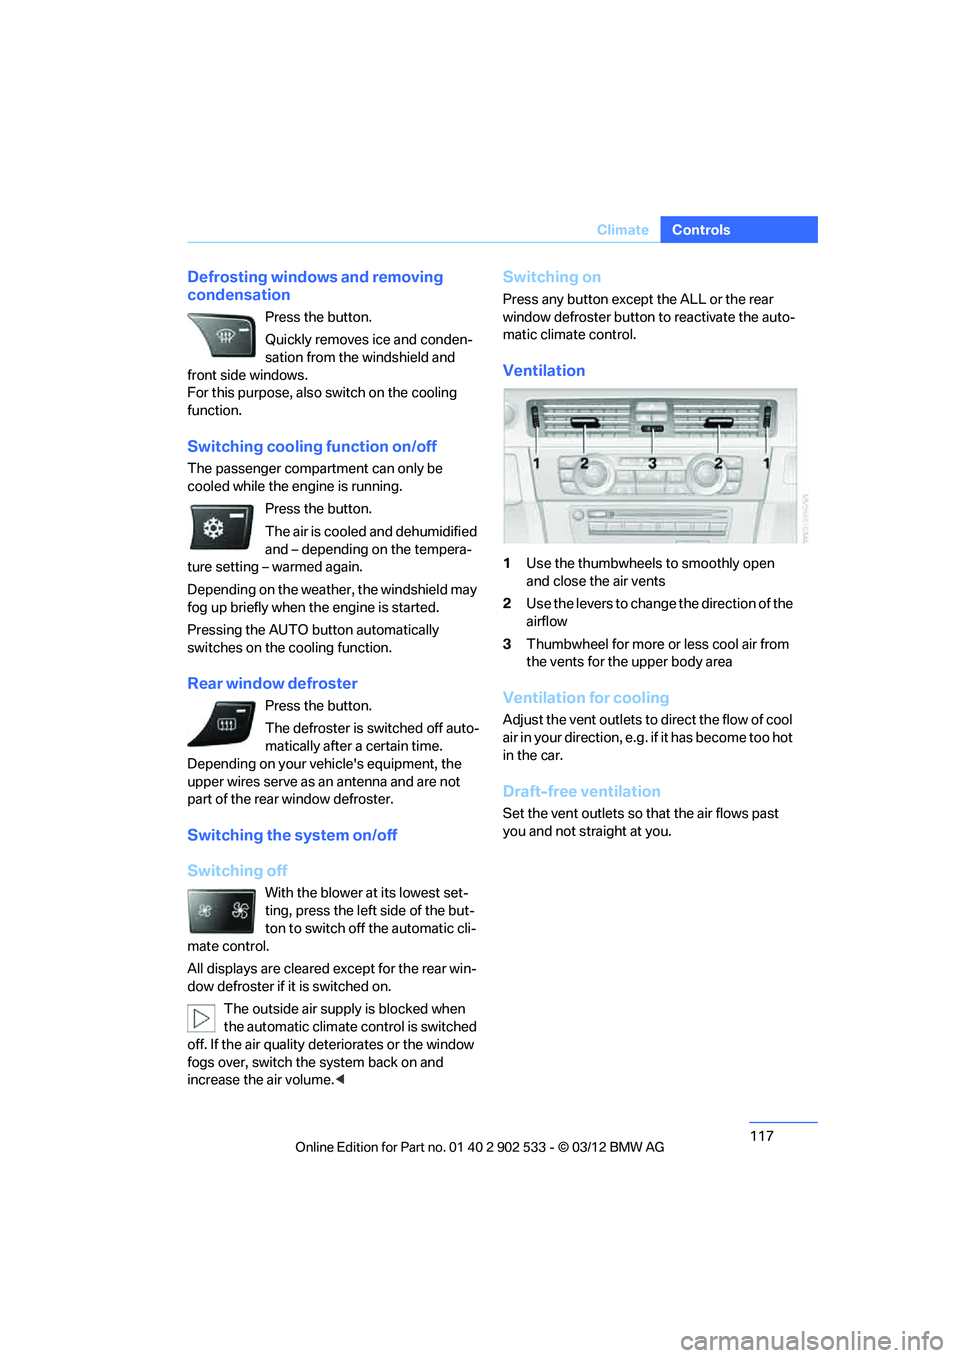
Ventilation
1Use the thumbwheels to smoothly open
and close the air vents
2 Use the levers to change the direction of the
airflow
3 Thumbwheel for more or less cool air from
the vents for the upper body area
Ventilation for cooling
Adjust the vent outlets to direct the flow of cool
air in your direction, e.g. if it has become too hot
in the car.
Draft-free ventilation
Set the vent outlets so that the air flows past
you and not straight at you.
00320051004F004C00510048000300280047004C0057004C005200510003
Page 119 of 308
118
ControlsClimate
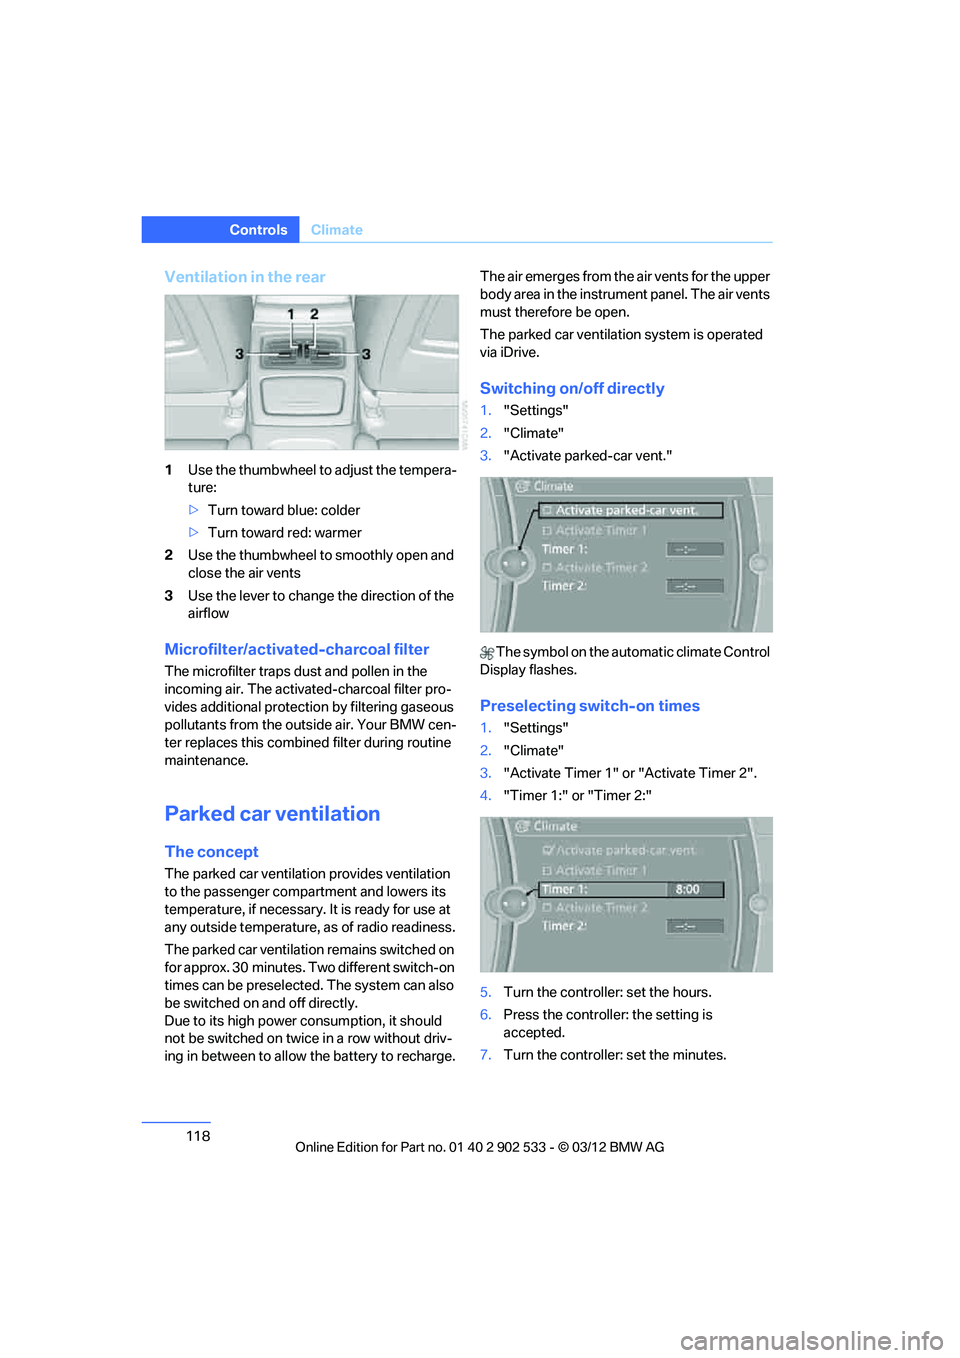
Ventilation in the rear
1Use the thumbwheel to adjust the tempera-
ture:
>Turn toward blue: colder
> Turn toward red: warmer
2 Use the thumbwheel to smoothly open and
close the air vents
3 Use the lever to change the direction of the
airflow
Microfilter/activated-charcoal filter
The microfilter traps dust and pollen in the
incoming air. The activated-charcoal filter pro-
vides additional protecti on by filtering gaseous
pollutants from the outside air. Your BMW cen-
ter replaces this combined filter during routine
maintenance.
Parked car ventilation
The concept
The parked car ventilation provides ventilation
to the passenger compartment and lowers its
temperature, if necessary. It is ready for use at
any outside temperature, as of radio readiness.
The parked car ventilation remains switched on
for approx. 30 minutes. Two different switch-on
times can be preselected. The system can also
be switched on and off directly.
Due to its high power co nsumption, it should
not be switched on twice in a row without driv-
ing in between to allow the battery to recharge. The air emerges from the air vents for the upper
body area in the instrument panel. The air vents
must therefore be open.
The parked car ventilation system is operated
via iDrive.
Switching on/off directly
1.
"Settings"
2. "Climate"
3. "Activate parked-car vent."
The symbol on the automatic climate Control
Display flashes.
Preselecting switch-on times
1. "Settings"
2. "Climate"
3. "Activate Timer 1" or "Activate Timer 2".
4. "Timer 1:" or "Timer 2:"
5. Turn the controller: set the hours.
6. Press the controller: the setting is
accepted.
7. Turn the controller: set the minutes.
00320051004F004C00510048000300280047004C0057004C005200510003
Page 122 of 308
121
Practical interior accessories
Controls
3.
Hold the hand-held transmitter of the
device to be controlled approx. 1 in/2.5 cm
to 3 in/8 cm away from the buttons on the
inside mirror.
The required distance depends on the
hand-held transmitter.
4. Simultaneously press and hold the button
of the desired function on the hand-held
transmitter and the button to be pro-
grammed on the inside mirror.
The LED on the inside mirror will flash
slowly at first.
5. As soon as the LED flashes rapidly, release
both buttons. The rapid flashing indicates
that the button on the inside mirror has
been programmed.
If the LED does not flash rapidly within
60 seconds, change the distance between
the inside mirror and the hand-held trans-
mitter and repeat this step. This may
require several attempts. Allow at least
15 seconds between attempts.
6. To program additional functions on the
other buttons of the inside mirror, repeat
steps 3 through 5.
The buttons on the inside mirro r can be used to
operate the devices if the ignition is switched
on.
Special procedure with alternating-
code systems
If the device fails to function even after repeated
programming, check whether the device to be
controlled uses an alternating-code system.
To do so, either read the instructions for the
device or hold down the programmed button on
the inside mirror. If the LED on the inside mirror
flashes quickly at first and then remains lit for
2 seconds, the device uses an alternating-code
system. The LED flashes and lights up repeat-
edly for approx. 20 seconds.
In devices with an alternating-code system, the
Integrated universal remote control and the
device must also be synchronized. For information about synchronizing can also
be found in the operating instructions for the
device to be set.
Programming will be easier with the aid of a
second person.
Synchronizing:
1.
Park your vehicle within the range of the
remote-controlled device.
2. Program the Integrated universal remote
control as described above.
3. Locate and press the synchronization but-
ton on the device to be set. You have
approx. 30 seconds to perform the next
step.
4. Hold down the programmed button on the
inside mirror for approx. 3 seconds and then
release it. Repeat this operation, up to three
times if necessary, to complete the syn-
chronization. If the synchronization has
succeeded, the programmed function is
performed.
Reprogramming individual buttons
1.Switch on the ignition.
2. Hold the hand-held transmitter of the
device to be controlled approx. 1 in/2.5 cm
to 3 in/8 cm away from the buttons on the
inside mirror.
The required distance depends on the
hand-held transmitter.
3. Press the desired button on the inside mir-
ror.
4. If the LED on the inside mirror flashes
slowly after approx. 20 seconds, press the
transmit key of the hand-held transmitter.
5. As soon as the LED flashes rapidly, release
both buttons.
If the LED does not flash rapidly after
approx. 60 seconds, alter the distance and
repeat the step.
Canada: if the LED does not flash rapidly
after approx. 60 seconds, alter the distance
and repeat this step or, if the programming
00320051004F004C00510048000300280047004C0057004C005200510003
Page 148 of 308
147
Destination entry
Navigation
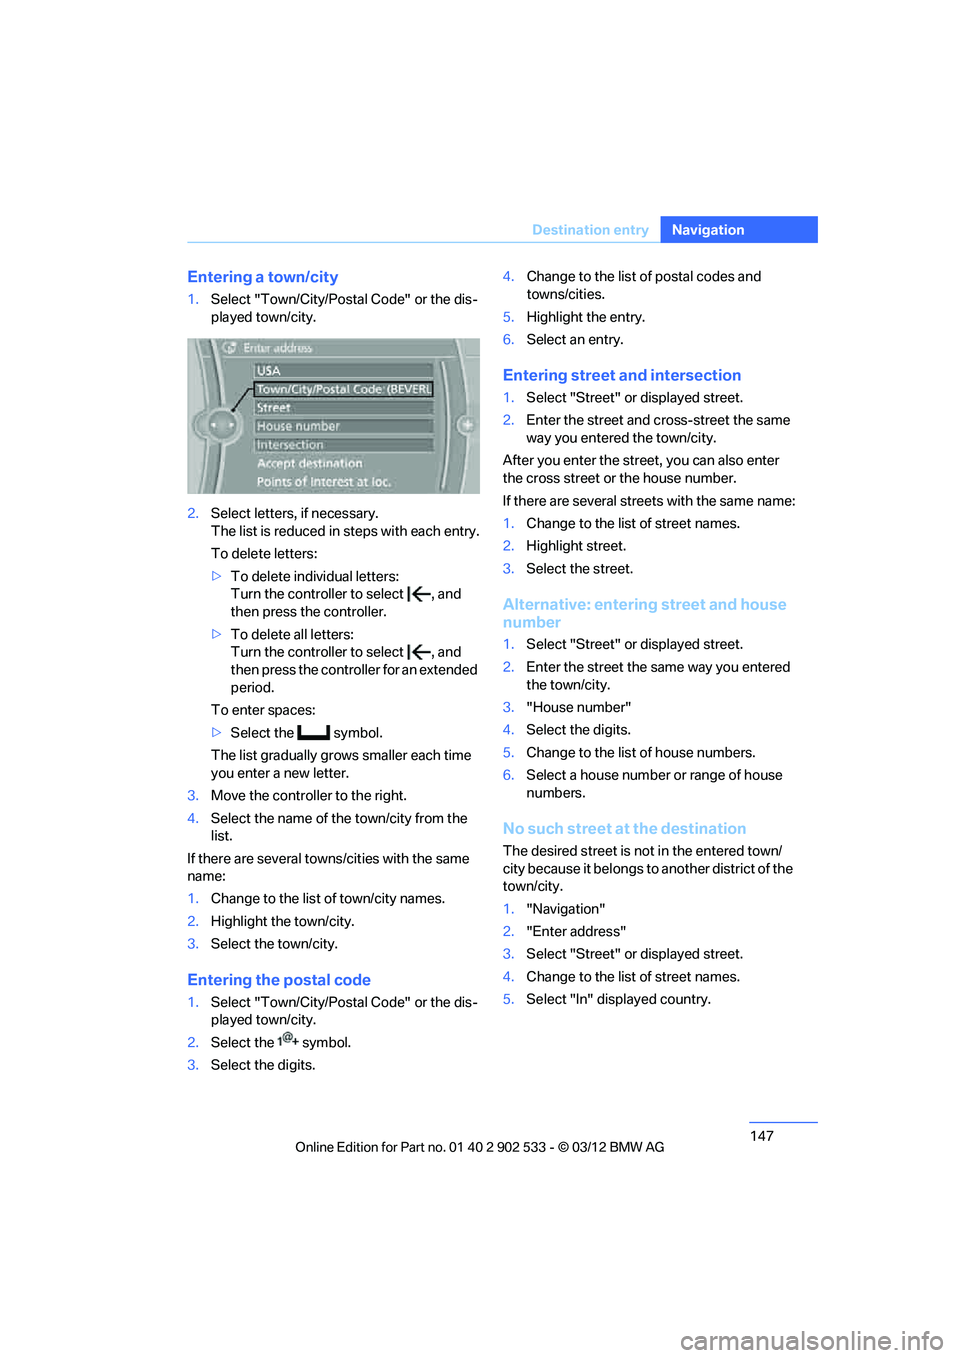
Entering a town/city
1.
Select "Town/City/Postal Code" or the dis-
played town/city.
2. Select letters, if necessary.
The list is reduced in steps with each entry.
To delete letters:
>To delete individual letters:
Turn the controller to select , and
then press the controller.
> To delete all letters:
Turn the controller to select , and
then press the controller for an extended
period.
To enter spaces:
> Select the symbol.
The list gradually grows smaller each time
you enter a new letter.
3. Move the controller to the right.
4. Select the name of the town/city from the
list.
If there are several towns/cities with the same
name:
1. Change to the list of town/city names.
2. Highlight the town/city.
3. Select the town/city.
Entering the postal code
1.Select "Town/City/Postal Code" or the dis-
played town/city.
2. Select the symbol.
3. Select the digits. 4.
Change to the list of postal codes and
towns/cities.
5. Highlight the entry.
6. Select an entry.
Entering street and intersection
1.Select "Street" or displayed street.
2. Enter the street and cross-street the same
way you entered the town/city.
After you enter the street, you can also enter
the cross street or the house number.
If there are several streets with the same name:
1. Change to the list of street names.
2. Highlight street.
3. Select the street.
Alternative: entering street and house
number
1.Select "Street" or displayed street.
2. Enter the street the same way you entered
the town/city.
3. "House number"
4. Select the digits.
5. Change to the list of house numbers.
6. Select a house number or range of house
numbers.
No such street at the destination
The desired street is not in the entered town/
city because it belongs to another district of the
town/city.
1."Navigation"
2. "Enter address"
3. Select "Street" or displayed street.
4. Change to the list of street names.
5. Select "In" displayed country.
00320051004F004C00510048000300280047004C0057004C005200510003
Page 156 of 308
155
Destination guidance
Navigation
Destination guidance
Vehicle equipment
In this chapter, all production, country, and
optional equipment that is offered in the model
range is described. Equipment is also described
that is not available because of, for example,
selected options or country version. This also
applies to safety related functions and systems.
Starting destination
guidance
1.
"Navigation"
2. Entering a destination, refer to page 146.
3. "Accept destination"
4. "Start guidance"
The route is displayed on the Control Display
after it is calculated.
In the map view, the distance to the destination/
intermediate destination and the estimated
time of arrival are displayed.
The arrow display appears on the Control Dis-
play, if so desired.
Terminating destination
guidance
1. "Navigation"
2. "Map"
3. "Guidance".
4. "Stop guidance"
Continuing destination
guidance
If the destination was not reached during the
last trip, destination guidance can be resumed.
"Resume guidance"
Route criteria
General information
>You can influence the calculated route by
selecting certain trip criteria.
> Route criteria can be changed during desti-
nation entry and during route guidance.
> Street types are part of the navigation data
and are taken into account in route plan-
ning, e.g. avoiding highways.
> The proposed route can differ from per-
sonal experience.
> The settings are stored for the remote con-
trol currently in use.
> Route guidance with traffic bulletins, refer
to page 161.
Changing route criteria
1."Navigation"
2. "Map"
3. "Route preference"
4. Selecting a criterion:
> "Fast route": time-optimized route
through a combination of the least pos-
sible distance and stretches of road that
allow rapid driving.
> "ECO PRO route": optimized combi-
nation of the fastest and shortest possi-
ble route.
> "Short route": short distance without
taking time into account.
> "Alternative routes": are suggested,
where possible, during active route
guidance.
00320051004F004C00510048000300280047004C0057004C005200510003
Page 160 of 308
159
Destination guidance
Navigation
Automatic scaling of the map
In the map view facing north, turn the controller
in any direction until AUTO is displayed as the
map scale.
The map shows the entire range from your loca-
tion to the destination.
Settings for the map view
The map is shown on the Control Display.
1.
Open "Options".
2. "Settings"
Set the optimized map view.
> "Day/night mode"
Select and adjust depending on light condi-
tions.
"Traffic conditions/gray map" active:
Settings are not taken into account.
> "Satellite images"
Depending on the availability and resolu-
tion, satellite images are displayed in scales
of approx. 1 mile to 600 miles/2 km to
1,000 km.
> "Perspective view in 3D"
Displays a three-dimensional view. Promi-
nent areas that are contained in the naviga-
tion data are displayed on the map in 3D.
> "Traffic conditions/gray map"
The map is optimized for displaying traffic
bulletins. Symbols for the special destina-
tions are no longer displayed.
Map view for the split screen display
The map view for the split screen can be
selected separately from the main screen.
1.Open "Options".
2. "Split screen"
3. Move the controller to the right repeatedly
until the split screen content is selected.
4. Select "Split screen content" or scale. 5.
Select the map view:
>"Arrow display"
> "Map facing north"
> "Map direction of travel"
> "Map view with perspective"
> "Position"
> "Exit ramp view"
> "Traffic conditions/gray map"
6. To change the scale: switch to the split
screen and turn the controller.
Traffic bulletins
Overview
>You can display the traffic bulletins from
radio stations that broadcast the TMC
(Traffic Message Channel) of a traffic infor-
mation service. Bulletins about traffic
obstructions and hazards are continuously
updated.
> Traffic bulletins are indicated by symbols on
the map.
> Traffic bulletins for the surrounding area are
stored in a list.
The symbol in the toolbar of the map view
turns red if a traffic bulletin relates to the calcu-
lated route.
Real Time Traffic Information End-User
Provisions
Certain BMW models equipped with navigation
have the capability to display real-time traffic
information. If your system has this capability
the following additional terms and conditions
apply:
An End-User shall no longer have the right to
use the Traffic Data in the event that the End-
User is in material breach of the terms and con-
ditions contained herein.
A. Total Traffic Network, a division of Clear
Channel Broadcasting, In c. ("Total Traffic Net-
00320051004F004C00510048000300280047004C0057004C005200510003