2013 BMW 328I XDRIVE COUPE low beam
[x] Cancel search: low beamPage 110 of 308

109
Lamps
Controls
low-beam headlamps manually under these
conditions.
<
Welcome lamps
If you leave the light switch in position 2 or3
when you park the car, the parking lamps and
the interior lamps light up briefly when you
unlock the vehicle.
Activating/deactivating welcome
lamps
1. "Settings"
2. "Lighting"
3. "Welcome light"
The setting is stored for the remote control cur-
rently in use.
Pathway lighting
If the headlamp flasher is activated after switch-
ing off the ignition with the lamps switched off,
the low beams come on and remain on for a cer-
tain time.
Setting duration
1. "Settings"
2. "Lighting"
3. "Pathway light.:"
4. Set a time of duration or deactivate the
function. The setting is stored for the remote control cur-
rently in use.
Daytime running lights
The daytime running lights light up in switch
position
0, 1 and 3. They are less powerful than
the low beams.
The tail lamps may also light up.
Activating/deactivating daytime
running lights
1. "Settings"
2. "Lighting"
3. "Daytime running lamps"
The setting is stored for the remote control cur-
rently in use.
Adaptive Light Control
The concept
Adaptive Light Control is a variable headlamp
control system that enables better illumination
of the road surface. Depending on the steering
00320051004F004C00510048000300280047004C0057004C005200510003
Page 111 of 308

110
ControlsLamps
angle and other parameters, the light from the
headlamp follows the course of the road.
In tight curves at speeds up to 40 mph/70 km/h,
e.g. on mountainous roads or when turning, an
additional, corner-illuminating lamp is switched
on that lights up the inside area of the curve.
Activating Adaptive Light Control
With the ignition switched on, turn the light
switch to position 3, refer to page 108.
The corner-illuminating lamp is switched on
automatically, depending on the steering wheel
angle or turn signal indicator.
Standstill function: to avoid blinding oncoming
traffic, the Adaptive Light Control does not
direct light toward the driver's side when the
vehicle is at a standstill.
When you are reversing, only the corner-illumi-
nating lamps are switched on and active on
both sides.
Malfunction
The warning lamp lights up. A mes-
sage appears on the Control Dis-
play.The Adaptive Light Control is
malfunctioning or failed. Have the system
checked as soon as possible.
High beams/roadside parking
lamps
1 High beams
2 Headlamp flasher
3 Roadside parking lamps
Roadside parking lamps, left or right
There is an additional option of switching on the
lamps on the side of the car facing the road
when parked.
Switching on
After parking the vehicle, press the lever up or
down beyond the pressure point for a longer
period, arrow 3 .
The roadside parking lamps drain the bat-
tery. Therefore, do not leave them on for
unduly long periods of time; otherwise, the bat-
tery might not have enough power to start the
engine. <
Switching off
Press the lever in the opposite direction to the
pressure point, arrow 3.
High-beam Assistant
The concept
This system automatically switches the high
beams on and off. The procedure is controlled
by a sensor on the front of the interior rearview
mirror. The assistant ensures that the high
beams are switched on whenever the traffic sit-
uation allows. It handles this task for you and
gives you the benefit of the best possible view.
You can intervene at any time and switch the
high beams on and off as usual.
Activating the system
1. Turn the light switch to position 3, refer to
page 108.
2. With the low beams switched on, briefly
push the turn signal/high beam lever in the
direction of the high beam.
The indicator lamp in the instrument
cluster lights up when the high beams
are activated. The system automati-
cally switches from high beams to low beams
and vice versa in response to oncoming traffic,
00320051004F004C00510048000300280047004C0057004C005200510003
Page 112 of 308

111
Lamps
Controls
traffic ahead of you, and adequate ambient
lighting, e.g. on city streets.
Switching the high beams on and off
manually
Whenever you wish, or when the situation
requires, you can intervene:
>
If the High-beam Assistant switches on the
high beams, but you would like to drive with
the low beams, simply switch off the high
beams using the turn signal/high beam
lever. This deactivates the High-beam
Assistant.
To reactivate the system, briefly push the
turn signal/high beam lever toward the high
beams again.
> If the High-beam Assistant switches on the
low beams, but you would like to drive with
the high beams, switch on the high beams
as usual. This deactivates the system and
the high beams need to be switched off
manually, if necessary.
To reactivate the system, briefly push the
turn signal/high beam lever toward the high
beams again.
> Use the headlamp flasher as usual with the
low beams switched on.
System limitations
The High-beam Assistant cannot serve
as a substitute for the driver's personal
judgment of when to use the high beams.
Therefore, manually switch off the high beams
in situations where this is required to avoid a
safety risk.<
The system is not fully functional in situations
such as the following, and driver intervention
may be necessary:
> In very unfavorable weather conditions,
such as fog or heavy precipitation
> In detecting poorly-lit road users, such as
pedestrians, cyclists, horseback riders and
wagons; when driving close to train or ship
traffic; and at animal crossings >
In tight curves, on hilltops or in depressions,
in cross traffic or half-obscured oncoming
traffic on highways
> In poorly lit towns and cities and in the pres-
ence of highly reflective signs
> At low speeds
> When the windshield in front of the interior
rearview mirror is fogged over, dirty or cov-
ered with stickers, etc.
> If the sensor is dirty. Clean the sensor on
the front of the interior rearview mirror using
a cloth moistened with a small amount of
glass cleaner.
Activating via iDrive
1."Settings"
2. "Lighting"
3. "High beam assistant"
The setting is stored for the remote control cur-
rently in use.
00320051004F004C00510048000300280047004C0057004C005200510003
Page 113 of 308
112
ControlsLamps
Fog lamps
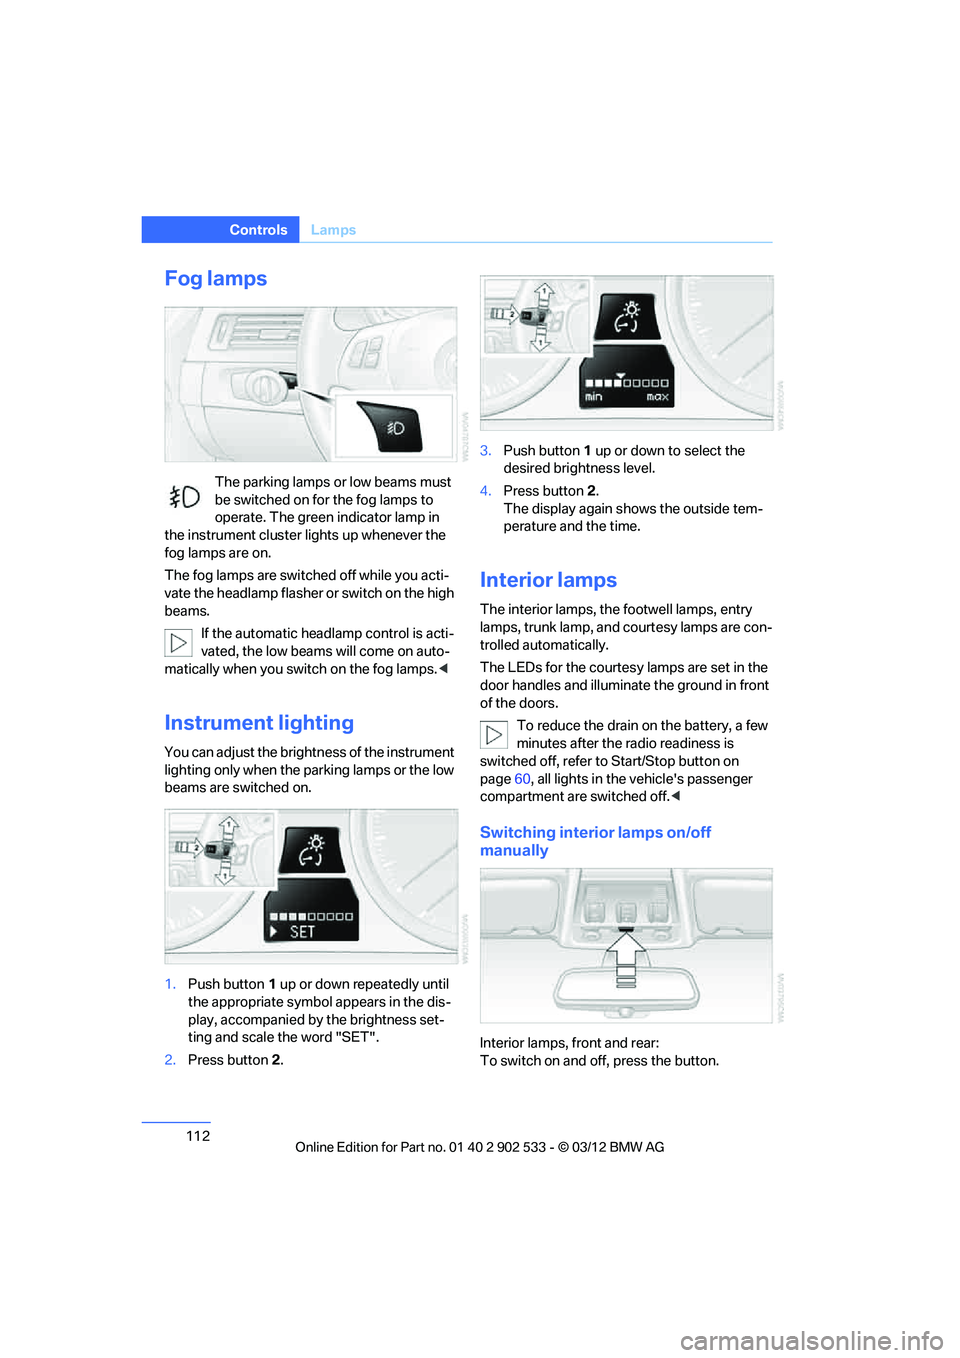
The parking lamps or low beams must
be switched on for the fog lamps to
operate. The green indicator lamp in
the instrument cluster lights up whenever the
fog lamps are on.
The fog lamps are switched off while you acti-
vate the headlamp flasher or switch on the high
beams.
If the automatic headlamp control is acti-
vated, the low beams will come on auto-
matically when you switch on the fog lamps. <
Instrument lighting
You can adjust the brightness of the instrument
lighting only when the parking lamps or the low
beams are switched on.
1.Push button 1 up or down repeatedly until
the appropriate symbol appears in the dis-
play, accompanied by the brightness set-
ting and scale the word "SET".
2. Press button 2. 3.
Push button 1 up or down to select the
desired brightness level.
4. Press button 2.
The display again shows the outside tem-
perature and the time.
Interior lamps
The interior lamps, the footwell lamps, entry
lamps, trunk lamp, and courtesy lamps are con-
trolled automatically.
The LEDs for the courtesy lamps are set in the
door handles and illuminate the ground in front
of the doors.
To reduce the drain on the battery, a few
minutes after the radio readiness is
switched off, refer to Start/Stop button on
page 60, all lights in the vehicle's passenger
compartment are switched off. <
Switching interior lamps on/off
manually
Interior lamps, front and rear:
To switch on and off, press the button.
00320051004F004C00510048000300280047004C0057004C005200510003
Page 276 of 308
275
Giving and receiving assistance
Mobility
5.
Attach the second terminal clamp of the
minus/– jumper cable to the negative termi-
nal of the battery or to the engine or body
ground of the vehicle to be started.
Starting the engine
1.Start the engine of the donor vehicle and
allow it to run for a few minutes at slightly
increased idle speed.
2. Start the engine on the other vehicle in the
usual way.
If the first start attempt is not successful,
wait a few minutes before another attempt
in order to allow the discharged battery to
recharge.
3. Let the engines run for a few minutes.
4. Disconnect the jumper cables by reversing
the above connecting sequence.
If necessary, have the battery checked and
recharged.
Never use spray fluids to start the
engine. <
Tow-starting, towing away
Observe the applicable laws and regula-
tions for tow-starting and towing vehi-
cles. <
Do not transport any passengers other
than the driver in a vehicle that is being
towed. <
Using a tow fitting
The screw-in tow fitting must always be carried
in the car. It can be screwed in at the front or
rear of the BMW.
Coupe: it is stored in the onboard vehicle tool kit
underneath the cover on the right-hand side of
the trunk, refer to page 266.
Convertible: it is stored in the onboard vehicle
tool kit underneath the trunk floor, refer to
page 266. Use only the tow fitting provided with the
vehicle and screw it all the way in. Use the
tow fitting for towing on paved roads only. Avoid
lateral loading of the tow fitting, e.g. do not lift
the vehicle by the tow fitting. Otherwise, the
tow fitting and the vehicle could be damaged. <
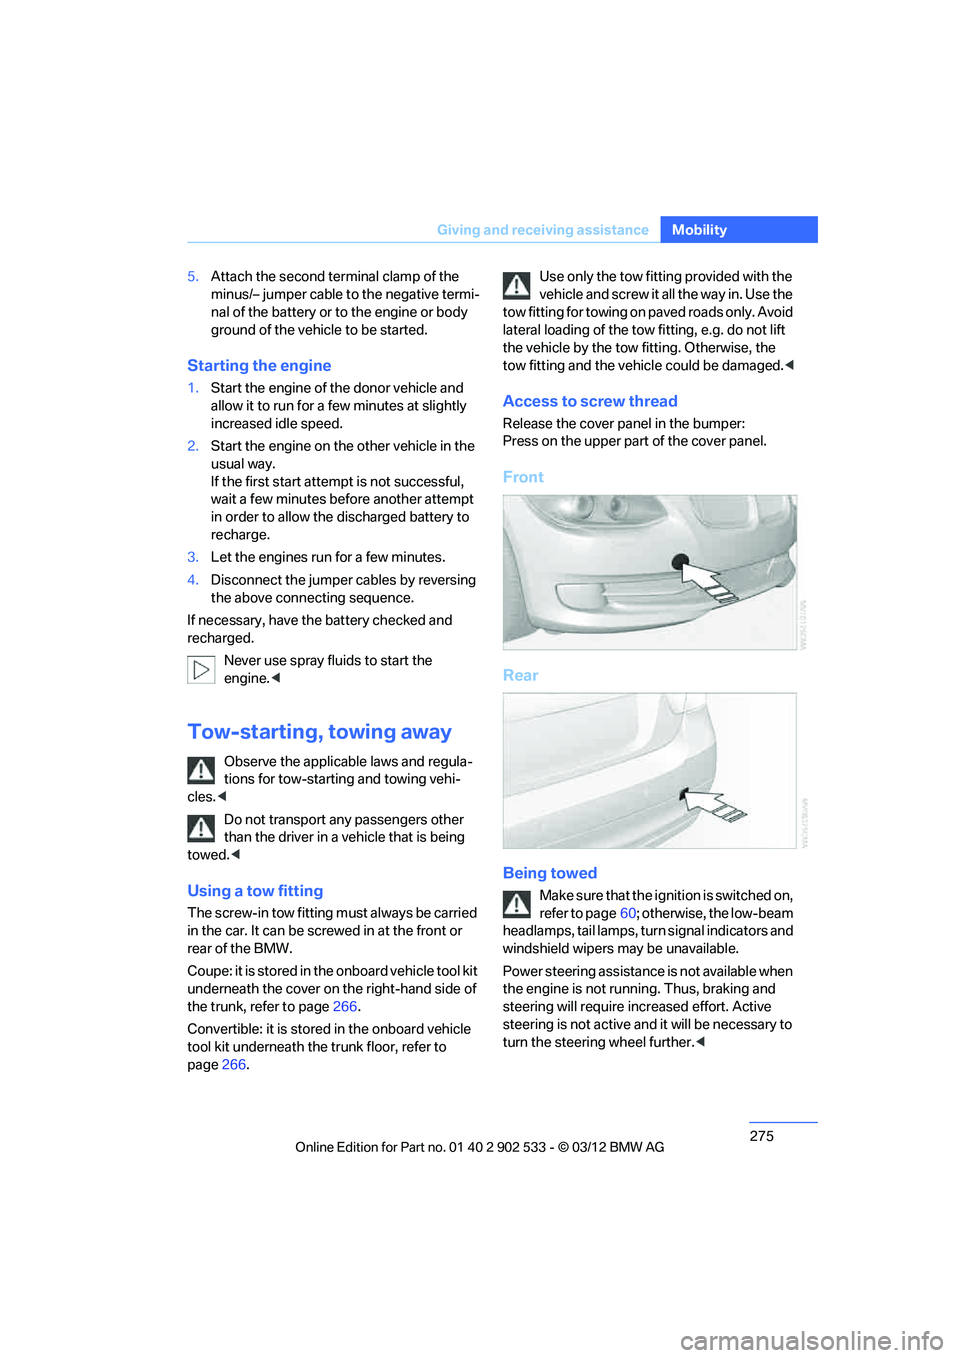
Access to screw thread
Release the cover panel in the bumper:
Press on the upper part of the cover panel.
Front
Rear
Being towed
Make sure that the ignition is switched on,
refer to page60; otherwise, the low-beam
headlamps, tail lamps, turn signal indicators and
windshield wipers may be unavailable.
Power steering assistance is not available when
the engine is not running. Thus, braking and
steering will require increased effort. Active
steering is not active and it will be necessary to
turn the steering wheel further. <
00320051004F004C00510048000300280047004C0057004C005200510003
Page 293 of 308
292
Referen ceEverything from A to Z
Everything from A to Z
Index
A
ABS Antilock Brake
System 95
ACC, refer to Active Cruise
Control 74
Acceleration assistant, refer to Launch Control 69
Accessories, refer to Vehicle equipment 5
Accident, refer to Sending an
Emergency Request 272
Activated-charcoal filter for automatic climate
control 118
Active Cruise Control 74
– indicator lamp 77
– malfunction 78
– selecting distance 75
– sensor 77
Active steering 103
Adaptive brake lamp
– Brake Force Display 104
Adaptive Light Control 109
Additives
– coolant 259
– engine oil 258
Address, entering 146,152
Address for navigation
– entering 146
Adjusting temperature inside the car, refer to Automatic
climate control 115
Adjusting the thigh support 48
Airbags 104
– indicator/warning lamp 106
– sitting safely 46
Air conditioning mode
– automatic climate
control 115
– ventilation 117 Air distribution
– automatic
115
Airing, refer to Ventilation 117
Air pressure, refer to Tire inflation pressure 235
Air recirculation, refer to Recirculated air mode 116
Air supply
– automatic climate
control 115
– ventilation 117
Air vents 114
Air volume 116
AKI, refer to Fuel grade 233
Alarm system 36
– avoiding unintentional alarms 38
– interior motion sensor 37
– switching off an alarm 37
– tilt alarm sensor 37
ALL program 116
All -se
ason tires, refer to
Winter tires 254
All-wheel drive, refer to xDrive 97
Ambient air, refer to
Recirculated air mode 116
Antifreeze
– coolant 259
– washer fluid 71
Antilock Brake System ABS 95
Anti-theft alarm system, refer to Alarm system 36
Appointments, refer to
Calendar 219
Approved axle loads, refer to Weights 283
Approved engine oils 258
Approved gross vehicle weight, refer to Weights 283Apps
228
Armrest, refer to Center
armrest 124
Arrival time, refer to Computer 82
Ashtray 126
Assist systems, refer to Driving stability control 95
AUC Automatic recirculated air control 116
Audible instructions, refer to
Voice instructions 157
Audio device, external 125
Automatic
– air distribution 115
– air volume 115
– cruise control 72,74
– headlamp control 108
Automatic car washes 262
Automatic climate control 114
Automatic curb monitor 54
Automatic high beams and low beams, refer to High-
beam Assistant 110
Automatic recirculated air control AUC 116
Automatic Service Request 227
Automatic transmission with
Steptronic 63
– interlock 63
– overriding selector lever
lock 65
– shiftlock, refer to Changing selector lever position 63
– sport program 64
– towing 275
– tow-starting 275
AUTO program for automatic climate control 115
00320051004F004C00510048000300280047004C0057004C005200510003
Page 297 of 308
296
Referen ceEverything from A to Z
Distance warning, refer to
Park Distance Control
PDC 94
Door key, refer to Remote
control with integrated
key 30
Door lock 34
Doors, emergency operation 34
DOT Quality Grades 251
Draft-free ventilation 117
Drinks holders, refer to Cupholders 126
Drive mode 67
Drive-off assistance, refer to Dynamic Stability Control
DSC 95
Drive-off assistant 98
Driving dynamics control 68
Driving lamps, refer to Parking lamps/low beams 108
Driving notes 136
Driving off on hills, refer to Drive-off assistant 98
Driving stability control
systems 95
Driving through water 138
Driving tips, refer to Driving
notes 136
Dry air, refer to Cooling function 117
DSC Dynamic Stability Control 95
DTC Dynamic Traction
Control 96
– indicator/warning lamp 96
Dynamic Brake Control
DBC 95
Dynamic destination guidance 162
Dynamic Stability Control DSC 95
– indicator/warning lamp 96
Dynamic Traction Control DTC 96
– indicator/warning lamp 96E
EBV Electronic brake-force
distribution 95
Electrical defect
– 7-gear Sport automatic transmission with double
clutch 68
Electrical malfunction
– door lock 34
– driver's door 34
– fuel filler flap 232
Electric seat adjustment 48
Electric steering wheel lock
– with Comfort Access 38
Electronic brake-force
distribution EBV 95
Electronic oil level check 256
Electronic Stability Program
ESP, refer to Dynamic
Stability Control DSC 95
E-mail 218
Emergency actuation, automatic transmission,
refer to Overriding selector
lever lock 65
Emergency operation
– fuel filler flap, manual release 232
Emergency operation, refer to Manual operation
– door lock 34
Emergency release
– trunk lid from inside 36
Emergency Request 272
Emergency services, refer to Roadside Assistance 273
Energy, saving
– saving fuel 136
Engine
– breaking in 136
– overheated, refer to Coolant temperature 259
– starting 61
– starting, Comfort Access 38
– switching off 62
Engine compartment 255Engine coolant, refer to
Coolant 259
Engine oil
– adding 258
– additives, refer to Approved engine oils 258
– alternative oil types 259
– approved engine oils 258
– BMW Maintenance System 260
– capacity 284
– checking level 256
– intervals between changes,
refer to Service
requirements 85
Engine starting, refer to
Starting the engine 61
Entering the postal code for navigation 147
Entry lamps, refer to Interior lamps 112
Entry map for destination 151
ESP Electronic Stability Program, refer to Dynamic
Stability Control DSC 95
Ex haust sy
stem, refer to Hot
exhaust system 137
Exterior mirrors 53
– adjusting 53
– automatic dimming feature 55
– automatic heating 54
– folding in and out 54
External audio device 125
Eyes
– for tow-starting and towing away 275
– for tying down loads 140
F
Failure messages, refer to
Check Control 89
Failure of an electrical consumer 271
00320051004F004C00510048000300280047004C0057004C005200510003
Page 299 of 308
298
Referen ceEverything from A to Z
Heating
– mirrors54
– rear window 117
– seats 51
– steering wheel 55
Heating and ventilation, refer to Climate 114
Heavy loads, refer to Stowing cargo 140
Height, refer to
Dimensions 281
Height adjustment
– seats 47
– steering wheel 55
High-beam Assistant 110
High beams 110
– headlamp flasher 110
– indicator lamp 13
High beams and low beams,
automatic, refer to High-
beam Assistant 110
High-pressure
washer 262,263
High water, refer to Driving through water 138
Highways, refer to Route criteria 155
Hill Descent Control HDC 97
Hills 139
Holders for cups 126
Homepage BMW 4
Hood 256
Hooks for shopping bags 129
Horn 10,11
Hotel function, refer to Locking or unlocking
separately 36
Hot exhaust system 137
Hydraulic brake assist, refer to Dynamic Brake Control 95
Hydroplaning 138
I
Ice warning, refer to Outside
temperature warning 80Identification marks
– run-flat tires
254
– tire coding 251
iDrive 18
– adjusting brightness 92
– changing date and time 88
– changing language 92
– changing settings 92
– changing units of measure and display format 85
– controls 18
– menu guidance 19
– operating principle 18
– overview 18
– start menu 19
– status information 21
Ignition 61
– switched off 61
– switched on 61
Ignition key, refer to Remote control with integrated
key 30
Ignition key position 1, refer to Radio readiness 60
Ignition key position 2, refer to
Ignition on 61
Ignition lock 60
Imprint 2
Incoming call 205
Indicator and warning lamps 13
– Tire Pressure Monitor TPM 101
Inflation pressure, refer to Tire
inflation pressure 235
Inflation pressure monitoring, refer to Tire Pressure
Monitor TPM 100
Initializing
– after power failure 270
– compass, refer to Calibrating 123
– Flat Tire Monitor FTM 98
– glass roof 42
– refer to Setting the time and date 88 Installation location
– telephone
124
Instructions for navigation system, refer to Voice
instructions 157
Instrument cluster 12
Instrument cluster, refer to
Cockpit 10
Instrument combination, refer to Instrument cluster 12
Instrument lighting 112
Integrated key 30
Integrated universal remote
control 12
0
Intera
ctive map 152
Interior lamps 112
– remote control 32
Interior motion sensor 37
Interior rearview mirror 54
– automatic dimming feature 55
– compass 122
Interlock, refer to Disengaging the remote control 63
Intermittent mode of the
wipers 71
Intersection, entering, navigation 147
J
Jacking points 270
Joystick, refer to iDrive 18
Jumpering, refer to Jump-
starting 274
Jump-starting 274
K
Key, refer to Integrated key/
remote control 30
Keyless go, refer to Comfort Access 38
Keyless opening and closing, refer to Comfort Access 38
00320051004F004C00510048000300280047004C0057004C005200510003