2013 BMW 328I SEDAN turn signal
[x] Cancel search: turn signalPage 19 of 248

Front fog lamps 94Parking lamps 91Low beams 91Automatic headlamp con‐
trol 92
Daytime running lights 92
Adaptive Light Control 92
High-beam Assistant 93Instrument lighting 947Steering column stalk, leftTurn signal 68High beams, head‐
lamp flasher 68High-beam Assistant 93Roadside parking lamps 92Computer 868Steering wheel buttons, leftStore speed 128, 121Resume speed 129, 121Cruise control on/off, interrupt‐
ing 128Active Cruise Control on/off, in‐
terrupting 121Reduce distance 124Increase distance 124Cruise control rocker switch 129, 1239Instrument cluster 7510Steering wheel buttons, rightEntertainment sourceVolumeVoice activation 26Telephone, see user's manual for
Navigation, Entertainment and
CommunicationThumbwheel for selection lists 8511Steering column stalk, rightWindshield wipers 68Rain sensor 69Clean the windshields and head‐
lamps 7012Start/stop the engine and switch
the ignition on/off 64Auto Start/Stop function 6513Horn14Steering wheel heating 5815Adjust steering wheel 5816Unlock hood 199Seite 15CockpitAt a glance15
Online Edition for Part no. 01 40 2 926 810 - X/13
Page 41 of 248

▷CD/Multimedia: audio source listened to
last.▷Unlocking/locking of the vehicle: settings.▷Driving Dynamics Control: sport program▷Driver's seat position: automatically re‐
trieved after unlocking.▷Programmable memory buttons: assign‐
ment.▷Head-up Display: selection, brightness,
position and rotation of the display.▷Headlamp courtesy delay feature: time set‐
ting.▷Tone: tone settings.▷Automatic climate control/Automatic cli‐
mate control with enhanced features: set‐
tings.▷Navigation: map views, route criteria, voice
output on/off.▷Park Distance Control PDC: adjusting the
signal tone volume.▷Radio: stored stations, station listened to
last, special settings.▷Rearview camera: selection of functions
and type of display.▷Side View: selection of the display type.▷Language on the Control Display.▷Lane departure warning: last setting, on/
off.▷Active Blind Spot Detection: last setting,
on/off.▷Daytime running lights: current setting.▷Triple turn signal activation.▷Locking the vehicle: after a brief period or
after starting to drive.
Central locking system
The concept The central locking system becomes active
when the driver's door is closed.
The system simultaneously engages and re‐
leases the locks on the following:▷Doors.▷Trunk lid.▷Fuel filler flap.
Operating from the outside
▷Via the remote control.▷Via the door handles of the driver's and
front passenger doors.
The following takes place simultaneously
when locking/unlocking the vehicle via the re‐
mote control:
▷Depending on how the vehicle is equipped,
the theft protection is activated/deacti‐
vated. Theft protection prevents the doors
from being unlocked using the lock but‐
tons or the door opener.▷The welcome lamps, interior lamps and
courtesy lamps are switched on and off.▷The alarm system, refer to page 44, is
armed or disarmed.
Operating from the inside
Via the button for the central locking system.
If the vehicle has been locked from inside, the
fuel filler flap remains unlocked.
If an accident of a certain severity occurs, the
central locking system unlocks automatically.
The hazard warning system and interior lamps
come on.
Seite 37Opening and closingControls37
Online Edition for Part no. 01 40 2 926 810 - X/13
Page 70 of 248

Displays in the instrument clusterThe READY display in the tach‐
ometer signals that the Auto
Start/Stop function is ready to
start the engine automatically.
The display indicates that the
conditions for an automatic en‐
gine stop have not been satis‐
fied.
Note The engine is not switched off automatically in
the following situations:▷External temperature too low.▷The external temperature is high and auto‐
matic climate control is running.▷The passenger compartment has not yet
been heated or cooled to the required
level.▷The engine is not yet at operating temper‐
ature.▷The wheels are at a sharp angle or the
steering wheel is being turned.▷After driving in reverse.▷Fogging of the windows when the auto‐
matic climate control is switched on.▷Vehicle battery is heavily discharged.▷The engine compartment lid is unlocked.▷The parking assistant is activated.▷Stop-and-go traffic.▷The transmission selector lever is in posi‐
tion N or M/S.▷Use of fuel with high ethanol content.
Starting the engine
The engine starts automatically under the fol‐
lowing conditions:
▷Manual transmission:
The clutch pedal is pressed.▷Automatic transmission:
By releasing the brake pedal.
After the engine starts, accelerate as usual.
Safety mode
After the engine switches off automatically, it
will not start again automatically if any one of
the following conditions are met.
▷The driver's safety belt is unbuckled and
the driver's door is open.▷The hood was unlocked.
Some indicator lamps light up for varying
lengths of time.
The engine can only be started via the Start/
Stop button.
Note Even if driving away was not intended, the de‐
activated engine starts up automatically in the
following situations:
▷Excessive warming of the passenger com‐
partment when the cooling function is
switched on.▷The steering wheel is turned.▷Automatic transmission: the transmission
position is changed from D to N, R, or M/S.▷Automatic transmission: the transmission
position is changed from P to N, D, R or
M/S.▷The vehicle begins rolling.▷Fogging of the windows when the auto‐
matic climate control is switched on.▷Vehicle battery is heavily discharged.▷Excessive cooling of the passenger com‐
partment when the heating is switched on.▷Low brake vacuum pressure; this can oc‐
cur, for example, if the brake pedal is de‐
pressed a number of times in succession.Seite 66ControlsDriving66
Online Edition for Part no. 01 40 2 926 810 - X/13
Page 72 of 248

periodically while coasting, if traffic conditions
permit.
The brake lamps will not light up if the parking
brake is engaged.
Turn signal, high beams, headlamp flasher
Turn signal Do not fold in the exterior mirrors
Do not fold in the exterior mirror while
driving and when the turn signals/warning
flashers are working, or else the additional
flasher lights in the exterior mirror will no lon‐
ger be in the prescribed position and will be
difficult to see.◀
Using turn signals
Press the lever beyond the resistance point.
To switch off manually, press the lever to the
resistance point.
Unusually rapid flashing of the indicator lamp
indicates that a turn signal bulb has failed.
Triple turn signal activation Press the lever to the resistance point.
The turn signal flashes three times.
The function can be activated or deactivated:
1."Settings"2."Lighting"3."Triple turn signal"Signaling briefly
Press the lever to the resistance point and hold
it there for as long as you want the turn signal
to flash.
High beams, headlamp flasher▷High beams, arrow 1.▷Headlamp flasher, arrow 2.
Washer/wiper system Switching the wipers on/off and brief
wipe
Do not switch on the wipers if frozen
Do not switch on the wipers if they are
frozen onto the windshield; otherwise, the wiper blades and the windshield wiper motor
may be damaged.◀
No wiper operation on dry windshield
Do not use the windshield wipers if the
windshield is dry, as this may damage the
wiper blades or cause them to become worn
more quickly.◀
No wiper operation with wipers folded
away
Do not switch on the wipers if they are folded
away, otherwise the hood or the wipers may be
damaged.◀
Seite 68ControlsDriving68
Online Edition for Part no. 01 40 2 926 810 - X/13
Page 83 of 248

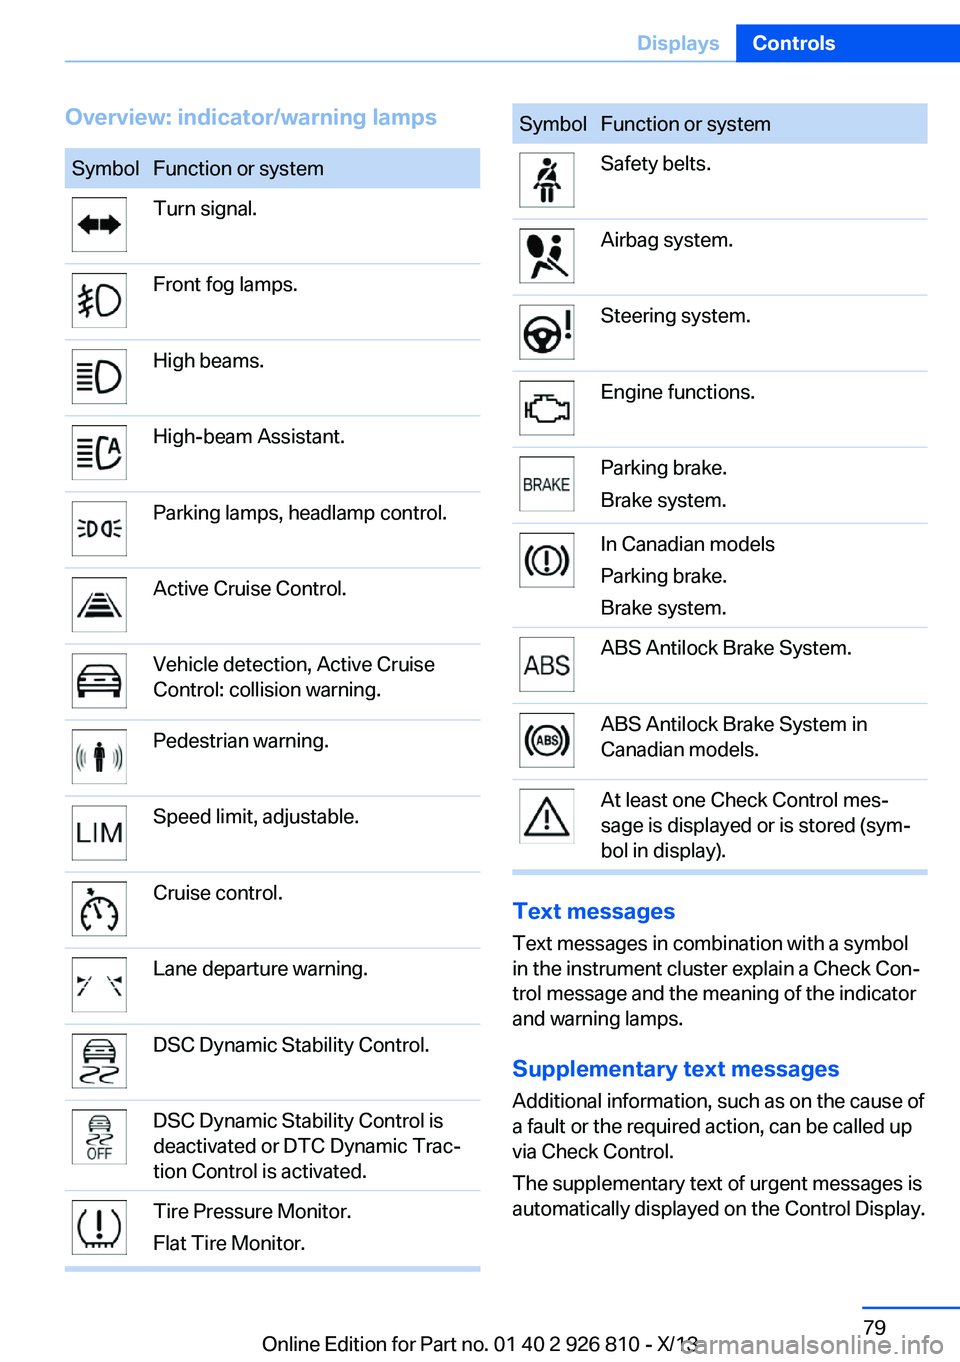
Overview: indicator/warning lampsSymbolFunction or systemTurn signal.Front fog lamps.High beams.High-beam Assistant.Parking lamps, headlamp control.Active Cruise Control.Vehicle detection, Active Cruise
Control: collision warning.Pedestrian warning.Speed limit, adjustable.Cruise control.Lane departure warning.DSC Dynamic Stability Control.DSC Dynamic Stability Control is
deactivated or DTC Dynamic Trac‐
tion Control is activated.Tire Pressure Monitor.
Flat Tire Monitor.SymbolFunction or systemSafety belts.Airbag system.Steering system.Engine functions.Parking brake.
Brake system.In Canadian models
Parking brake.
Brake system.ABS Antilock Brake System.ABS Antilock Brake System in
Canadian models.At least one Check Control mes‐
sage is displayed or is stored (sym‐
bol in display).
Text messages
Text messages in combination with a symbol
in the instrument cluster explain a Check Con‐ trol message and the meaning of the indicator
and warning lamps.
Supplementary text messages
Additional information, such as on the cause of
a fault or the required action, can be called up
via Check Control.
The supplementary text of urgent messages is
automatically displayed on the Control Display.
Seite 79DisplaysControls79
Online Edition for Part no. 01 40 2 926 810 - X/13
Page 84 of 248

Symbols
Depending on the Check Control message, the
following functions can be selected.▷ "Owner's Manual"
Display additional information about the
Check Control message in the Integrated
Owner's Manual.▷ "Service request"
Contact your service center.▷ "Roadside Assistance"
Contact Roadside Assistance.
Hiding Check Control messages
Press the onboard computer button on the
turn signal lever.
▷Some Check Control messages are dis‐
played continuously and are not cleared
until the malfunction is eliminated. If sev‐
eral malfunctions occur at once, the mes‐
sages are displayed consecutively.
These messages can be hidden for approx.
8 seconds. After this time, they are dis‐
played again automatically.▷Other Check Control messages are hidden
automatically after approx. 20 seconds.
They are stored and can be displayed
again later.
Displaying stored Check Control
messages
1."Vehicle Info"2."Vehicle status"3. "Check Control"4.Select the text message.
Messages after trip completion
Special messages that are displayed during
driving are displayed again after the ignition is
switched off.
Fuel gauge The vehicle inclination may
cause the display to vary.
US models: the arrow beside the
fuel pump symbol shows which
side of the vehicle the fuel filler
flap is on.
Hints on refueling, refer to page 180.
Tachometer
Always avoid engine speeds in the red warning
field. In this range, the fuel supply is inter‐
rupted to protect the engine.
Engine oil temperature
▷Cold engine: the pointer is at
the low temperature end.
Drive at moderate engine
and vehicle speeds.▷Normal operating tempera‐
ture: the pointer is in the
middle or in the left half of
the temperature display.▷Hot engine: the pointer is at the high end of
the temperature range. A Check Control
message is also displayed.Seite 80ControlsDisplays80
Online Edition for Part no. 01 40 2 926 810 - X/13
Page 90 of 248

ComputerIndication in the info display The information from the on‐
board computer is shown in the
info display in the instrument
cluster.
Calling up information on the info
display
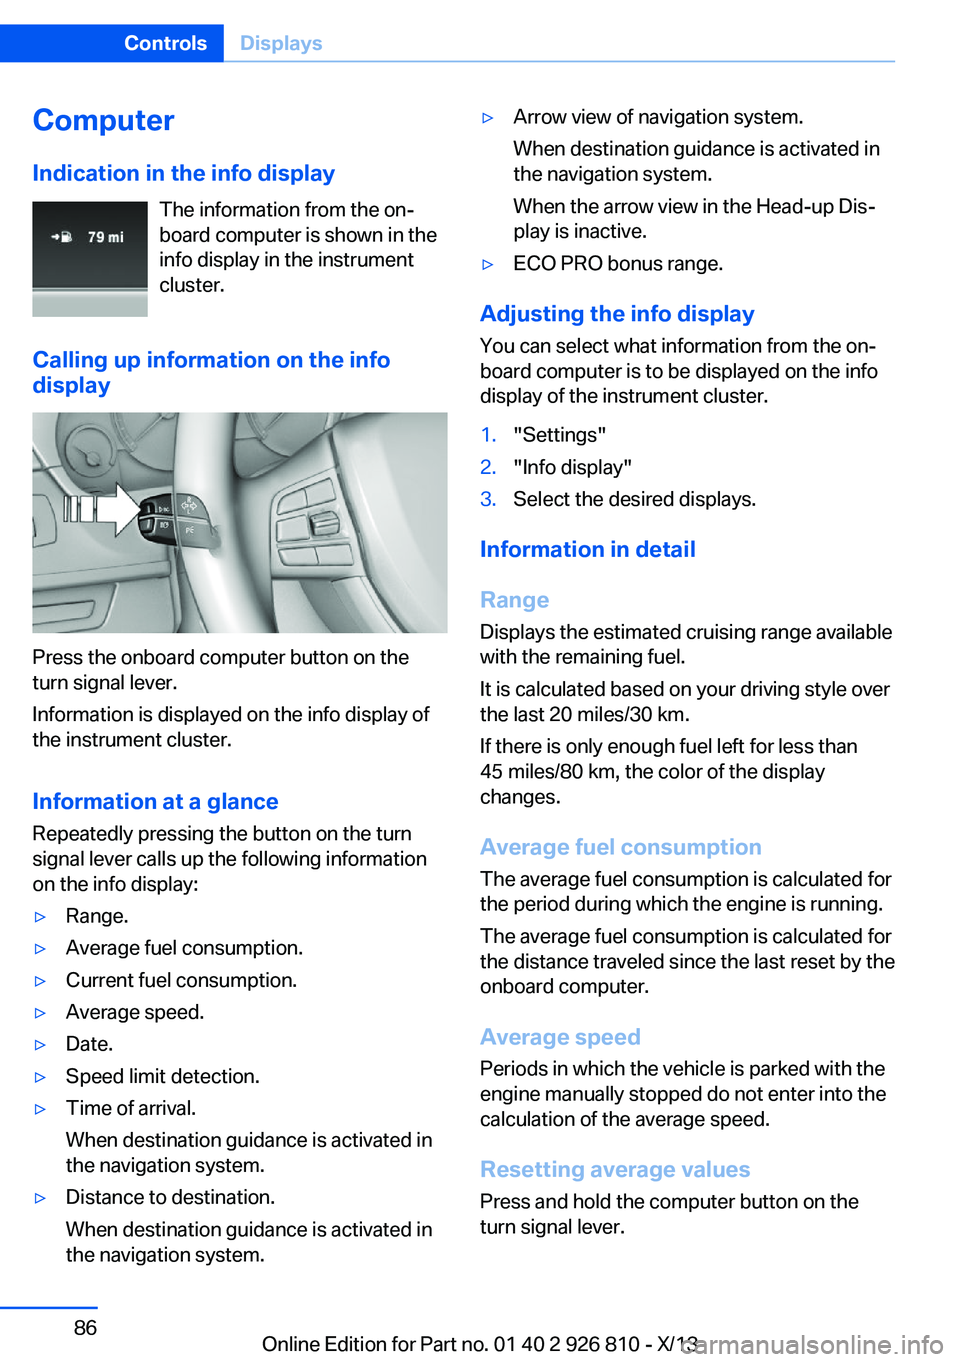
Press the onboard computer button on the
turn signal lever.
Information is displayed on the info display of
the instrument cluster.
Information at a glance
Repeatedly pressing the button on the turn
signal lever calls up the following information
on the info display:
▷Range.▷Average fuel consumption.▷Current fuel consumption.▷Average speed.▷Date.▷Speed limit detection.▷Time of arrival.
When destination guidance is activated in
the navigation system.▷Distance to destination.
When destination guidance is activated in
the navigation system.▷Arrow view of navigation system.
When destination guidance is activated in
the navigation system.
When the arrow view in the Head-up Dis‐
play is inactive.▷ECO PRO bonus range.
Adjusting the info display
You can select what information from the on‐
board computer is to be displayed on the info
display of the instrument cluster.
1."Settings"2."Info display"3.Select the desired displays.
Information in detail
Range
Displays the estimated cruising range available
with the remaining fuel.
It is calculated based on your driving style over
the last 20 miles/30 km.
If there is only enough fuel left for less than
45 miles/80 km, the color of the display
changes.
Average fuel consumption
The average fuel consumption is calculated for
the period during which the engine is running.
The average fuel consumption is calculated for
the distance traveled since the last reset by the
onboard computer.
Average speed
Periods in which the vehicle is parked with the
engine manually stopped do not enter into the
calculation of the average speed.
Resetting average values Press and hold the computer button on the
turn signal lever.
Seite 86ControlsDisplays86
Online Edition for Part no. 01 40 2 926 810 - X/13
Page 96 of 248

3."Pathway lighting:"4.Set the duration.
The setting is stored for the remote control
currently in use.
Automatic headlamp control
Switch position
: the low beams are
switched on and off automatically, e.g., in tun‐
nels, in twilight or if there is precipitation. The
indicator lamp in the instrument cluster lights
up.
A blue sky with the sun low on the horizon can
cause the lights to be switched on.
The low beams always stay on when the fog
lamps are switched on.
Personal responsibility
The automatic headlamp control cannot
serve as a substitute for your personal judg‐
ment in determining when the lamps should be
switched on in response to ambient lighting
conditions.
For example, the sensors are unable to detect
fog or hazy weather. To avoid safety risks, you
should always switch on the lamps manually
under these conditions.◀
Daytime running lights With the ignition switched on, the daytime run‐
ning lights light up in position 0,
or .
After the ignition is switched off, the parking
lamps light up in position
.
Activating/deactivating
In some countries, daytime running lights are
compulsory, so it may not be possible to deac‐
tivate the daytime running lights.
1."Settings"2."Lighting"3."Daytime running lamps"
The setting is stored for the remote control
currently in use.
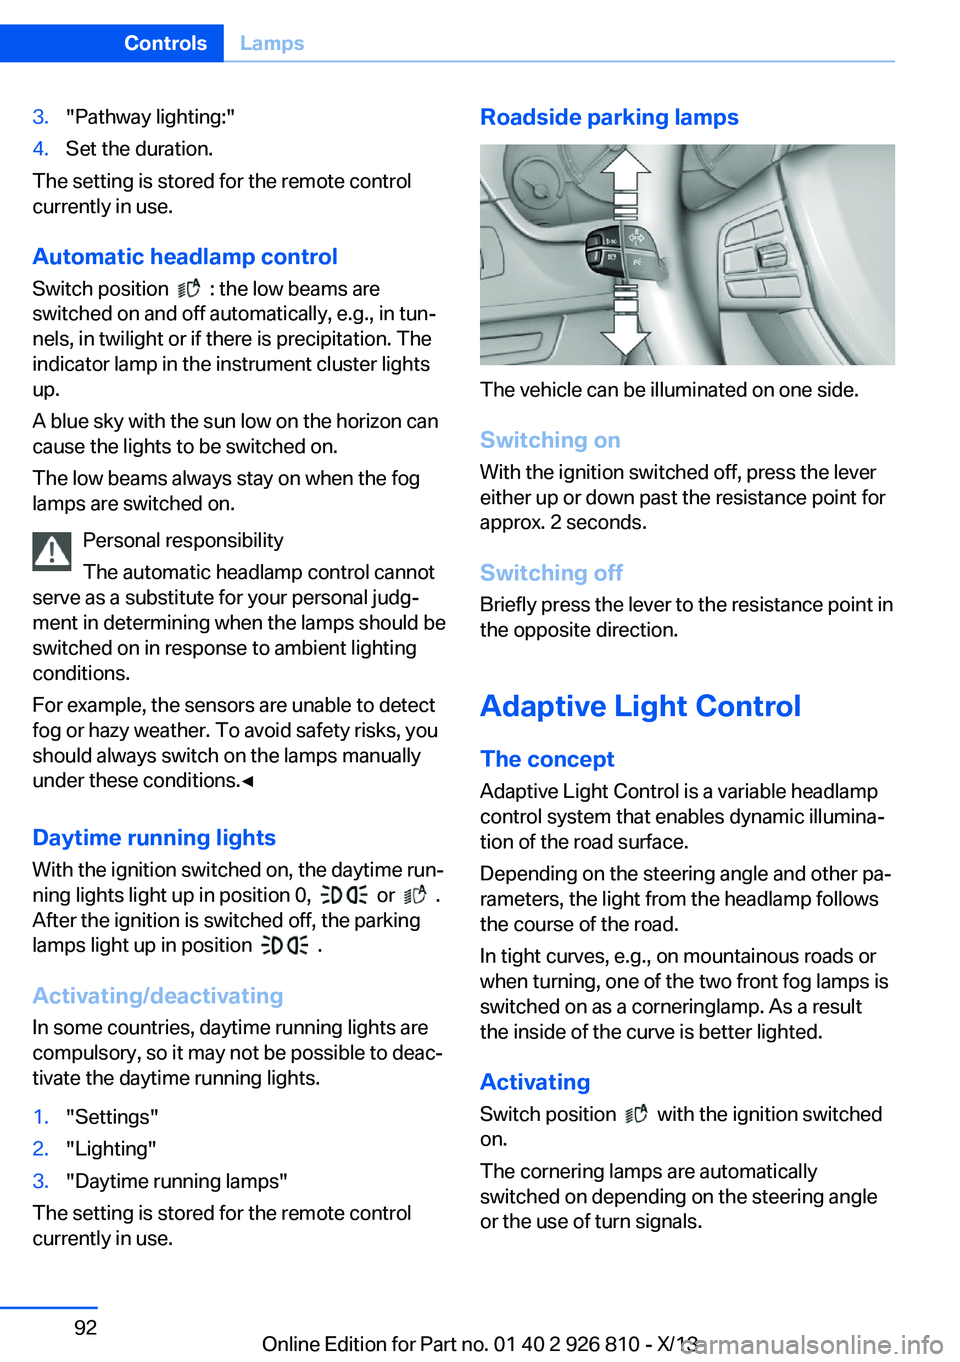
Roadside parking lamps
The vehicle can be illuminated on one side.
Switching on With the ignition switched off, press the lever
either up or down past the resistance point for
approx. 2 seconds.
Switching off Briefly press the lever to the resistance point in
the opposite direction.
Adaptive Light Control The conceptAdaptive Light Control is a variable headlamp
control system that enables dynamic illumina‐
tion of the road surface.
Depending on the steering angle and other pa‐
rameters, the light from the headlamp follows
the course of the road.
In tight curves, e.g., on mountainous roads or
when turning, one of the two front fog lamps is
switched on as a corneringlamp. As a result
the inside of the curve is better lighted.
Activating Switch position
with the ignition switched
on.
The cornering lamps are automatically
switched on depending on the steering angle
or the use of turn signals.
Seite 92ControlsLamps92
Online Edition for Part no. 01 40 2 926 810 - X/13