2013 BMW 328I CONVERTIBLE radio
[x] Cancel search: radioPage 62 of 308
61
Driving
Controls
Ignition on
All electrical consumers can operate. The
odometer and trip odometer are displayed in
the instrument cluster.
When the engine is off, please switch off
the ignition and any unnecessary electri-
cal consumers in order to preserve the bat-
tery.<
Radio readiness and ignition off
All indicator and warning lamps as well as dis-
plays in the instrument cluster go out.
Starting the engine
Do not run the engine in enclosed areas;
otherwise, the inhalation of toxic exhaust
gases can cause loss of consciousness and
death. The exhaust gases contain carbon mon-
oxide, an odorless and colorless, but highly
toxic gas. Never leave an unattended vehicle
with the engine running; otherwise, such a vehi-
cle represents a potential safety hazard.
Before leaving the car with the engine running,
place the transmission in neutral or move the
selector lever to position P and forcefully apply
the parking brake to prevent the car from mov-
ing. <
Avoid frequent starting in quick succes-
sion as well as repeated start attempts in
which the engine does not start. Otherwise, the
fuel is not burned or incompletely burned and
there is a danger of overheating and damaging
the catalytic converter.<
Do not wait for the engine to warm up while the
vehicle remains stationary. Start driving right
away, but at moderate engine speeds.
Manual transmission
Remote control in the ignition lock or, with
Comfort Access, inside the vehicle, refer to
page 38.
1. Depress the brake.
2. Depress the clutch and shift into neutral.
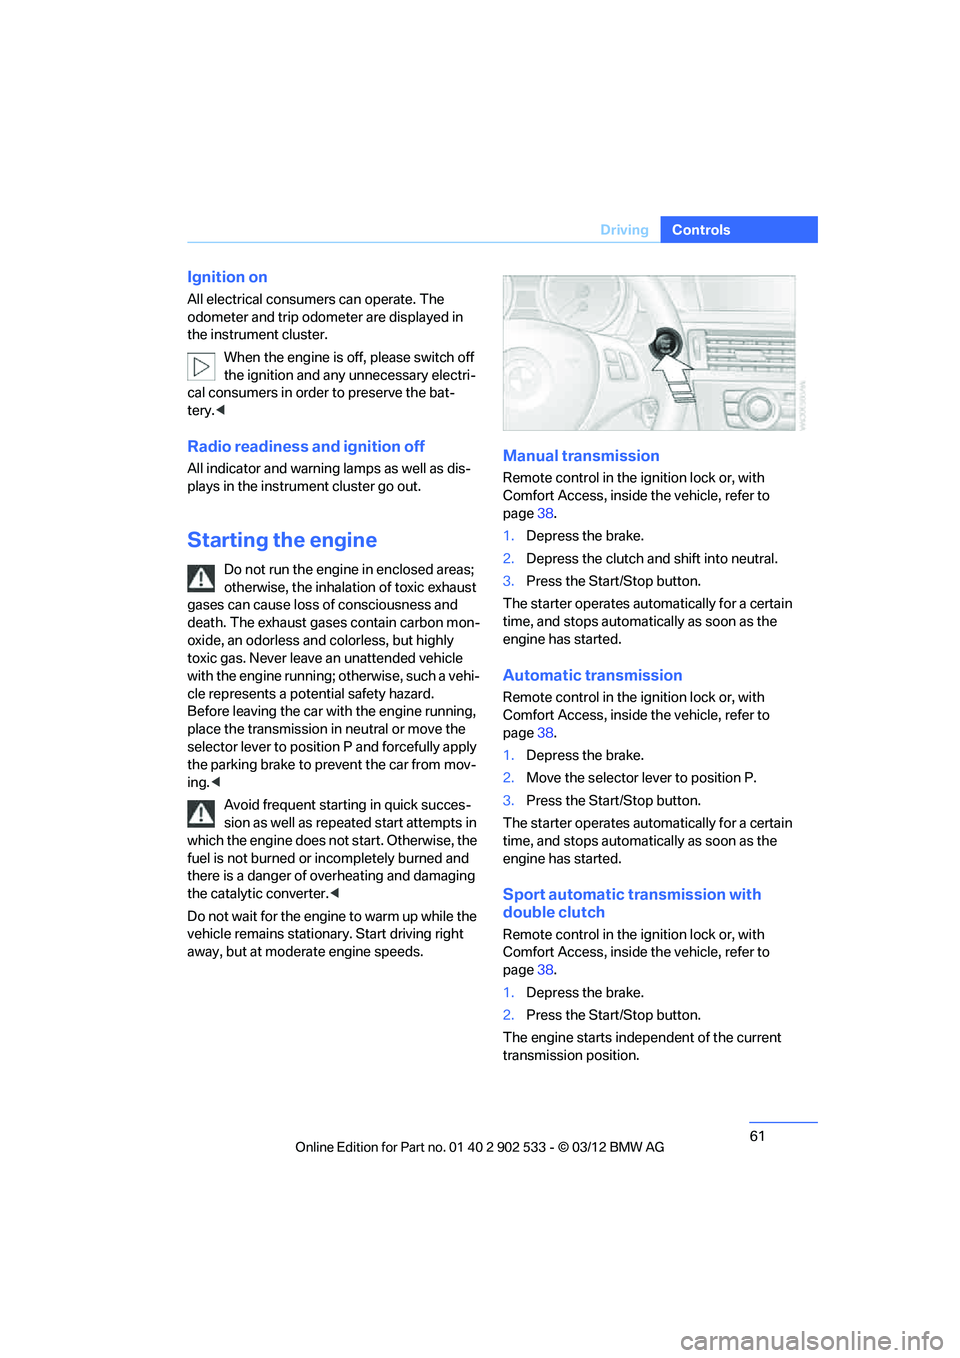
3. Press the Start/Stop button.
The starter operates automatically for a certain
time, and stops automatically as soon as the
engine has started.
Automatic transmission
Remote control in the ignition lock or, with
Comfort Access, inside the vehicle, refer to
page 38.
1. Depress the brake.
2. Move the selector lever to position P.
3. Press the Start/Stop button.
The starter operates automatically for a certain
time, and stops automatically as soon as the
engine has started.
Sport automatic transmission with
double clutch
Remote control in the ignition lock or, with
Comfort Access, inside the vehicle, refer to
page 38.
1. Depress the brake.
2. Press the Start/Stop button.
The engine starts independent of the current
transmission position.
00320051004F004C00510048000300280047004C0057004C005200510003
Page 101 of 308
100
ControlsTechnology for driving comfort and safety
Tire Pressure Monitor TPM
The concept
Check the inflation pressure in the four installed
tires. The system notifies you if there is a signif-
icant loss of pressure in one or more tires.
Functional requirement
The system must have been reset while the
inflation pressure was correct; otherwise, reli-
able signaling of a flat tire is not ensured.
Always use wheels with TPM electronics to
ensure that the system will operate properly.
Each time a tire inflation pressure has been cor-
rected or a wheel or tire has been changed,
reset the system.
System limitations
Sudden serious tire damage caused by
external influences cannot be indicated in
advance. <
The system does not function correctly if it has
not been reset. For example, a flat tire may be
indicated even though the tire inflation pres-
sures are correct.
The system is inactive and cannot indicate a flat
tire:
> When a wheel without TPM electronics is
installed.
> Interference with TPM by other systems or
devices with the same transmission fre-
quency.
Status display
The current status of the Tire Pressure Monitor
TPM can be displayed on the Control Display,
e.g., whether or not the TPM is active.
1."Vehicle Info"
2. "Vehicle status" 3.
"Tire Pressure Monitor - TPM"
The status is displayed.
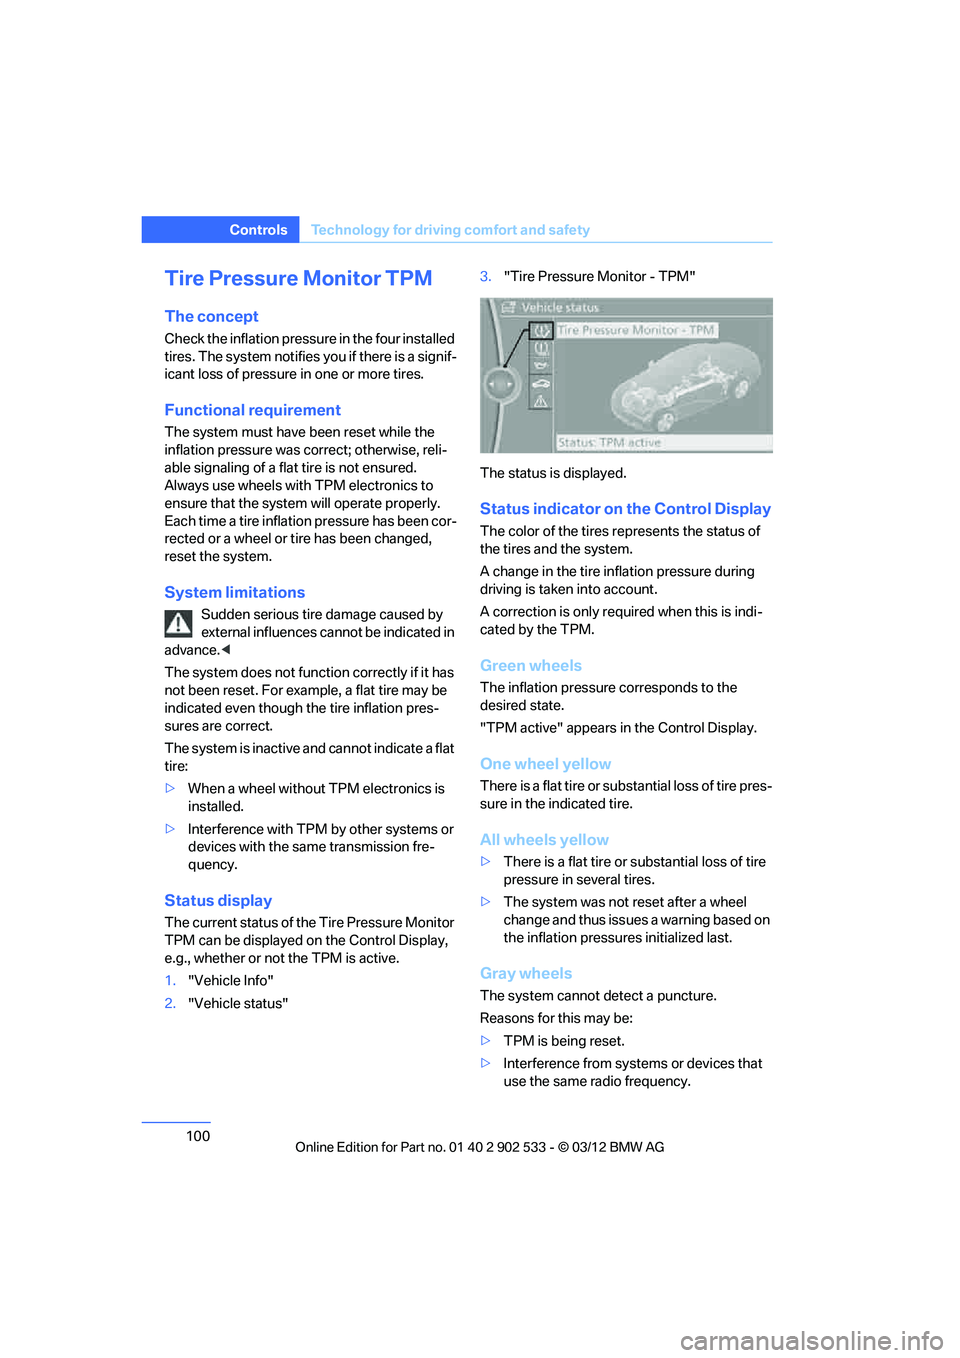
Status indicator on the Control Display
The color of the tires represents the status of
the tires and the system.
A change in the tire inflation pressure during
driving is taken into account.
A correction is only required when this is indi-
cated by the TPM.
Green wheels
The inflation pressure corresponds to the
desired state.
"TPM active" appears in the Control Display.
One wheel yellow
There is a flat tire or substantial loss of tire pres-
sure in the indicated tire.
All wheels yellow
> There is a flat tire or substantial loss of tire
pressure in several tires.
> The system was not reset after a wheel
change and thus issues a warning based on
the inflation pressures initialized last.
Gray wheels
The system cannot detect a puncture.
Reasons for this may be:
>TPM is being reset.
> Interference from systems or devices that
use the same radio frequency.
00320051004F004C00510048000300280047004C0057004C005200510003
Page 103 of 308

102
ControlsTechnology for driving comfort and safety
When driving with damaged tires, the handling
characteristics change, e.g. the vehicle will skid
sooner when braking, braking distances will be
longer, or self-steering response will change.
Adapt your driving style accordingly. Avoid
turning abruptly and driving over obstacles
such as curbs, potholes, etc.
Since the possible driving distance depends to
a considerable degree on the strain exerted on
the vehicle while driving, it can be shorter or,
with a gentle driving style, can also be longer,
depending on the speed, road condition, out-
side temperature, vehicle load, etc.
Drive cautiously and do not exceed a
speed of 50 mph/80 km/h.
When there is a tire pressure loss, the handling
characteristics change, e.g. there will be
reduced directional stability during braking,
braking distances will be longer, and self-steer-
ing response will change. <
Vibrations or loud noises while driving can
indicate complete failure of the tire.
Reduce your speed and bring the vehicle to a
stop; otherwise, tire components may become
detached, which could result in an accident. Do
not continue driving; instead, contact your
BMW center. <
Message for unsuccessful system
reset
Yellow warning lamp lights up. A
message appears on the Control Dis-
play.
The system has detected a wheel change, but
was not reset. A reliable warning is not possible
at the current inflation pressures.
Check the tire inflation pressure and reset the
system, refer to page 101.
Malfunction
The small warning lamp flashes in
yellow and then lights up continu-
ously; the large warning lamp lights
up in yellow. The tires appear in gray in the Control Display. No punctures can be
detected.
Display in the following situations:
>
A wheel without TPM electronics has been
installed:
Have it checked by your BMW center.
> Malfunction
Have the system checked.
> Tire Pressure Monitor was unable to com-
plete the resetting process. Reset the sys-
tem again.
The small warning lamp flashes in
yellow and then lights up continu-
ously; the large warning lamp lights
up in yellow. The tires appear in gray
in the Control Display. No punctures can be
detected.
Display in the following situations:
> Interference from systems or devices that
use the same radio frequency:
The system automatically becomes active
again when the vehicle moves out of the
interference zone.
Declaration according to NHTSA/
FMVSS 138
Tire Pressure Monitoring Systems
Each tire should be checked monthly when cold
and inflated to the inflation pressure recom-
mended by the vehicle manufacturer on the
vehicle placard or tire inflation pressure label. If
your vehicle has tires of a different size than the
size indicated on the vehicle placard or tire infla-
tion pressure label, you should determine the
proper tire inflation pressure for those tires. As
an added safety feature, your vehicle has been
equipped with a tire pressure monitoring sys-
tem, TPMS, that illuminates a low tire pressure
telltale when one or more of your tires are signif-
icantly underinflated. Accordingly, when the
low tire pressure telltale illuminates, you should
stop and check your tires as soon as possible,
and inflate them to the proper pressure. Driving
on a significantly underinflated tire causes the
00320051004F004C00510048000300280047004C0057004C005200510003
Page 107 of 308
106
ControlsTechnology for driving comfort and safety
The front and side airbags for the front pas-
senger are activated.
> The indicator lamp does not light up if the
seat is empty.
The front and side airbags for the front pas-
senger are not activated.
Operational readiness of airbag system
As of radio readiness, refer to page 60, the
warning lamp lights up briefly to indicate that
the entire airbag system and the belt tensioners
are operational.
Airbag system malfunction
> Warning lamp does not light up at radio
readiness or beyond.
> Warning lamp remains permanently on.
In the event of a fault in the airbag system,
have it checked without delay; otherwise,
there is the risk that the system will not function
as intended even if a sufficiently severe acci-
dent occurs. <
Convertible: rollover
protection system
The rollover protection system is activated
automatically in the event of an accident of suf-
ficient severity or an extreme tilt in the car's lon-
gitudinal axis. The protection bars behind the
rear head restraints deploy within fractions of a
second.
As a supplementary system to the reinforced
windshield frame, the rollover protection sys- tem increases the safety of the vehicle occu-
pants.
Always keep the area of movement of the
rollover protection system clear.
In minor accidents, you are protected by the
fastened safety belt and, depending on acci-
dent severity, by the safety belt tensioner and
multi-phase airbag retention system. <
Resetting
If the rollover protection system was not
impacted after being automatically activated, it
can be reset by lowering the protection bars to
their original positions. This does not require
tools.
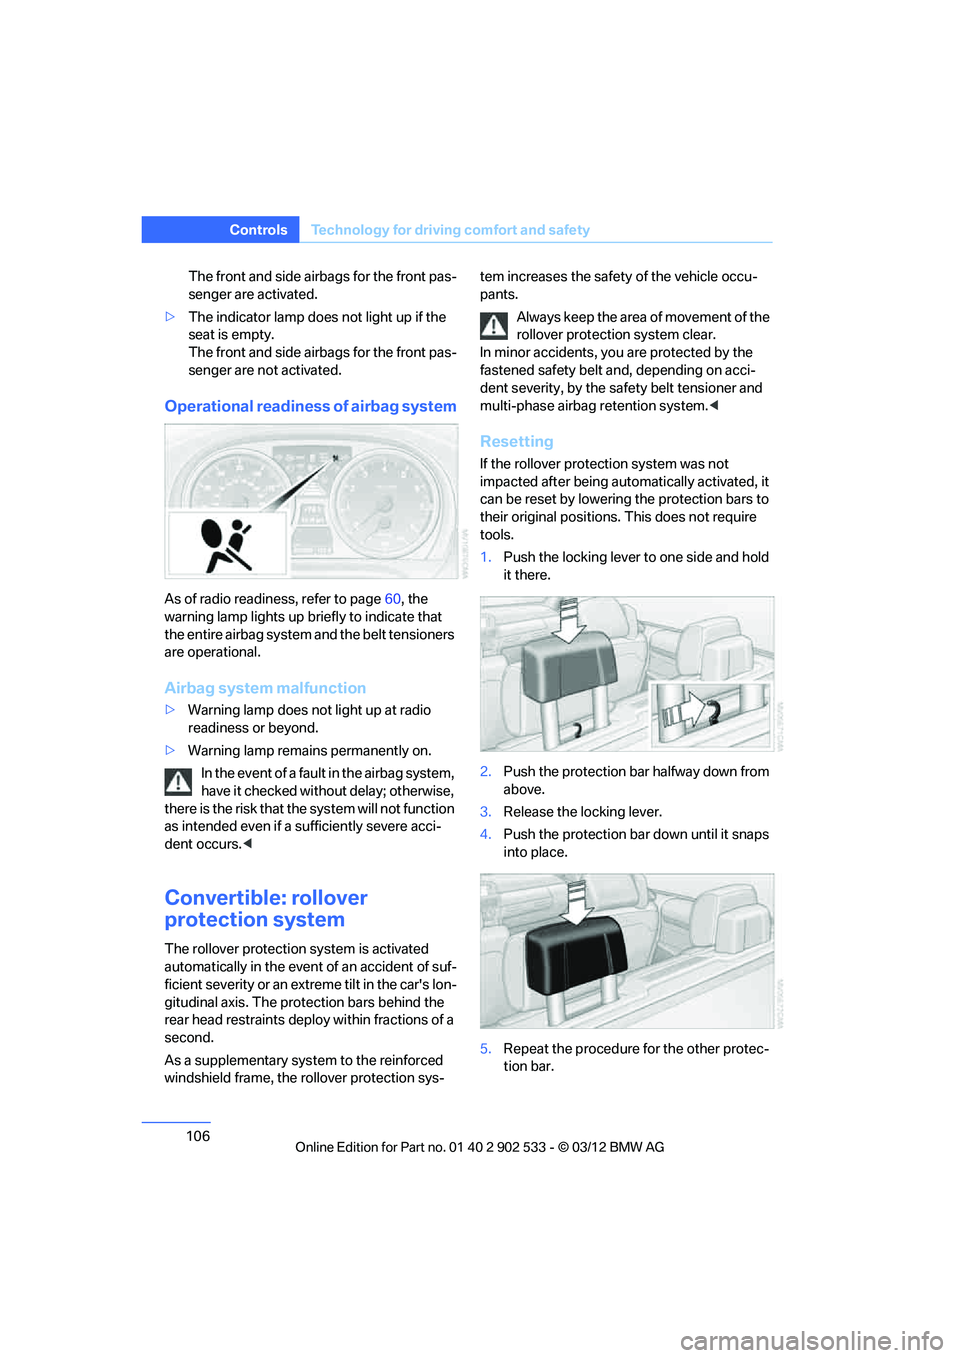
1.Push the locking lever to one side and hold
it there.
2. Push the protection bar halfway down from
above.
3. Release the locking lever.
4. Push the protection bar down until it snaps
into place.
5. Repeat the procedure for the other protec-
tion bar.
00320051004F004C00510048000300280047004C0057004C005200510003
Page 113 of 308
112
ControlsLamps
Fog lamps
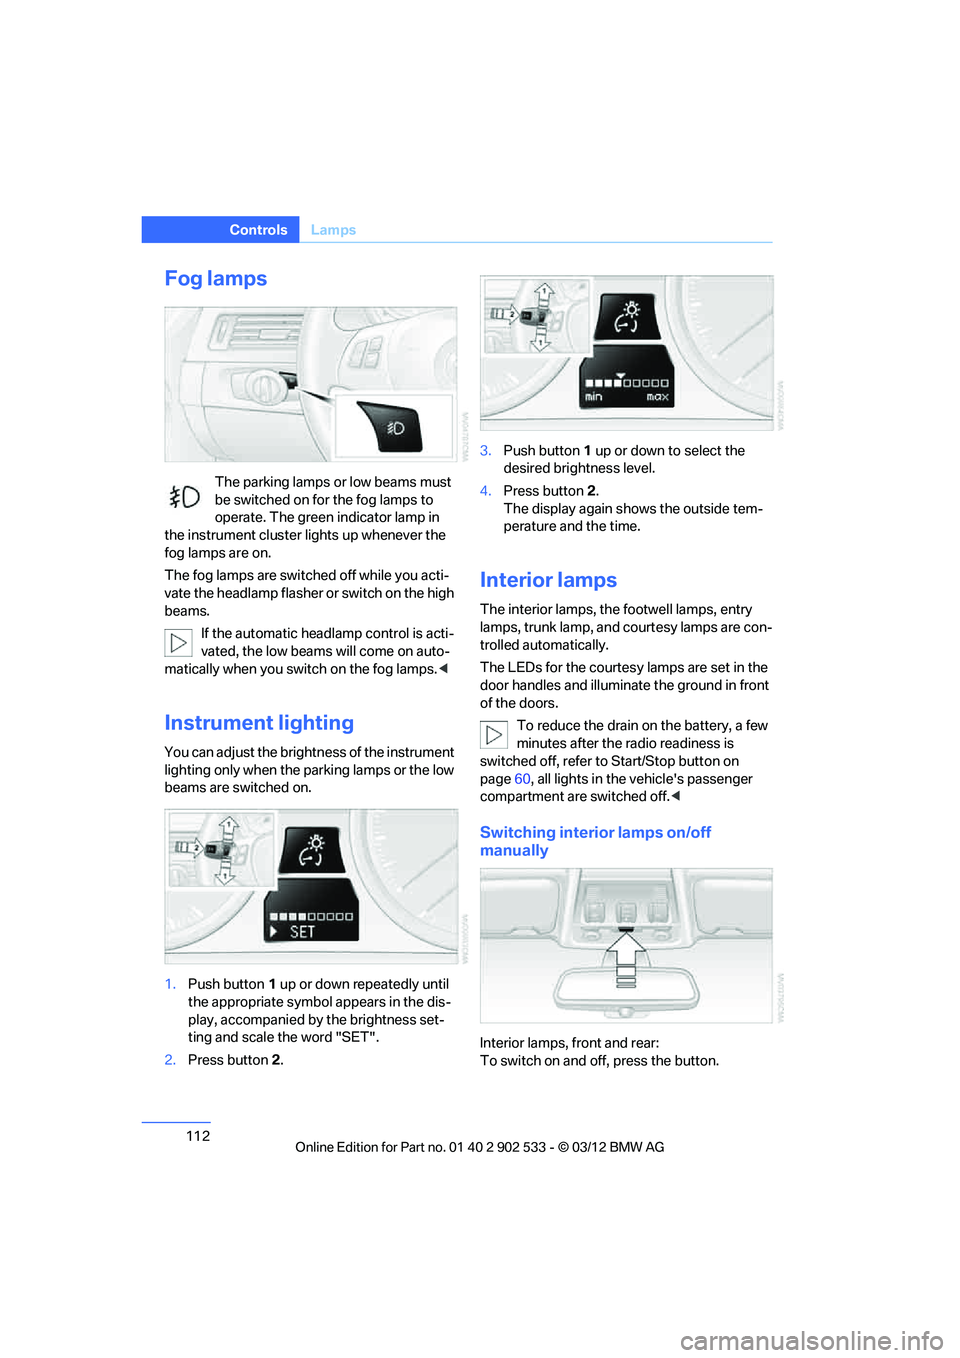
The parking lamps or low beams must
be switched on for the fog lamps to
operate. The green indicator lamp in
the instrument cluster lights up whenever the
fog lamps are on.
The fog lamps are switched off while you acti-
vate the headlamp flasher or switch on the high
beams.
If the automatic headlamp control is acti-
vated, the low beams will come on auto-
matically when you switch on the fog lamps. <
Instrument lighting
You can adjust the brightness of the instrument
lighting only when the parking lamps or the low
beams are switched on.
1.Push button 1 up or down repeatedly until
the appropriate symbol appears in the dis-
play, accompanied by the brightness set-
ting and scale the word "SET".
2. Press button 2. 3.
Push button 1 up or down to select the
desired brightness level.
4. Press button 2.
The display again shows the outside tem-
perature and the time.
Interior lamps
The interior lamps, the footwell lamps, entry
lamps, trunk lamp, and courtesy lamps are con-
trolled automatically.
The LEDs for the courtesy lamps are set in the
door handles and illuminate the ground in front
of the doors.
To reduce the drain on the battery, a few
minutes after the radio readiness is
switched off, refer to Start/Stop button on
page 60, all lights in the vehicle's passenger
compartment are switched off. <
Switching interior lamps on/off
manually
Interior lamps, front and rear:
To switch on and off, press the button.
00320051004F004C00510048000300280047004C0057004C005200510003
Page 119 of 308
118
ControlsClimate
Ventilation in the rear
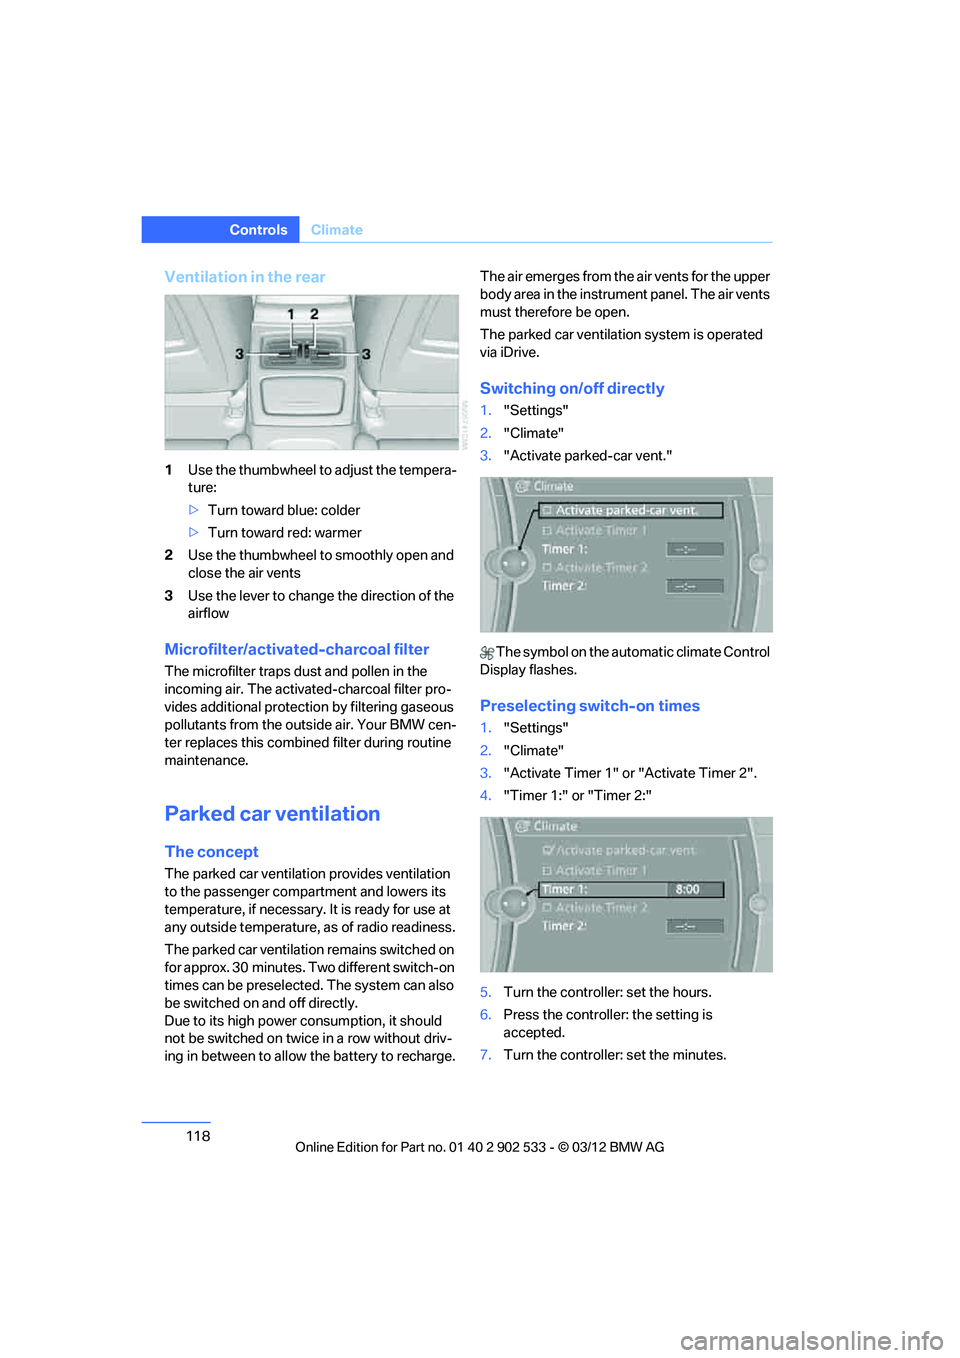
1Use the thumbwheel to adjust the tempera-
ture:
>Turn toward blue: colder
> Turn toward red: warmer
2 Use the thumbwheel to smoothly open and
close the air vents
3 Use the lever to change the direction of the
airflow
Microfilter/activated-charcoal filter
The microfilter traps dust and pollen in the
incoming air. The activated-charcoal filter pro-
vides additional protecti on by filtering gaseous
pollutants from the outside air. Your BMW cen-
ter replaces this combined filter during routine
maintenance.
Parked car ventilation
The concept
The parked car ventilation provides ventilation
to the passenger compartment and lowers its
temperature, if necessary. It is ready for use at
any outside temperature, as of radio readiness.
The parked car ventilation remains switched on
for approx. 30 minutes. Two different switch-on
times can be preselected. The system can also
be switched on and off directly.
Due to its high power co nsumption, it should
not be switched on twice in a row without driv-
ing in between to allow the battery to recharge. The air emerges from the air vents for the upper
body area in the instrument panel. The air vents
must therefore be open.
The parked car ventilation system is operated
via iDrive.
Switching on/off directly
1.
"Settings"
2. "Climate"
3. "Activate parked-car vent."
The symbol on the automatic climate Control
Display flashes.
Preselecting switch-on times
1. "Settings"
2. "Climate"
3. "Activate Timer 1" or "Activate Timer 2".
4. "Timer 1:" or "Timer 2:"
5. Turn the controller: set the hours.
6. Press the controller: the setting is
accepted.
7. Turn the controller: set the minutes.
00320051004F004C00510048000300280047004C0057004C005200510003
Page 123 of 308
122
ControlsPractical interior accessories
by means of the hand-held transmitter was
interrupted, hold down the button on the
inside mirror and then press and release the
button on the hand-held transmitter several
times, holding it down for 2 seconds each
time.
Operation
To prevent possible damage or injury,
before programming or using the inte-
grated universal remote control to operate a
device, always inspect the immediate area to
make certain that no people, animals or objects
are within the pivoting or travel range of the
device being operated.
Also follow the safety instructions supplied with
the hand-held transmitter.
door, if the engine is running or the ignition is
switched on. To do so, within the reception
range of the device, press the button of the
device until the function is triggered. The LED
on the inside mirror remains lit during transmis-
sion of the radio signal.Deleting stored functions
Simultaneously hold down the right and left
buttons on the inside mirror for approx. 20 sec-
onds until the LED on the inside mirror flashes
rapidly. All stored functions are deleted. The
functions cannot be deleted individually.
Digital compass
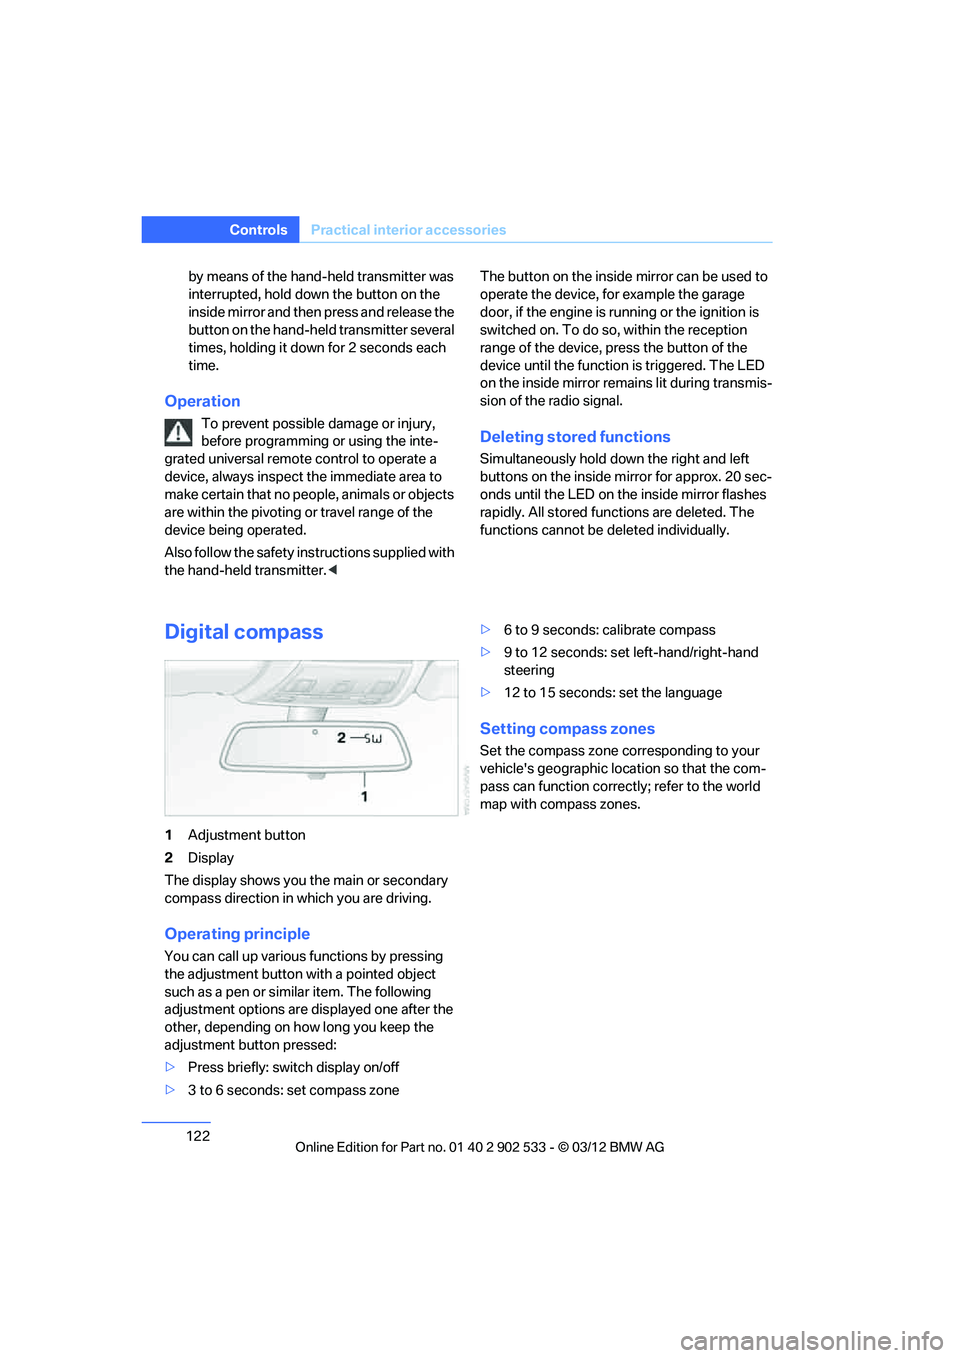
1
Adjustment button
2 Display
The display shows you the main or secondary
compass direction in which you are driving.
Operating principle
You can call up various functions by pressing
the adjustment button with a pointed object
such as a pen or similar item. The following
adjustment options are displayed one after the
other, depending on how long you keep the
adjustment button pressed:
> Press briefly: switch display on/off
> 3 to 6 seconds: set compass zone >
6 to 9 seconds: calibrate compass
> 9 to 12 seconds: set left-hand/right-hand
steering
> 12 to 15 seconds: set the language
Setting compass zones
Set the compass zone corresponding to your
vehicle's geographic location so that the com-
pass can function correctly; refer to the world
map with compass zones.
00320051004F004C00510048000300280047004C0057004C005200510003
Page 139 of 308
138
Driving tipsThings to remember when driving
tem. Do not remove the heat shields installed
adjacent to various sections of the exhaust sys-
tem, and never apply undercoating to them.
When driving, standing at idle and while park-
ing, take care to avoid possible contact
between the hot exhaust system and any highly
flammable materials such as hay, leaves, grass,
etc. Such contact could lead to a fire, with the
risk of serious personal injuries and property
damage. Do not touch hot exhaust tail pipes.
Otherwise, there is a risk of burns. <
Mobile phones in the vehicle
It is not advisable to use wireless devices
such as mobile phones inside the vehicle
without a direct connection to an external aerial.
Otherwise, it is not possible to exclude the pos-
sibility of a reciprocal interference occurring
between the vehicle electronics and the wire-
less device. Otherwise, there is no assurance
that the radiation generated by the radio trans-
mission will be conveyed out of the passenger
compartment. <
Hydroplaning
When driving on wet or slushy roads,
reduce road speed. If you do not, a wedge
of water can form between tires and road sur-
face. This situation, known as hydroplaning,
means that the tire can completely lose contact
with the road surface, so that neither the car can
be steered nor the brake be properly applied. <
The risk of hydroplaning increases with declin-
ing tread depth on the tires, refer also to Mini-
mum tread depth on page 252.
Driving through water
Drive through water on the road only if it is
not deeper than 1 ft/30 cm, and then only
at walking speed at the most. Otherwise, the
vehicle's engine, the electrical systems and the
transmission may be damaged.<
Use the parking brake on inclines
On inclines, do not hold the vehicle for a
lengthy period using the clutch; use the
parking brake instead. Otherwise, greater
clutch wear will result. <
For more information about the drive-off assis-
tant, refer to page 98.
Braking safely
Your BMW is equipped with ABS as a standard
feature. Applying the brakes fully is the most
effective way of braking in situations in which
this is necessary. Since the vehicle maintains
steering responsiveness, you can still avoid
possible obstacles with a minimum of steering
effort.
Pulsation of the brake pedal, combined with
sounds from the hydraulic circuits, indicate that
ABS is in its active mode.
Objects in the movement range of the
pedals
Keep floor mats, carpet, and other objects
out of the movement range of the pedals;
otherwise, they may inhibit the function of the
pedals during driving.
Do not place additional floor mats onto an exist-
ing one or onto other objects.
Only use floor mats that have been approved for
the vehicle and can be appropriately fastened.
Make sure that the floor mats are securely fas-
tened again after they have been removed, e.g.
for cleaning. <
Driving in wet conditions
When roads are wet or there is heavy rain,
briefly exert gentle pressure on the brake pedal
every few miles. Monitor traffic conditions to
ensure that this maneuver does not endanger
other road users. The heat generated in this
process helps dry the pads and rotors to ensure
that full braking efficiency will then be available
when you need it.
00320051004F004C00510048000300280047004C0057004C005200510003