2013 BMW 328I CONVERTIBLE buttons
[x] Cancel search: buttonsPage 53 of 308
52
ControlsAdjustments
Seat and mirror memory
You can store and call up two different combi-
nations of driver's seat and exterior mirror posi-
tions.
Settings for the backrest width and lumbar sup-
port are not stored in memory.
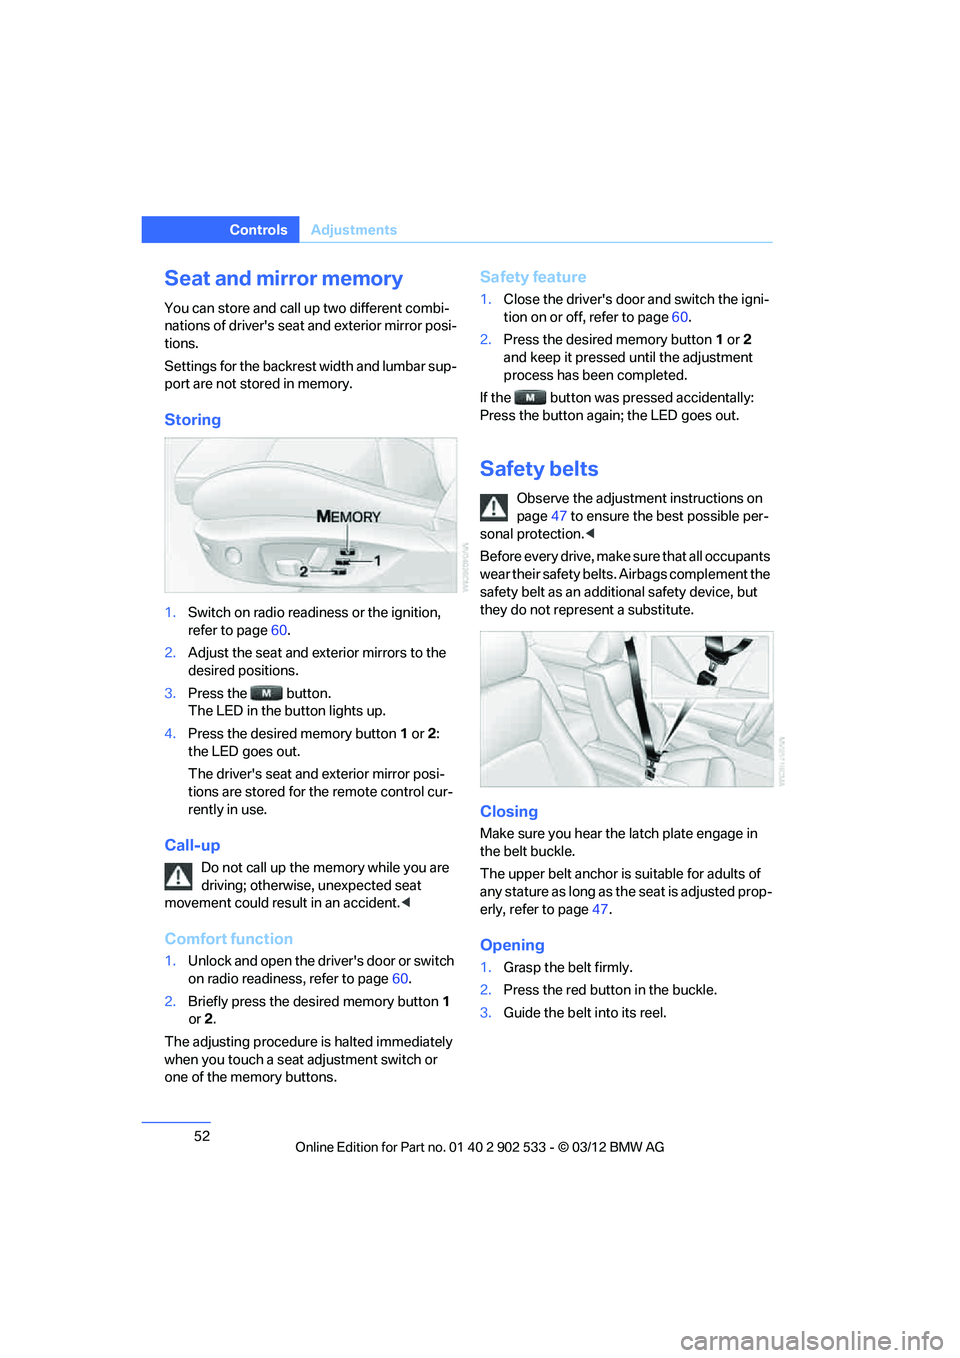
Storing
1.Switch on radio readiness or the ignition,
refer to page 60.
2. Adjust the seat and exterior mirrors to the
desired positions.
3. Press the button.
The LED in the button lights up.
4. Press the desired memory button 1 or 2:
the LED goes out.
The driver's seat and exterior mirror posi-
tions are stored for the remote control cur-
rently in use.
Call-up
Do not call up the memory while you are
driving; otherwise, unexpected seat
movement could result in an accident. <
Comfort function
1.Unlock and open the driver's door or switch
on radio readiness, refer to page 60.
2. Briefly press the desired memory button 1
or 2.
The adjusting procedure is halted immediately
when you touch a seat adjustment switch or
one of the memory buttons.
Safety feature
1. Close the driver's door and switch the igni-
tion on or off, refer to page 60.
2. Press the desired memory button 1 or 2
and keep it pressed until the adjustment
process has been completed.
If the button was pressed accidentally:
Press the button again; the LED goes out.
Safety belts
Observe the adjustment instructions on
page 47 to ensure the best possible per-
sonal protection. <
Before every drive, make sure that all occupants
wear their safety belts. Airbags complement the
safety belt as an additional safety device, but
they do not represent a substitute.
Closing
Make sure you hear the latch plate engage in
the belt buckle.
The upper belt anchor is suitable for adults of
any stature as long as the seat is adjusted prop-
erly, refer to page 47.
Opening
1. Grasp the belt firmly.
2. Press the red button in the buckle.
3. Guide the belt into its reel.
00320051004F004C00510048000300280047004C0057004C005200510003
Page 121 of 308
120
ControlsPractical interior accessories
Practical interior accessories
Vehicle equipment
In this chapter, all production, country, and
optional equipment that is offered in the model
range is described. For this reason, descrip-
tions will be given of some equipment that may
not be available in a vehicle, for example due to
the special options or national-market version
selected. This also applies to safety related
functions and systems.
Integrated universal remote
control
The concept
The Integrated universal remote control can be
used to operate up to 3 functions of remote-
controlled devices such as garage door open-
ers or lighting systems. The Integrated univer-
sal remote control thus replaces as many as
three different hand-held transmitters. To oper-
ate them, the buttons on the interior rearview
mirror must be programmed with the desired
functions. Programming requires the hand-held
transmitter for the respective device.
To prevent possible damage or injury,
before programming or using the inte-
grated universal remote control to operate a
device, always inspect the immediate area to
make certain that no people, animals or objects
are within the pivoting or travel range of the
device being operated.
Also follow the safety instructions supplied with
the hand-held transmitter. <
For security reasons, make sure to delete the
stored functions before selling the vehicle, refer
to page 122.
Compatibility
If this symbol appears on the package
or in the instructions supplied with the
device to be operated, you can gener-
ally assume that the device is compatible with
the Integrated universal remote control.
For additional questions, please consult:
> your BMW center.
> www.homelink.com on the Internet.
HomeLink is a registered trademark of Johnson
Controls, Inc.
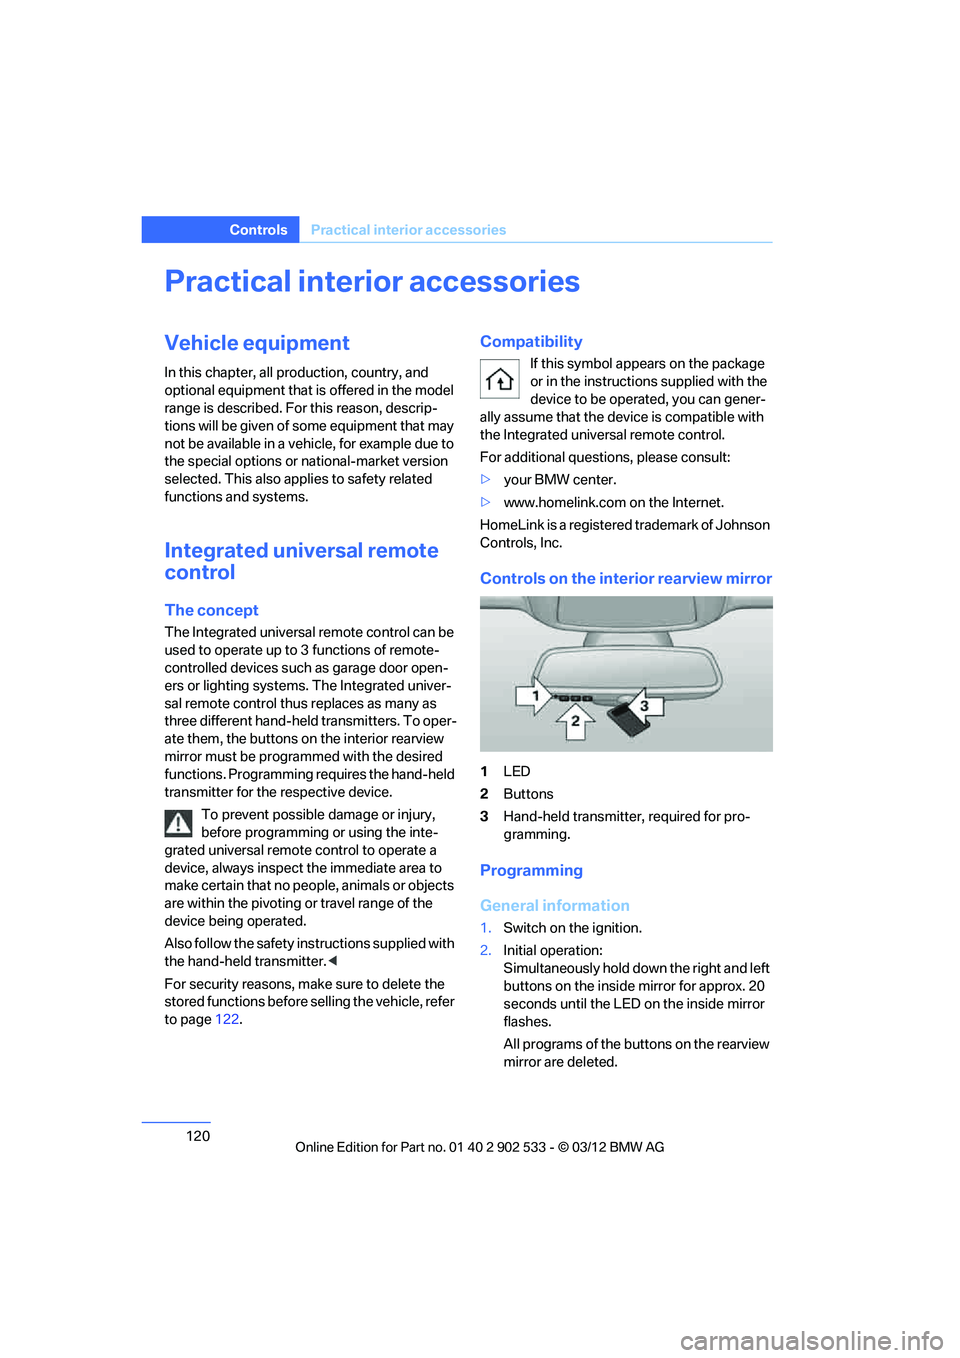
Controls on the interior rearview mirror
1 LED
2 Buttons
3 Hand-held transmitter, required for pro-
gramming.
Programming
General information
1.Switch on the ignition.
2. Initial operation:
Simultaneously hold down the right and left
buttons on the inside mirror for approx. 20
seconds until the LED on the inside mirror
flashes.
All programs of the buttons on the rearview
mirror are deleted.
00320051004F004C00510048000300280047004C0057004C005200510003
Page 122 of 308
121
Practical interior accessories
Controls
3.
Hold the hand-held transmitter of the
device to be controlled approx. 1 in/2.5 cm
to 3 in/8 cm away from the buttons on the
inside mirror.
The required distance depends on the
hand-held transmitter.
4. Simultaneously press and hold the button
of the desired function on the hand-held
transmitter and the button to be pro-
grammed on the inside mirror.
The LED on the inside mirror will flash
slowly at first.
5. As soon as the LED flashes rapidly, release
both buttons. The rapid flashing indicates
that the button on the inside mirror has
been programmed.
If the LED does not flash rapidly within
60 seconds, change the distance between
the inside mirror and the hand-held trans-
mitter and repeat this step. This may
require several attempts. Allow at least
15 seconds between attempts.
6. To program additional functions on the
other buttons of the inside mirror, repeat
steps 3 through 5.
The buttons on the inside mirro r can be used to
operate the devices if the ignition is switched
on.
Special procedure with alternating-
code systems
If the device fails to function even after repeated
programming, check whether the device to be
controlled uses an alternating-code system.
To do so, either read the instructions for the
device or hold down the programmed button on
the inside mirror. If the LED on the inside mirror
flashes quickly at first and then remains lit for
2 seconds, the device uses an alternating-code
system. The LED flashes and lights up repeat-
edly for approx. 20 seconds.
In devices with an alternating-code system, the
Integrated universal remote control and the
device must also be synchronized. For information about synchronizing can also
be found in the operating instructions for the
device to be set.
Programming will be easier with the aid of a
second person.
Synchronizing:
1.
Park your vehicle within the range of the
remote-controlled device.
2. Program the Integrated universal remote
control as described above.
3. Locate and press the synchronization but-
ton on the device to be set. You have
approx. 30 seconds to perform the next
step.
4. Hold down the programmed button on the
inside mirror for approx. 3 seconds and then
release it. Repeat this operation, up to three
times if necessary, to complete the syn-
chronization. If the synchronization has
succeeded, the programmed function is
performed.
Reprogramming individual buttons
1.Switch on the ignition.
2. Hold the hand-held transmitter of the
device to be controlled approx. 1 in/2.5 cm
to 3 in/8 cm away from the buttons on the
inside mirror.
The required distance depends on the
hand-held transmitter.
3. Press the desired button on the inside mir-
ror.
4. If the LED on the inside mirror flashes
slowly after approx. 20 seconds, press the
transmit key of the hand-held transmitter.
5. As soon as the LED flashes rapidly, release
both buttons.
If the LED does not flash rapidly after
approx. 60 seconds, alter the distance and
repeat the step.
Canada: if the LED does not flash rapidly
after approx. 60 seconds, alter the distance
and repeat this step or, if the programming
00320051004F004C00510048000300280047004C0057004C005200510003
Page 123 of 308
122
ControlsPractical interior accessories
by means of the hand-held transmitter was
interrupted, hold down the button on the
inside mirror and then press and release the
button on the hand-held transmitter several
times, holding it down for 2 seconds each
time.
Operation
To prevent possible damage or injury,
before programming or using the inte-
grated universal remote control to operate a
device, always inspect the immediate area to
make certain that no people, animals or objects
are within the pivoting or travel range of the
device being operated.
Also follow the safety instructions supplied with
the hand-held transmitter.
door, if the engine is running or the ignition is
switched on. To do so, within the reception
range of the device, press the button of the
device until the function is triggered. The LED
on the inside mirror remains lit during transmis-
sion of the radio signal.Deleting stored functions
Simultaneously hold down the right and left
buttons on the inside mirror for approx. 20 sec-
onds until the LED on the inside mirror flashes
rapidly. All stored functions are deleted. The
functions cannot be deleted individually.
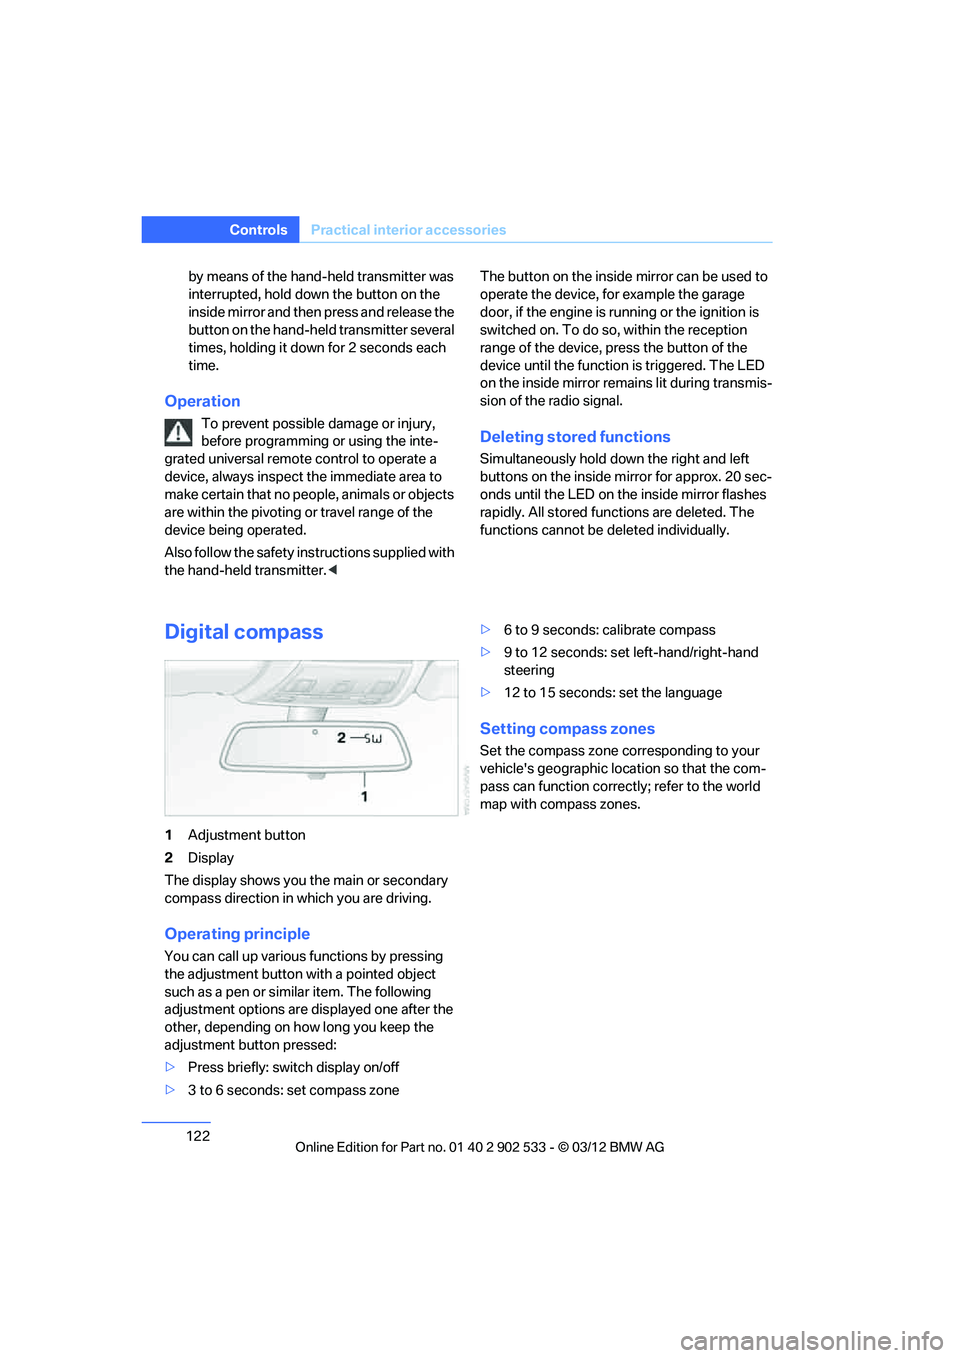
Digital compass
1
Adjustment button
2 Display
The display shows you the main or secondary
compass direction in which you are driving.
Operating principle
You can call up various functions by pressing
the adjustment button with a pointed object
such as a pen or similar item. The following
adjustment options are displayed one after the
other, depending on how long you keep the
adjustment button pressed:
> Press briefly: switch display on/off
> 3 to 6 seconds: set compass zone >
6 to 9 seconds: calibrate compass
> 9 to 12 seconds: set left-hand/right-hand
steering
> 12 to 15 seconds: set the language
Setting compass zones
Set the compass zone corresponding to your
vehicle's geographic location so that the com-
pass can function correctly; refer to the world
map with compass zones.
00320051004F004C00510048000300280047004C0057004C005200510003
Page 167 of 308
166
EntertainmentOn/off and tone
On/off and tone
Vehicle equipment
In this chapter, all production, country, and
optional equipment that is offered in the model
range is described. Equipment is also described
that is not available because of, for example,
selected options or country version. This also
applies to safety related functions and systems.
General information
The following audio and video sources share
the same control elements and adjustments:
>Radio
> CD/DVD player
> CD changer
> Video
> External devices, e.g. MP3 player
Controls
The audio and video sources can be controlled
using the:
>Buttons near the CD/DVD player
> iDrive
> Buttons on the steering wheel, refer to
page 11
> Programmable memory keys, refer to
page 23
> Voice activation system
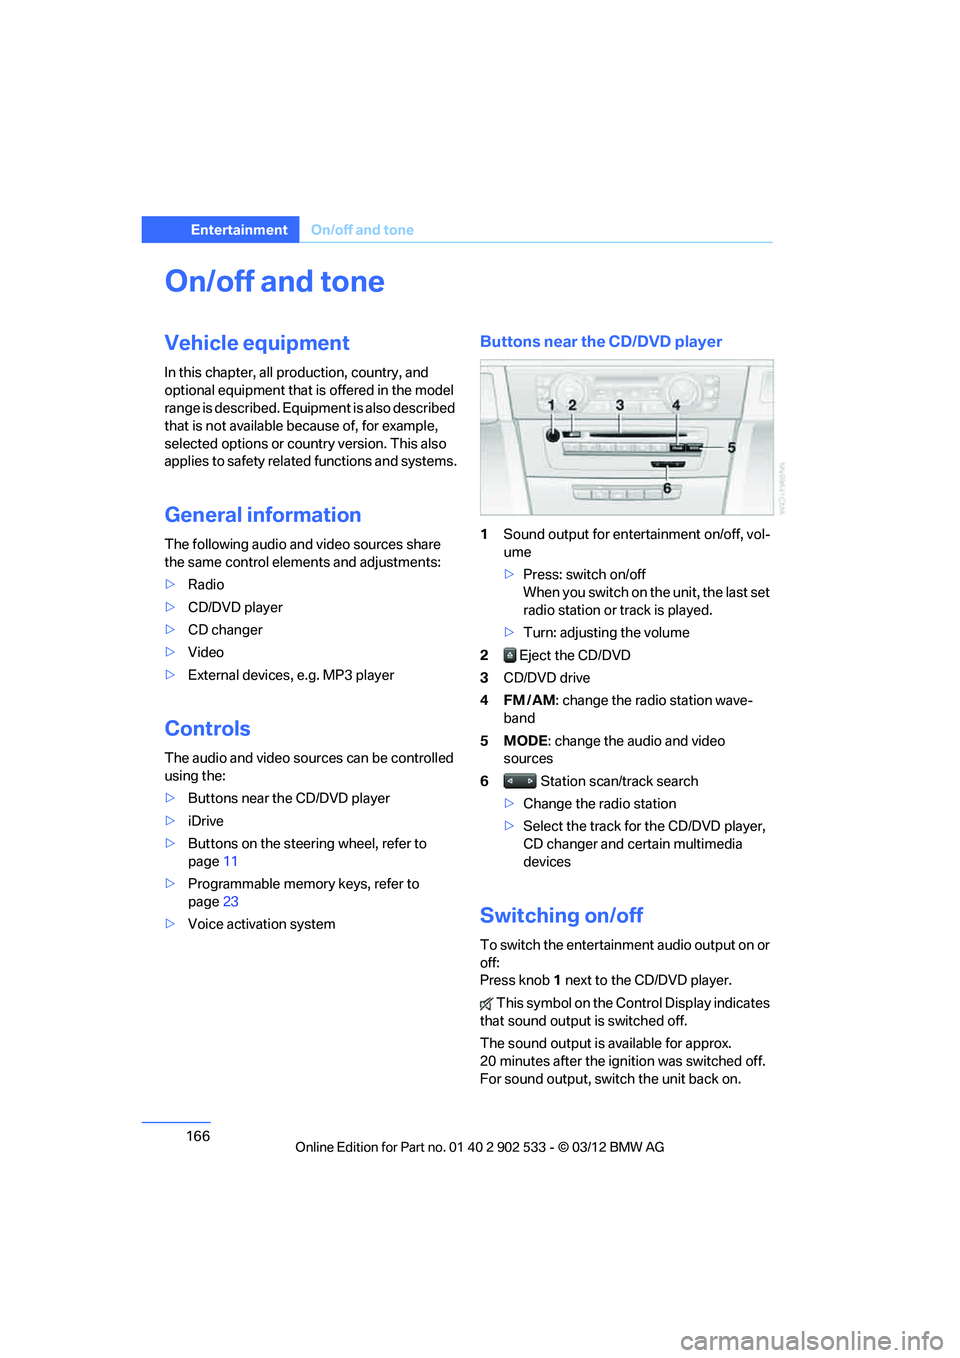
Buttons near the CD/DVD player
1Sound output for entertainment on/off, vol-
ume
>Press: switch on/off
When you switch on the unit, the last set
radio station or track is played.
> Turn: adjusting the volume
2 Eject the CD/DVD
3 CD/DVD drive
4FM/AM : change the radio station wave-
band
5MODE : change the audio and video
sources
6 Station scan/track search
> Change the radio station
> Select the track for the CD/DVD player,
CD changer and certain multimedia
devices
Switching on/off
To switch the entertainment audio output on or
off:
Press knob 1 next to the CD/DVD player.
This symbol on the Control Display indicates
that sound output is switched off.
The sound output is available for approx.
20 minutes after the ignition was switched off.
For sound output, switch the unit back on.
00320051004F004C00510048000300280047004C0057004C005200510003
Page 168 of 308
167
On/off and tone
Entertainment
Adjusting volume
Turn knob
1 next to the CD/DVD player until the
desired volume is obtained.
You can also adjust the volume with buttons on
the steering wheel, refer to page 11.
Setting tone controls
You can alter various tone settings, e.g. treble
and bass or the speed-dependent volume
increase.
The tone settings are set for all audio sources at
once.
The settings are stored for the remote control
currently in use.
Treble, bass, balance, fader
> "Treble": treble adjustment.
> "Bass": bass adjustment.
> "Balance": left/right volume distribution
> "Fader": front/rear volume distribution
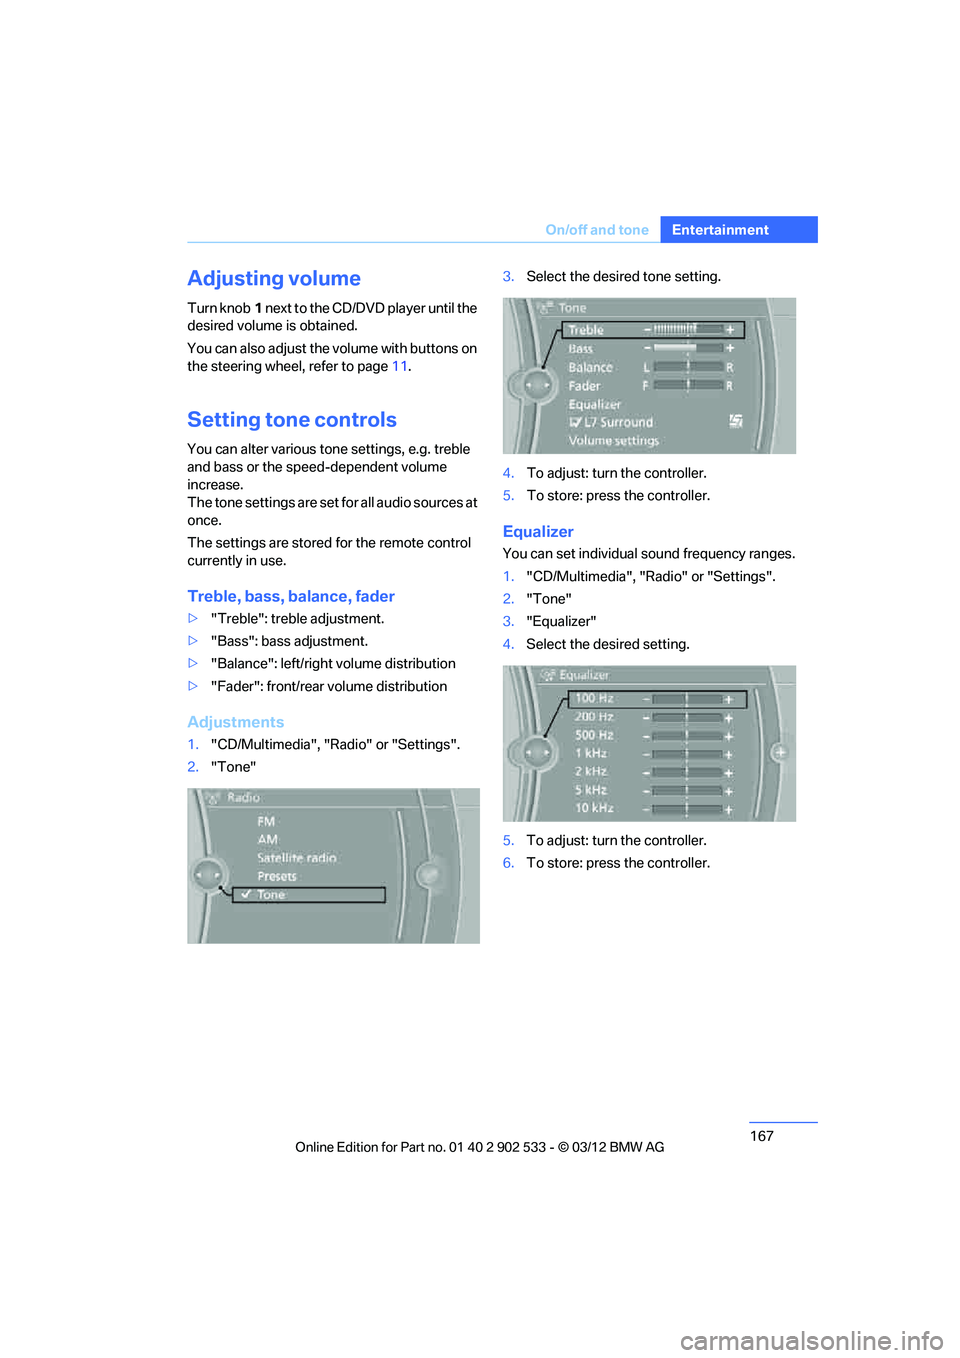
Adjustments
1."CD/Multimedia", "Radio" or "Settings".
2. "Tone" 3.
Select the desired tone setting.
4. To adjust: turn the controller.
5. To store: press the controller.
Equalizer
You can set individual sound frequency ranges.
1."CD/Multimedia", "Radio" or "Settings".
2. "Tone"
3. "Equalizer"
4. Select the desired setting.
5. To adjust: turn the controller.
6. To store: press the controller.
00320051004F004C00510048000300280047004C0057004C005200510003
Page 170 of 308
169
Radio
Entertainment
Radio
Vehicle equipment
In this chapter, all production, country, and
optional equipment that is offered in the model
range is described. Equipment is also described
that is not available because of, for example,
selected options or country version. This also
applies to safety related functions and systems.
General information
Your radio is designed for reception of the fol-
lowing stations:
>
FM and AM
> HD Radio
> Satellite radio
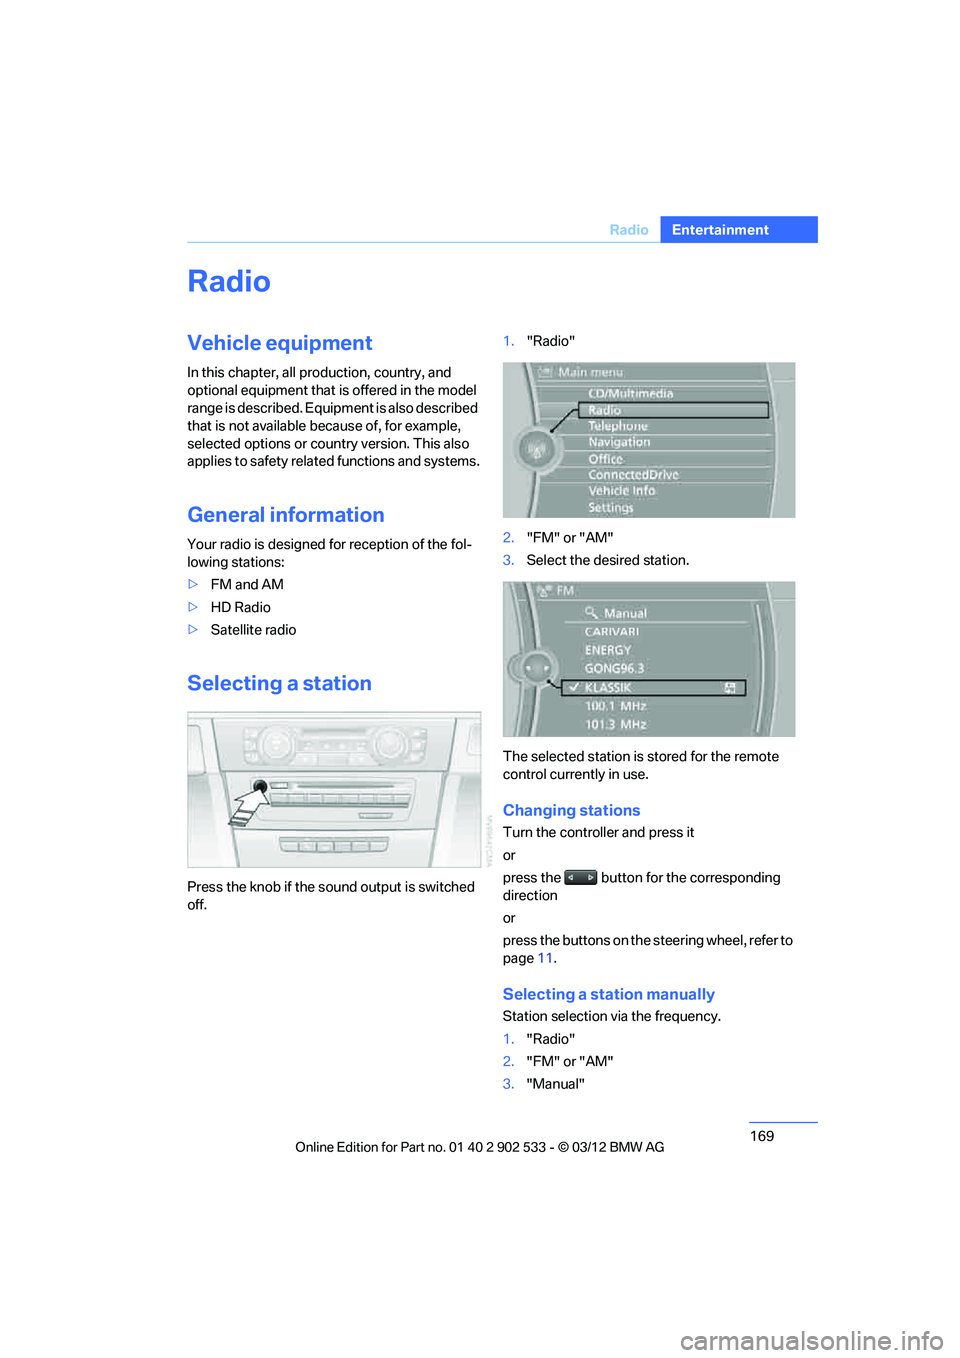
Selecting a station
Press the knob if the sound output is switched
off. 1.
"Radio"
2. "FM" or "AM"
3. Select the desired station.
The selected station is stored for the remote
control currently in use.
Changing stations
Turn the controller and press it
or
press the button for the corresponding
direction
or
press the buttons on the steering wheel, refer to
page 11.
Selecting a station manually
Station selection via the frequency.
1. "Radio"
2. "FM" or "AM"
3. "Manual"
00320051004F004C00510048000300280047004C0057004C005200510003
Page 173 of 308
172
EntertainmentSatellite radio
Satellite radio
Vehicle equipment
In this chapter, all production, country, and
optional equipment that is offered in the model
range is described. Equipment is also described
that is not available because of, for example,
selected options or country version. This also
applies to safety related functions and systems.
General information
The channels are offered in fixed packages.
Packages must be activated by telephone.
Navigation bar
The functions of the navigation bar symbols can
also be stored on the programmable memory
buttons, refer to page 23.
Managing subscription
Clear reception is required for activating and
deactivating channels. Reception is best when
you have an unobstructed view to the sky. The
channel name is displayed in the status line.
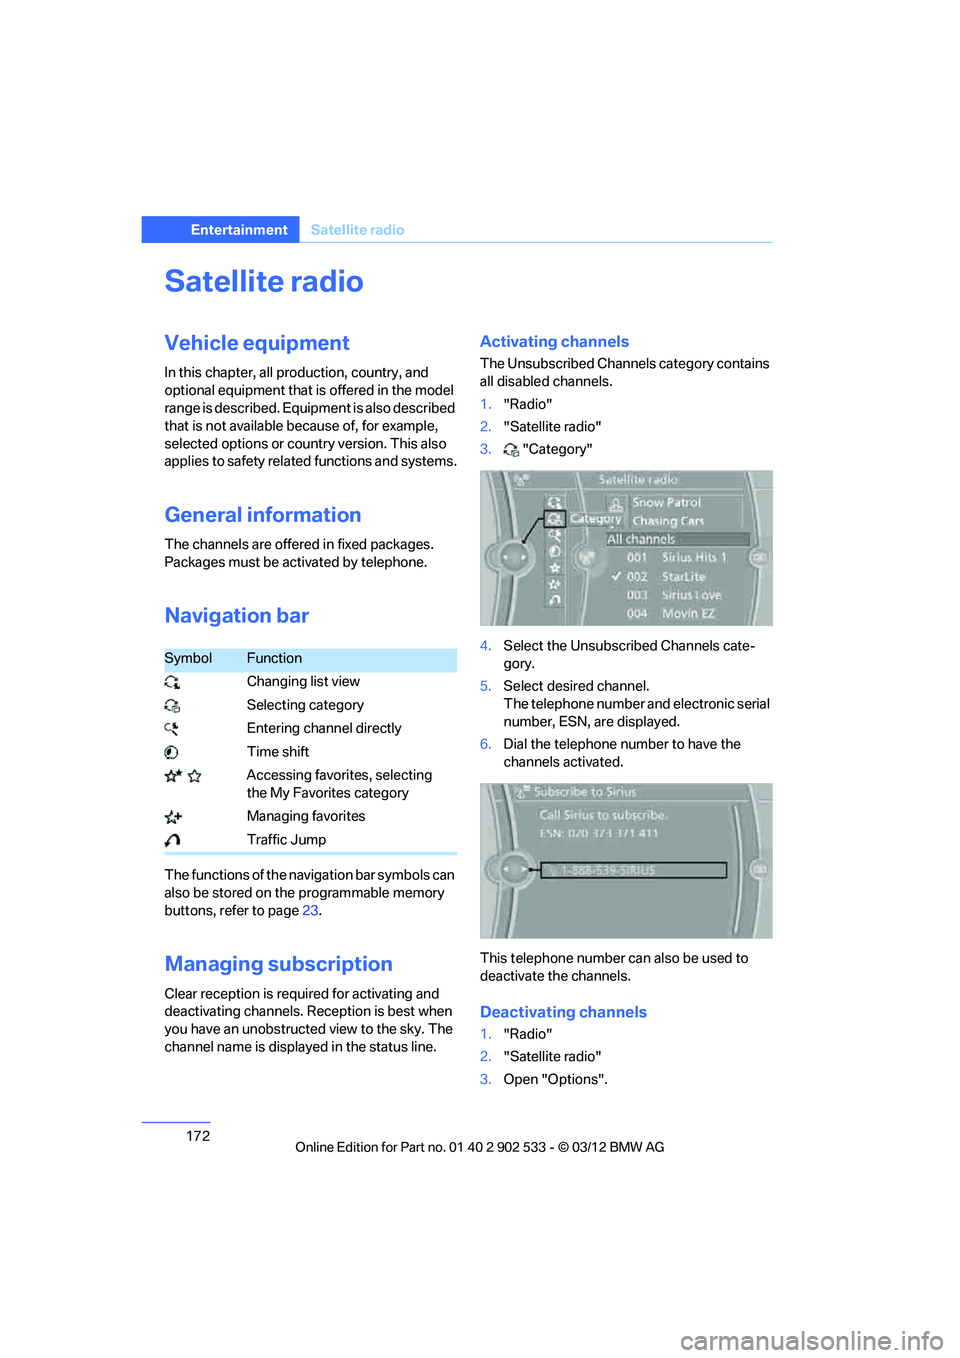
Activating channels
The Unsubscribed Channels category contains
all disabled channels.
1. "Radio"
2. "Satellite radio"
3. "Category"
4. Select the Unsubscribed Channels cate-
gory.
5. Select desired channel.
The telephone number and electronic serial
number, ESN, are displayed.
6. Dial the telephone number to have the
channels activated.
This telephone number can also be used to
deactivate the channels.
Deactivating channels
1. "Radio"
2. "Satellite radio"
3. Open "Options".
SymbolFunction
Changing list view
Selecting category
Entering channel directly
Time shift
Accessing favorites, selecting the My Favorites category
Managing favorites
Traffic Jump
00320051004F004C00510048000300280047004C0057004C005200510003