2013 BMW 3 SERIES SEDAN light
[x] Cancel search: lightPage 7 of 248

Addendum
Information about recommended
snow chains is available from a
service center.
12.At page 199, under the heading
“Hood,” the sentence beginning, “If
you are unfamiliar” should be
disregarded.
13.At page 202, under the heading:
“Approved oil types,” the references
to “Approved” should be read as
“Suitable.” Immediately preceding
the “Gasoline engine” chart, the
following sentence should be
inserted: “Add engine oils that meet
the following oil rating
standards: . . .”
14.At page 202, under the heading:
“Alternative oil types,” the text
preceding the chart should be
disregarded, and in lieu thereof
should be read as follows: “If an
engine oil suitable for continuous
use is not available, up to 1 US
quart/liter of an engine oil with the
following oil rating can be
added: . . .” The reference to
“specification” should be read as
“rating.”
15.At page 202, under the heading:
“Engine oil change,” the text should
be disregarded and in lieu thereof
should be read as follows:
BMW recommends that you have
the oil changed at your BMW
dealer’s service center or at another
service center that has trained
personnel that can perform the work
in accordance with BMW
specifications.
16.At page 204, under the heading:
“Service and Warranty Information
Booklet for US models and
Warranty and Service Guide
Booklet for Canadian models,” the
second paragraph should be
disregarded and the following text
read in lieu thereof:
The manufacturer of your vehicle
recommends that you have
maintenance and repair performed
by your BMW dealer’s service
center or another service center or
repair shop that employs trained
personnel that can perform
maintenance and repair work on
your vehicle in accordance with
BMW specifications. The
manufacturer of your vehicle
recommends that you maintain
records of all maintenance and
repair work performed on your
vehicle.
17.At page 207 and page 210, where it
reads: “Do not perform work/bulb
replacement on xenon headlamps,”
that text should be disregarded and
in lieu thereof the following text
should be read: “Xenon headlamp
work or replacement can cause
serious and fatal injuries.” In the
text that follows, where it reads:
“[h]ave any work on the xenon
lighting system . . . ,” the following
words should be read as preceding
that passage: “It is strongly
suggested that you . . . .”
18.At page 215, under the “Battery
replacement” section, the text
should be disregarded and in lieu
Page 12 of 248

chemicals known to the State of California to
cause cancer and birth defects or other repro‐
ductive harm. Battery posts, terminals and re‐
lated accessories contain lead and lead com‐
pounds. Wash your hands after handling. Used
engine oil contains chemicals that have caused
cancer in laboratory animals. Always protect
your skin by washing thoroughly with soap and
water.
Service and warranty
We recommend that you read this publication
thoroughly. Your vehicle is covered by the fol‐
lowing warranties:▷New Vehicle Limited Warranty.▷Rust Perforation Limited Warranty.▷Federal Emissions System Defect War‐
ranty.▷Federal Emissions Performance Warranty.▷California Emission Control System Lim‐
ited Warranty.
Detailed information about these warranties is
listed in the Service and Warranty Information
Booklet for US models or in the Warranty and
Service Guide Booklet for Canadian models.
Your vehicle has been specifically adapted and
designed to meet the particular operating con‐
ditions and homologation requirements in your
country and continental region in order to de‐
liver the full driving pleasure while the vehicle
is operated under those conditions. If you wish
to operate your vehicle in another country or
region, you may be required to adapt your ve‐
hicle to meet different prevailing operating
conditions and homologation requirements.
You should also be aware of any applicable
warranty limitations or exclusions for such
country or region. In such case, please contact
Customer Relations for further information.
Maintenance
Maintain the vehicle regularly to sustain the
road safety, operational reliability and the New
Vehicle Limited Warranty.
Specifications for required maintenance meas‐
ures:▷BMW Maintenance system▷Service and Warranty Information Booklet
for US models▷Warranty and Service Guide Booklet for
Canadian models
If the vehicle is not maintained according to
these specifications, this could result in seri‐
ous damage to the vehicle. Such damage is
not covered by the BMW New Vehicle Limited
Warranty.
Data memory
Many electronic components on your vehicle
are equipped with data memories that tempo‐
rarily or permanently store technical informa‐
tion about the condition of the vehicle, events
and faults. This technical information generally
documents the state of a component, a mod‐ ule, a system or the environment:
▷Operating states of system components,
fill levels for instance.▷Status messages for the vehicle and from
its individual components, e.g., wheel rota‐
tion speed/ vehicle speed, deceleration,
transverse acceleration.▷Malfunctions and faults in important sys‐
tem components, e.g., lights and brakes.▷Responses by the vehicle to special situa‐
tions, e.g., deployment of an airbag, en‐
gagement of stability control systems.▷Ambient conditions, such as temperature.
This data is purely technical in nature and is
used to detect and correct faults and to opti‐
mize vehicle functions. Motion profiles over
routes traveled cannot be created from this
data. When service offerings are used, e.g., re‐
pair services, service processes, warranty
claims, quality assurance, this technical infor‐
mation can be read out from the event and
fault memories by the service personnel, in‐
Seite 8Notes8
Online Edition for Part no. 01 40 2 926 810 - X/13
Page 19 of 248

Front fog lamps 94Parking lamps 91Low beams 91Automatic headlamp con‐
trol 92
Daytime running lights 92
Adaptive Light Control 92
High-beam Assistant 93Instrument lighting 947Steering column stalk, leftTurn signal 68High beams, head‐
lamp flasher 68High-beam Assistant 93Roadside parking lamps 92Computer 868Steering wheel buttons, leftStore speed 128, 121Resume speed 129, 121Cruise control on/off, interrupt‐
ing 128Active Cruise Control on/off, in‐
terrupting 121Reduce distance 124Increase distance 124Cruise control rocker switch 129, 1239Instrument cluster 7510Steering wheel buttons, rightEntertainment sourceVolumeVoice activation 26Telephone, see user's manual for
Navigation, Entertainment and
CommunicationThumbwheel for selection lists 8511Steering column stalk, rightWindshield wipers 68Rain sensor 69Clean the windshields and head‐
lamps 7012Start/stop the engine and switch
the ignition on/off 64Auto Start/Stop function 6513Horn14Steering wheel heating 5815Adjust steering wheel 5816Unlock hood 199Seite 15CockpitAt a glance15
Online Edition for Part no. 01 40 2 926 810 - X/13
Page 24 of 248

Buttons on controllerPress the but‐
tonFunctionMENUOpen the main menu.AudioOpen audio menu last lis‐
tened to, switch between au‐
dio menus.TELOpens the Telephone menu.BACKOpen previous panel.OPTIONOpens the Options menu.
Operating concept
Opening the main menu Press the button.
The main menu is displayed.
All iDrive functions can be called up via the
main menu.
Selecting menu items
Highlighted menu items can be selected.1.Turn the controller until the desired menu
item is highlighted.2.Press the controller.
Menu items in the Owner's Manual
In the Owner's Manual, menu items that can be
selected are set in quotation marks, e.g.,
"Settings".
Changing between panels
After a menu item is selected, e.g., "Radio", a
new panel is displayed. Panels can overlap.
▷Move the controller to the left.
The current panel is closed and the previ‐
ous panel is displayed.
The previous panel is opened again by
pressing the BACK button. In this case, the
current panel is not closed.▷Move the controller to the right.
A new panel is opened on top of the previ‐
ous display.Seite 20At a glanceiDrive20
Online Edition for Part no. 01 40 2 926 810 - X/13
Page 26 of 248

▷For the input of upper/lower case letters
and numbers, it may be necessary to
switch via the controller to the correspond‐
ing Input mode, refer to page 25, e.g.
when the spelling of upper and lower case
letters is identical.▷Enter characters as they are displayed on
the Control Display.▷Always enter accompanying signs, such as
accents or periods so that the letter can be
clearly recognized. The possibility of input
depends on the set language. Where nec‐
essary, enter special characters via the
controller.▷To delete a character, slide to the left on
the touchpad.▷To enter a blank space, slide to the right in
the center of the touchpad.▷To enter a hyphen, slide to the right in the
upper area of the touchpad.▷To enter an underscore, slide to the right in
the lower area of the touchpad.
Using interactive map and Internet
The interactive map in the navigation system
and Internet sites can be moved via the touch‐
pad.
FunctionControlsMove interactive map
or Internet sites.Slide in the corre‐
sponding direction.Enlarge/shrink interac‐
tive map or Internet
sites.Drag inwards or
outwards on the
touchpad with the
fingers.Display the menu or
open a link in the Inter‐
net.Tap once.Changing settings
Settings on the control display, such as the
volume, can be made via the touchpad. To do
this slide to the left or right accordingly.
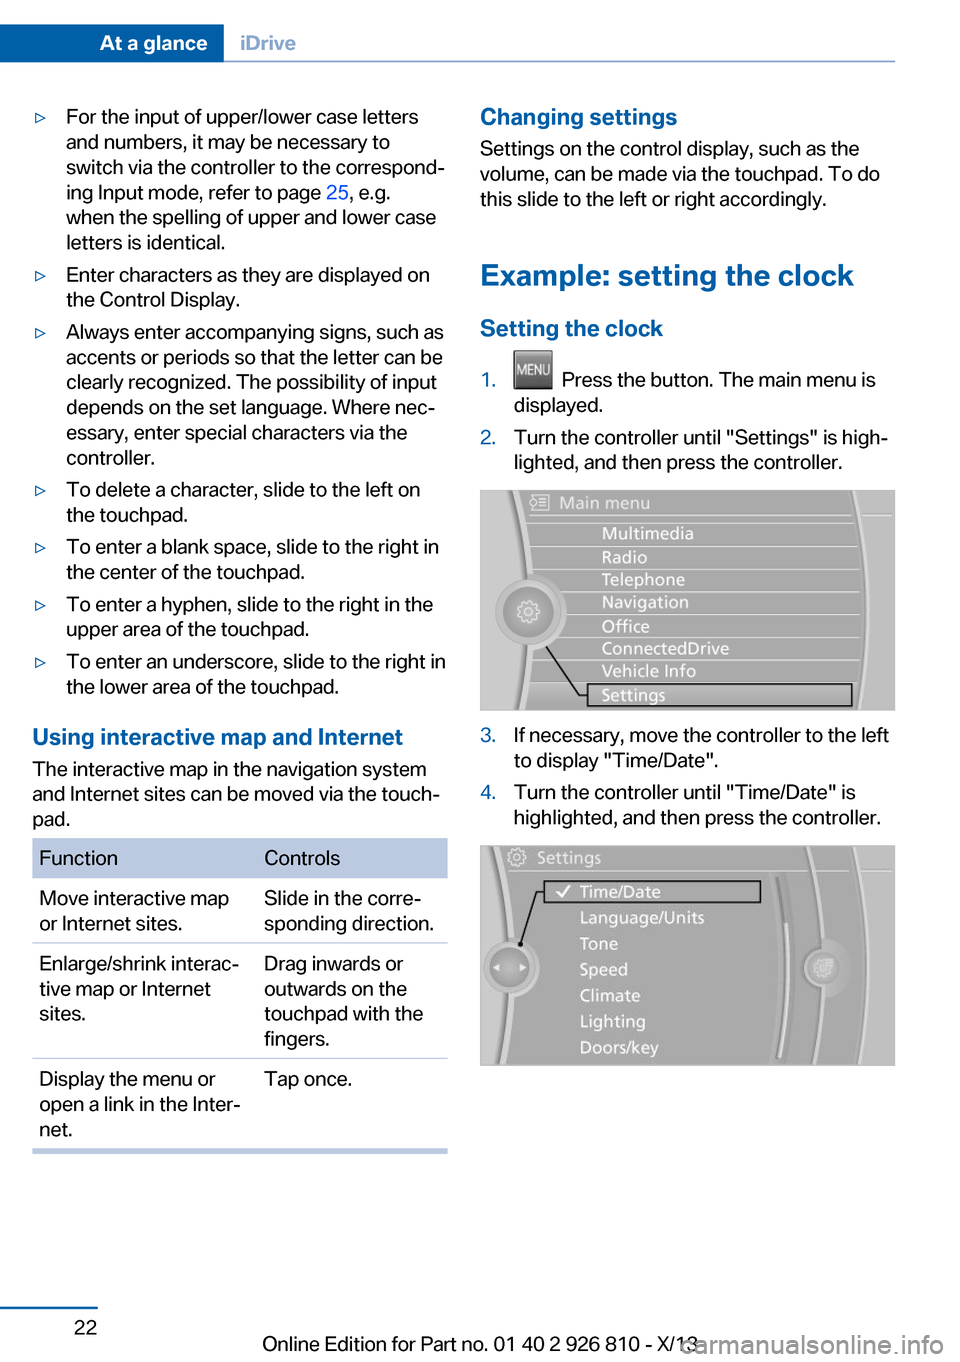
Example: setting the clock Setting the clock1. Press the button. The main menu is
displayed.2.Turn the controller until "Settings" is high‐
lighted, and then press the controller.3.If necessary, move the controller to the left
to display "Time/Date".4.Turn the controller until "Time/Date" is
highlighted, and then press the controller.Seite 22At a glanceiDrive22
Online Edition for Part no. 01 40 2 926 810 - X/13
Page 27 of 248

5.Turn the controller until "Time:" is high‐
lighted, and then press the controller.6.Turn the controller to set the hours and
press the controller.7.Turn the controller to set the minutes and
press the controller.
Status information
Status field The following information is displayed in the
status field at the top right:
▷Time.▷Current entertainment source.▷Sound output, on/off.▷Wireless network reception strength.▷Telephone status.▷Traffic bulletin reception.
Status field symbols
The symbols are grouped as follows.
Radio symbols
SymbolMeaning Satellite radio is switched on.Telephone symbolsSymbolMeaning Incoming or outgoing call. Missed call. Wireless network reception
strength.
Symbol flashes: network search. Wireless network is not available. Bluetooth is switched on. Roaming is active. Text message was received. Check the SIM card. SIM card is blocked. SIM card is missing. Enter the PIN.
Entertainment symbols
SymbolMeaning CD/DVD player. Music collection. Gracenote® database. AUX-IN port. USB audio interface. Mobile phone audio interface.
Additional symbols
SymbolMeaning Spoken instructions are switched
off.Seite 23iDriveAt a glance23
Online Edition for Part no. 01 40 2 926 810 - X/13
Page 28 of 248

Split screen
General information Additional information can be displayed on the
right side of the split screen, e.g., information
from the onboard computer.
In the divided screen view, the so-called split
screen, this information remains visible even when you change to another menu.
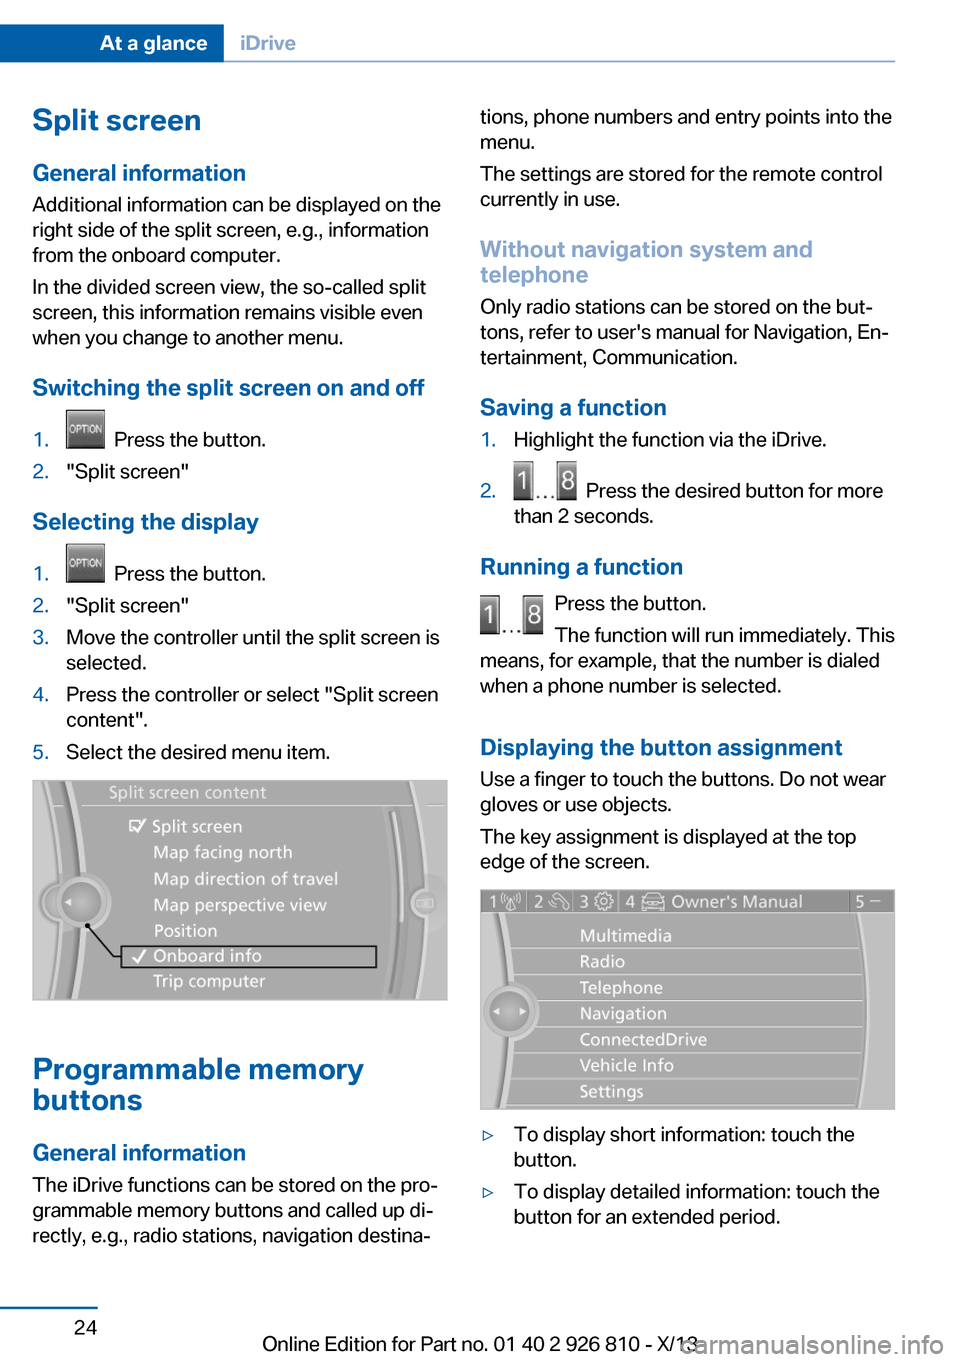
Switching the split screen on and off1. Press the button.2."Split screen"
Selecting the display
1. Press the button.2."Split screen"3.Move the controller until the split screen is
selected.4.Press the controller or select "Split screen
content".5.Select the desired menu item.
Programmable memory
buttons
General information
The iDrive functions can be stored on the pro‐
grammable memory buttons and called up di‐
rectly, e.g., radio stations, navigation destina‐
tions, phone numbers and entry points into the
menu.
The settings are stored for the remote control
currently in use.
Without navigation system and
telephone
Only radio stations can be stored on the but‐
tons, refer to user's manual for Navigation, En‐
tertainment, Communication.
Saving a function1.Highlight the function via the iDrive.2. Press the desired button for more
than 2 seconds.
Running a function
Press the button.
The function will run immediately. This
means, for example, that the number is dialed
when a phone number is selected.
Displaying the button assignment Use a finger to touch the buttons. Do not wear
gloves or use objects.
The key assignment is displayed at the top
edge of the screen.
▷To display short information: touch the
button.▷To display detailed information: touch the
button for an extended period.Seite 24At a glanceiDrive24
Online Edition for Part no. 01 40 2 926 810 - X/13
Page 33 of 248

Integrated Owner's Manual in the vehicleVehicle equipmentAll standard, country-specific and optional
equipment that is offered in the model series is
described in this chapter. Therefore, equip‐
ment is also described that is not available in a
vehicle, e. g., because of the selected optional
equipment or country variant. This also applies
for safety-related functions and systems.
Integrated Owner's Manual
in the vehicle
The Integrated Owner's Manual can be dis‐
played on the Control Display. The equipment
and functions that are in the vehicle are descri‐
bed therein.
Components of the Integrated
Owner's Manual
The Integrated Owner's Manual consists of
three parts, which offer various levels of infor‐
mation or access possibilities.
Quick Reference Guide Located in the Quick Reference is important
information for the operation of the vehicle, the
operation of basic vehicle functions or for what
to do in the event of a flat tire. This information
can also be displayed during driving.
Search by pictures
Information and descriptions based on illustra‐
tions can be searched via search by pictures.
This is helpful, for example, if the description of
an outfitting package that cannot be named is
needed.
Owner's Manual
Information and descriptions can be searched
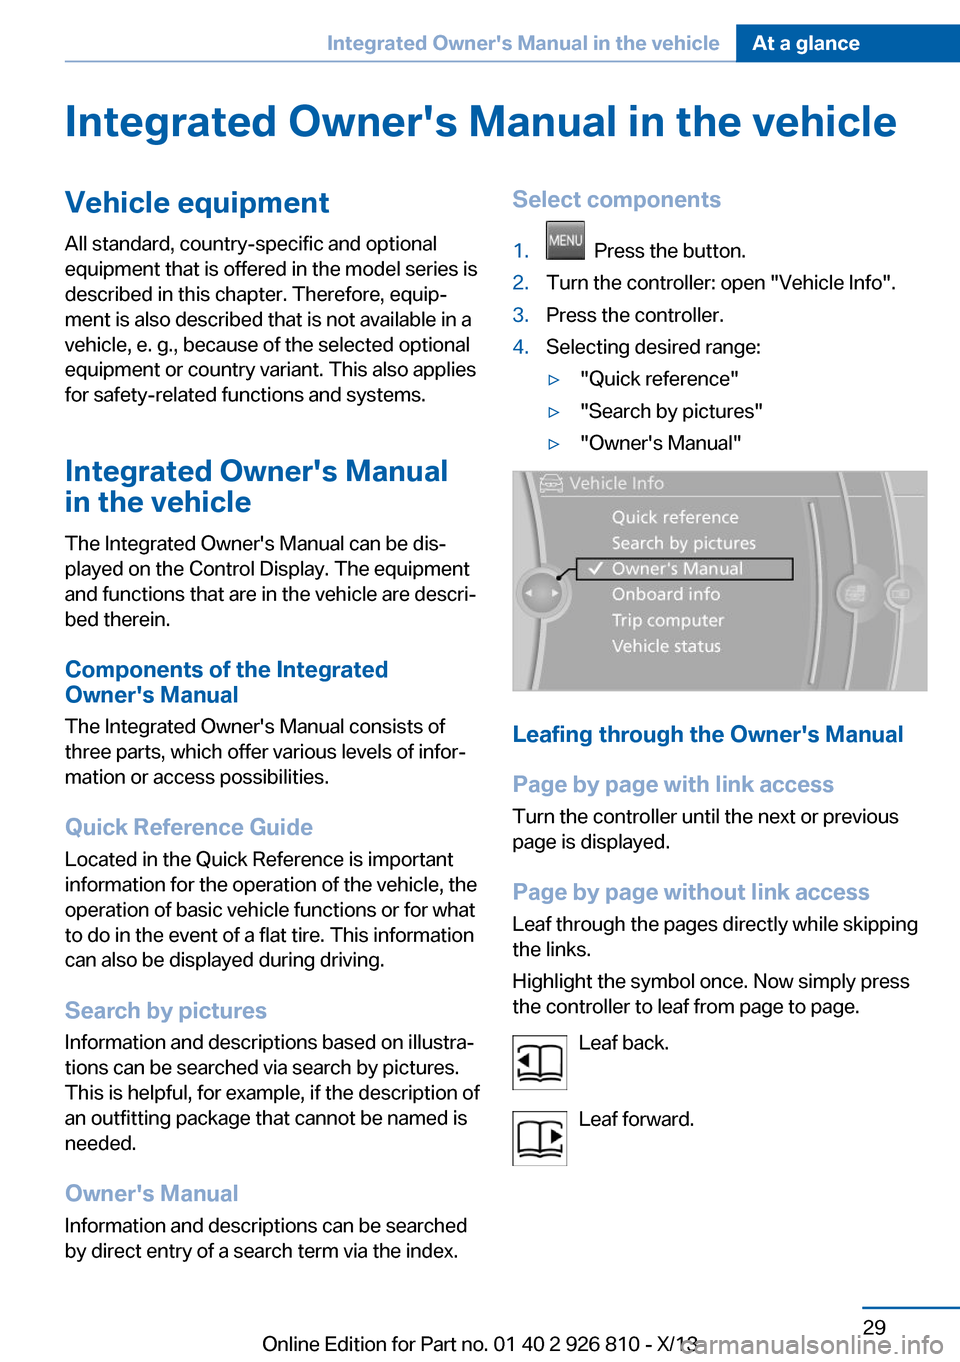
by direct entry of a search term via the index.Select components1. Press the button.2.Turn the controller: open "Vehicle Info".3.Press the controller.4.Selecting desired range:▷"Quick reference"▷"Search by pictures"▷"Owner's Manual"
Leafing through the Owner's Manual
Page by page with link access
Turn the controller until the next or previous
page is displayed.
Page by page without link access
Leaf through the pages directly while skipping
the links.
Highlight the symbol once. Now simply press
the controller to leaf from page to page.
Leaf back.
Leaf forward.
Seite 29Integrated Owner's Manual in the vehicleAt a glance29
Online Edition for Part no. 01 40 2 926 810 - X/13