2013 BMW 3 SERIES SEDAN ESP
[x] Cancel search: ESPPage 158 of 248

World map with magnetic zonesProcedure1.Press and hold the control button for ap‐
prox. 3 to 4 seconds. The number of the
set compass zone appears in the mirror.2.To change the zone setting, press the con‐
trol button quickly and repeatedly until the
number of the compass zone correspond‐
ing to your location appears in the mirror.
The set zone is stored automatically. The com‐
pass is ready for use again after approximately
10 seconds.
Calibrating the digital compass
The digital compass must be calibrated in the
event of the following:
▷The wrong point of the compass is dis‐
played.▷The point of the compass displayed does
not change despite changing the direction
of travel.▷Not all points of the compass are dis‐
played.Procedure1.Make sure that there are no large metallic
objects or overhead power lines near the
vehicle and that there is sufficient room to
drive around in a circle.2.Set the currently applicable compass zone.3.Press and hold the control button for ap‐
prox. 6 to 7 seconds so that "C" appears
on the display. Next, drive in a complete
circle at least once at a speed of no more
than 4 mph/7 km/h. If calibration is suc‐
cessful, the "C" is replaced by the points of
the compass.
Left/right-hand steering
The digital compass is already set for right or
left-hand steering at the factory.
Setting the language
Press and hold the control button for approx.
12 to 13 seconds. Briefly press the control
button again to switch between English "E"
and German "O".
Seite 154ControlsInterior equipment154
Online Edition for Part no. 01 40 2 926 810 - X/13
Page 161 of 248

With Professional navigation system
or TV: at a glance
The USB interface is located in the center arm‐
rest.
Notes Observe the following when connecting:
▷Do not use force when plugging the con‐
nector into the USB interface.▷Do not connect devices such as fans or
lamps to the USB interface.▷Do not connect USB hard drives.▷Do not use the USB interface to recharge
external devices.
Through-loading system
The concept The cargo area can be enlarged by folding
down the rear seat backrest.
The rear seat backrest is divided into two parts at a ratio of 60 to 40.
If equipped with through-loading system: the
rear seat backrest is divided in the ratio 40–20– 40.
The sides can be folded down separately or to‐
gether.
Hints
Danger of pinching
Before folding down the rear seat back‐
rests, ensure that the area of movement of the
backrests is clear. In particular, ensure that no
one is located in or reaches into the area of
movement of the rear seat backrests when the
middle section is folded down. Otherwise, in‐
jury or damage may result.◀
Lock the rear seat backrests in position
Before installation of child restraint sys‐
tems on the rear seat backrest, set a backrest
tilt at which the childseat rests firmly against
the backrest and securely latch all backrests.
Otherwise, the stability of the child seat is lim‐
ited, and there is an increased risk of injury be‐
cause of unexpected movement of the rear
seat backrest.◀
Retract the head restraint if necessary
before backrest is folded down
With folding head restraints, fold in the head
restraints before folding down the backrests, or damage may result.◀
Opening1.Unlock the belt lock of the center safety
belt in the rear using the latch plate of an‐
other safety belt.2.Insert the latch plate at the end of the belt
into the specially designated fixture on the
rear window shelf.3.Push the corresponding head restraint
down as far as it will go.Seite 157Interior equipmentControls157
Online Edition for Part no. 01 40 2 926 810 - X/13
Page 162 of 248

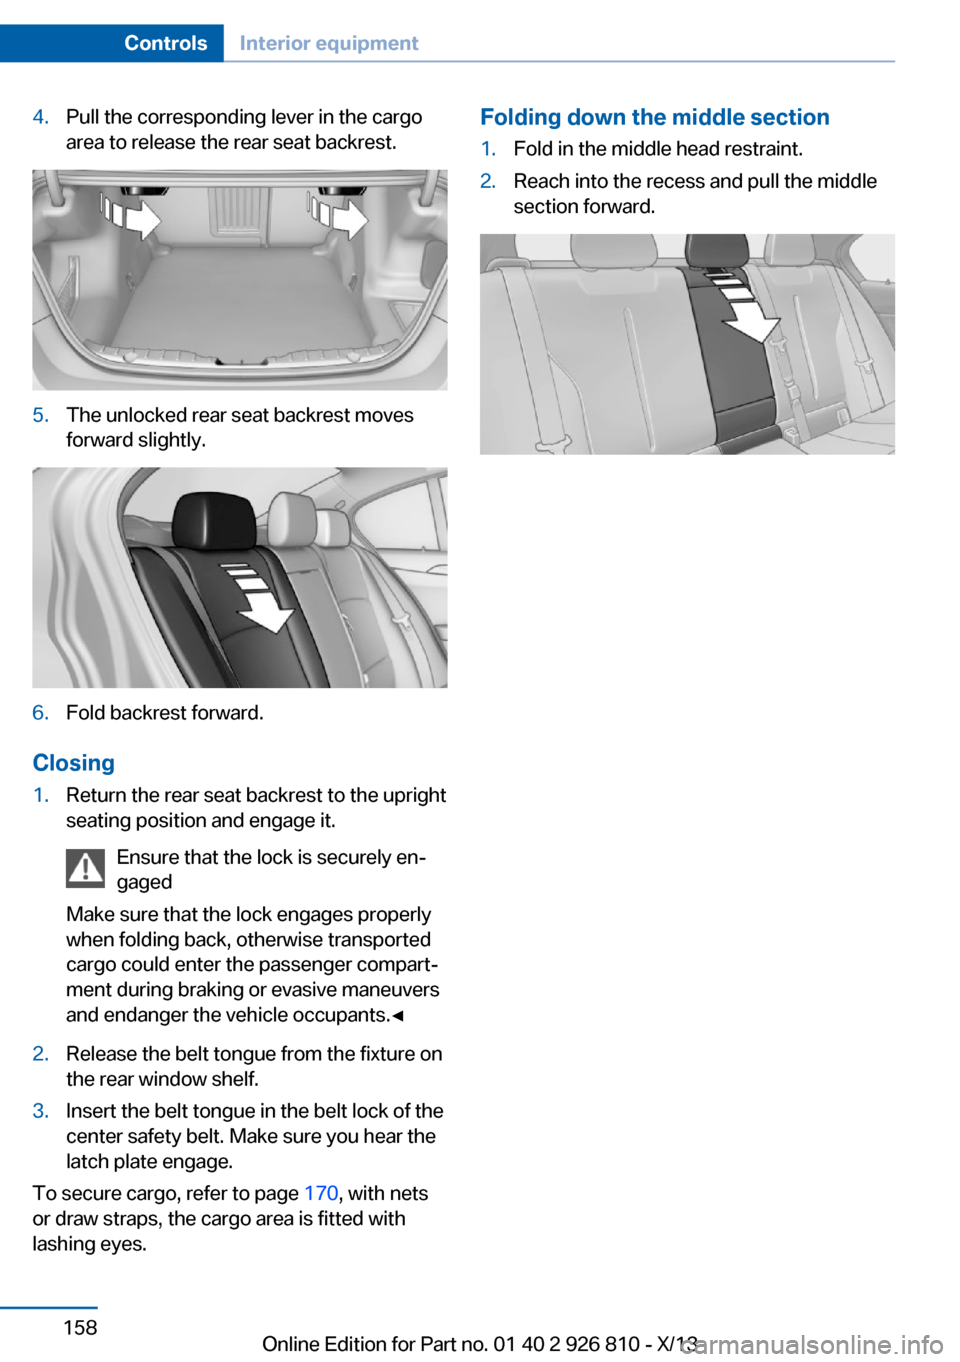
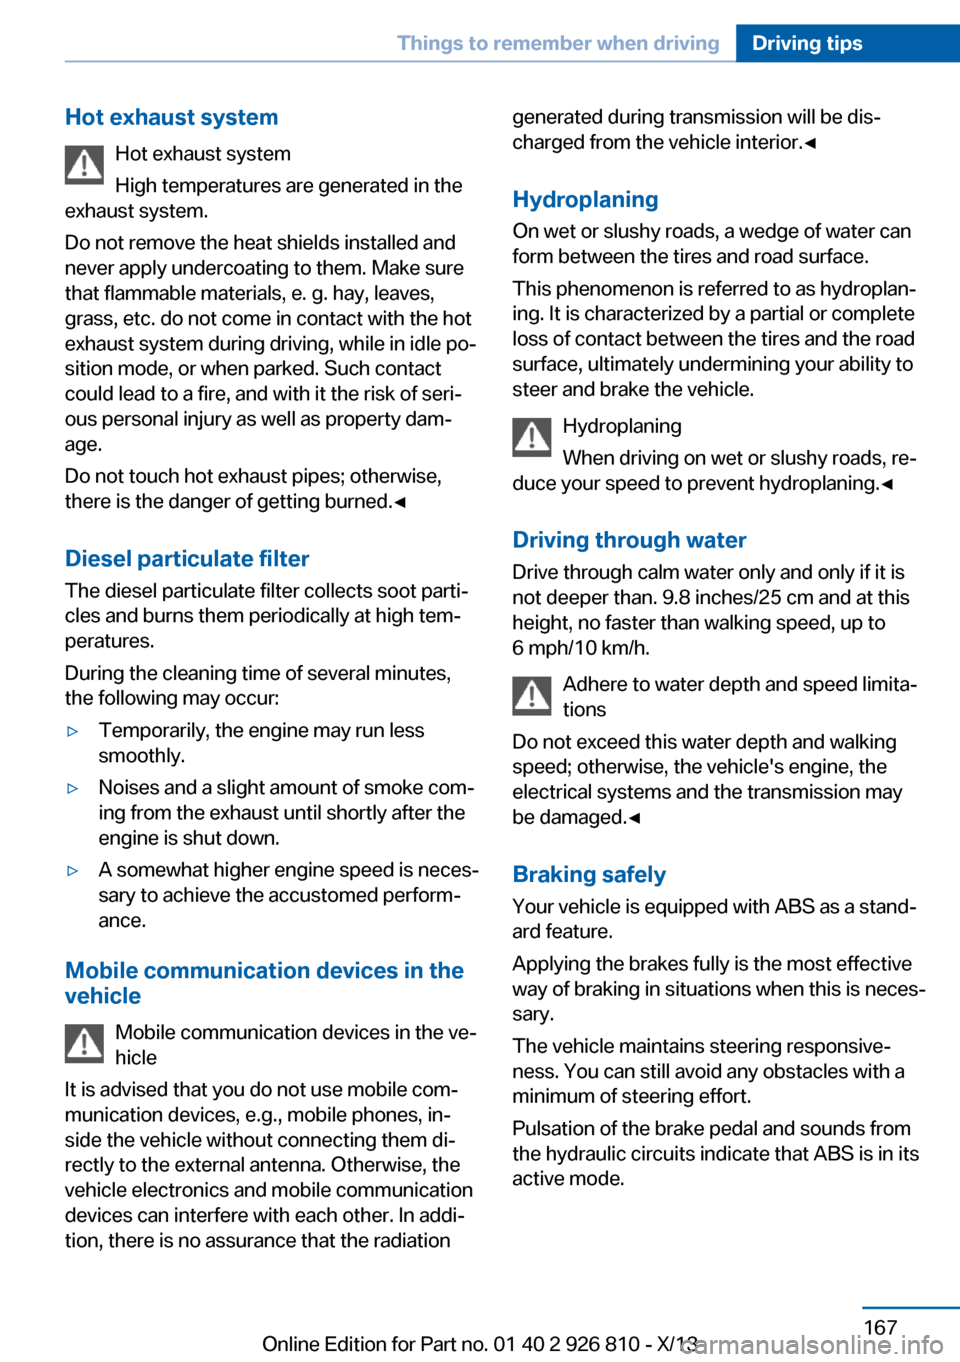
4.Pull the corresponding lever in the cargo
area to release the rear seat backrest.5.The unlocked rear seat backrest moves
forward slightly.6.Fold backrest forward.
Closing
1.Return the rear seat backrest to the upright
seating position and engage it.
Ensure that the lock is securely en‐
gaged
Make sure that the lock engages properly
when folding back, otherwise transported
cargo could enter the passenger compart‐
ment during braking or evasive maneuvers
and endanger the vehicle occupants.◀2.Release the belt tongue from the fixture on
the rear window shelf.3.Insert the belt tongue in the belt lock of the
center safety belt. Make sure you hear the
latch plate engage.
To secure cargo, refer to page 170, with nets
or draw straps, the cargo area is fitted with
lashing eyes.
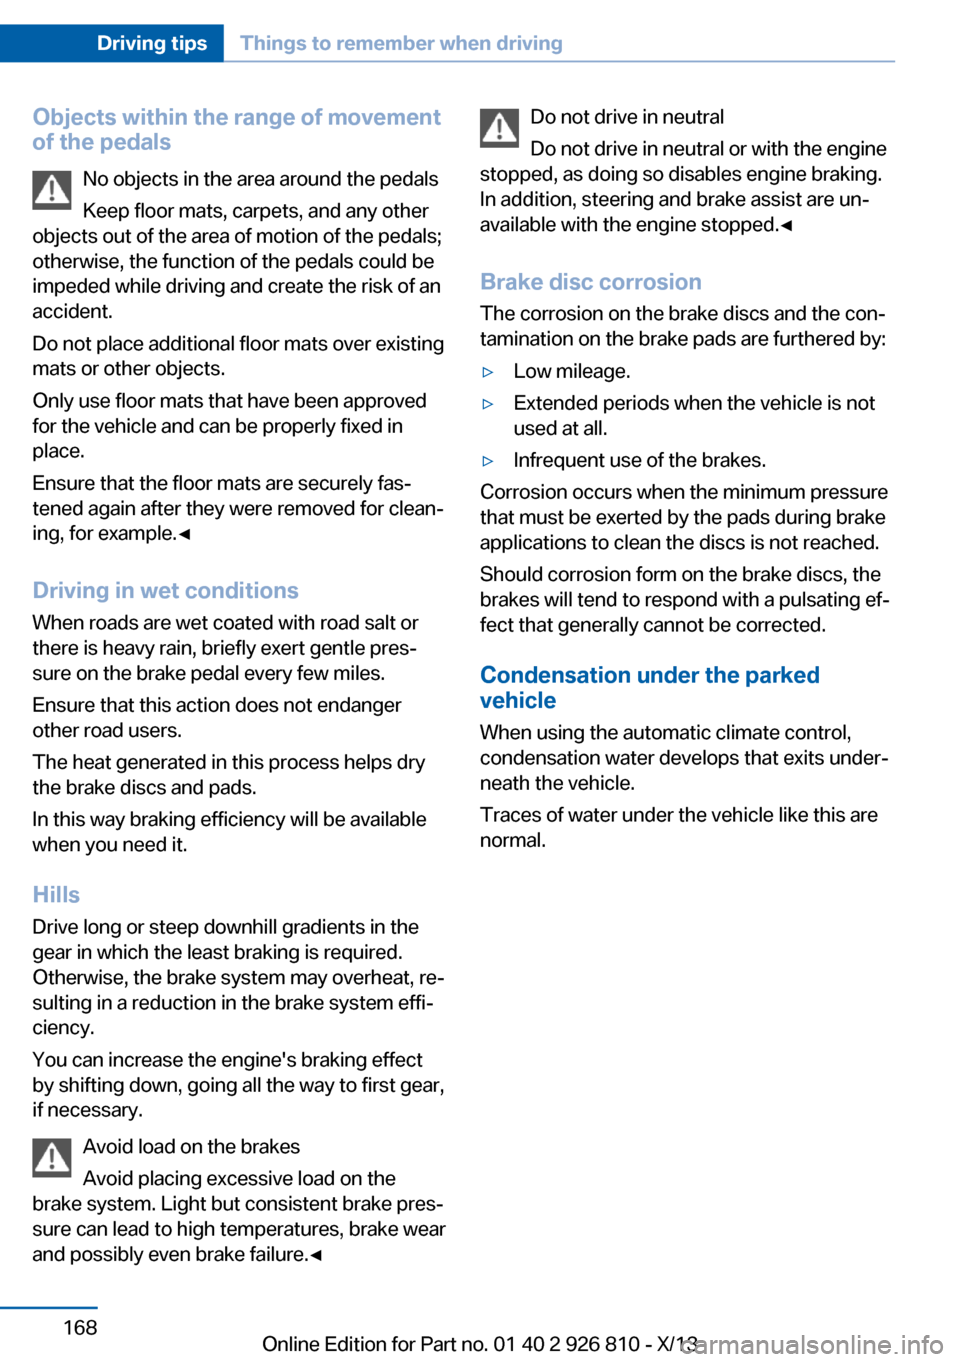
Folding down the middle section1.Fold in the middle head restraint.2.Reach into the recess and pull the middle
section forward.Seite 158ControlsInterior equipment158
Online Edition for Part no. 01 40 2 926 810 - X/13
Page 171 of 248

Hot exhaust systemHot exhaust system
High temperatures are generated in the
exhaust system.
Do not remove the heat shields installed and
never apply undercoating to them. Make sure
that flammable materials, e. g. hay, leaves,
grass, etc. do not come in contact with the hot
exhaust system during driving, while in idle po‐
sition mode, or when parked. Such contact
could lead to a fire, and with it the risk of seri‐
ous personal injury as well as property dam‐
age.
Do not touch hot exhaust pipes; otherwise,
there is the danger of getting burned.◀
Diesel particulate filter The diesel particulate filter collects soot parti‐
cles and burns them periodically at high tem‐
peratures.
During the cleaning time of several minutes,
the following may occur:▷Temporarily, the engine may run less
smoothly.▷Noises and a slight amount of smoke com‐
ing from the exhaust until shortly after the
engine is shut down.▷A somewhat higher engine speed is neces‐
sary to achieve the accustomed perform‐
ance.
Mobile communication devices in the
vehicle
Mobile communication devices in the ve‐
hicle
It is advised that you do not use mobile com‐
munication devices, e.g., mobile phones, in‐
side the vehicle without connecting them di‐
rectly to the external antenna. Otherwise, the
vehicle electronics and mobile communication
devices can interfere with each other. In addi‐
tion, there is no assurance that the radiation
generated during transmission will be dis‐
charged from the vehicle interior.◀
Hydroplaning
On wet or slushy roads, a wedge of water can
form between the tires and road surface.
This phenomenon is referred to as hydroplan‐
ing. It is characterized by a partial or complete
loss of contact between the tires and the road
surface, ultimately undermining your ability to
steer and brake the vehicle.
Hydroplaning
When driving on wet or slushy roads, re‐
duce your speed to prevent hydroplaning.◀
Driving through water Drive through calm water only and only if it is
not deeper than. 9.8 inches/25 cm and at this
height, no faster than walking speed, up to
6 mph/10 km/h.
Adhere to water depth and speed limita‐
tions
Do not exceed this water depth and walking
speed; otherwise, the vehicle's engine, the
electrical systems and the transmission may
be damaged.◀
Braking safely
Your vehicle is equipped with ABS as a stand‐
ard feature.
Applying the brakes fully is the most effective
way of braking in situations when this is neces‐
sary.
The vehicle maintains steering responsive‐
ness. You can still avoid any obstacles with a
minimum of steering effort.
Pulsation of the brake pedal and sounds from
the hydraulic circuits indicate that ABS is in its
active mode.Seite 167Things to remember when drivingDriving tips167
Online Edition for Part no. 01 40 2 926 810 - X/13
Page 172 of 248

Objects within the range of movement
of the pedals
No objects in the area around the pedals
Keep floor mats, carpets, and any other
objects out of the area of motion of the pedals;
otherwise, the function of the pedals could be
impeded while driving and create the risk of an
accident.
Do not place additional floor mats over existing
mats or other objects.
Only use floor mats that have been approved
for the vehicle and can be properly fixed in
place.
Ensure that the floor mats are securely fas‐
tened again after they were removed for clean‐
ing, for example.◀
Driving in wet conditions When roads are wet coated with road salt or
there is heavy rain, briefly exert gentle pres‐
sure on the brake pedal every few miles.
Ensure that this action does not endanger
other road users.
The heat generated in this process helps dry
the brake discs and pads.
In this way braking efficiency will be available
when you need it.
Hills
Drive long or steep downhill gradients in the
gear in which the least braking is required.
Otherwise, the brake system may overheat, re‐
sulting in a reduction in the brake system effi‐
ciency.
You can increase the engine's braking effect
by shifting down, going all the way to first gear,
if necessary.
Avoid load on the brakes
Avoid placing excessive load on the
brake system. Light but consistent brake pres‐
sure can lead to high temperatures, brake wear
and possibly even brake failure.◀Do not drive in neutral
Do not drive in neutral or with the engine
stopped, as doing so disables engine braking.
In addition, steering and brake assist are un‐
available with the engine stopped.◀
Brake disc corrosion The corrosion on the brake discs and the con‐
tamination on the brake pads are furthered by:▷Low mileage.▷Extended periods when the vehicle is not
used at all.▷Infrequent use of the brakes.
Corrosion occurs when the minimum pressure
that must be exerted by the pads during brake
applications to clean the discs is not reached.
Should corrosion form on the brake discs, the
brakes will tend to respond with a pulsating ef‐
fect that generally cannot be corrected.
Condensation under the parked
vehicle
When using the automatic climate control,
condensation water develops that exits under‐
neath the vehicle.
Traces of water under the vehicle like this are
normal.
Seite 168Driving tipsThings to remember when driving168
Online Edition for Part no. 01 40 2 926 810 - X/13
Page 177 of 248

Avoid high engine speeds
Use 1st gear to get the vehicle in motion. Be‐
ginning with 2nd gear, accelerate rapidly.
When accelerating, shift up before reaching
high engine speeds.
When you reach the desired speed, shift into
the highest applicable gear and drive with the
engine speed as low as possible and at a con‐
stant speed.
As a rule: driving at low engine speeds lowers
fuel consumption and reduces wear.
The gear shift indicator of your vehicle indi‐
cates the most fuel efficient gear.
Use coasting When approaching a red light, take your foot
off the accelerator and let the vehicle coast to
a halt.
On a downhill gradient, take your foot off the
accelerator and let the vehicle roll.
The flow of fuel is interrupted while coasting.
Switch off the engine during longer stops
Switch off the engine during longer stops, e.g.,
at traffic lights, railroad crossings or in traffic
congestion.
Auto Start/Stop function The Auto Start/Stop function of your vehicle
automatically switches off the engine during a
stop.
If the engine is switched off and then restarted
rather than leaving the engine running con‐
stantly, fuel consumption and emissions are
reduced. Savings can begin within a few sec‐
onds of switching off the engine.
Using this system can cause certain compo‐
nents of the vehicle to become worn prema‐
turely.In addition, fuel consumption is also deter‐
mined by other factors, such as driving style,
road conditions, maintenance or environmental
factors.
Switch off any functions that
are not currently needed
Functions such as seat heating and the rear
window defroster require a lot of energy and
reduce the range, especially in city and stop-
and-go traffic.
Therefore, switch off these functions if they
are not actually needed.
The ECO PRO driving program supports the
energy conserving use of comfort functions.
These functions are automatically deactivated
partially or completely.
Have maintenance carried
out
Have vehicles maintained regularly to achieve
optimal vehicle economy and operating life.
The maintenance should be carried out by
your service center.
Also note the BMW Maintenance System, refer
to page 204.
ECO PRO
The concept ECO PRO supports a driving style that saves
on fuel consumption. For this purpose, the en‐
gine control and comfort functions, e. g. the
climate control output, are adjusted.
In addition, context-sensitive instructions can
be displayed that assist in driving in a manner
that optimizes fuel consumption.
In the instrument display, the extension of the
range achieved by this can be displayed as a
bonus range.Seite 173Saving fuelDriving tips173
Online Edition for Part no. 01 40 2 926 810 - X/13
Page 181 of 248

Color code blue, arrow 1, and symbol, arrow 2:
driving condition Coasting.
Displaying EfficientDynamics info
1."Vehicle Info"2."EfficientDynamics"3. "EfficientDynamics info"
Deactivating the system manually The function can be deactivated in the Config‐
ure ECO PRO, refer to page 174, menu, e.g., to
use the braking effect of the engine when trav‐
eling downhill.
The setting is stored for the profile currently in
use.
ECO PRO driving style analysis
The concept
The system helps in this situation to develop
an especially efficient driving style and to con‐
serve fuel.
For this purpose, the driving style is analyzed.
The assessment is done in various categories
and is displayed on the Control Display.
Using this indication, the individual driving
style can be oriented toward conserving fuel.
The last fifteen minutes of a trip are evaluated.
The range of the vehicle can be extended by
an efficient driving style.
This gain in range is displayed as a bonus
range in the instrument cluster and on the
Control Display.
Functional requirement
The function is only available in ECO PRO
mode.
Calling up ECO PRO driving style
analysis
Via the Driving Dynamics Control1.Activate ECO PRO.2."EfficientDynamics"3. Select the symbol.
Display
Display on the Control Display
The display of the ECO PRO driving style anal‐
ysis consists of a symbolized road route and a
lookup table.
The road symbolizes the efficiency of the driv‐
ing style. The more efficient the driving style,
the smoother the depicted road route be‐
comes, arrow 1.
The table of values contains stars. The more
efficient the driving style, the more stars are in‐
cluded in the table and the faster the bonus
range increases, arrow 2.
If, on the other hand, the driving style is ineffi‐
cient, a wavy road and a reduced number of
stars is displayed.
To assist with an efficient driving style, ECO
PRO tips are displayed during the drive.
Tips about the energy saving driving style,
Conserving fuel, refer to page 172.
Seite 177Saving fuelDriving tips177
Online Edition for Part no. 01 40 2 926 810 - X/13
Page 186 of 248

FuelVehicle equipmentAll standard, country-specific and optional
equipment that is offered in the model series is
described in this chapter. Therefore, equip‐
ment is also described that is not available in a
vehicle, e. g., because of the selected optional
equipment or country variant. This also applies
for safety-related functions and systems.
Fuel recommendation Note General fuel quality
Even fuels that conform to the specifica‐
tions can be of low quality. Switch gas stations
or use fuel from brand name producers having
a higher octane level; otherwise, engine prob‐
lems, such as poor engine starting perform‐
ance, poorer handling characteristics or driving
performance may occur.◀
Gasoline For the best fuel economy, the gasoline should
be sulfur-free or very low in sulfur content.
Fuels that are marked on the gas pump as con‐
taining metal must not be used.
Refuel only with unleaded gasoline with‐out metallic additives.
Do not refuel with any leaded gasoline or gaso‐
line with metallic additives, e. g. manganese or
iron, or permanent damage to the catalytic
converter and other components.◀
Fuels with a maximum ethanol content of
10 %, i. e., E10, may be used for refueling.
Ethanol should satisfy the following quality
standards:
US: ASTM 4806–xx
CAN: CGSB-3.511–xxxx: comply with the current standard in each
case.
Do not refuel with Ethanol above the
maximum Ethanol proportion
Do not refuel with Ethanol above the maximum
Ethanol proportion, that is, refueling with fuel
that contains more than 10 % Ethanol, flex fuel
or other alcohols; otherwise, damage to the
engine and fuel supply could result.◀
Gasoline quality BMW recommends AKI 91.
Minimum fuel grade
BMW recommends AKI 89.
Minimum fuel grade
Do not use any gasoline below the mini‐
mum fuel grade as this may impair engine per‐
formance.◀
If you use gasoline with this minimum AKI Rat‐
ing, the engine may produce knocking sounds
when starting at high outside temperatures.
This has no effect on the engine life.
Fuel quality
The use of poor-quality fuels may result
in harmful engine deposits or damage. Addi‐
tionally, problems relating to drivability, start‐
ing and stalling, especially under certain envi‐
ronmental conditions such as high ambient
temperature and high altitude, may occur.
If drivability problems are encountered, we rec‐
ommend switching to a high quality gasoline
brand and a higher octane grade — AKI num‐
ber — for a few tank fills. To avoid harmful en‐
gine deposits, it is highly recommended to
purchase gasoline from BP or Top Tier retail‐
ers.Seite 182MobilityFuel182
Online Edition for Part no. 01 40 2 926 810 - X/13