2013 BMW 3 SERIES SEDAN light
[x] Cancel search: lightPage 215 of 248

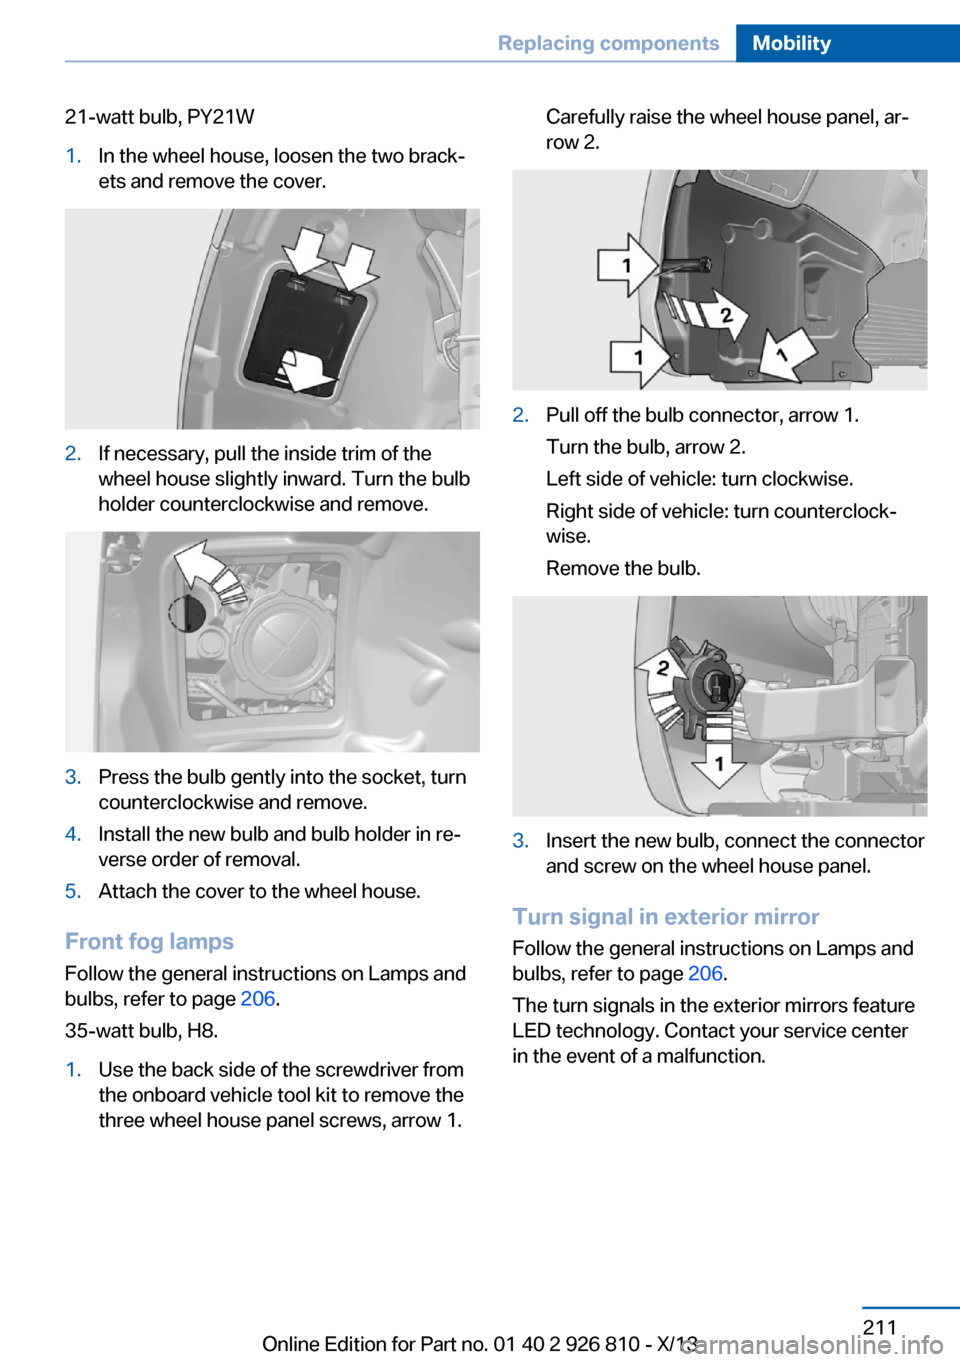
21-watt bulb, PY21W1.In the wheel house, loosen the two brack‐
ets and remove the cover.2.If necessary, pull the inside trim of the
wheel house slightly inward. Turn the bulb
holder counterclockwise and remove.3.Press the bulb gently into the socket, turn
counterclockwise and remove.4.Install the new bulb and bulb holder in re‐
verse order of removal.5.Attach the cover to the wheel house.
Front fog lamps
Follow the general instructions on Lamps and
bulbs, refer to page 206.
35-watt bulb, H8.
1.Use the back side of the screwdriver from
the onboard vehicle tool kit to remove the
three wheel house panel screws, arrow 1.Carefully raise the wheel house panel, ar‐
row 2.2.Pull off the bulb connector, arrow 1.
Turn the bulb, arrow 2.
Left side of vehicle: turn clockwise.
Right side of vehicle: turn counterclock‐
wise.
Remove the bulb.3.Insert the new bulb, connect the connector
and screw on the wheel house panel.
Turn signal in exterior mirror
Follow the general instructions on Lamps and
bulbs, refer to page 206.
The turn signals in the exterior mirrors feature
LED technology. Contact your service center
in the event of a malfunction.
Seite 211Replacing componentsMobility211
Online Edition for Part no. 01 40 2 926 810 - X/13
Page 221 of 248

Breakdown assistanceVehicle equipment
All standard, country-specific and optional
equipment that is offered in the model series is
described in this chapter. Therefore, equip‐
ment is also described that is not available in a
vehicle, e. g., because of the selected optional
equipment or country variant. This also applies
for safety-related functions and systems.
Hazard warning flashers
The button is located in the center console.
Intelligent Emergency
Request
Requirements
▷The radio ready state is switched on.▷The Assist system is functional.▷The SIM card integrated in the vehicle has
been activated.
General information
Only press the SOS button in an emergency.
Hints
Emergency Request not guaranteed
For technical reasons, the Emergency
Request cannot be guaranteed under unfavor‐
able conditions.◀
Initiating an Emergency Request1.Press the cover briefly to open it.2.Press the SOS button until the LED in the
button lights up.▷The LED lights up: an Emergency Request
was initiated.
If the situation allows, wait in your vehicle
until the voice connection has been estab‐
lished.▷The LED flashes when a connection to the
BMW Response Center has been estab‐
lished.
When the emergency request is received
at the BMW Response Center, the BMW
Response Center contacts you and takes
further steps to help you.
Even if you are unable to respond, the
BMW Response Center can take further
steps to help you under certain circum‐
stances.
For this purpose, data that are used to de‐
termine the necessary rescue measures,
such as the current position of the vehicleSeite 217Breakdown assistanceMobility217
Online Edition for Part no. 01 40 2 926 810 - X/13
Page 224 of 248

If the first starting attempt is not success‐
ful, wait a few minutes before making an‐
other attempt in order to allow the dis‐
charged battery to recharge.3.Let both engines run for several minutes.4.Disconnect the jumper cables in the re‐
verse order.
Check the battery and recharge if necessary.
Tow-starting and towing Note Tow-starting and towing
When tow-starting and towing the vehi‐
cle, switch off the Intelligent Safety systems;
otherwise, improper behavior of the braking
function of individual systems could result in
an accident.◀
Switch off Intelligent Safety systems, refer to
page 104.
Automatic transmission: transporting
your vehicle
Note
Your vehicle is not permitted to be towed.
Therefore, contact a service center in the
event of a breakdown.
Do not have the vehicle towedHave your vehicle transported on a load‐
ing platform only; otherwise, damage may oc‐ cur.◀
Tow truck
Do not lift the vehicle
Do not lift the vehicle by the tow fitting or
body and chassis parts; otherwise, damage
may result.◀
Use the tow fitting screwed in at the front for
maneuvering the vehicle only.
Manual transmission
Gearshift lever in neutral position.
Towing Follow the towing instructions
Follow all towing instructions; otherwise,
vehicle damage or accidents may occur.◀
▷Make sure that the ignition is switched on;
otherwise, the low beams, tail lamps, turn
signals, and windshield wipers may be un‐
available.▷Do not tow the vehicle with the rear axle
tilted, as the front wheels could turn.▷When the engine is stopped, there is no
power assist. Consequently, more force
needs to be applied when braking and
steering.▷Larger steering wheel movements are re‐
quired.▷The towing vehicle must not be lighter
than the vehicle being towed; otherwise,
it will not be possible to control the vehicle
response.Seite 220MobilityBreakdown assistance220
Online Edition for Part no. 01 40 2 926 810 - X/13
Page 225 of 248

Tow truck
Have your vehicle transported with a tow truck
with a so-called lift bar or on a flat bed.
Do not lift the vehicle
Do not lift the vehicle by the tow fitting or
body and chassis parts; otherwise, damage
may result.◀
Towing other vehicles
General information Light towing vehicle
The towing vehicle must not be lighter
than the vehicle being towed; otherwise, it will
not be possible to control the vehicle re‐
sponse.◀
Attaching the tow bar/tow rope correctly
Attach the tow bar or tow rope to the tow
fitting; connecting it to other vehicle parts may
cause damage.◀
▷Switch on the hazard warning system, de‐
pending on local regulations.▷If the electrical system has failed, clearly
identify the vehicle being towed by placing
a sign or a warning triangle in the rear win‐
dow.
Tow bar
The tow fittings used should be on the same
side on both vehicles.
Should it prove impossible to avoid mounting
the tow bar at an offset angle, please observe
the following:▷Maneuvering capability is limited during
cornering.▷The tow bar will generate lateral forces if it
is secured with an offset.
Tow rope
When starting to tow the vehicle, make sure
that the tow rope is taut.
To avoid jerking and the associated stresses
on the vehicle components when towing, al‐
ways use nylon ropes or nylon straps.
Attaching the tow rope correctly
Only secure the tow rope on the tow fit‐
ting; otherwise, damage can occur when it is
secured on other parts of the vehicle.◀
Tow fitting
The screw-in tow fitting should always be car‐
ried in the vehicle. It can be screwed in at the
front or rear of the BMW. It is in the onboard
vehicle tool kit located in a storage compart‐
ment on the right side in the cargo area. Open
the cover.
Tow fitting, information on use
▷Use only the tow fitting provided with
the vehicle and screw it all the way in.▷Use the tow fitting for towing on paved
roads only.Seite 221Breakdown assistanceMobility221
Online Edition for Part no. 01 40 2 926 810 - X/13
Page 229 of 248

To guard against discoloration, such as from
clothing, provide leather care roughly every
two months.
Clean light-colored leather more frequently be‐
cause soiling on such surfaces is substantially
more visible.
Use leather care products; otherwise, dirt and
grease will gradually break down the protective
layer of the leather surface.
Suitable care products are available from the
service center.
Upholstery material care Vacuum regularly with a vacuum cleaner.
If they are very dirty, e.g., beverage stains, use
a soft sponge or microfiber cloth with a suita‐
ble interior cleaner.
Clean the upholstery down to the seams using
large sweeping motions. Avoid rubbing the
material vigorously.
Damage from Velcro® fasteners
Open Velcro® fasteners on pants or
other articles of clothing can damage the seat
covers. Ensure that any Velcro® fasteners are
closed.◀
Caring for special components
Light-alloy wheels When cleaning the vehicle, use only neutral
wheel cleaners having a pH value from 5 to 9.
Do not use abrasive cleaning agents or steam
jets above 140 ℉/60 ℃. Follow the manufac‐
turer's instructions.
Aggressive, acidic or alkaline cleaning agents
can destroy the protective layer of adjacent
components, such as the brake disk.
Chrome surfaces Carefully clean components such as the radia‐
tor grille or door handles with an ample supply of water, possibly with shampoo added, partic‐ularly when they have been exposed to road
salt.
Rubber components Aside from water, treat only with rubber
cleansers.
When cleaning rubber seals, do not use any
silicon-containing car care products in order to
avoid damage or reduced noise damping.
Fine wood parts Clean fine wood facing and fine wood compo‐
nents only with a moist rag. Then dry with a
soft cloth.
Plastic components
These include:▷Imitation leather surfaces.▷Headliner.▷Lamp lenses.▷Instrument cluster cover.▷Matte black spray-coated components.▷Painted parts in the interior.
Clean with a microfiber cloth.
Lightly dampen the cloth with water.
Do not soak the headliner.
Do not use cleansers that contain alcohol
or solvents
Do not use cleansers that contain alcohol or
solvents, such as lacquer thinners, heavy-duty
grease removers, fuel, or such; this could lead
to surface damage.◀
Safety belts
Dirty belt straps impede the reeling action and
thus have a negative impact on safety.
Chemical cleaning
Do not clean chemically; this can destroy
the webbing.◀
Seite 225CareMobility225
Online Edition for Part no. 01 40 2 926 810 - X/13
Page 238 of 248

Everything from A to Z
IndexA ABS, Antilock Brake Sys‐ tem 116
ACC, Active Cruise Control with Stop & Go 121
Acceleration Assistant, refer to Launch Control 74
Activated-charcoal filter 149
Active Blind Spot Detec‐ tion 114
Active Cruise Control with Stop & Go, ACC 121
Adaptive brake lights, refer to Brake force display 115
Adaptive Light Control 92
Additives, oil 201
Adjustments, seats/head re‐ straints 49
After washing vehicle 224
Airbags 96
Airbags, indicator/warning light 97
Air circulation, refer to Recir‐ culated-air mode 145, 148
Air, dehumidifying, refer to Cooling function 145, 147
Air distribution, manual 145, 148
Air flow, air conditioner 145
Air flow, automatic climate control 148
Air pressure, tires 187
Air vents, refer to Ventila‐ tion 149
Alarm system 44
Alarm, unintentional 45
All around the center con‐ sole 16
All around the headliner 17 All around the steering
wheel 14
All-season tires, refer to Win‐ ter tires 196
All-wheel-drive 117
Alternating-code hand-held transmitter 152
Alternative oil types 202
Antifreeze, washer fluid 70
Antilock Brake System, ABS 116
Anti-slip control, refer to DSC 116
Approved axle load 230
Approved engine oils 202
Arrival time 87
Ash tray 155
Assistance, Roadside Assis‐ tance 218
Assistance when driving off 120
Assist system information, on Control Display 89
AUTO intensity 147
Automatic car wash 223
Automatic climate con‐ trol 144
Automatic climate control with enhanced features 146
Automatic Cruise Control with Stop & Go 121
Automatic Curb Monitor 57
Automatic deactivation, front passenger airbags 98
Automatic headlamp con‐ trol 92
Automatic locking 43
Automatic recirculated-air control 148
Automatic transmission with Steptronic 71 AUTO program, automatic cli‐
mate control 147
AUTO program, climate con‐ trol 145
AUTO program, intensity 147
Auto Start/Stop function 65
Average fuel consumption 86
Average speed 86
Axle loads, weights 230
B Backrest curvature, refer to Lumbar support 51
Backrest, width 51
Band-aids, refer to First aid kit 218
Bar for tow-starting/ towing 221
Battery replacement, vehicle battery 215
Battery replacement, vehicle remote control 34
Battery, vehicle 214
Belts, safety belts 52
Beverage holder, cu‐ pholder 161
Blinds, sun protection 47
BMW Advanced Diesel 183
BMW Assist, see user's manual for Navigation, En‐
tertainment and Communi‐
cation
BMW Homepage 6
BMW Internet page 6
BMW maintenance sys‐ tem 204
Bonus range, ECO PRO 174
Bottle holder, refer to Cu‐ pholder 161
Brake assistant 116 Seite 234ReferenceEverything from A to Z234
Online Edition for Part no. 01 40 2 926 810 - X/13
Page 239 of 248

Brake discs, breaking in 166
Brake force display 115
Brake lamps, brake force dis‐ play 115
Brake lights, adaptive 115
Brake pads, breaking in 166
Braking, hints 167
Breakdown assis‐ tance 217, 218
Breaking in 166
Brightness of Control Dis‐ play 89
Bulb replacement 206
Bulb replacement, front 207
Bulb replacement, halogen headlamps 207
Bulb replacement, rear 212
Bulb replacement, xenon headlamps 210
Bulbs and lamps 206
Button, RES 124
Button, Start/Stop 63
Bypassing, refer to Jump- starting 218
C
California Proposition 65 Warning 7
Camera, care 226
Camera, rearview cam‐ era 133
Camera, Side View 136
Camera, Top View 137
Can holder, refer to Cu‐ pholder 161
Car battery 214
Car care products 224
Care, displays 226
Care, vehicle 224
Cargo 169
Cargo area, enlarging 157
Cargo area lid 40
Cargo area, storage compart‐ ments 162
Cargo, securing 170 Cargo straps, securing
cargo 170
Car key, refer to Remote con‐ trol 34
Carpet, care 226
Car wash 223
Catalytic converter, refer to Hot exhaust system 167
CBS Condition Based Serv‐ ice 204
CD/Multimedia, see user's manual for Navigation, En‐
tertainment and Communi‐
cation
Center armrest 160
Center console 16
Center-Lock, see button for central locking 37
Central locking system 37
Central screen, refer to Con‐ trol Display 18
Changes, technical, refer to Safety 7
Changing parts 206
Changing wheels 214
Changing wheels/tires 195
Check Control 78
Checking the oil level elec‐ tronically 200
Children, seating position 59
Children, transporting safely 59
Child restraint fixing sys‐ tem 59
Child restraint fixing system LATCH 60
Child restraint fixing systems, mounting 59
Child safety locks 62
Child seat, mounting 59
Child seats 59
Chrome parts, care 225
Cigarette lighter 155
Cleaning, displays 226
Climate control 144, 146
Clock 81 Closing/opening from in‐
side 40
Closing/opening via door lock 39
Closing/opening with remote control 38
Clothes hooks 161
Coasting 176
Coasting with engine decou‐ pled, coasting 176
Coasting with idling en‐ gine 176
Cockpit 14
Cold starting, refer to Starting the engine 64
Collision warning with braking function 108
Collision warning with City Braking function 105
Combination switch, refer to Turn signals 68
Combination switch, refer to Wiper system 68
Comfort Access 41
COMFORT program, Dy‐ namic Driving Control 119
Compartments in the doors 160
Compass 153
Computer 86
Condensation on win‐ dows 148
Condensation under the vehi‐ cle 168
Condition Based Service CBS 204
Configuring drive pro‐ gram 119
Confirmation signal 43
ConnectedDrive, see user's manual for Navigation, En‐
tertainment and Communi‐
cation
ConnectedDrive Services
Connecting electrical devi‐ ces 155 Seite 235Everything from A to ZReference235
Online Edition for Part no. 01 40 2 926 810 - X/13
Page 240 of 248

Control Display 18
Control Display, settings 88
Controller 18, 19
Control systems, driving sta‐ bility 116
Convenient opening 38
Coolant 203
Coolant temperature 81
Cooling function 145, 147
Cooling, maximum 147
Cooling system 203
Corrosion on brake discs 168
Cruise control 128
Cruise control, active with Stop & Go 121
Cruising range 81
Cupholder 161
Current fuel consumption 82
D
Damage, tires 195
Damping control, dy‐ namic 117
Data, technical 230
Date 81
Daytime running lights 92
Defrosting, refer to defrosting the windows 145
Defrosting, refer to Windows, defrosting 148
Defrosting the windows 145
Dehumidifying, air 145, 147
Destination distance 87
Diesel exhaust fluid, at low temperatures 184
Diesel exhaust fluid, having refilled 184
Diesel exhaust fluid, on mini‐ mum 184
Diesel exhaust fluid, replen‐ ishing yourself 184
Diesel particulate filter 167
Digital clock 81
Digital compass 153
Dimensions 230 Dimmable exterior mirrors 57
Dimmable interior rearview mirror 58
Direction indicator, refer to Turn signals 68
Display, electronic, instru‐ ment cluster 77
Display in windshield 89
Display lighting, refer to In‐ strument lighting 94
Displays 75
Displays, cleaning 226
Disposal, coolant 203
Disposal, vehicle battery 215
Distance control, refer to PDC 130
Distance to destination 87
Divided screen view, split screen 24
Door lock, refer to Remote control 34
Drive-off assistant 120
Drive-off assistant, refer to DSC 116
Driver assistance, see Intelli‐ gent Safety 104
Driving Assistant, see Intelli‐ gent Safety 104
Driving Dynamics Con‐ trol 118
Driving instructions, breaking in 166
Driving mode 118
Driving notes, general 166
Driving stability control sys‐ tems 116
Driving style analysis 177
Driving tips 166
DSC Dynamic Stability Con‐ trol 116
DTC Dynamic Traction Con‐ trol 117
Dynamic Damping Con‐ trol 117
Dynamic Stability Control DSC 116 Dynamic Traction Control
DTC 117
E
ECO PRO 173
ECO PRO, bonus range 174
ECO PRO display 173
ECO PRO driving mode 173
ECO PRO driving style analy‐ sis 177
ECO PRO mode 173
ECO PRO Tip - driving in‐ struction 175
EfficientDynamics 175
Electronic displays, instru‐ ment cluster 77
Electronic Stability Program ESP, refer to DSC 116
Emergency detection, remote control 35
Emergency release, door lock 40
Emergency release, fuel filler flap 180
Emergency Request 217
Emergency service, refer to Roadside Assistance 218
Emergency start function, en‐ gine start 35
Emergency unlocking, trunk lid 41
Energy Control 82
Energy recovery 82
Engine, automatic Start/Stop function 65
Engine, automatic switch- off 65
Engine compartment 198
Engine compartment, work‐ ing in 199
Engine coolant 203
Engine idling when driving, coasting 176
Engine oil 200
Engine oil, adding 201 Seite 236ReferenceEverything from A to Z236
Online Edition for Part no. 01 40 2 926 810 - X/13