Page 8 of 311
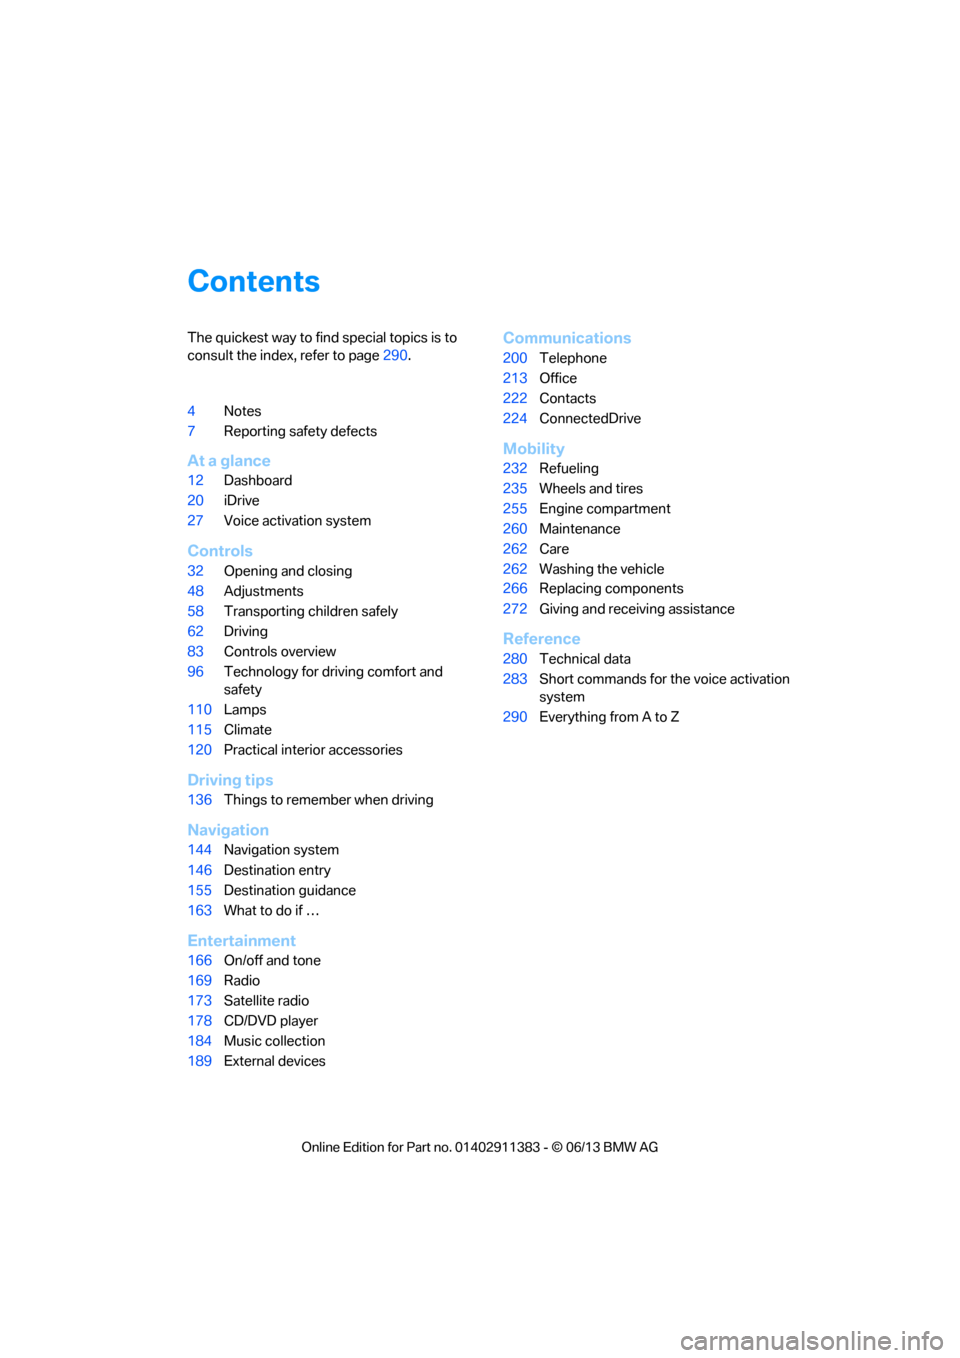
Contents
The quickest way to find special topics is to
consult the index, refer to page290.
4 Notes
7 Reporting safety defects
At a glance
12Dashboard
20 iDrive
27 Voice activation system
Controls
32Opening and closing
48 Adjustments
58 Transporting children safely
62 Driving
83 Controls overview
96 Technology for driving comfort and
safety
110 Lamps
115 Climate
120 Practical interior accessories
Driving tips
136Things to remember when driving
Navigation
144Navigation system
146 Destination entry
155 Destination guidance
163 What to do if …
Entertainment
166On/off and tone
169 Radio
173 Satellite radio
178 CD/DVD player
184 Music collection
189 External devices
Communications
200Telephone
213 Office
222 Contacts
224 ConnectedDrive
Mobility
232Refueling
235 Wheels and tires
255 Engine compartment
260 Maintenance
262 Care
262 Washing the vehicle
266 Replacing components
272 Giving and receiving assistance
Reference
280Technical data
283 Short commands for the voice activation
system
290 Everything from A to Z
00320051004F004C00510048000300280047004C0057004C005200510003
Page 26 of 311
21
iDrive
At a glance
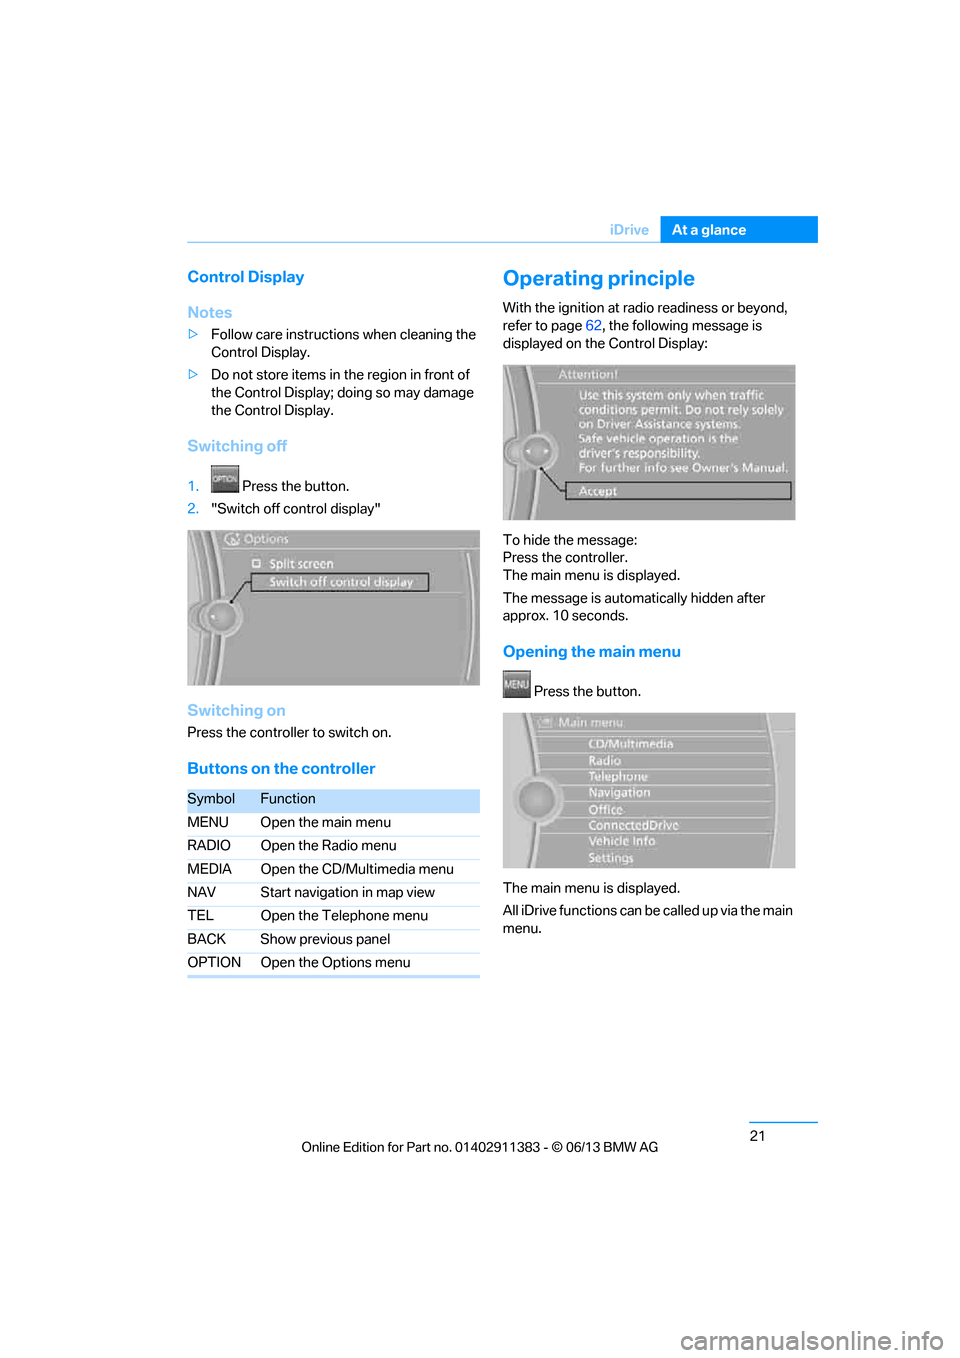
Control Display
Notes
>
Follow care instructions when cleaning the
Control Display.
> Do not store items in the region in front of
the Control Display; doing so may damage
the Control Display.
Switching off
1. Press the button.
2. "Switch off control display"
Switching on
Press the controller to switch on.
Buttons on the controller
Operating principle
With the ignition at radio readiness or beyond,
refer to page 62, the following message is
displayed on the Control Display:
To hide the message:
Press the controller.
The main menu is displayed.
The message is automatically hidden after
approx. 10 seconds.
Opening the main menu
Press the button.
The main menu is displayed.
All iDrive functions can be called up via the main
menu.
SymbolFunction
MENU Open the main menu
RADIO Open the Radio menu
MEDIA Open the CD/Multimedia menu
NAV Start navigation in map view
TEL Open the Telephone menu
BACK Show previous panel
OPTION Open the Options menu
00320051004F004C00510048000300280047004C0057004C005200510003
Page 29 of 311
24
At a glanceiDrive
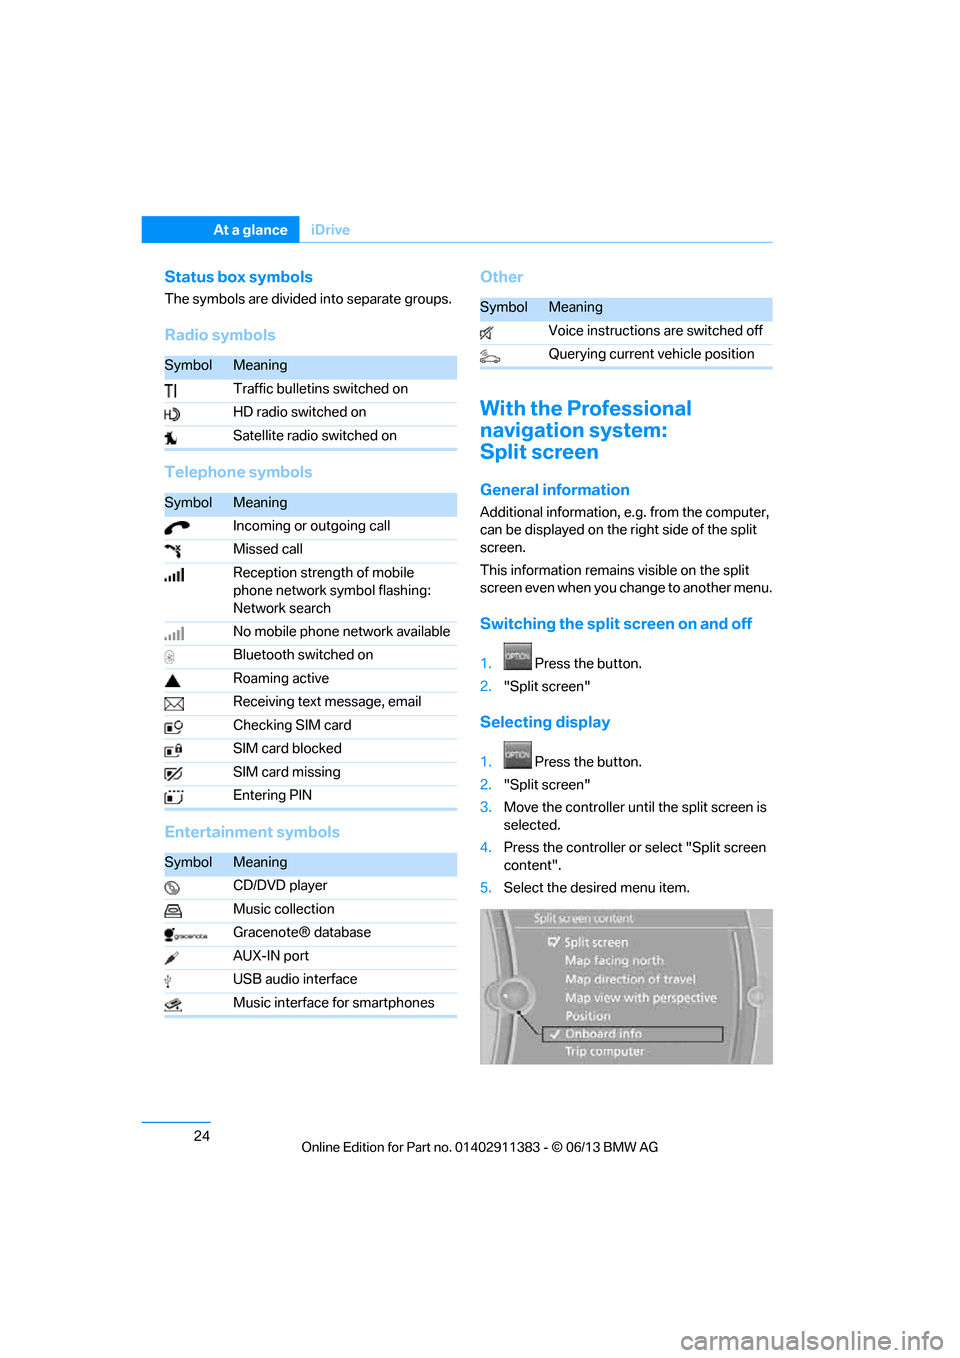
Status box symbols
The symbols are divided into separate groups.
Radio symbols
Telephone symbols
Entertainment symbols Other
With the Professional
navigation system:
Split screen
General information
Additional information, e.g. from the computer,
can be displayed on the right side of the split
screen.
This information remains visible on the split
screen even when you change to another menu.
Switching the split
screen on and off
1.Press the button.
2. "Split screen"
Selecting display
1. Press the button.
2. "Split screen"
3. Move the controller until the split screen is
selected.
4. Press the controller or select "Split screen
content".
5. Select the desired menu item.
SymbolMeaning
Traffic bulletins switched on
HD radio switched on
Satellite radio switched on
SymbolMeaning
Incoming or outgoing call
Missed call
Reception strength of mobile
phone network symbol flashing:
Network search
No mobile phone network available
Bluetooth switched on
Roaming active
Receiving text message, email
Checking SIM card
SIM card blocked
SIM card missing
Entering PIN
SymbolMeaning
CD/DVD player
Music collection
Gracenote® database
AUX-IN port
USB audio interface
Music interface for smartphones
SymbolMeaning
Voice instructions are switched off
Querying current vehicle position
00320051004F004C00510048000300280047004C0057004C005200510003
Page 30 of 311
25
iDrive
At a glance
Programmable memory keys
General information
iDrive functions can be stored on the program-
mable memory keys and called up directly, e.g.
radio stations, navigation destinations, phone
numbers and entry points into the menu.
The settings are stored
for the remote control
currently in use.
Storing functions
1. Highlight the function via the iDrive.
2. Press the desired button
... for longer than
two seconds.
Executing a function
... Press the button.
The function is executed immediately. This
means, for example, that the number is dialed
when a phone number is selected.
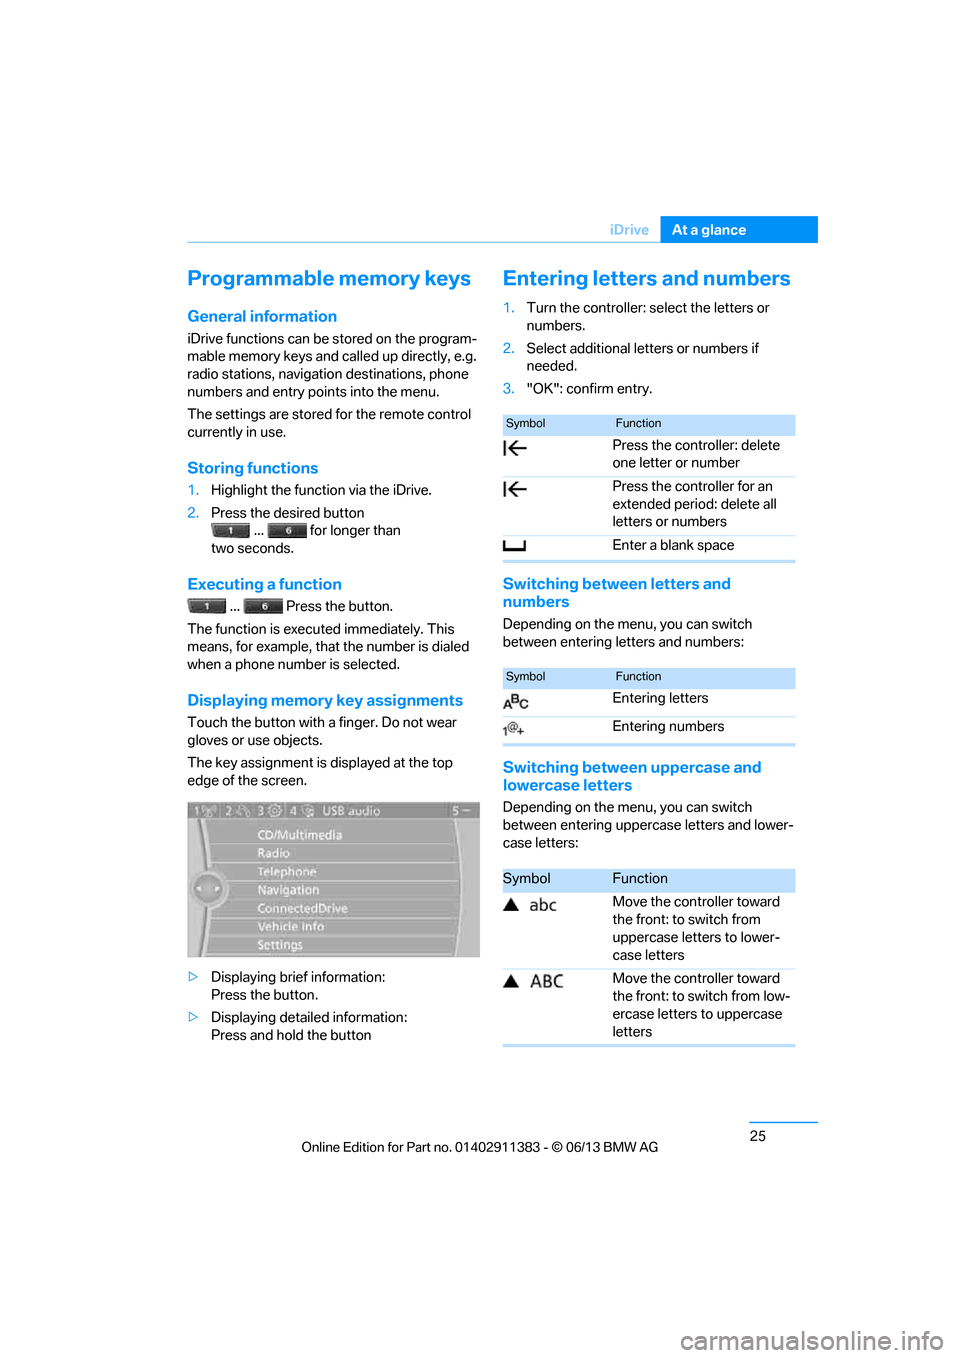
Displaying memory key assignments
Touch the button with a finger. Do not wear
gloves or use objects.
The key assignment is displayed at the top
edge of the screen.
> Displaying brief information:
Press the button.
> Displaying detailed information:
Press and hold the button
Entering letters and numbers
1.Turn the controller: se lect the letters or
numbers.
2. Select additional letters or numbers if
needed.
3. "OK": confirm entry.
Switching between letters and
numbers
Depending on the menu, you can switch
between entering letters and numbers:
Switching between uppercase and
lowercase letters
Depending on the menu, you can switch
between entering upperc ase letters and lower-
case letters:
SymbolFunction
Press the controller: delete
one letter or number
Press the controller for an
extended period: delete all
letters or numbers
Enter a blank space
SymbolFunction
Entering letters
Entering numbers
SymbolFunction
Move the controller toward
the front: to switch from
uppercase letters to lower-
case letters
Move the controller toward
the front: to switch from low-
ercase letters to uppercase
letters
00320051004F004C00510048000300280047004C0057004C005200510003
Page 91 of 311
86
ControlsControls overview
Displaying "Onboard info":
>Cruising range
> Distance from destination
> Estimated time of arrival if a destination has
been entered in the navigation system.
Displaying "Trip computer":
> Departure time
> Trip duration
> Trip distance
Both displays show:
> The average speed and
> the average fuel consumption.
Resetting the fuel consumption and
speed
You can reset the values for average speed and
average consumption:
1.Select the respective menu entry.
2. Press the controller to confirm your
selection.
Resetting the trip computer
You can reset all values:
1."Vehicle Info"
2. "Trip computer"
3. "Reset"
00320051004F004C00510048000300280047004C0057004C005200510003
Page 148 of 311
This chapter describes how you can
enter destinations and specify your route
so that your navigation system guides you
reliably to your destination.
Navigation
00320051004F004C00510048000300280047004C0057004C005200510003
Page 149 of 311
144
NavigationNavigation system
Navigation system
Vehicle equipment
In this chapter, all pr oduction, country, and
optional equipment that is offered in the model
range is described. Equipment is also described
that is not available because of, for example,
selected options or country version. This also
applies to safety related functions and systems.
General information
The navigation system can determine the pre-
cise position of the vehicle, with the aid of satel-
lites and vehicle sensors, and can reliably guide
you to every entered destination.
Enter data only with the vehicle station-
ary, and always give priority to the appli-
cable traffic regulations in the event of any con-
tradiction between traffi c and road conditions
and the instructions issu ed by the navigation
system. Failure to take to this precaution can
place you in violation of the law and put vehicle
occupants and other road users in danger. <
Accessing navigation system
1.Press the button.
2. "Navigation"
The navigation syst em can also be
accessed directly with the button on the
controller.
Navigation data
General information
Navigation data and au thorization codes are
available from your BMW center. Navigation
data are stored in the vehicle and can be
updated. >
Depending on the data volume, a data
update may take several hours.
> Update data while dr iving to reduce the
drain on the battery.
> Only the main functions of the navigation
system are available during updating.
The update is resumed automatically when a
trip is continued after an interruption.
> You can inquire as to the status of the
update.
> The data are stored in the vehicle.
> After the update, the system restarts.
> The medium that holds the navigation
data can be removed after the update is
completed.
Information about navigation data
1."Navigation"
2. Open "Options".
3. "Navigation system version":
Information about the data version is
displayed.
Updating the navigation data
Inserting navigation DVD
1.Insert the navigation DVD into the DVD
player with the labe led side facing up.
2. Follow the instructions on the Control
Display.
3. Enter the authorization code of the naviga-
tion DVD and change the DVD if needed.
00320051004F004C00510048000300280047004C0057004C005200510003
Page 150 of 311
145
Navigation system
Navigation
Removing navigation DVD
1.
Press the button 1.
The DVD emerges slightly from the drive.
2. Remove the DVD.
Querying status
1. Press the button.
2. "Navigation update"
00320051004F004C00510048000300280047004C0057004C005200510003