2013 BMW 3 SERIES CONVERTIBLE Rear light
[x] Cancel search: Rear lightPage 18 of 311

13
Dashboard
At a glance
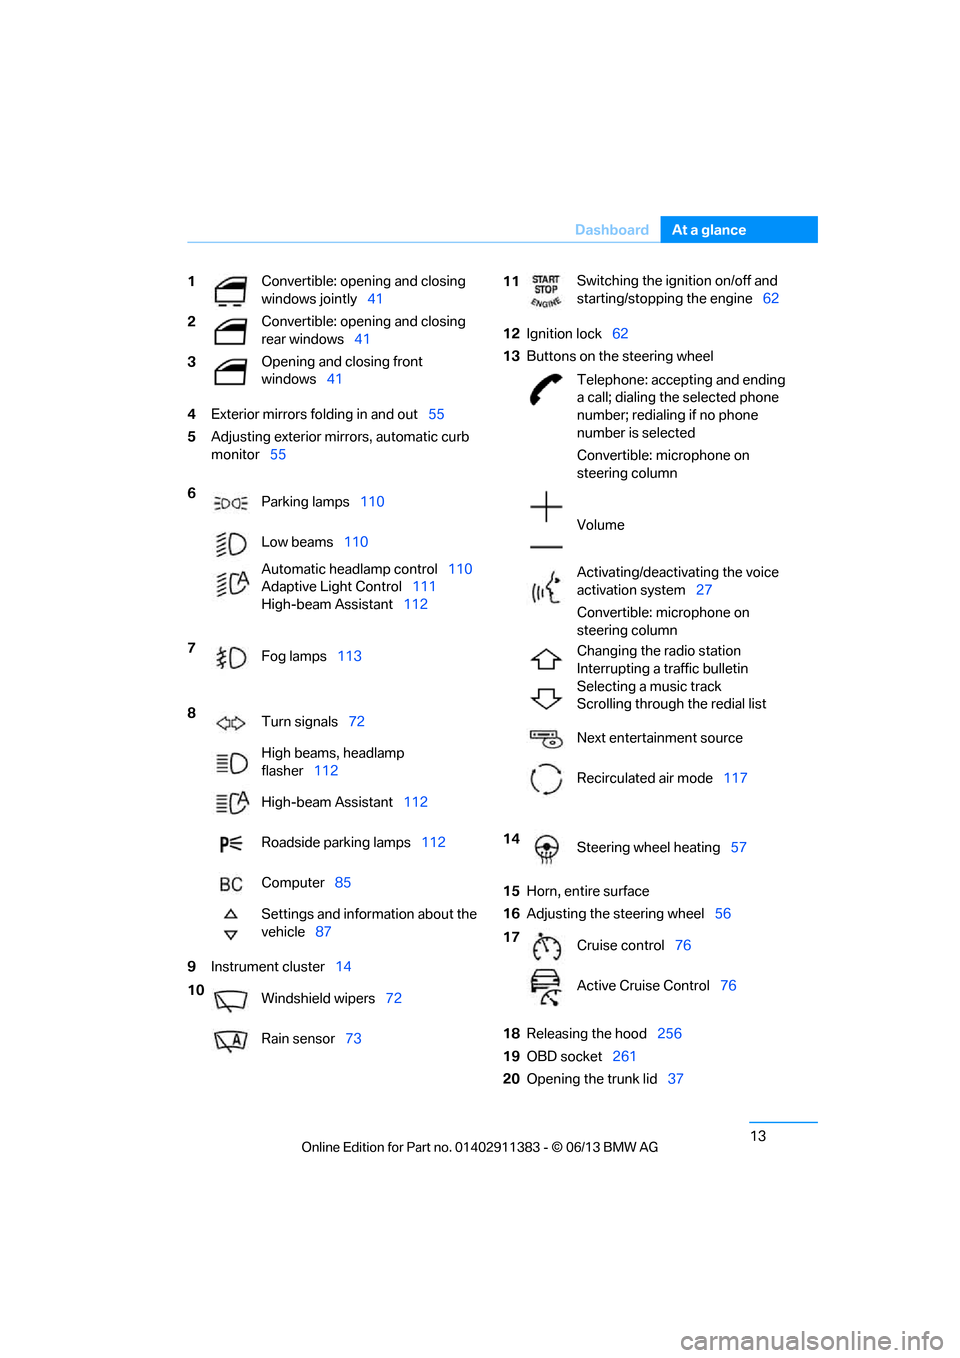
4
Exterior mirrors fo lding in and out55
5 Adjusting exterior mirrors, automatic curb
monitor 55
9 Instrument cluster 14 12
Ignition lock 62
13 Buttons on the steering wheel
15 Horn, entire surface
16 Adjusting the steering wheel 56
18 Releasing the hood 256
19 OBD socket 261
20 Opening the trunk lid 37
1
Convertible: opening and closing
windows jointly
41
2 Convertible: opening and closing
rear windows
41
3 Opening and closing front
windows
41
6 Parking lamps 110
Low beams 110
Automatic head lamp control110
Adaptive Light Control 111
High-beam Assistant 112
7 Fog lamps 113
8 Turn signals 72
High beams, headlamp
flasher 112
High-beam Assistant 112
Roadside parking lamps 112
Computer 85
Settings and information about the
vehicle 87
10 Windshield wipers 72
Rain sensor 73
11Switching the ignition on/off and
starting/stopping the engine
62
Telephone: accepting and ending
a call; dialing the selected phone
number; redialing if no phone
number is selected
Convertible: microphone on
steering column
Volume
Activating/deactivating the voice
activation system 27
Convertible: microphone on
steering column
Changing the radio station
Interrupting a traffic bulletin
Selecting a music track
Scrolling through the redial list
Next entertainment source
Recirculated air mode 117
14 Steering wheel heating 57
17 Cruise control 76
Active Cruise Control 76
00320051004F004C00510048000300280047004C0057004C005200510003
Page 40 of 311

35
Opening and closing
Controls
The trunk lid swings back and up when
opened. Ensure that there is sufficient
clearance. To avoid lo cking yourself out by
accident, do not place th e remote control in the
trunk. A previously locked trunk lid is locked
again after closing.
Before and after each tr ip, check that the trunk
lid has not been inad vertently unlocked.<
Convertible: convenient loading
When you are close to the vehicle, the remote
control for Comfort Access can be used to
partially raise the op en hardtop for more
convenient loading of the trunk.
1. Briefly press the butto n and, within one
second, press again and hold until the
retractable hardtop stop s in an intermediate
position. The trunk lid opens slightly.
2. Open the trunk lid, press the trunk partition
upward and stow the cargo in the trunk.
3. Press down the trunk partition until it
engages on both sides and close the
trunk lid.
4. Press the button for a longer period to
fold the retractable hardtop back in.
Confirmation signals
You can activate or deac tivate the confirmation
signals.
1. "Settings"
2. "Door locks"
3. "Flash when lock/unlock"
4. Press the controller.
Calling up the driver's seat position
The driver's seat position last set is stored for
the remote control currently in use.
You can select whether or not the seat is reset
to that position automatically.
When this Personal Profile function is
used, first make sure that the footwell
behind the driver's seat is free of obstacles.
Failure to do so could ca use injury to persons or
damage to objects as a result of a rearward
movement of the seat. <
The adjusting procedure is halted immediately
when you touch a seat adjustment switch or
one of the memory buttons.
Selecting automatic call-up
1. "Settings"
2. "Door locks"
3. "Last seat position auto."
The setting is stored fo r the remote control cur-
rently in use.
Malfunctions
The remote control ma y malfunction due to
local radio waves. If this occurs, unlock and lock
the car at the door lock with the integrated key.
Convertible: if hardtop movement via the
remote control is inte rrupted briefly, the
movement will be completed more quickly if
you keep the correspo nding button pressed
continuously.
If the car can no longer be locked with a remote
control, the battery in the remote control is
discharged. Use the remote control on an
00320051004F004C00510048000300280047004C0057004C005200510003
Page 47 of 311

42
ControlsOpening and closing
Coupe: opening, closing
>Press the switch to the resistance point:
The window opens as long as you press the
switch.
> Press the switch beyond the resistance
point:
The window opens automatically. Press
the switch again to stop the opening
movement.
You can close the windows in the same manner
by pulling the switch.
Convertible: opening, closing
Individually
> Press the switch to the resistance point:
The window opens as long as you press the
switch.
> Press the switch beyond the resistance
point:
The window opens automatically. Press
the switch again to stop the opening
movement.
You can close the windows in the same manner
by pulling the switch. The rear windows do not
close automatically.
Jointly
> Press the switch to the resistance point:
All windows open as lo ng as you press the
switch.
> Press the switch beyond the resistance
point:
All windows open automatically. Press
the switch again to stop the opening
movement.
> Pull the switch:
All windows close as long as you pull the
switch.
After switching off the ignition
When the remote control is removed or the igni-
tion is switched off, you can still operate the
windows for approx. 1 minute as long as no
door is opened.
Convenient opening and closing
For information on Convenient opening and
closing via the remote control, refer to page 33.
For information on Convenient closing with
Comfort Access, refer to locking on page 34.
Pinch protection system
If the closing force exceeds a specific value as a
window closes, the closing action is interrupted
and the window reopens slightly.
Despite the pinch protection system
check and clear the window's travel path
prior to closing it; otherw ise, the safety system
might fail to detect certain kinds of obstruc-
tions, such as thin objects, and the window
would continue closing.
00320051004F004C00510048000300280047004C0057004C005200510003
Page 48 of 311

43
Opening and closing
Controls
Do not install any accessories that might inter-
fere with window movement. Otherwise, the
pinch protection system could be impaired.
Convertible: the rear windows are not equipped
with pinch protection. Therefore, watch them
closely when closing to avoid personal injury.
<
Closing without pinch protection
If there is an external danger, or if ice on the
windows, etc., prevents you from closing the
windows normally, proceed as follows:
1.Pull the switch past the resistance point and
hold it there. Pinch protection is limited and
the window reopens slightly if the closing
force exceeds a certain value.
2. Pull the switch again past the resistance
point within approx. 4 seconds and hold it
there. The window closes without pinch
protection.
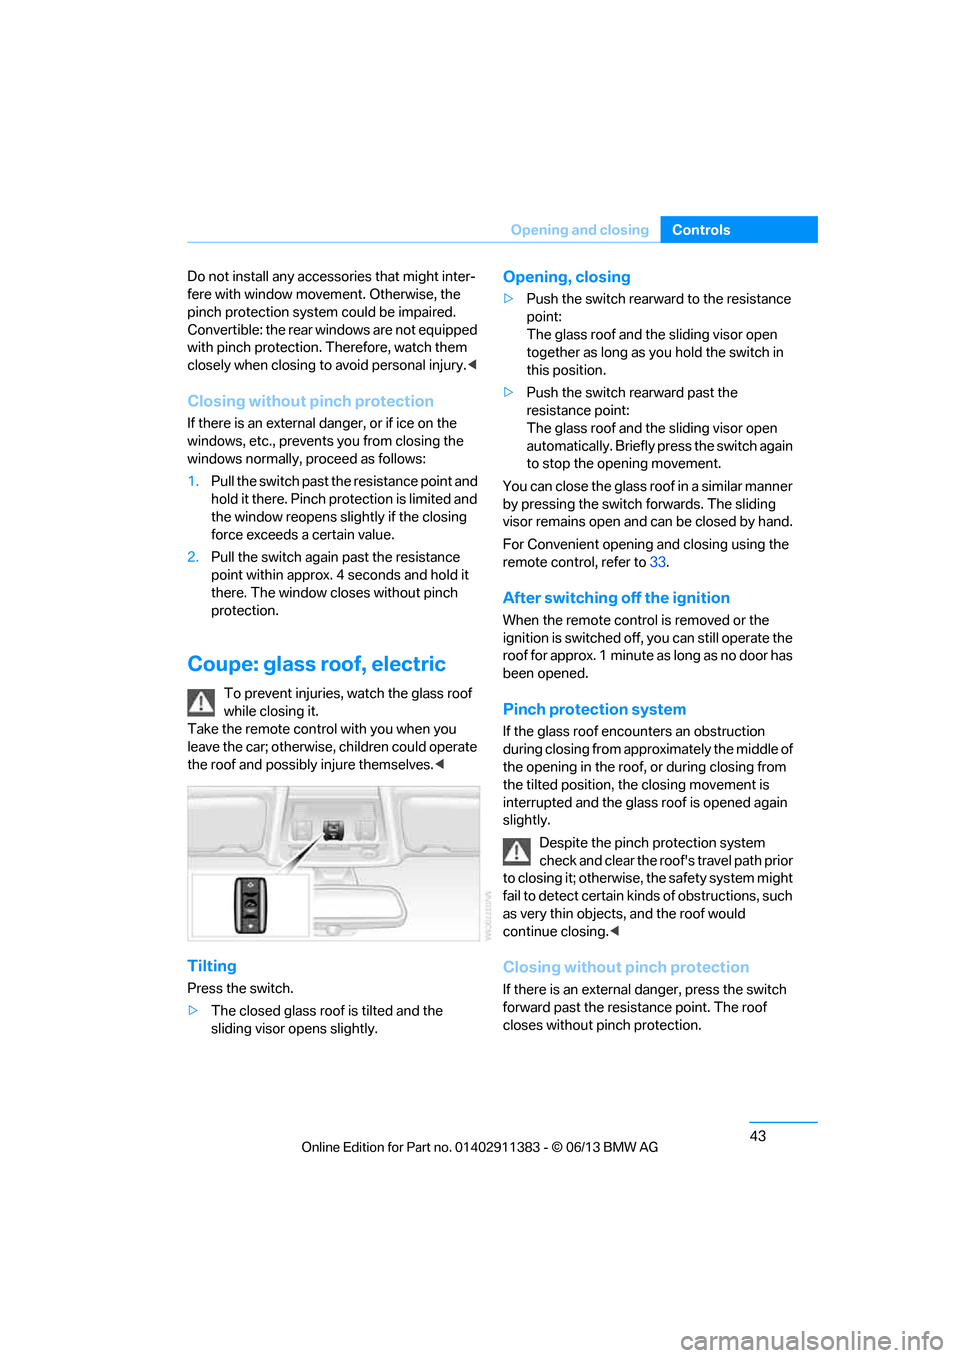
Coupe: glass roof, electric
To prevent injuries, watch the glass roof
while closing it.
Take the remote contro l with you when you
leave the car; otherwise, children could operate
the roof and possibly injure themselves. <
Tilting
Press the switch.
>The closed glass roof is tilted and the
sliding visor opens slightly.
Opening, closing
>Push the switch rearward to the resistance
point:
The glass roof and the sliding visor open
together as long as you hold the switch in
this position.
> Push the switch rearward past the
resistance point:
The glass roof and the sliding visor open
automatically. Briefly press the switch again
to stop the opening movement.
You can close the glass roof in a similar manner
by pressing the switch forwards. The sliding
visor remains open and can be closed by hand.
For Convenient opening and closing using the
remote control, refer to 33.
After switching off the ignition
When the remote contro l is removed or the
ignition is switched off, you can still operate the
roof for approx. 1 minute as long as no door has
been opened.
Pinch protection system
If the glass roof encounters an obstruction
during closing from approximately the middle of
the opening in the roof, or during closing from
the tilted position, the closing movement is
interrupted and the glass roof is opened again
slightly.
Despite the pinch protection system
check and clear the roof's travel path prior
to closing it; otherwise, the safety system might
fail to detect certain kinds of obstructions, such
as very thin objects, and the roof would
continue closing. <
Closing without pinch protection
If there is an external danger, press the switch
forward past the resistance point. The roof
closes without pinch protection.
00320051004F004C00510048000300280047004C0057004C005200510003
Page 57 of 311

52
ControlsAdjustments
Do not insert objects behind the head
cushion; otherwise, the head restraint
may not function properly. <
Coupe: rear seats
Height adjustment
>To raise: pull up.
> To lower: press the button, arrow 1, and
slide the head restraint down.
Removing
Only remove a head rest raint if no one will be
sitting on the seat in question.
1. Pull up as far as it will go.
2. Press the button, arrow 1, tilt the rear seat
backrest slightly forward and pull the head
restraint all the way out.
Entering the rear seats
Coupe: seat with manual longitudinal
adjustment
Easy entry
The easy entry feature includes a memory
function for the longitudinal adjustment and
backrest angle. 1.
Pull the lever and swing the backrest
forward.
2. Push the seat forward.
Previous position
Push the seat backward and swing the backrest
back.
When pushing the seat into its rearmost
position, make sure that no one is injured
and that no objects are damaged.
Before driving off, en gage both seats and
backrests so that they are locked in place.
Otherwise, there is a risk of an accident due to
unexpected movement. <
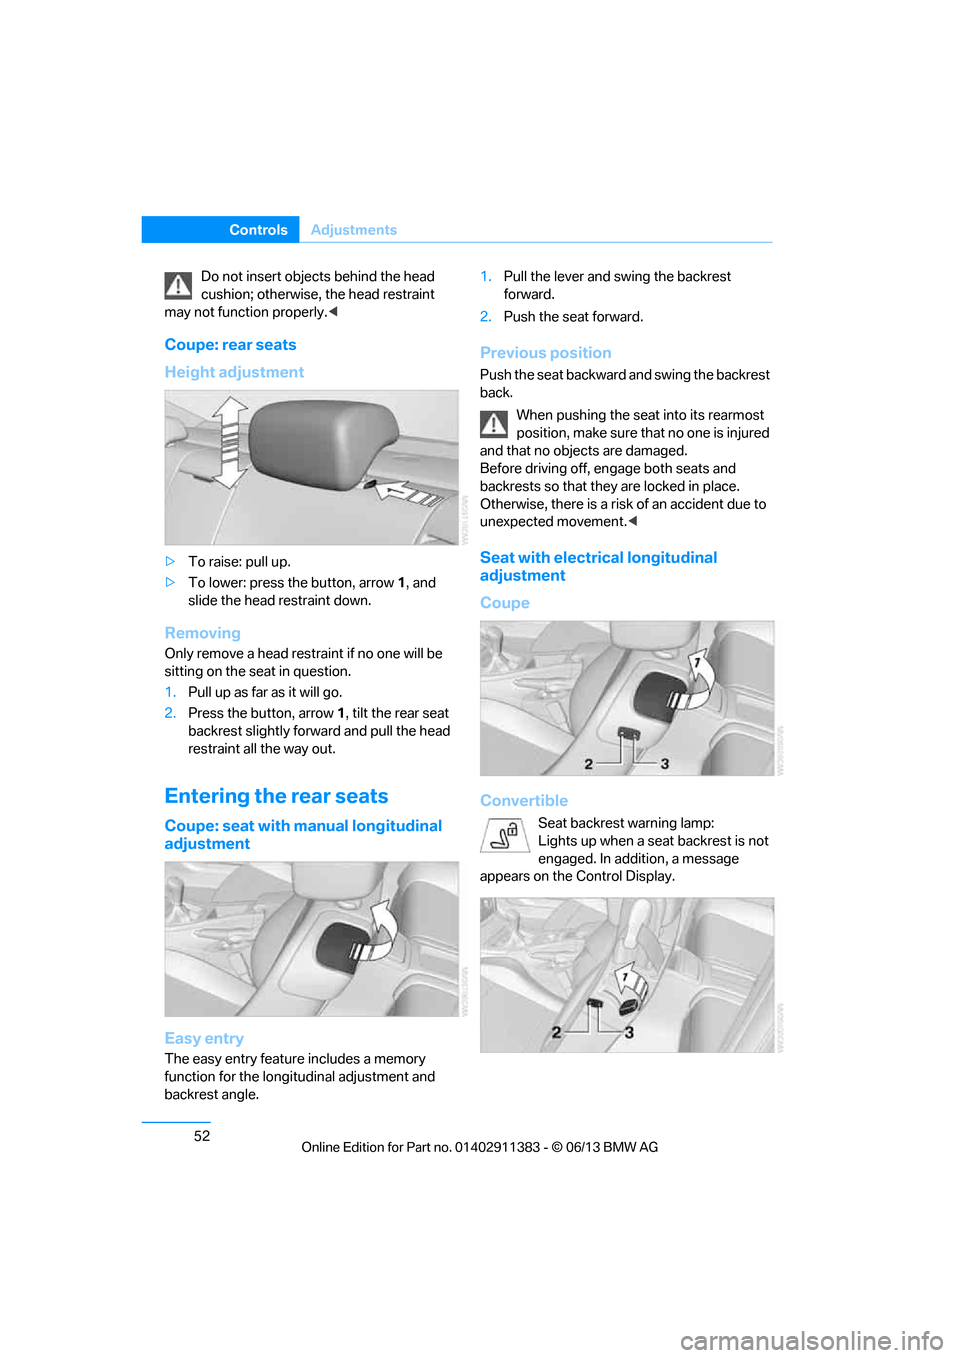
Seat with electrical longitudinal
adjustment
Coupe
Convertible
Seat backrest warning lamp:
Lights up when a seat backrest is not
engaged. In addition, a message
appears on the Control Display.
00320051004F004C00510048000300280047004C0057004C005200510003
Page 58 of 311

53
Adjustments
Controls
Easy entry
The easy entry feature includes a memory
function for the longitudinal adjustment and
backrest angle.
1.
Pull lever 1 and swing the backrest forward.
2. Press the front end 2 of the switch until the
seat has moved into the desired position.
Previous position
Press the rear end 3 of the switch until the seat
automatically stops in its previous position, and
fold the backrest back. If you release the switch
before the previous seat position is reached,
the seat will stop at its current position.
When sliding the seat backward, make
sure no one is injure d and no objects are
damaged.
Before driving off, engage both seats and
backrests so that they are locked in place.
Otherwise, there is a risk of an accident due to
unexpected movement. <
Seat heating
Press the button once per temperature level.
Three LEDs indicate the highest temperature.
To switch off:
Press button longer.
If you continue driving within approx. the next
15 minutes, the seat heating is automatically
activated at the previo usly set temperature.
The temperature is lowered or the heating is
switched off entirely to save on battery power.
The LEDs stay lit.
Seat and mirror memory
You can store and call up two different combi-
nations of driver's seat and exterior mirror
positions.
Settings for the backrest width and lumbar
support are not stored in memory.
Storing
1. Switch on radio readiness or the ignition,
refer to page 62.
2. Adjust the seat and exterior mirrors to the
desired positions.
3. Press the button.
The LED in the button lights up.
4. Press the desired memory button 1 or 2:
the LED goes out.
The driver's seat and exterior mirror posi-
tions are stored for the remote control
currently in use.
Call-up
Do not call up the memory while you are
driving; otherwise, unexpected seat
movement could result in an accident. <
Comfort function
1.Unlock and open the driver's door or switch
on radio readiness, refer to page 62.
2. Briefly press the desired memory button 1
or 2.
The adjusting procedure is halted immediately
when you touch a seat adjustment switch or
one of the memory buttons.
00320051004F004C00510048000300280047004C0057004C005200510003
Page 61 of 311

56
ControlsAdjustments
Passenger side mirro r tilt function –
automatic curb monitor
Activating
1. Push the switch to the position for the
driver's side mirror, arrow 1.
2. Shift into reverse or mo ve the selector lever
into the R position.
The glass of the mirror on the passenger
side tilts slightly down. This allows the
driver to see the area immediately adjacent
to the vehicle, e.g. a curb, when backing into
a parking space.
Deactivating
Push the switch to the position for the passen-
ger side mirror, arrow 2.
Interior rearview mirror
Turn the knob to reduce glare from the head-
lamps of cars behind you when driving at night.
Interior and exte rior mirrors,
automatic dimming feature
The automatic dimming feature of the interior
and exterior mirrors is controlled by two photo
cells in the interior re arview mirror. One photo
cell is in the mirror frame, see arrow; the other is
on the back of the mirror.
In order to ensure that the system functions
correctly, keep the photo cells clean, do not
cover the area between the interior rearview
mirror and windshield, and do not affix adhesive
labels or stickers of an y kind to the windshield
directly in front of the mirror.
Steering wheel
Adjustments
Do not adjust the steering wheel position
while the car is in mo tion; otherwise, there
is a risk of an accident due to unexpected
movement. <
1. Fold the lever down.
2. Move the steering wheel to the preferred
height and angle to suit your seated
position.
00320051004F004C00510048000300280047004C0057004C005200510003
Page 69 of 311

64
ControlsDriving
Switching off the engine
When leaving the vehicle, always take
along the remote contro l; this precaution
prevents children from starting the engine, for
example. <
When parking, apply the parking brake
forcefully; otherwise, the vehicle could
begin to roll. On steep uphill and downhill
inclines, also secure the vehicle by turning the
wheels toward the curb, for example. <
Manual transmission
1.With the car at a standstill, press the
Start/Stop button.
2. Shift into first gear or reverse.
3. Forcefully apply the parking brake.
4. Removing the remote control from the
ignition lock, refer to page 62.
Automatic transmission
1.With the car at a standstill, move the
selector lever to position P.
2. Press the Start/Stop button.
3. Forcefully apply the parking brake.
4. Removing the remote control from the
ignition lock, refer to page 62.
Sport automatic transmission with
double clutch
1.With the car at a standstill, press the
Start/Stop button.
If the transmission is shifted into N when
the engine is switched off, you will be
notified visually and acoustically of this
fact.
2. Forcefully apply the parking brake.
3. Remove remote control from the ignition
lock, refer to page 62. The transmission is
automatically shifted into transmission
position P.
Parking brake
The parking brake is primarily intended to pre-
vent the vehicle from rolling while parked; it
brakes the rear wheels.
Also follow the instructions on page 64, under
Switching off the engine.
Indicator lamp
The indicator lamp is lit, and when you
drive off an acoustic signal sounds in
addition. The parking brake is still
applied.
Indicator lamp for Canadian models.
Applying
The lever locks in po sition automatically.
Releasing
Pull slightly upwards, press the button and
lower the lever.
In exceptional cases, if the parking brake
has to be used to slow or stop the car, do
not pull the lever up too hard. In doing so, con-
tinuously press the button of the parking brake
lever.
Otherwise, excessive force on the parking
brake can lock up the rear wheels and cause the
rear of the car to swerve. <
00320051004F004C00510048000300280047004C0057004C005200510003