2013 BMW 135IS CONVERTIBLE turn signal
[x] Cancel search: turn signalPage 195 of 284
194
CommunicationsTe l e p h o n e
Entering phone numbers
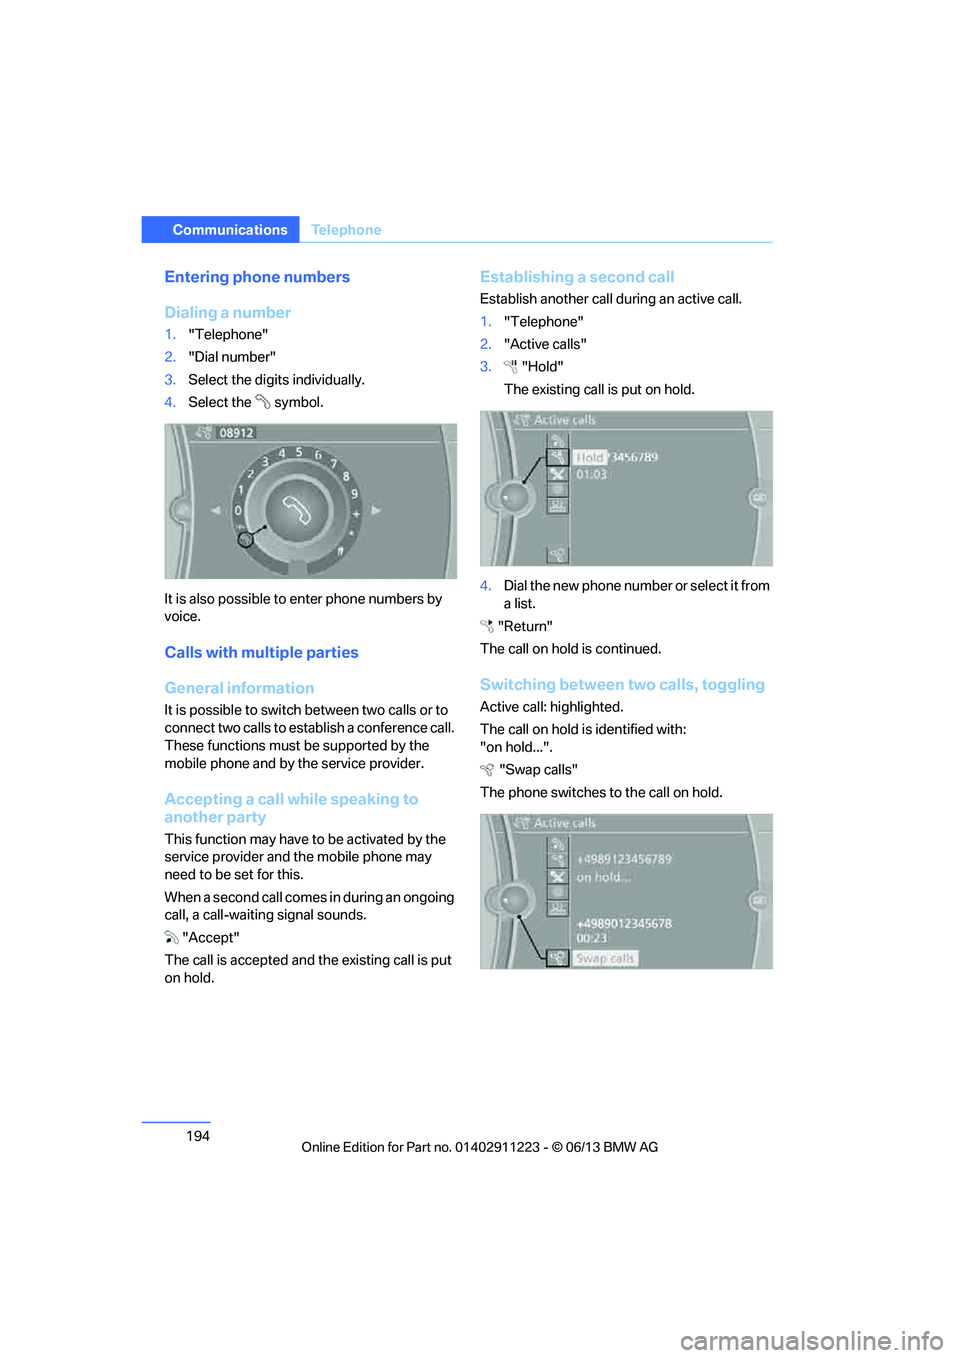
Dialing a number
1."Telephone"
2. "Dial number"
3. Select the digits individually.
4. Select the symbol.
It is also possible to enter phone numbers by
voice.
Calls with multiple parties
General information
It is possible to switch between two calls or to
connect two calls to establish a conference call.
These functions must be supported by the
mobile phone and by the service provider.
Accepting a call while speaking to
another party
This function may have to be activated by the
service provider and the mobile phone may
need to be set for this.
When a second call comes in during an ongoing
call, a call-waiting signal sounds.
"Accept"
The call is accepted and the existing call is put
on hold.
Establishing a second call
Establish another call during an active call.
1. "Telephone"
2. "Active calls"
3. "Hold"
The existing call is put on hold.
4. Dia l the ne w pho ne numbe r o r sele ct it from
a list.
"Return"
The call on hold is continued.
Switching between two calls, toggling
Active call: highlighted.
The call on hold is identified with:
"on hold...". "Swap calls"
The phone switches to the call on hold.
00320051004F004C00510048000300280047004C0057004C005200510003
Page 234 of 284
233
Engine compartment
Mobility
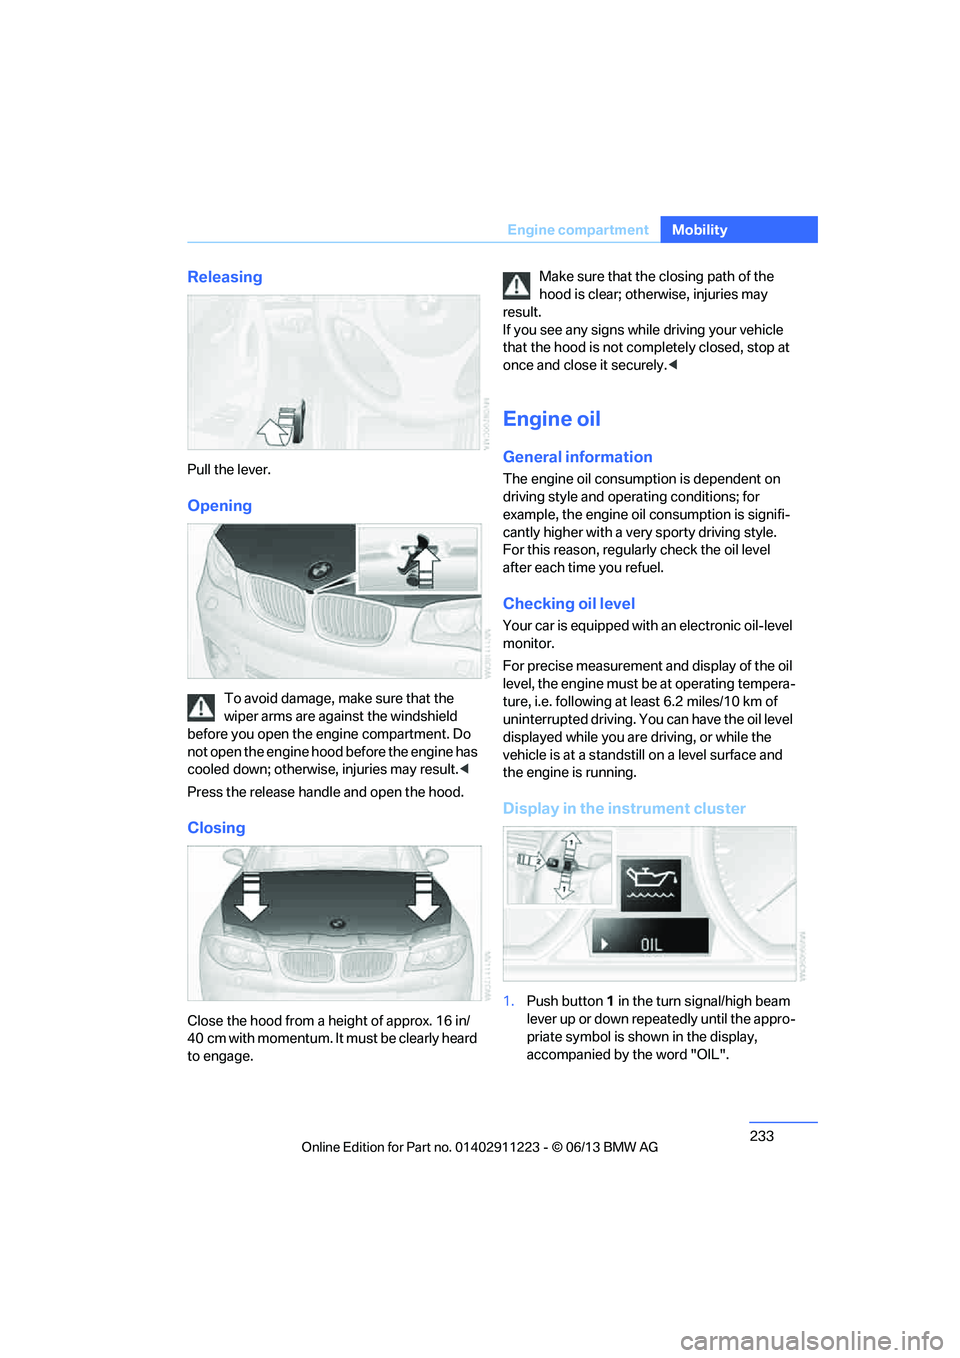
Releasing
Pull the lever.
Opening
To avoid damage, make sure that the
wiper arms are against the windshield
before you open the engine compartment. Do
not open the engine hood before the engine has
cooled down; otherwise, injuries may result. <
Press the release handle and open the hood.
Closing
Close the hood from a height of approx. 16 in/
40 cm with momentum. It must be clearly heard
to engage. Make sure that the
closing path of the
hood is clear; otherwise, injuries may
result.
If you see any signs while driving your vehicle
that the hood is not comp letely closed, stop at
once and close it securely. <
Engine oil
General information
The engine oil consumption is dependent on
driving style and operating conditions; for
example, the engine oil consumption is signifi-
cantly higher with a very sporty driving style.
For this reason, regularly check the oil level
after each time you refuel.
Checking oil level
Your car is equipped with an electronic oil-level
monitor.
For precise measurement and display of the oil
level, the engine must be at operating tempera-
ture, i.e. following at least 6.2 miles/10 km of
uninterrupted driving. Yo u can have the oil level
displayed while you are driving, or while the
vehicle is at a standstill on a level surface and
the engine is running.
Display in the instrument cluster
1. Push button 1 in the turn signal/high beam
lever up or down repeatedly until the appro-
priate symbol is shown in the display,
accompanied by the word "OIL".
00320051004F004C00510048000300280047004C0057004C005200510003
Page 247 of 284
246
MobilityReplacing components
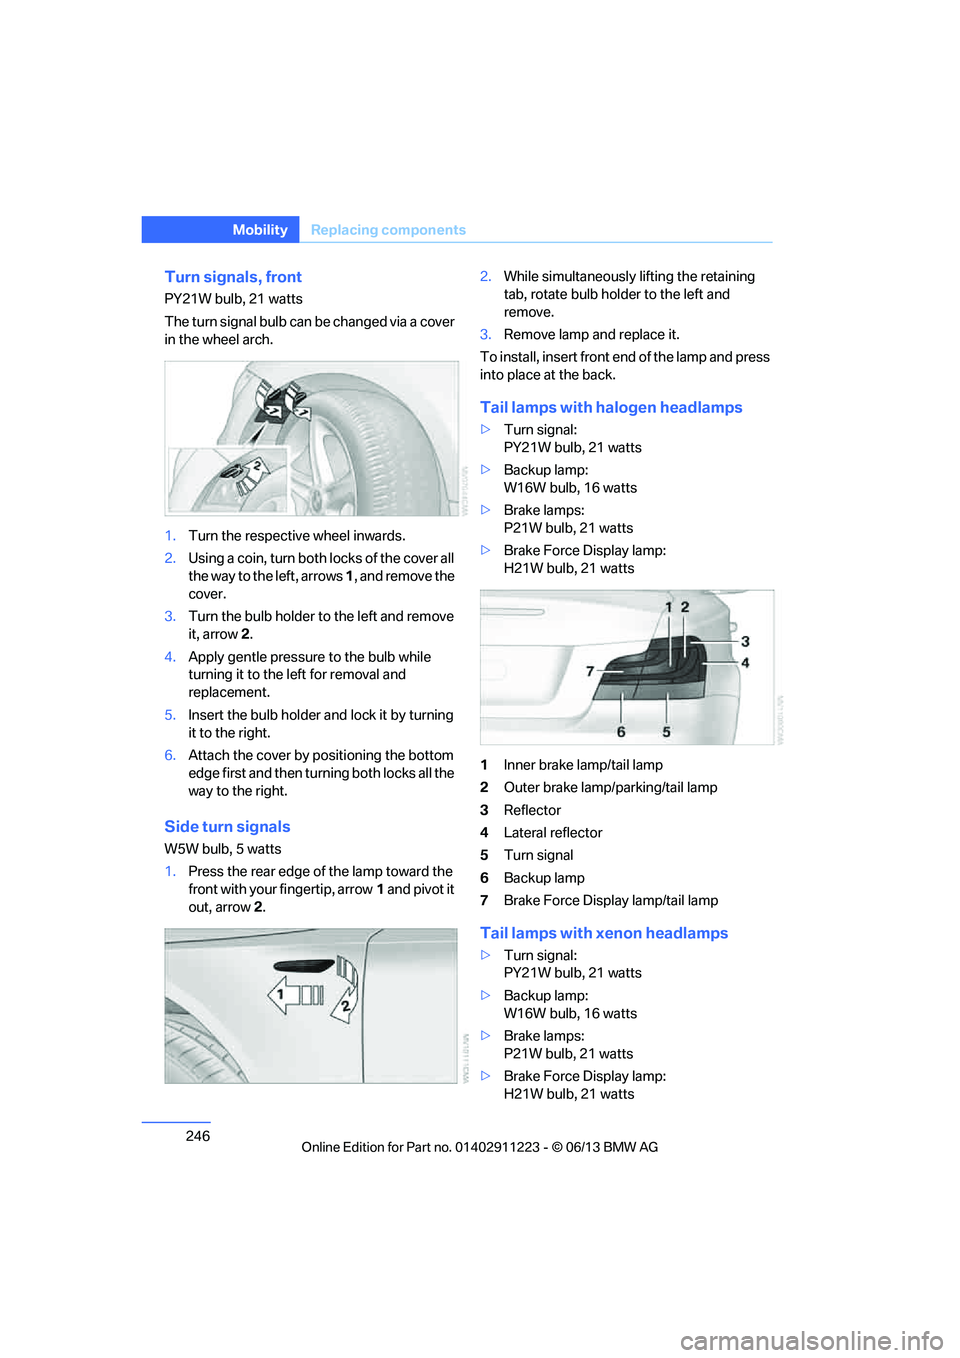
Turn signals, front
PY21W bulb, 21 watts
The turn signal bulb can be changed via a cover
in the wheel arch.
1.Turn the respecti ve wheel inwards.
2. Using a coin, turn both locks of the cover all
the way to the left, arrows 1, and remove the
cover.
3. Turn the bulb holder to the left and remove
it, arrow 2.
4. Apply gentle pressure to the bulb while
turning it to the left for removal and
replacement.
5. Insert the bulb holder and lock it by turning
it to the right.
6. Attach the cover by positioning the bottom
edge first and then turn ing both locks all the
way to the right.
Side turn signals
W5W bulb, 5 watts
1. Press the rear edge of the lamp toward the
front with your fingertip, arrow 1 and pivot it
out, arrow 2. 2.
While simultaneously lifting the retaining
tab, rotate bulb hold er to the left and
remove.
3. Remove lamp and replace it.
To install, insert front end of the lamp and press
into place at the back.
Tail lamps with halogen headlamps
> Turn signal:
PY21W bulb, 21 watts
> Backup lamp:
W16W bulb, 16 watts
> Brake lamps:
P21W bulb, 21 watts
> Brake Force Display lamp:
H21W bulb, 21 watts
1 Inner brake lamp/tail lamp
2 Outer brake lamp/parking/tail lamp
3 Reflector
4 Lateral reflector
5 Turn signal
6 Backup lamp
7 Brake Force Display lamp/tail lamp
Tail lamps with xenon headlamps
>Turn signal:
PY21W bulb, 21 watts
> Backup lamp:
W16W bulb, 16 watts
> Brake lamps:
P21W bulb, 21 watts
> Brake Force Display lamp:
H21W bulb, 21 watts
00320051004F004C00510048000300280047004C0057004C005200510003
Page 248 of 284
247
Replacing components
Mobility
1
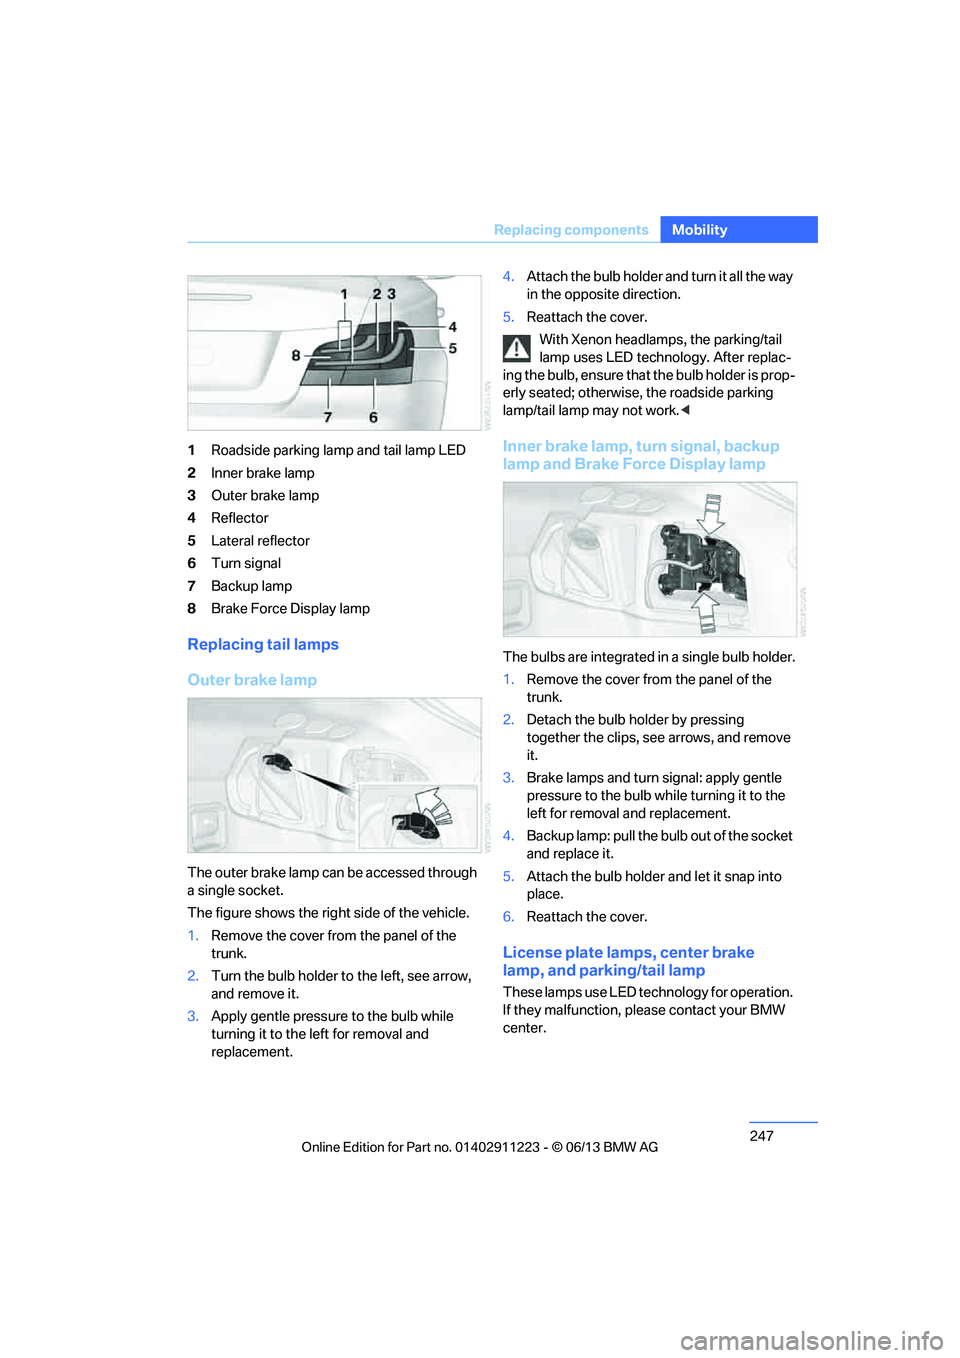
Roadside parking lamp and tail lamp LED
2 Inner brake lamp
3 Outer brake lamp
4 Reflector
5 Lateral reflector
6 Turn signal
7 Backup lamp
8 Brake Force Display lamp
Replacing tail lamps
Outer brake lamp
The outer brake lamp can be accessed through
a single socket.
The figure shows the right side of the vehicle.
1.Remove the cover from the panel of the
trunk.
2. Turn the bulb holder to the left, see arrow,
and remove it.
3. Apply gentle pressure to the bulb while
turning it to the left for removal and
replacement. 4.
Attach the bulb holder and turn it all the way
in the opposite direction.
5. Reattach the cover.
With Xenon headlamps, the parking/tail
lamp uses LED techno logy. After replac-
ing the bulb, ensure that the bulb holder is prop-
erly seated; otherwise, the roadside parking
lamp/tail lamp may not work. <
Inner brake lamp, turn signal, backup
lamp and Brake Force Display lamp
The bulbs are integrated in a single bulb holder.
1.Remove the cover from the panel of the
trunk.
2. Detach the bulb holder by pressing
together the clips, see arrows, and remove
it.
3. Brake lamps and turn signal: apply gentle
pressure to the bulb wh ile turning it to the
left for removal and replacement.
4. Backup lamp: pull the bulb out of the socket
and replace it.
5. Attach the bulb holder and let it snap into
place.
6. Reattach the cover.
License plate lamps, center brake
lamp, and parking/tail lamp
These lamps use LED technology for operation.
If they malfunction, please contact your BMW
center.
00320051004F004C00510048000300280047004C0057004C005200510003
Page 254 of 284
253
Giving and receiving assistance
Mobility
Use only the tow fitting provided with the
vehicle and screw it a
ll the way in. Use the
tow fitting for towing on paved roads only. Avoid
lateral loading of the tow fitting, e.g. do not lift
the vehicle by the tow fitting. Otherwise, the
tow fitting and the vehicle could be damaged. <
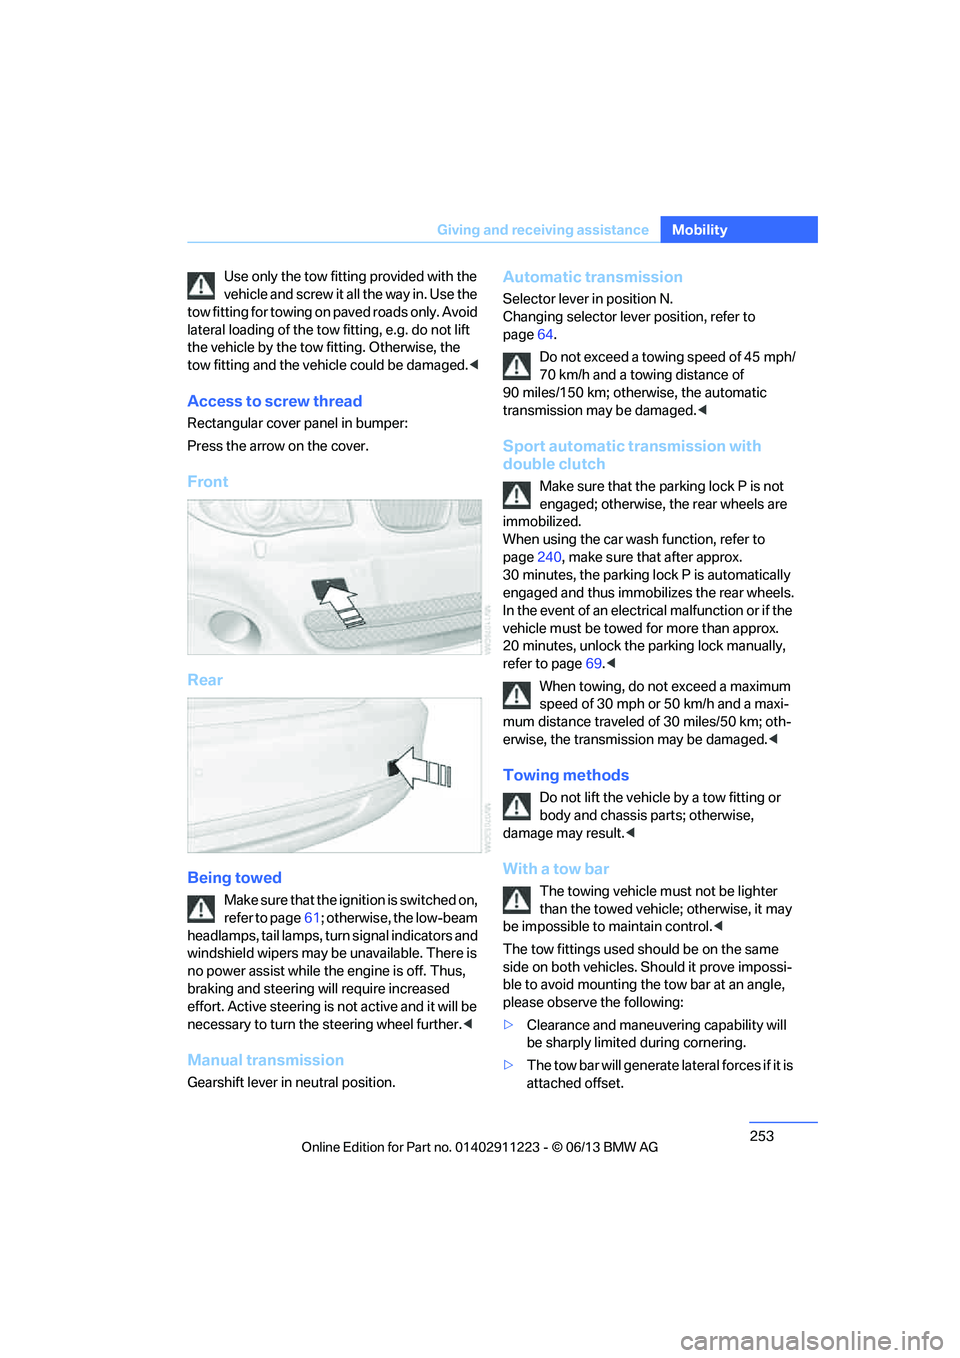
Access to screw thread
Rectangular cover panel in bumper:
Press the arrow on the cover.
Front
Rear
Being towed
Make sure that the ignition is switched on,
refer to page61; otherwise, the low-beam
headlamps, tail lamps, turn signal indicators and
windshield wipers may be unavailable. There is
no power assist while the engine is off. Thus,
braking and steering will require increased
effort. Active steering is not active and it will be
necessary to tu rn the steering wheel further. <
Manual transmission
Gearshift lever in neutral position.
Automatic transmission
Selector lever in position N.
Changing selector lever position, refer to
page 64.
Do not exceed a towing speed of 45 mph/
70 km/h and a towing distance of
90 miles/150 km; otherwise, the automatic
transmission may be damaged. <
Sport automatic transmission with
double clutch
Make sure that the parking lock P is not
engaged; otherwise, the rear wheels are
immobilized.
When using the car wash function, refer to
page 240, make sure that after approx.
30 minutes, the parking lock P is automatically
engaged and thus immobilizes the rear wheels.
In the event of an electrical malfunction or if the
vehicle must be towed for more than approx.
20 minutes, unlock the parking lock manually,
refer to page 69.<
When towing, do not exceed a maximum
speed of 30 mph or 50 km/h and a maxi-
mum distance traveled of 30 miles/50 km; oth-
erwise, the transmission may be damaged. <
Towing methods
Do not lift the vehicle by a tow fitting or
body and chassis parts; otherwise,
damage may result. <
With a tow bar
The towing vehicle must not be lighter
than the towed vehicle; otherwise, it may
be impossible to maintain control.<
The tow fittings used sh ould be on the same
side on both vehicles. Should it prove impossi-
ble to avoid mounting the tow bar at an angle,
please observe the following:
> Clearance and maneuvering capability will
be sharply limited during cornering.
> The tow bar will ge nerate lateral forces if it is
attached offset.
00320051004F004C00510048000300280047004C0057004C005200510003
Page 272 of 284

271
Everything from A to Z
Reference
Connecting an MP3 player,
refer to AUX-In
connection 177
Connecting an MP3 player, refer to USB audio
interface 178
Connecting vacuum cleaner, refer to Connecting
electrical appliances 117
Consumption, refer to Average fuel
consumption 77
Contacts 202
– deleting 204,211
– exporting/importing 211
– new contact 203
Control Center, refer to iDrive 20
Control Display 20,21
Control Display, refer to iDrive
– switching on/off 21
Controller, refer to iDrive 20
Controls and displays 12
Convenient opening and closing
– windows 34
– windows with Comfort Access 40
– with Comfort Access 40
Convenient start, refer to Starting the engine 62
Convertible
– rollover protection system 99
– top 44
– wind deflector 47
Convertible top
– convenient opening 34
Convertible top care 242
Coolant 235
– checking level 236
– filling 236
Coolant temperature 236
Cooling, maximum 107Cooling fluid, refer to
Coolant 235
Corner-illuminating lamps 102
Cornering light, refer to
Adaptive Light Control 101
Courtesy lamps 104
Criteria for route 143
Cross-hairs in navigation139
Cruise control 73
Cruising range 77
Cupholders 116
Curb weight, refer to Weights 259
Current fuel consumption 77
Cu rrent playback
– e
xternal devices 180
– in music collection 174
Customer Relations 215
D
Dashboard, refer to
Cockpit 12
Dashboard lighting, refer to
Instrument lighting 104
Data, technical
– capacities 259
– dimensions 258
– weights 259
Data memory 7
Data transfer 216
Date
– setting 84
– setting format 84
Daytime running lights, switch positions 101
DBC Dynamic Brake Control 89
Deactivating front passenger
airbags 97
Deadlocking, refer to Locking 34 Defect
– door lock
36
– fuel filler flap 221
Defining a home address 203
Defogging windows 109
Defrosting windows 109
Defrosting windows and removing condensation 109
Defrosting windshield, refer to Defrosting windows 109
Defrost position, refer to
Defrosting windows 109
Destination, entering by town/ city name 134
Destination address
– entering 134,140
Destination entry via BMW Assist 139
Destination for navigation
– entering by voice 140
– entering via map 139
– entry 134
– home address 137
– manual entry 134
Destination guidance 143
– bypassing a route section 144
– changing specified
route 143
– continuing 143
– starting 143
– voice instructions 145
– volume of voice instructions 145
Differential, breaking in 124
Digital clock 75,82
Digital compass 113
Digital radio, refer to HD Radio 159
Dime nsion
s258
Directional indicators, refer to Turn signals 71
Direction instructions, refer to
Voice instructions 145
00320051004F004C00510048000300280047004C0057004C005200510003
Page 277 of 284

276
ReferenceEverything from A to Z
Mobile phone, installation
location, refer to Center
armrest 115
Mobile phone, refer to Telephone 188
Modifications, te chnical, refer
to For your own safety 5
Monitor, refer to iDrive 20
Monitoring system for tire pressures, refer to Flat Tire
Monitor 91
Multi-channel playback 156
Multifunctional steering wheel, refer to Buttons on
the steering wheel 13
Multifunction switch
– refer to Turn signals/ headlamp flasher 71
– refer to Wiper system 71
Music collection 172
– backing up 176
– deleting 176
– random sequence 175
– restoring 176
Music interface for
smartphones 178
Music search 174
My Info 205
N
Navigation
– starting destination
guidance after entering a
destination 136
– storing current position 136
– voice activation 140
Navigation announcements, refer to Switching voice
instructions on/off 145
Navigation data 132 Navigation system
132
– address book 136
– bypassing a route section 144
– continuing destination
guidance 143
– destination entry 134
– dynamic destination
guidance 149
– entering a destination by voice 140
– entering a destination manually 134
– frequently asked
questions 151
– gas station
recommendations 145
– planning a trip 141
– route list 144
– selecting destination via map 139
– selecting route criteria 143
– special destinations 137
– starting destination guidance 143
– terminating destination guidance 143
– traffic bulletins 147
– voice instructions 145
– volume adjustment 145
Neck support, refer to Head
restraints 52
Nets, refer to Storage compartments 116
Neutral 67
New tires 230
Next Service indicator, refer to
Condition Based Service
CBS 237
North-facing map 145
Notes 208
O
OBD socket, refer to Socket
for Onboard Diagnosis 238
Octane ratings, refer to Fuel
specifications 221
Odometer 75
Office 201
– current office 201
– what to do if…. 209
Oil, refer to Engine oil 233
Oil consumption 233
Oil level 233
Old batteries, refer to
Disposal 249
Onboard vehicle tool kit 243
Opening and closing
– comfort access 40
– from inside 37
– from outside 34
– using the door lock 36
– using the remote control 34
Options, selecting for navigation 143
Orientation menu, refer to
Start menu 21
Outlets, refer to Ventilation 109
Outside temperature display 75
– changing unit of measure 80
– in computer 80
Outside temperature warning 75
Overriding selector lever lock 66
Overview
– radio operation 154
P
Paintwork care240
Park assistant, refer to Park
Distance Control 88
00320051004F004C00510048000300280047004C0057004C005200510003
Page 282 of 284
281
Everything from A to Z
Reference
Transmission
– 7-gear Sport automatic
transmission with double
clutch 66
– automatic transmission with
Steptronic 64
– idle position 67
– launch control 70
– manually unlocking parking lock 69
– manual transmission 64
– reverse gear 67
Transporting children safely 58
Transport securing devices, refer to Securing cargo 128
Tread depth, refer to Minimum tire tread 229
Trip, deleting 142
Trip, storing 142
Trip-distance counter, refer to Trip odometer 75
Triple turn signal activation 71
Trip odometer 75
Trips, changing 142
Trunk
– capacity 259
– comfort access 41
– enlarging, refer to Through- loading system 117
– lamp, refer to Interior
lamps 104
– opening from outside 38
Trunk lid 37
– comfort access 41
– emergency release 38
– opening from outside 38
– unlocking with remote control 35
Trunk net, refer to Securing
cargo 128 Turning circle, refer to
Dimensions 258
Turn signal 71
– indicator lamp 14
Turn signals
– replacing bulbs 246
– triple turn signal 71
Tying down loads, refer to
Cargo loading 128
U
Underbody protection, refer to
Caring for your vehicle 239
Uniform Tire Quality Grading/ UTQR 228
Units
– average fuel consumption 80
Units of measure
– temperature 80
Universal garage door opener,
refer to Integrated universal
remote control 111
Unlatching, refer to
Unlocking 34
Unlocking
– from inside 37
– from outside 34
– trunk lid 41
– without remote control, refer
to Comfort Access 40
Unlocking without a key, refer to Comfort Access 40
Updating software 184
Updating the navigation data 132
USB audio interface 178
USB interface 115
Using contact data 208
V
VCD168
Vehicle
– battery 248
– breaking in 124
– cargo loading 127
– decommissioning, refer to
Vehicle storage 242
– dimensions 258
– identification number, refer
to Engine compartment 232
– parking 63
– weight 259
Vehicle equipment 5
Vehicle jack 248
Vehicle storage 242
Ventilation 109
– draft-free 109
Ventilation when parked, refer to Parked car ventilation 110
Vents, refer to Ventilation 109
Video menu 168
Video playback 168,180
Voice, refer to Destination
guidance through voice
instructions 145
Voice commands
– overview 27
– short commands 260
– telephone 197
Voice instructions from navigation system 145
– repeating 145
– switching on/off 145
– volume 145
Voice phone book 198
Volume 154
– audio sources 154
– fuel tank, refer to
Capacities 259
– mobile phone 193
– voice instructions 145
Volume compensation, tone control 156
00320051004F004C00510048000300280047004C0057004C005200510003