2013 BMW 135I COUPE stop start
[x] Cancel search: stop startPage 105 of 284
104
ControlsLamps
The parking lamps or low beams must
be switched on for the fog lamps to
operate. The green indicator lamp in
the instrument cluster lights up whenever the
fog lamps are on.
The fog lamps are switched off while you acti-
vate the headlamp flasher or switch on the high
beams.
If the automatic headla mp control is acti-
vated, the low beams will come on auto-
matically when you swit ch on the fog lamps.<
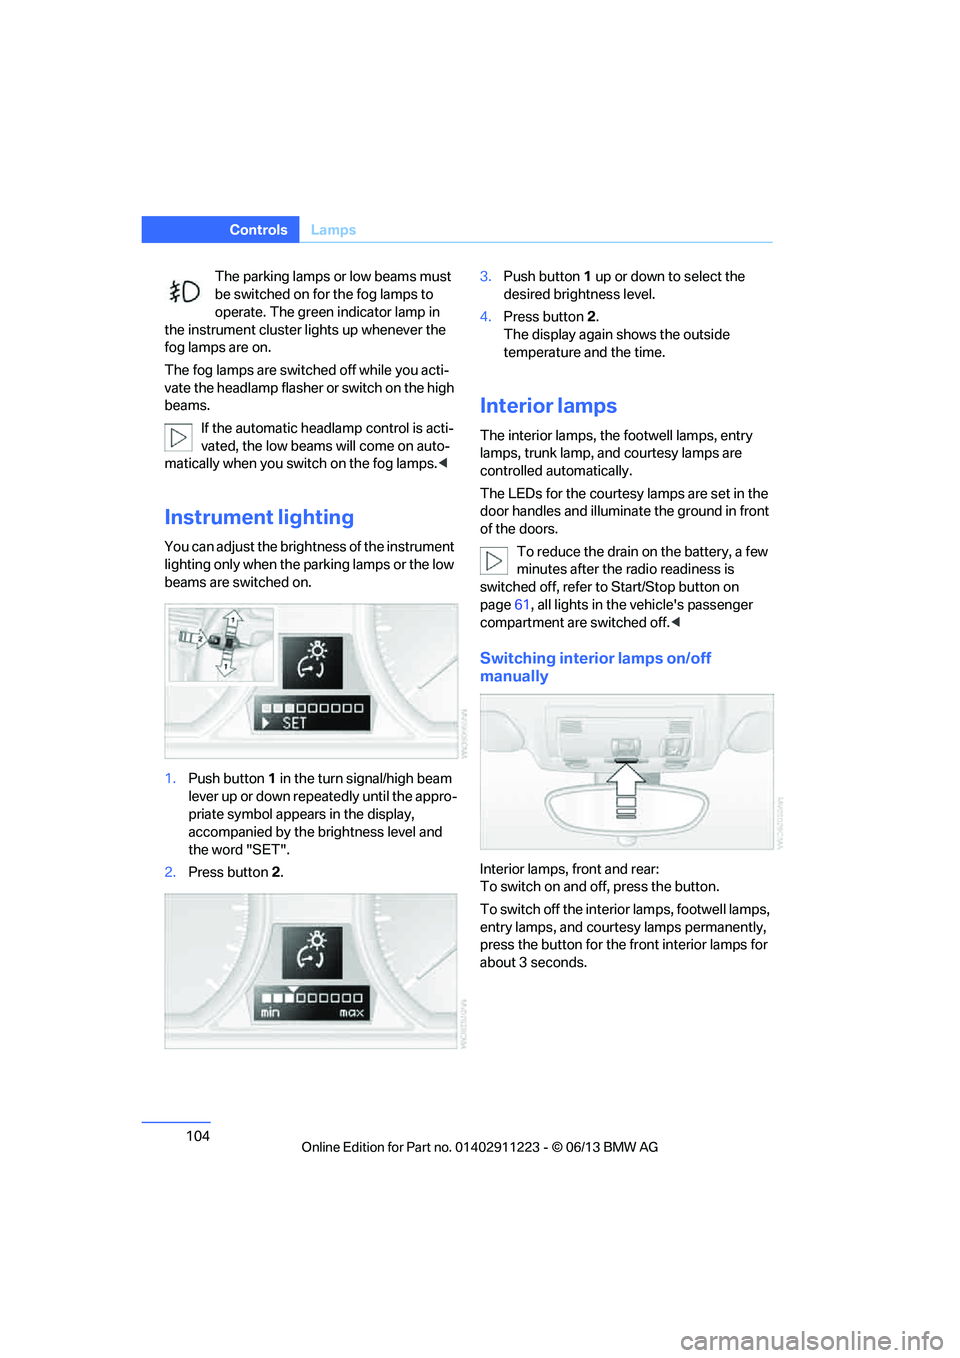
Instrument lighting
You can adjust the brightness of the instrument
lighting only when the parking lamps or the low
beams are switched on.
1.Push button 1 in the turn signal/high beam
lever up or down repe atedly until the appro-
priate symbol appear s in the display,
accompanied by the brightness level and
the word "SET".
2. Press button 2. 3.
Push button 1 up or down to select the
desired brightness level.
4. Press button 2.
The display again shows the outside
temperature and the time.
Interior lamps
The interior lamps, the footwell lamps, entry
lamps, trunk lamp, and courtesy lamps are
controlled automatically.
The LEDs for the courtesy lamps are set in the
door handles and illuminate the ground in front
of the doors.
To reduce the drain on the battery, a few
minutes after the radio readiness is
switched off, refer to Start/Stop button on
page 61, all lights in the vehicle's passenger
compartment are switched off. <
Switching interior lamps on/off
manually
Interior lamps, front and rear:
To switch on and off, press the button.
To switch off the interior lamps, footwell lamps,
entry lamps, and courtesy lamps permanently,
press the button for the front interior lamps for
about 3 seconds.
00320051004F004C00510048000300280047004C0057004C005200510003
Page 144 of 284
143
Destination guidance
Navigation
Destination guidance
Vehicle equipment
In this chapter, all production, country, and
optional equipment that is offered in the model
range is described. Equipment is also described
that is not available because of, for example,
selected options or coun
try version. This also
applies to safety related functions and systems.
Starting destination
guidance
1. "Navigation"
2. Entering a destination, refer to page 134.
3. "Accept destination"
4. "Start guidance"
The route is displayed on the Control Display
after it is calculated.
In the map view, the distance to the destination/
intermediate destinat ion and the estimated
time of arrival are displayed.
The arrow display appears on the Control
Display, if so desired.
Terminating destination
guidance
1. "Navigation"
2. "Map"
3. "Guidance".
4. "Stop guidance"
Continuing destination
guidance
If the destination was not reached during the
last trip, destination gu idance can be resumed.
"Resume guidance"
Route criteria
General information
> You can influence the calculated route by
selecting certain trip criteria.
> Route criteria can be changed during desti-
nation entry and during route guidance.
> Street types are part of the navigation data
and are taken into account in route plan-
ning, e.g. avoiding highways.
> The proposed route can differ from
personal experience.
> The settings are stored for the remote
control currently in use.
> Route guidance with traffic bulletins, refer
to page 149.
Changing route criteria
1."Navigation"
2. "Map"
3. "Route preference"
4. Selecting a criterion:
> "Fast route": time-optimized route
through a combination of the least pos-
sible distance and stretches of road that
allow rapid driving.
> "ECO PRO route": optimized
combination of the fa stest and shortest
possible route.
> "Short route": short distance without
taking time into account.
> "Alternative routes": are suggested,
where possible, during active route
guidance.
The individual suggestions are labeled in
color.
00320051004F004C00510048000300280047004C0057004C005200510003
Page 147 of 284
146
NavigationDestination guidance
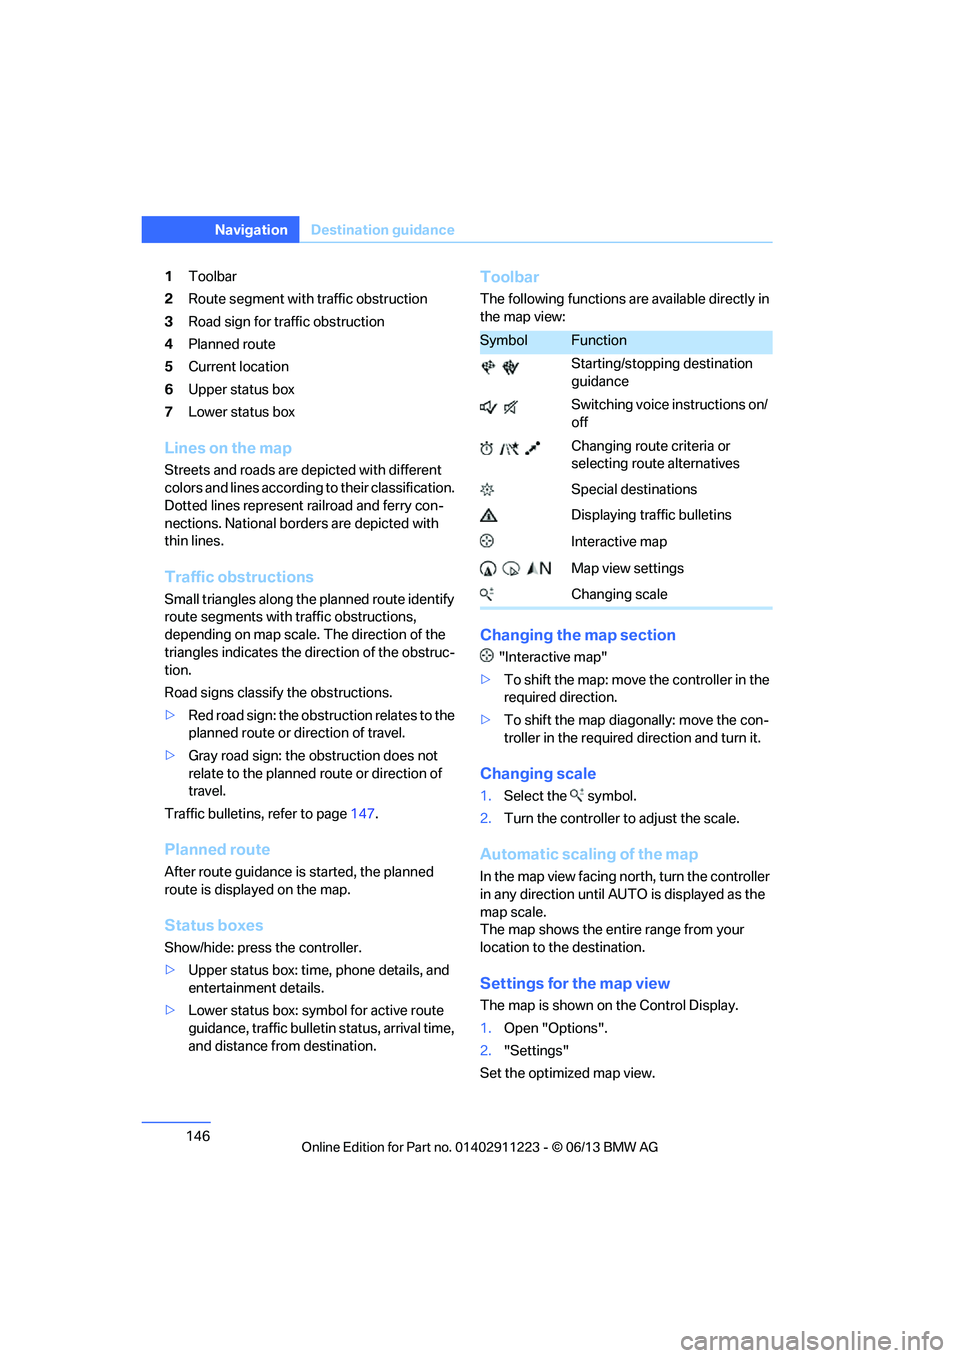
1Toolbar
2 Route segment with traffic obstruction
3 Road sign for traffic obstruction
4 Planned route
5 Current location
6 Upper status box
7 Lower status box
Lines on the map
Streets and roads are depicted with different
colors and lines according to their classification.
Dotted lines represent railroad and ferry con-
nections. National borders are depicted with
thin lines.
Traffic obstructions
Small triangles along the planned route identify
route segments with traffic obstructions,
depending on map scale. The direction of the
triangles indicates the di rection of the obstruc-
tion.
Road signs classify the obstructions.
> Red road sign: the obstruction relates to the
planned route or direction of travel.
> Gray road sign: the obstruction does not
relate to the planned route or direction of
travel.
Traffic bulletins, refer to page 147.
Planned route
After route guidance is started, the planned
route is displa yed on the map.
Status boxes
Show/hide: press the controller.
>Upper status box: time, phone details, and
entertainment details.
> Lower status box: symbol for active route
guidance, traffic bulletin status, arrival time,
and distance from destination.
Toolbar
The following functions are available directly in
the map view:
Changing the map section
"Interactive map"
> To shift the map: move the controller in the
required direction.
> To shift the map diag onally: move the con-
troller in the required direction and turn it.
Changing scale
1.Select the symbol.
2. Turn the controller to adjust the scale.
Automatic scaling of the map
In the map view facing no rth, turn the controller
in any direction until AUTO is displayed as the
map scale.
The map shows the entire range from your
location to the destination.
Settings for the map view
The map is shown on the Control Display.
1. Open "Options".
2. "Settings"
Set the optimized map view.
SymbolFunction
Starting/stopping destination
guidance
Switching voice instructions on/
off
Changing route criteria or
selecting route alternatives
Special destinations
Displaying traffic bulletins
Interactive map
Map view settings
Changing scale
00320051004F004C00510048000300280047004C0057004C005200510003
Page 169 of 284
168
EntertainmentCD/DVD player
Fast forward/reverse
Press and hold the button for the
corresponding direction.
Video playback
Country codes
Only DVDs with the code of the home region
can be played back; also refer to the information
on your DVD.
Starting playback
For your own safety, the video image is only dis-
played up to approx. 2 mph/3 km/h and in some
market-specific versions, only with the parking
brake engaged or the selector lever of the auto-
matic transmission is in the park position.
DVD video
1. "CD/Multimedia"
2. "CD/DVD"
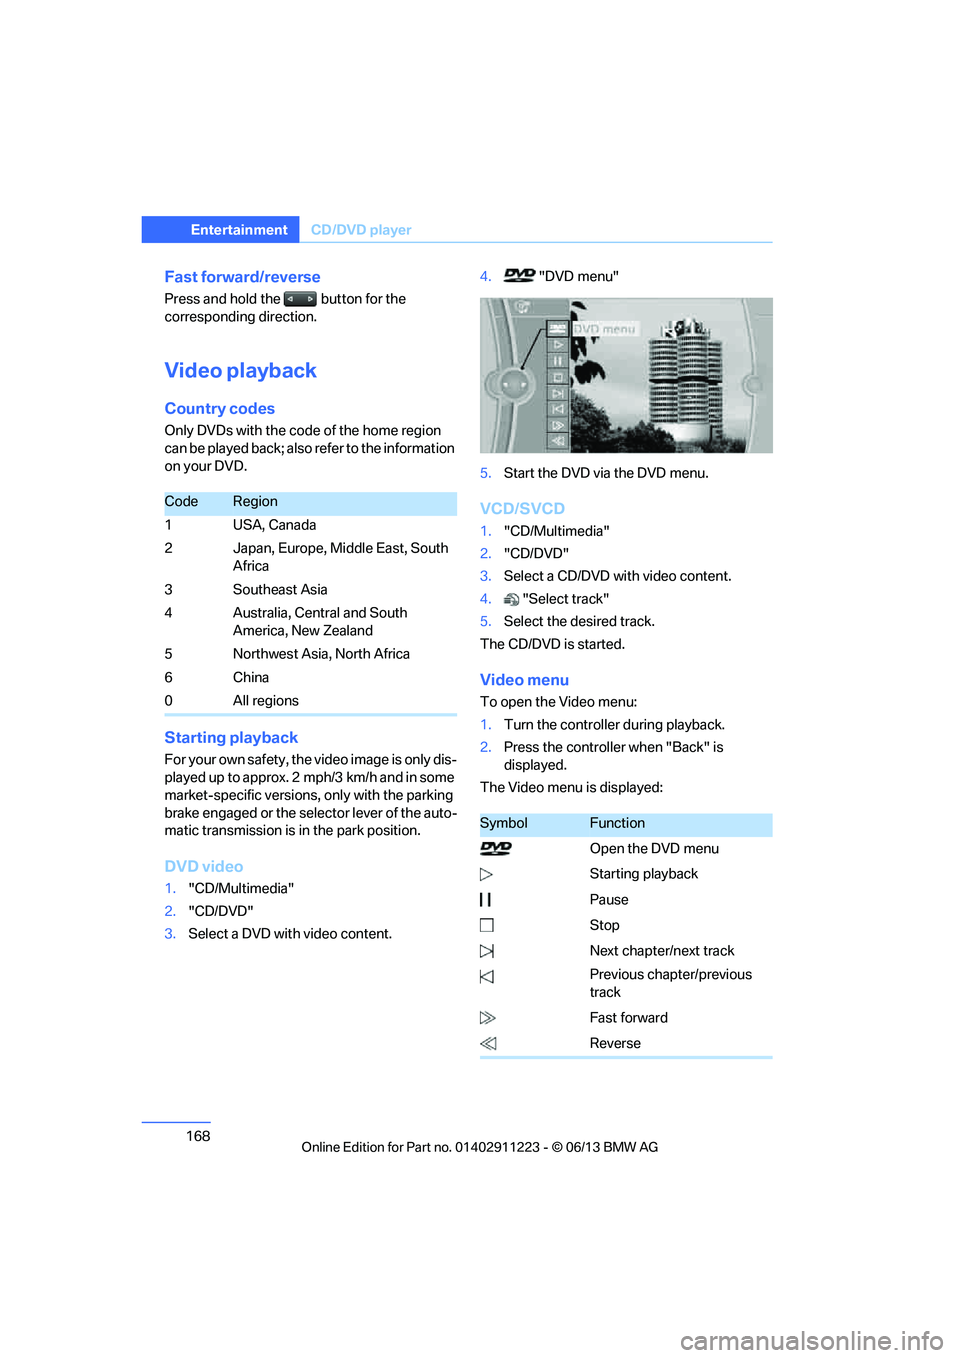
3. Select a DVD with video content. 4.
"DVD menu"
5. Start the DVD via the DVD menu.
VCD/SVCD
1."CD/Multimedia"
2. "CD/DVD"
3. Select a CD/DVD with video content.
4. "Select track"
5. Select the desired track.
The CD/DVD is started.
Video menu
To open the Video menu:
1. Turn the controller during playback.
2. Press the controller when "Back" is
displayed.
The Video menu is displayed:
CodeRegion
1USA, Canada
2 Japan, Europe, Middle East, South Africa
3Southeast Asia
4 Australia, Central and South America, New Zealand
5 Northwest Asia, North Africa
6China
0 All regions
SymbolFunction
Open the DVD menu
Starting playback
Pause
Stop
Next chapter/next track
Previous chapter/previous
track
Fast forward
Reverse
00320051004F004C00510048000300280047004C0057004C005200510003
Page 170 of 284
169
CD/DVD player
Entertainment
In fast forward/reverse: the speed increases
every time the controller is pressed. To stop,
start playback.
DVD menu
1.
If necessary, turn the controller to open the
Video menu.
2. "DVD menu"
The DVD menu is displayed. The display
depends on the contents of the DVD.
> To select menu items: move and press the
controller.
> To change to the Video menu: turn the
controller and select "Back".
DVD/VCD settings
For some DVDs, settings can only be made via
the DVD menu; also refer to the information on
your DVD.
Language
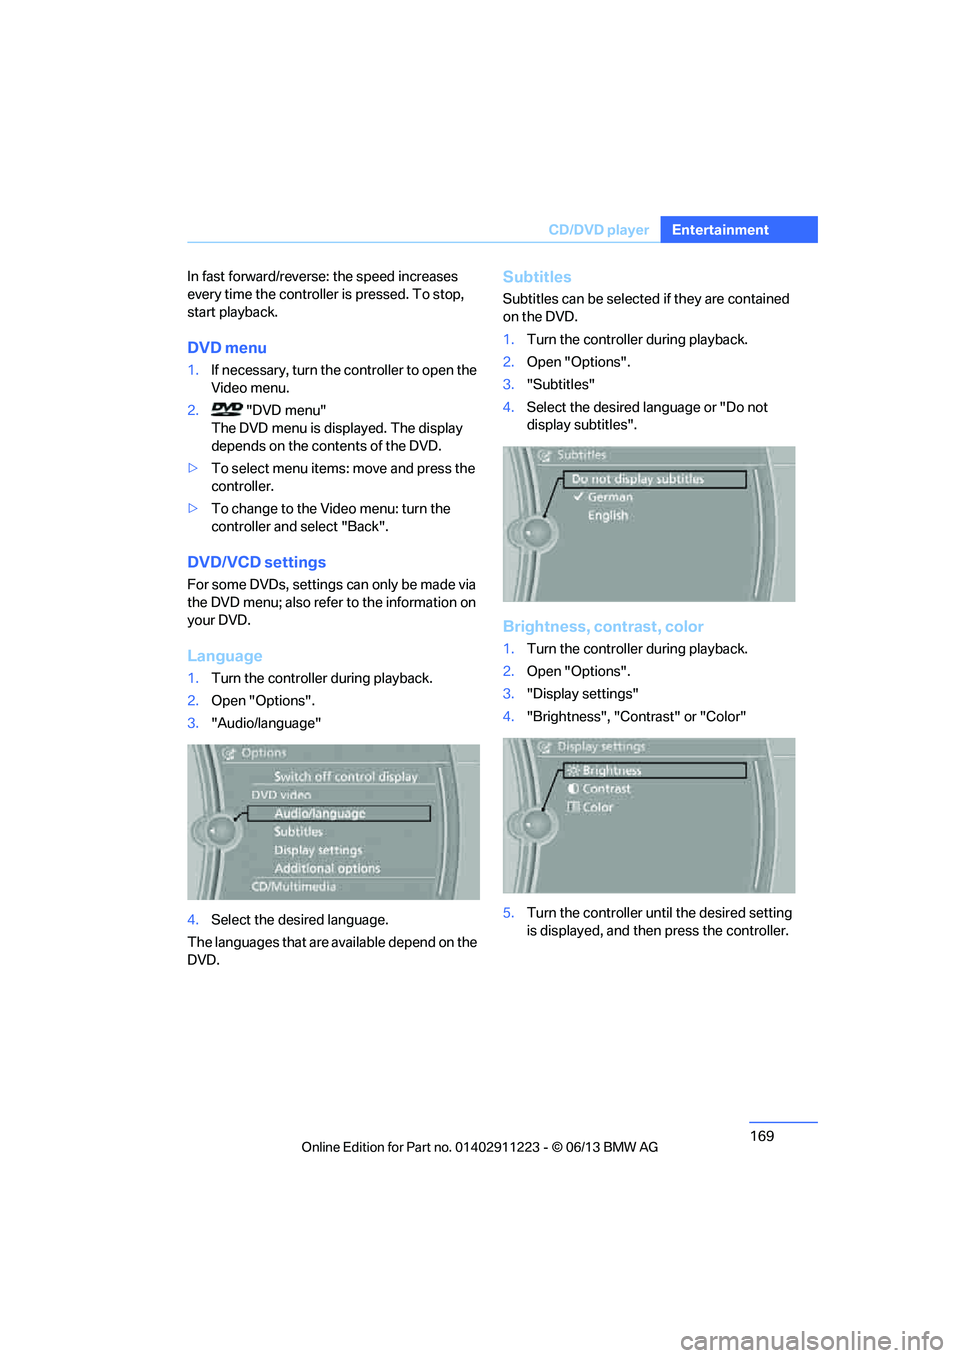
1.Turn the controller during playback.
2. Open "Options".
3. "Audio/language"
4. Select the desired language.
The languages that are available depend on the
DVD.
Subtitles
Subtitles can be selected if they are contained
on the DVD.
1. Turn the controller during playback.
2. Open "Options".
3. "Subtitles"
4. Select the desired la nguage or "Do not
display subtitles".
Brightness, contrast, color
1. Turn the controller during playback.
2. Open "Options".
3. "Display settings"
4. "Brightness", "Contrast" or "Color"
5. Turn the controller unt il the desired setting
is displayed, and then press the controller.
00320051004F004C00510048000300280047004C0057004C005200510003
Page 185 of 284
184
EntertainmentExternal devices
Disconnect one of the two connections, e.g.
the audio connection, refer to page 183,
and start playback again.
If you have gone through all items in the list and
still cannot activate the de sired function, please
contact Customer Relations or your BMW
center.
Software update
The vehicle supports various external devices,
depending on the software it is currently using.
A software update can enable the vehicle to
support, for example, new mobile phones or
new external devices.
Software updates and associated, up-to-date
instructions are available on the web page
www.bmwusa.com/update.
Displaying cu rrent version
The currently installed software is displayed.
1."Settings"
2. "Software update"
3. "Show current version"
Select the desired versio n to display additional
information.
Updating software by USB
The software update can only be performed
when stopped.
1. Save the file for the so ftware update in the
main directory of a USB data storage
device.
2. Connect the USB data storage device to the
USB audio interface in the center armrest. It
is not possible to perform the update using
the USB interface in the glove compart-
ment.
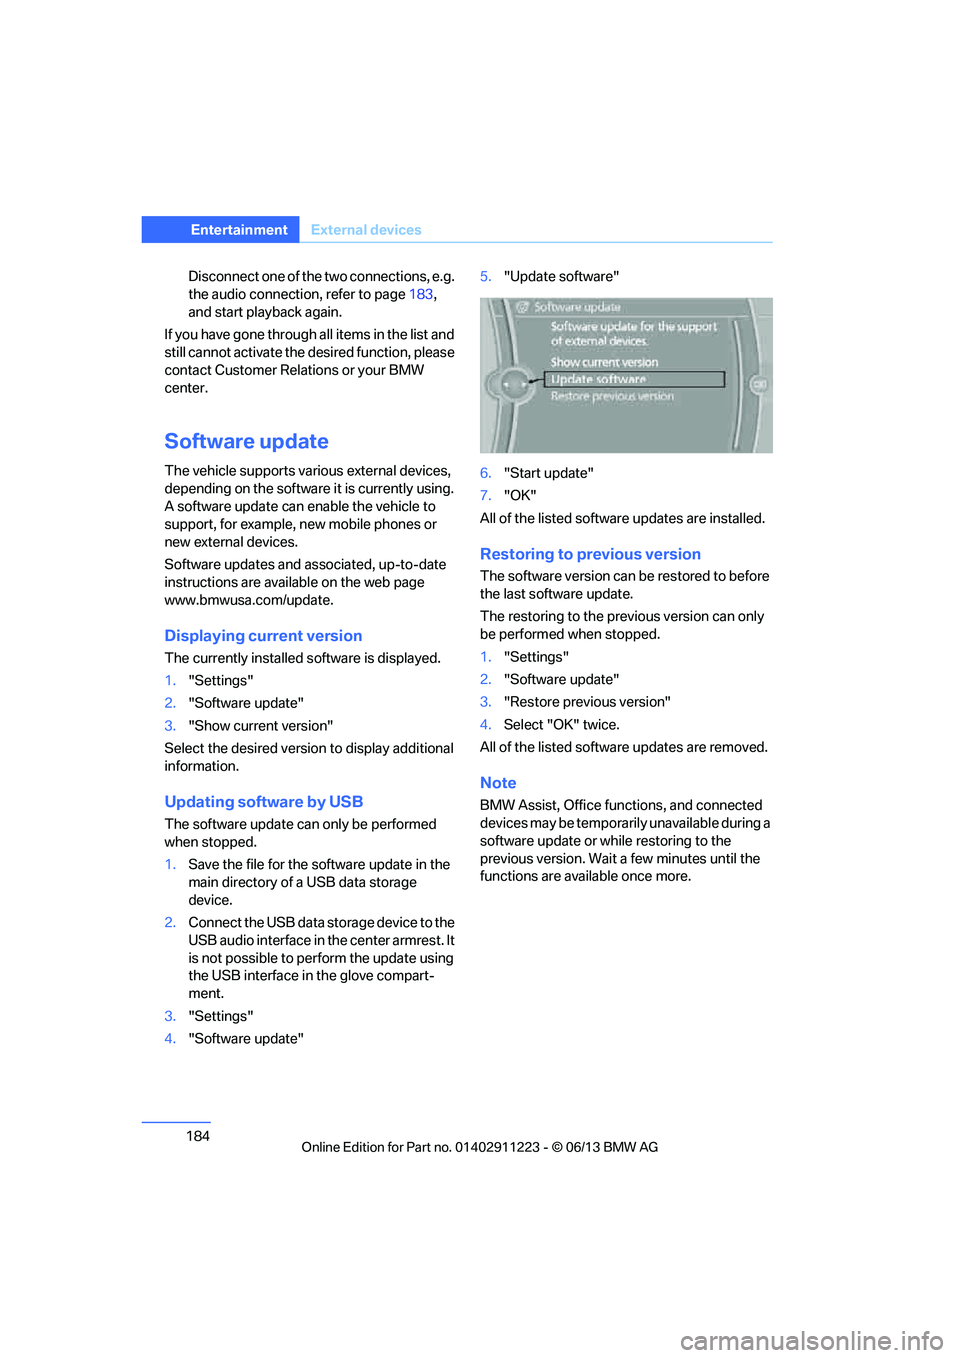
3. "Settings"
4. "Software update" 5.
"Update software"
6. "Start update"
7. "OK"
All of the listed software updates are installed.
Restoring to previous version
The software version can be restored to before
the last software update.
The restoring to the prev ious version can only
be performed when stopped.
1. "Settings"
2. "Software update"
3. "Restore previous version"
4. Select "OK" twice.
All of the listed softwa re updates are removed.
Note
BMW Assist, Office functions, and connected
devices may be temporarily unavailable during a
software update or while restoring to the
previous version. Wait a few minutes until the
functions are available once more.
00320051004F004C00510048000300280047004C0057004C005200510003
Page 255 of 284
254
MobilityGiving and receiving assistance
Attach the tow bar to the tow fittings only,
as attaching it to othe r parts of the vehicle
could result in damage.<
With a tow rope
When starting off in the towing vehicle, make
sure that the tow rope is taut.
To avoid jerking and the associated
stresses on vehicle components when
towing, always use nylon ropes or nylon straps.
Attach the tow rope to the tow fittings only, as
attaching it to other parts of the vehicle could
result in damage. <
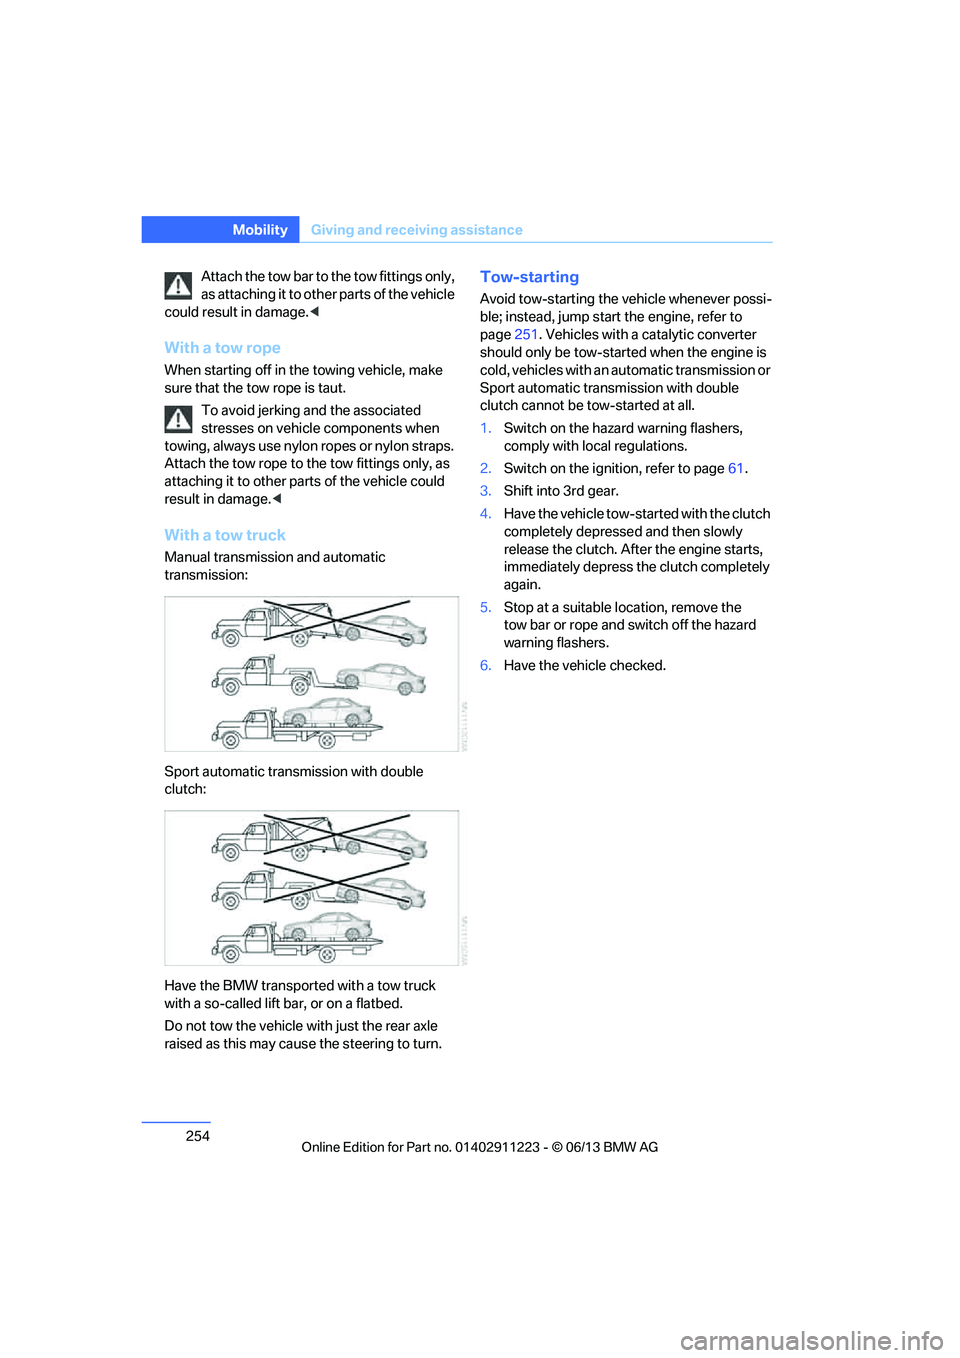
With a tow truck
Manual transmission and automatic
transmission:
Sport automatic transmission with double
clutch:
Have the BMW transported with a tow truck
with a so-called lift bar, or on a flatbed.
Do not tow the vehicle wi th just the rear axle
raised as this may cause the steering to turn.
Tow-starting
Avoid tow-starting the vehicle whenever possi-
ble; instead, jump start the engine, refer to
page 251. Vehicles with a catalytic converter
should only be tow-started when the engine is
cold, vehicles with an automatic transmission or
Sport automatic transmission with double
clutch cannot be tow-started at all.
1. Switch on the hazard warning flashers,
comply with local regulations.
2. Switch on the ignition, refer to page 61.
3. Shift into 3rd gear.
4. Have the vehicle tow-started with the clutch
completely depresse d and then slowly
release the clutch. Afte r the engine starts,
immediately depress the clutch completely
again.
5. Stop at a suitable location, remove the
tow bar or rope and switch off the hazard
warning flashers.
6. Have the vehicle checked.
00320051004F004C00510048000300280047004C0057004C005200510003
Page 265 of 284

264
ReferenceShort commands for the voice activation system
Navigation
General information
Map
FunctionCommand
Navigation menu {Navigation }
Opening destination entry {Enter address }
Entering an address {Enter address }
Opening destination guidance {Guidance }
Starting destination guidance {Start guidance }
Ending destination guidance {Stop guidance }
Opening the home address {Home address }
Opening the route criteria {Route preference }
Opening the route {Route information }
Switching on the voice instructions {Switch on voice instructions }
Repeating a voice instruction {Repeat voice instructions }
Switching off the voice instructions {Switch off voice instructions }
Displaying the address book {Address book }
Displaying the last destinations {Last destinations }
Opening the traffic bulletins {Traffic Info }
Special destinations {Points of interest }
FunctionCommand
Displaying the map {Map }
Map facing north {Map facing north }
Map in the direction of travel {Map in direction of travel }
Perspective map {Map perspective view }
Automatic map scaling {Map with automatic scaling }
Changing the scale {Map scale }
Scale...meters {Map scale … meters } e.g. map scale of
100 meters
Scale...kilometers {Map scale … kilometers } e.g. split screen
scale of 5 kilometers
00320051004F004C00510048000300280047004C0057004C005200510003