2013 BMW 135I CONVERTIBLE rear view mirror
[x] Cancel search: rear view mirrorPage 30 of 284
29
Voice activation system
At a glance
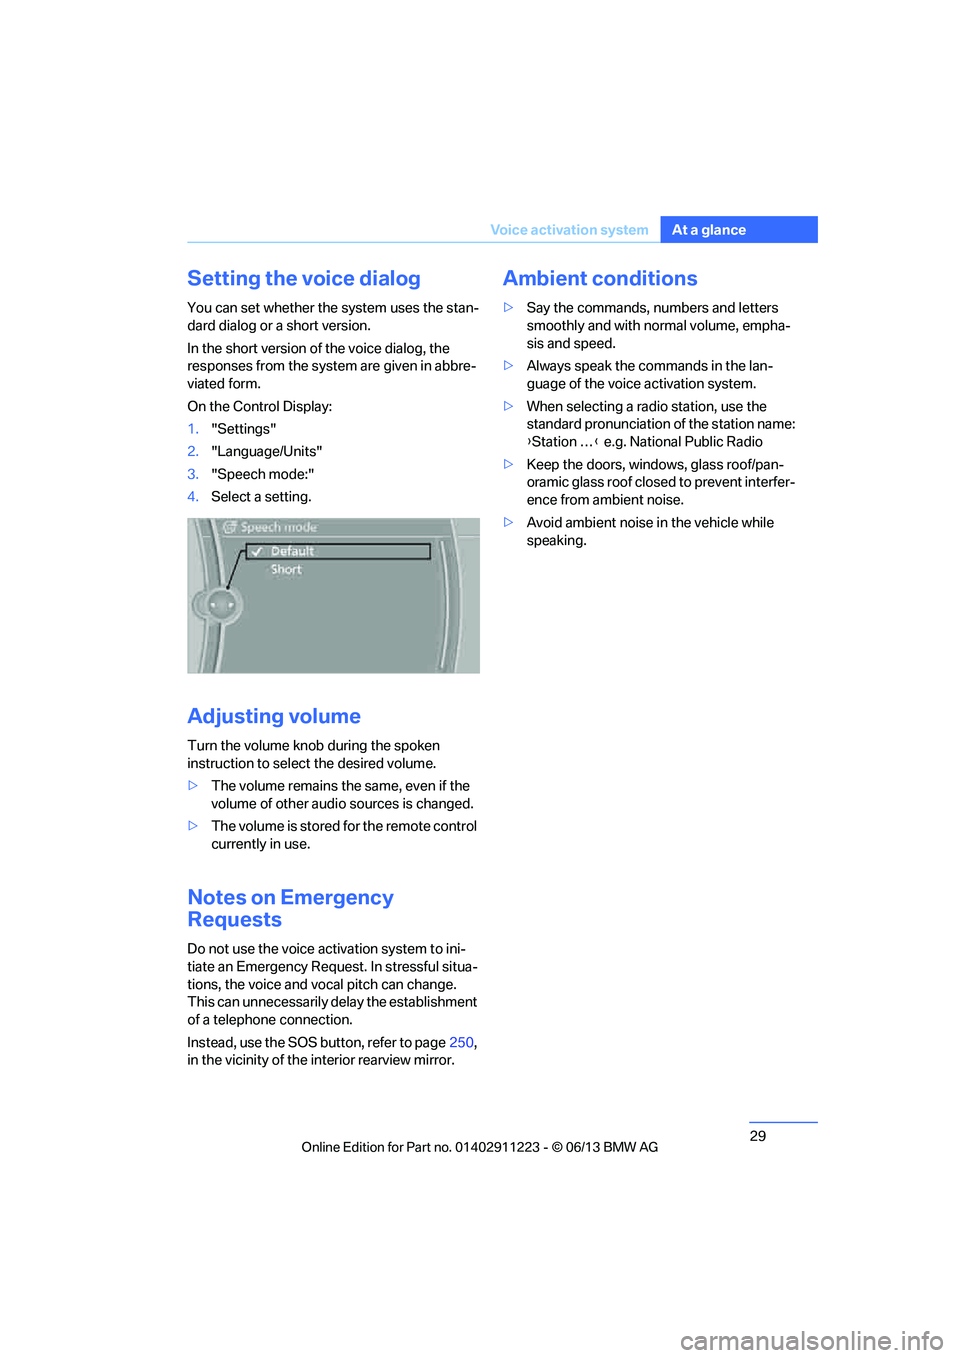
Setting the voice dialog
You can set whether the system uses the stan-
dard dialog or a short version.
In the short version of the voice dialog, the
responses from the system are given in abbre-
viated form.
On the Control Display:
1.
"Settings"
2. "Language/Units"
3. "Speech mode:"
4. Select a setting.
Adjusting volume
Turn the volume knob during the spoken
instruction to select the desired volume.
>The volume remains the same, even if the
volume of other audio sources is changed.
> The volume is stored for the remote control
currently in use.
Notes on Emergency
Requests
Do not use the voice activation system to ini-
tiate an Emergency Request. In stressful situa-
tions, the voice and vocal pitch can change.
This can unnecessarily delay the establishment
of a telephone connection.
Instead, use the SOS button, refer to page 250,
in the vicinity of the interior rearview mirror.
Ambient conditions
> Say the commands, nu mbers and letters
smoothly and with normal volume, empha-
sis and speed.
> Always speak the commands in the lan-
guage of the voice activation system.
> When selecting a radio station, use the
standard pronunciation of the station name:
{Station … } e.g. National Public Radio
> Keep the doors, windows, glass roof/pan-
oramic glass roof closed to prevent interfer-
ence from ambient noise.
> Avoid ambient noise in the vehicle while
speaking.
00320051004F004C00510048000300280047004C0057004C005200510003
Page 57 of 284
56
ControlsAdjustments
Automatic heating
Depending on the outside temperature, both
exterior mirrors are heated automatically when
the engine is running or the ignition is switched
on.
Passenger side mirro r tilt function –
automatic curb monitor
Activating
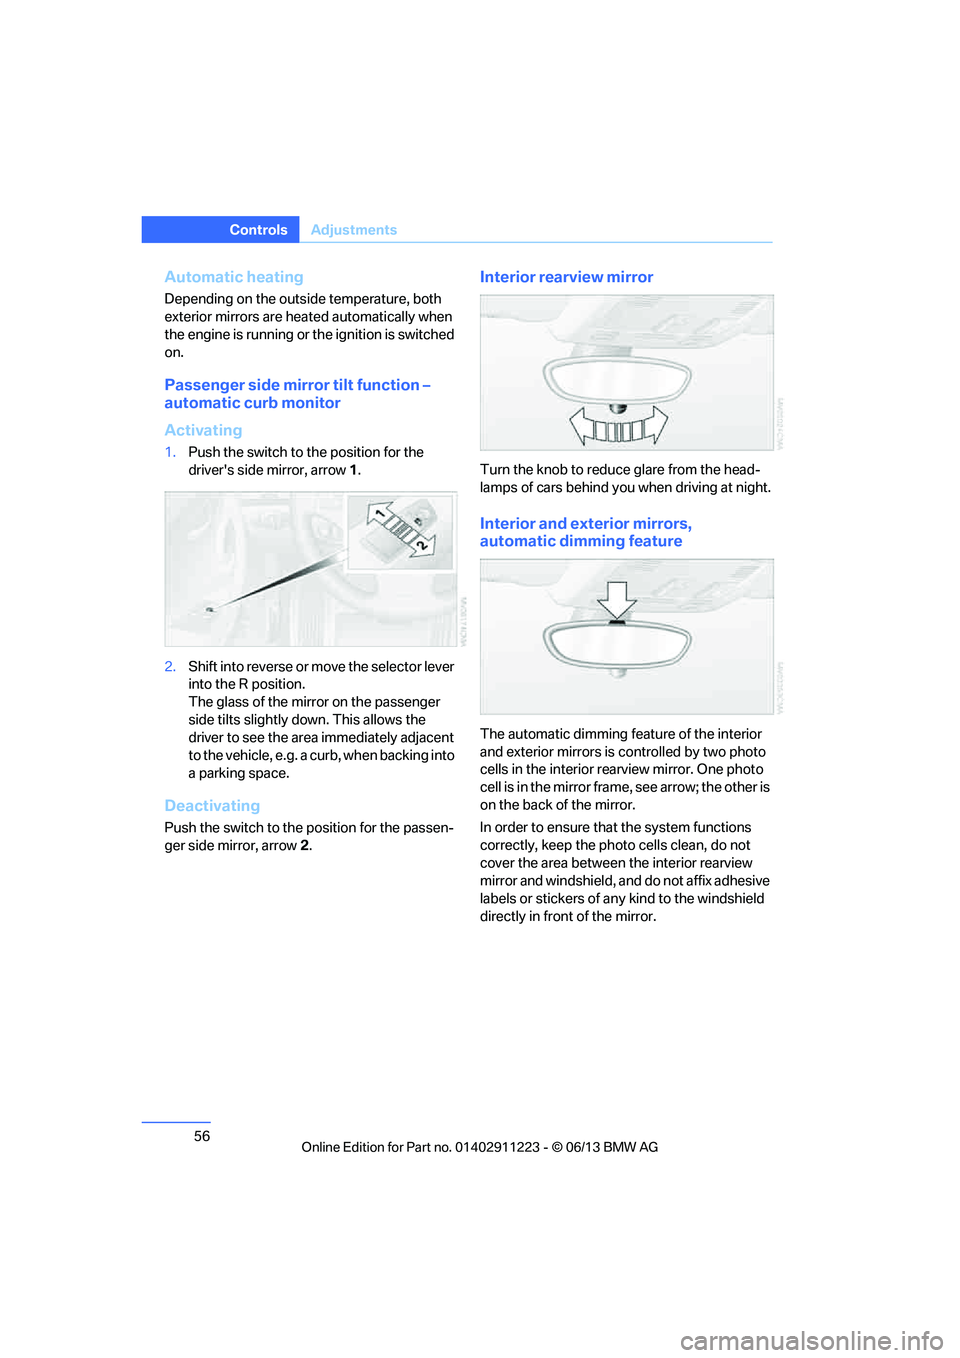
1. Push the switch to the position for the
driver's side mirror, arrow 1.
2. Shift into reverse or mo ve the selector lever
into the R position.
The glass of the mirror on the passenger
side tilts slightly down. This allows the
driver to see the area immediately adjacent
to the vehicle, e.g. a curb, when backing into
a parking space.
Deactivating
Push the switch to the position for the passen-
ger side mirror, arrow 2.
Interior rearview mirror
Turn the knob to reduce glare from the head-
lamps of cars behind yo u when driving at night.
Interior and exterior mirrors,
automatic dimming feature
The automatic dimming feature of the interior
and exterior mirrors is controlled by two photo
cells in the interior re arview mirror. One photo
cell is in the mirror frame, see arrow; the other is
on the back of the mirror.
In order to ensure that the system functions
correctly, keep the photo cells clean, do not
cover the area between the interior rearview
mirror and windshield, and do not affix adhesive
labels or stickers of an y kind to the windshield
directly in front of the mirror.
00320051004F004C00510048000300280047004C0057004C005200510003
Page 73 of 284
72
ControlsDriving
Switching on wipers
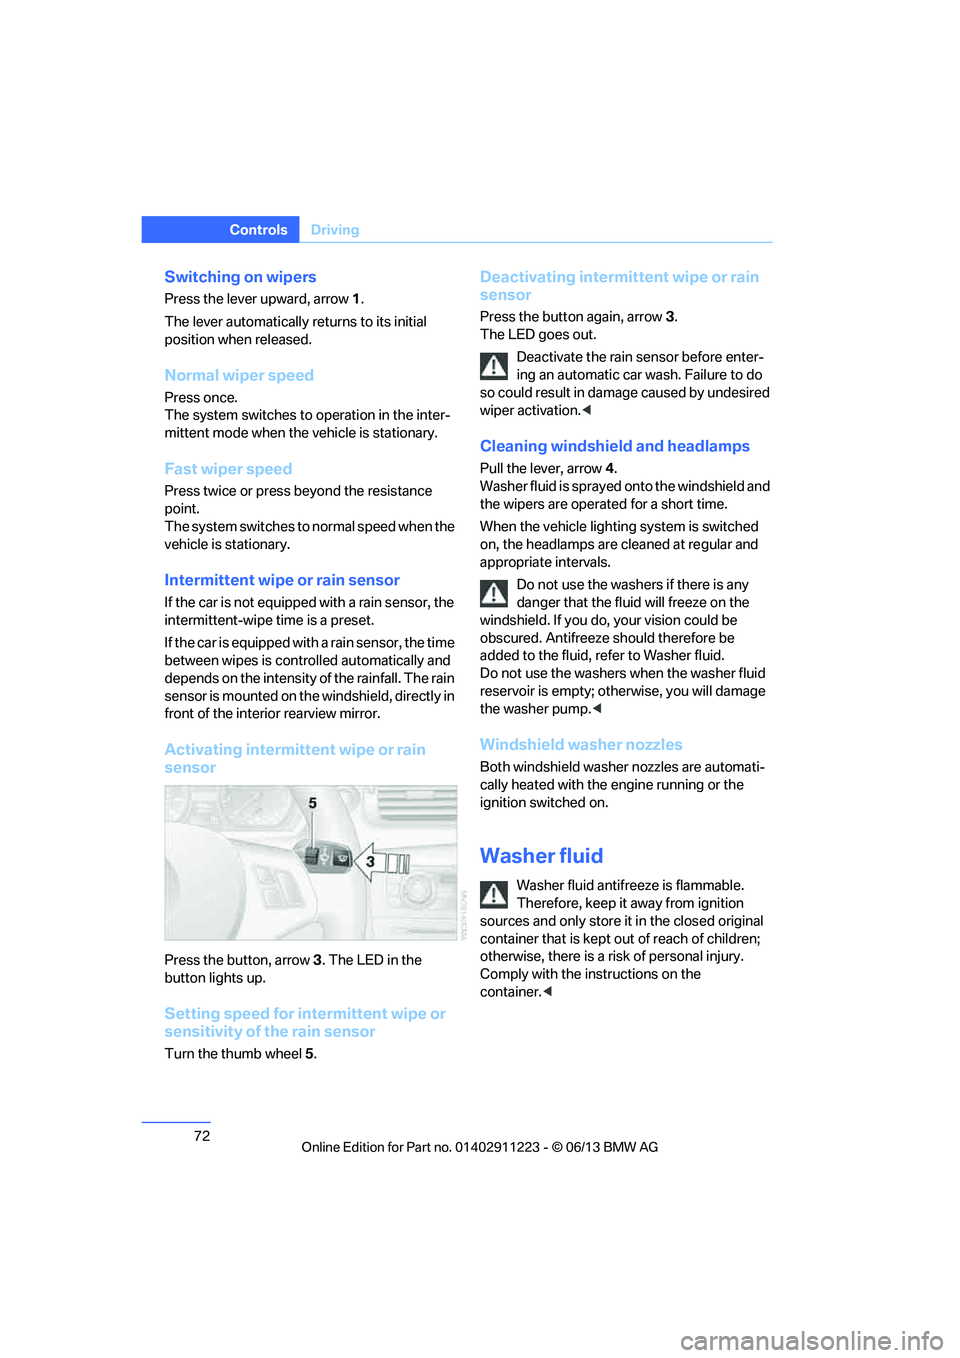
Press the lever upward, arrow 1.
The lever automatically returns to its initial
position when released.
Normal wiper speed
Press once.
The system switches to operation in the inter-
mittent mode when the vehicle is stationary.
Fast wiper speed
Press twice or press beyond the resistance
point.
The system switches to normal speed when the
vehicle is stationary.
Intermittent wipe or rain sensor
If the car is not equipped with a rain sensor, the
intermittent-wipe time is a preset.
If the car is equipped with a rain sensor, the time
between wipes is contro lled automatically and
depends on the intensity of the rainfall. The rain
sensor is mounted on the windshield, directly in
front of the interior rearview mirror.
Activating intermittent wipe or rain
sensor
Press the button, arrow 3. The LED in the
button lights up.
Setting speed for intermittent wipe or
sensitivity of the rain sensor
Turn the thumb wheel 5.
Deactivating intermit tent wipe or rain
sensor
Press the button again, arrow 3.
The LED goes out.
Deactivate the rain sensor before enter-
ing an automatic car wash. Failure to do
so could result in damage caused by undesired
wiper activation. <
Cleaning windshield and headlamps
Pull the lever, arrow 4.
Washer fluid is sprayed onto the windshield and
the wipers are operated for a short time.
When the vehicle lighting system is switched
on, the headlamps are cleaned at regular and
appropriate intervals.
Do not use the washers if there is any
danger that the flui d will freeze on the
windshield. If you do, your vision could be
obscured. Antifreeze should therefore be
added to the fluid, refer to Washer fluid.
Do not use the washers when the washer fluid
reservoir is empty; othe rwise, you will damage
the washer pump. <
Windshield washer nozzles
Both windshield washer nozzles are automati-
cally heated with the engine running or the
ignition switched on.
Washer fluid
Washer fluid antifree ze is flammable.
Therefore, keep it away from ignition
sources and only store it in the closed original
container that is kept out of reach of children;
otherwise, there is a risk of personal injury.
Comply with the instructions on the
container. <
00320051004F004C00510048000300280047004C0057004C005200510003
Page 98 of 284

97
Technology for driving comfort and safety
Controls
Airbags
The following airbags are located under the
marked covers:
1
Front airbags
2 Coupe: head airbags
3 Side airbags in the seat backrests
4 Convertible: knee airbags
Protective action
Observe the adjustment instructions on
page 49 to ensure the best possible
personal protection. <
The front airbags help protect the driver and
front passenger by responding to frontal
impacts in which safety belts alone cannot pro-
vide adequate restrain t. When needed, the
head and side airbags help provide protection in
the event of side impact. The relevant side air-
bag supports the side upper body area. The
head air bag supports the head.
The airbags have been designed to not be trig-
gered in every collision si tuation, e.g. not in
minor accidents or rear-end collisions.
Do not apply adhesive materials to the
cover panels of the airbags, cover them or
modify them in any other way.
Keep the dashboard and window on the front
passenger side clear, i. e., do not cover with
adhesive labels or coveri ngs, and do not attach
holders such as for navigation instruments and
mobile phones.
Do not attach seat cove rs, cushions or other
objects not specifically approved for seats with
integral side airbags to the front seats. Do not
hang items of clothing su ch as coats or jackets over the backrests. Do
not attempt to remove
the airbag retention system from the vehicle. Do
not modify the individu al components of the
system or its wiring in any way. This includes
the upholstered covers on the steering wheel,
instrument panel, seats and roof posts, as well
as the sides of the roof lining. Do not attempt to
remove or dismantle the steering wheel.
Do not touch the individual components imme-
diately after the system has been triggered,
because there is a danger of burns.
In the event of faults, immobilization, or after the
airbag system has been triggered, only have the
testing, repair, or disa ssembly and scrapping of
gas generator performed by your BMW center
or a workshop that has the required explosives
licenses. Unprofessional attempts to work on
the system could lead to failure in an emer-
gency or to undesired ai rbag activation, either
of which could result in personal injury. <
Warning notices and information about the
airbags can also be found on the sun visors.
Automatic deactivation of the front
passenger airbags
An analysis of the impr ession in the front pas-
senger seat cushion determines whether and
how the seat is occupied. The front and side air-
bags for the front passe nger are activated or
deactivated by the system accordingly.
The indicator lamp above the interior
rearview mirror shows the current status
of the front passenger ai rbags, deactivated or
activated, refer to Sta tus of front passenger
airbags below. <
00320051004F004C00510048000300280047004C0057004C005200510003
Page 103 of 284
102
ControlsLamps
angle and other parameters, the light from the
headlamp follows the course of the road.
In tight curves such as on switchbacks or when
turning, at speeds up to approx. 40 mph/
70 km/h, an additional, cornering light is
switched on that lights up the area inside the
curve.
Activating Adaptive Light Control
With the ignition switched on, turn the light
switch to position 3, refer to page 100.
The corner-illuminating lamp is switched on
automatically, depending on the steering wheel
angle or turn signal indicator.
Standstill function: to avoid blinding oncoming
traffic, the Adaptive Light Control does not
direct light toward the driver's side when the
vehicle is at a standstill.
When you are reversing, only the corner-illumi-
nating lamps are switched on and active on
both sides.
Malfunction
The warning lamp lights up. A mes-
sage appears on the Control Display.
The Adaptive Light Control is mal-
functioning or failed. Ha ve the system checked
as soon as possible.
High beams/roadside parking
lamps
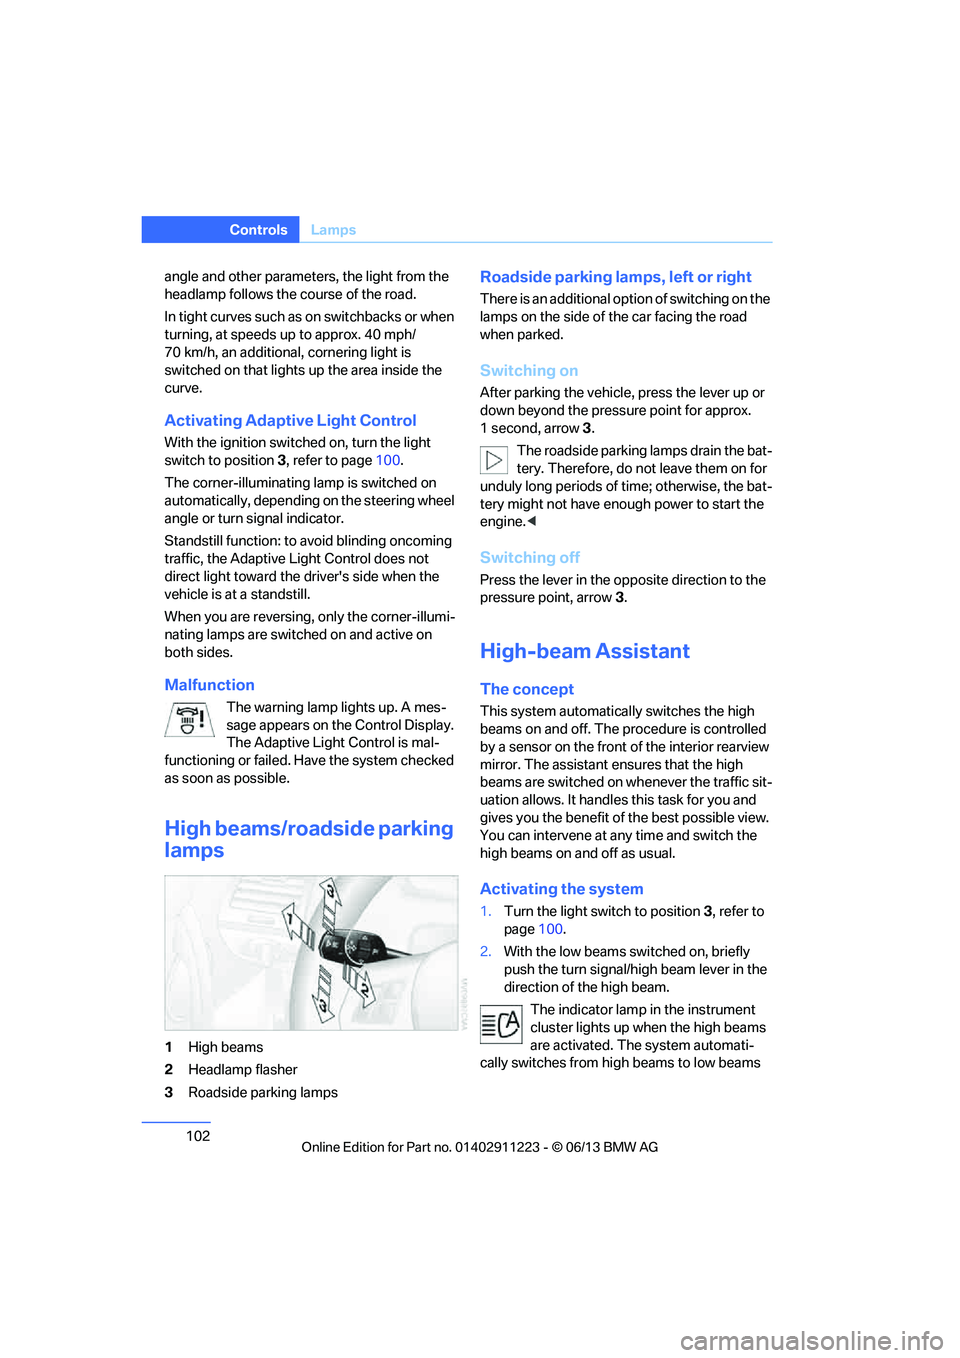
1 High beams
2 Headlamp flasher
3 Roadside parking lamps
Roadside parking lamps, left or right
There is an additional option of switching on the
lamps on the side of the car facing the road
when parked.
Switching on
After parking the vehicle, press the lever up or
down beyond the pressu re point for approx.
1 second, arrow 3.
The roadside parking lamps drain the bat-
tery. Therefore, do not leave them on for
unduly long periods of time; otherwise, the bat-
tery might not have enou gh power to start the
engine. <
Switching off
Press the lever in the o pposite direction to the
pressure point, arrow 3.
High-beam Assistant
The concept
This system automatically switches the high
beams on and off. The procedure is controlled
by a sensor on the front of the interior rearview
mirror. The assistant ensures that the high
beams are switched on whenever the traffic sit-
uation allows. It handle s this task for you and
gives you the benefit of the best possible view.
You can intervene at any time and switch the
high beams on and off as usual.
Activating the system
1. Turn the light switch to position 3, refer to
page 100.
2. With the low beams switched on, briefly
push the turn signal/high beam lever in the
direction of the high beam.
The indicator lamp in the instrument
cluster lights up when the high beams
are activated. The system automati-
cally switches from hi gh beams to low beams
00320051004F004C00510048000300280047004C0057004C005200510003
Page 104 of 284
103
Lamps
Controls
and vice versa in response
to oncoming traffic,
traffic ahead of you, and adequate ambient
lighting, e.g. on city streets.
Switching the high beams on and off
manually
Whenever you wish, or when the situation
requires, you can intervene:
> If the High-beam Assistant switches on the
high beams, but you would like to drive with
the low beams, simply switch off the high
beams using the turn signal/high beam
lever. This deacti vates the High-beam
Assistant.
To reactivate the syst em, briefly push the
turn signal/high beam lever toward the high
beams again.
> If the High-beam Assistant switches on the
low beams, but you would like to drive with
the high beams, switch on the high beams
as usual. This deacti vates the system and
the high beams need to be switched off
manually, if necessary.
To reactivate the syst em, briefly push the
turn signal/high beam lever toward the high
beams again.
> Use the headlamp flasher as usual with the
low beams switched on.
System limitations
The High-beam Assistant cannot serve
as a substitute for the driver's personal
judgment of when to use the high beams.
Therefore, manually switch off the high beams
in situations where this is required to avoid a
safety risk.<
The system is not fully fu nctional in situations
such as the following, and driver intervention
may be necessary:
> In very unfavorable weather conditions,
such as fog or heavy precipitation
> In detecting poorly-lit road users, such as
pedestrians, cyclists, horseback riders and
wagons; when driving close to train or ship
traffic; and at animal crossings >
In tight curves, on hilltops or in depressions,
in cross traffic or half-obscured oncoming
traffic on highways
> In poorly lit towns and cities and in the
presence of highly reflective signs
> At low speeds
> When the windshield in front of the interior
rearview mirror is fogged over, dirty or cov-
ered with stickers, etc.
> If the sensor is dirty. Clean the sensor on
the front of the interior r e a r v i e w m i r r o r u s i n g
a cloth moistened with a small amount of
glass cleaner.
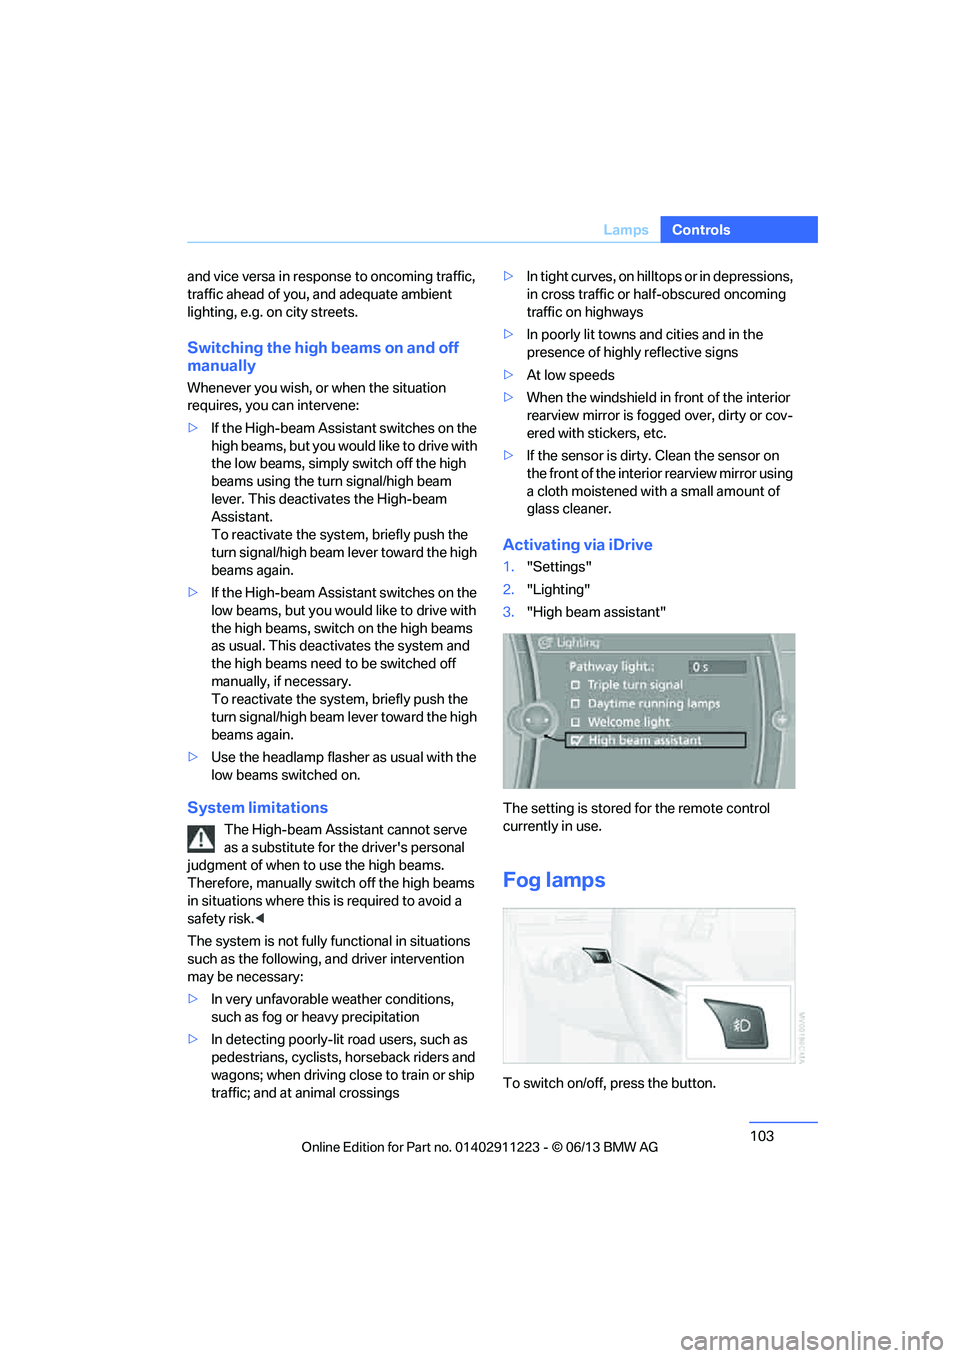
Activating via iDrive
1. "Settings"
2. "Lighting"
3. "High beam assistant"
The setting is stored for the remote control
currently in use.
Fog lamps
To switch on/off, press the button.
00320051004F004C00510048000300280047004C0057004C005200510003
Page 112 of 284
111
Practical interior accessories
Controls
Practical interior accessories
Vehicle equipment
In this chapter, all production, country, and
optional equipment that is offered in the model
range is described. For this reason, descrip-
tions will be given of some equipment that may
not be available in a vehi
cle, for example due to
the special options or national-market version
selected. This also app lies to safety related
functions and systems.
Integrated universal remote
control
The concept
The Integrated universal remote control can be
used to operate up to 3 functions of remote-
controlled devices such as garage door open-
ers or lighting systems. The Integrated univer-
sal remote control thus replaces as many as
three different hand-held transmitters. To oper-
ate them, the buttons on the interior rearview
mirror must be programmed with the desired
functions. Programming requires the hand-held
transmitter for the respective device.
To prevent possible damage or injury,
before programming or using the inte-
grated universal remote control to operate a
device, always inspect the immediate area to
make certain that no people, animals or objects
are within the pivoting or travel range of the
device being operated.
Also follow the safety in structions supplied with
the hand-held transmitter. <
For security reasons, make sure to delete the
stored functions before selling the vehicle, refer
to page 113.
Compatibility
If this symbol appears on the package
or in the instructions supplied with the
device to be operated, you can gener-
ally assume that the devi ce is compatible with
the Integrated univer sal remote control.
For additional questions, please consult:
> Your BMW center.
> www.homelink.com on the Internet.
HomeLink is a registered trademark of Johnson
Controls, Inc.
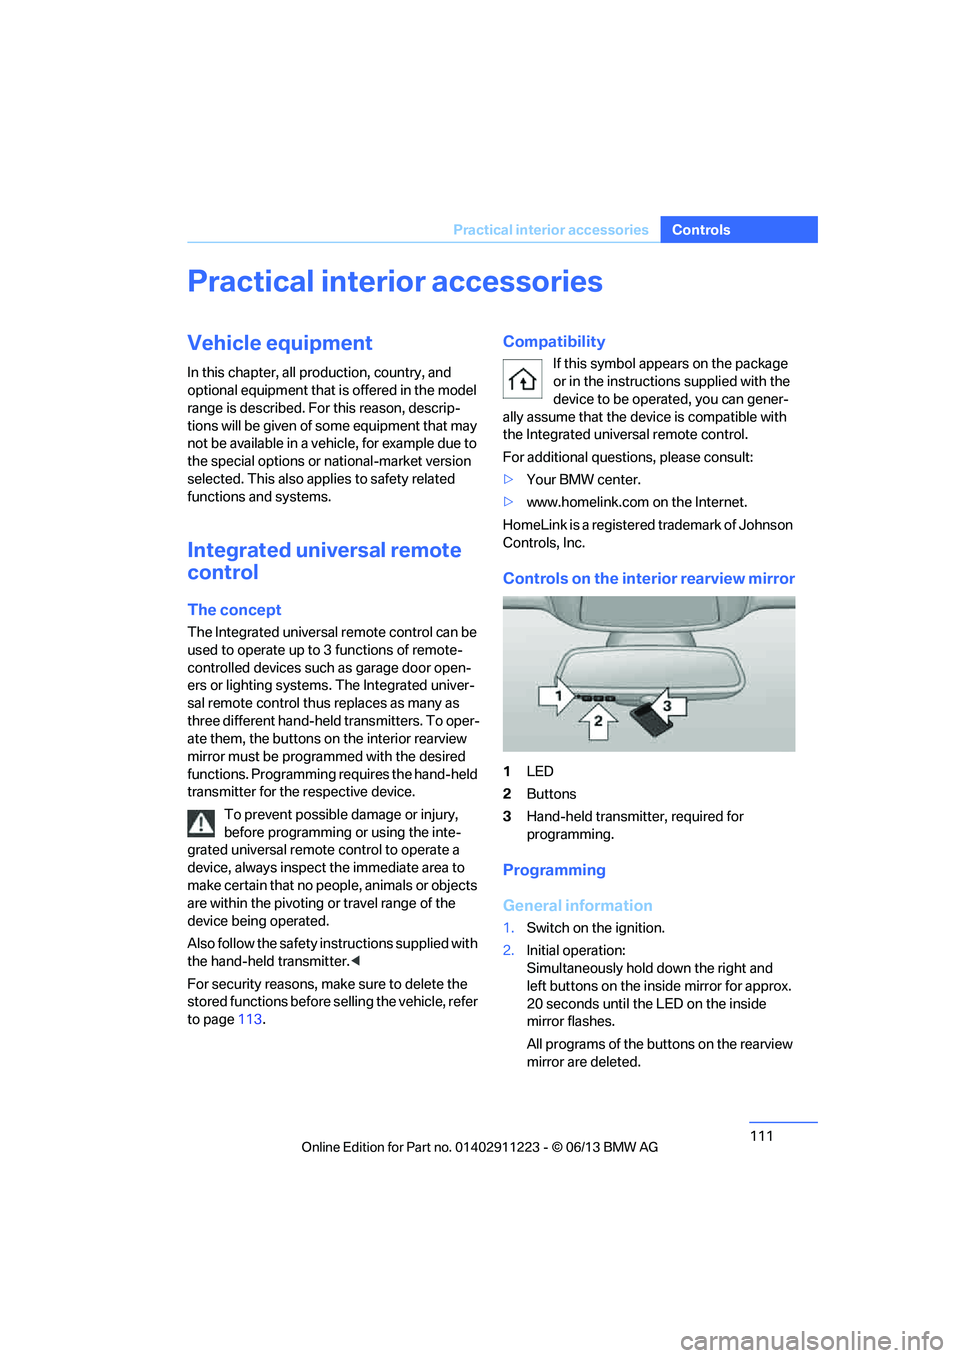
Controls on the inte rior rearview mirror
1LED
2 Buttons
3 Hand-held transmitter, required for
programming.
Programming
General information
1.Switch on the ignition.
2. Initial operation:
Simultaneously hold down the right and
left buttons on the inside mirror for approx.
20 seconds until the LED on the inside
mirror flashes.
All programs of the bu ttons on the rearview
mirror are deleted.
00320051004F004C00510048000300280047004C0057004C005200510003
Page 200 of 284
199
Te l e p h o n e
Communications
Adjusting volume
Turn knob during announcement.
>
The volume remains the same, even if the
volume of other audio sources is changed.
> The volume is stored for the remote control
currently in use.
Notes
Notes on Emergency Requests
Do not use the voice operation system to ini-
tiate an emergency call. In stressful situations,
the voice and vocal pitch can change. This can
unnecessarily delay the establishment of a tele-
phone connection.
Instead, use the SOS button, refer to page 250,
in the vicinity of the interior rearview mirror.
Ambient conditions
> Say the commands, nu mbers and letters
smoothly and with normal volume, empha-
sis and speed.
> Always say the commands in the language
of the system. The language of the voice
operation of the mobile phone is preset and
cannot be changed via the Control Display.
> Keep the doors, windows, glass roof, and
convertible top closed to prevent interfer-
ence from outside noise.
> Avoid ambient noise in the vehicle while
speaking.
Snap-in adapter
General information
Detailed information on snap-in adapters that
compatibly support mobile phone functions can
be found at your BMW center.
Notes
At high temperatures, the charging function of
the mobile phone may be limited and some
functions may no longer be carried out.
When using the mobile phone via the vehicle,
follow the operating instru ctions of the mobile
phone.
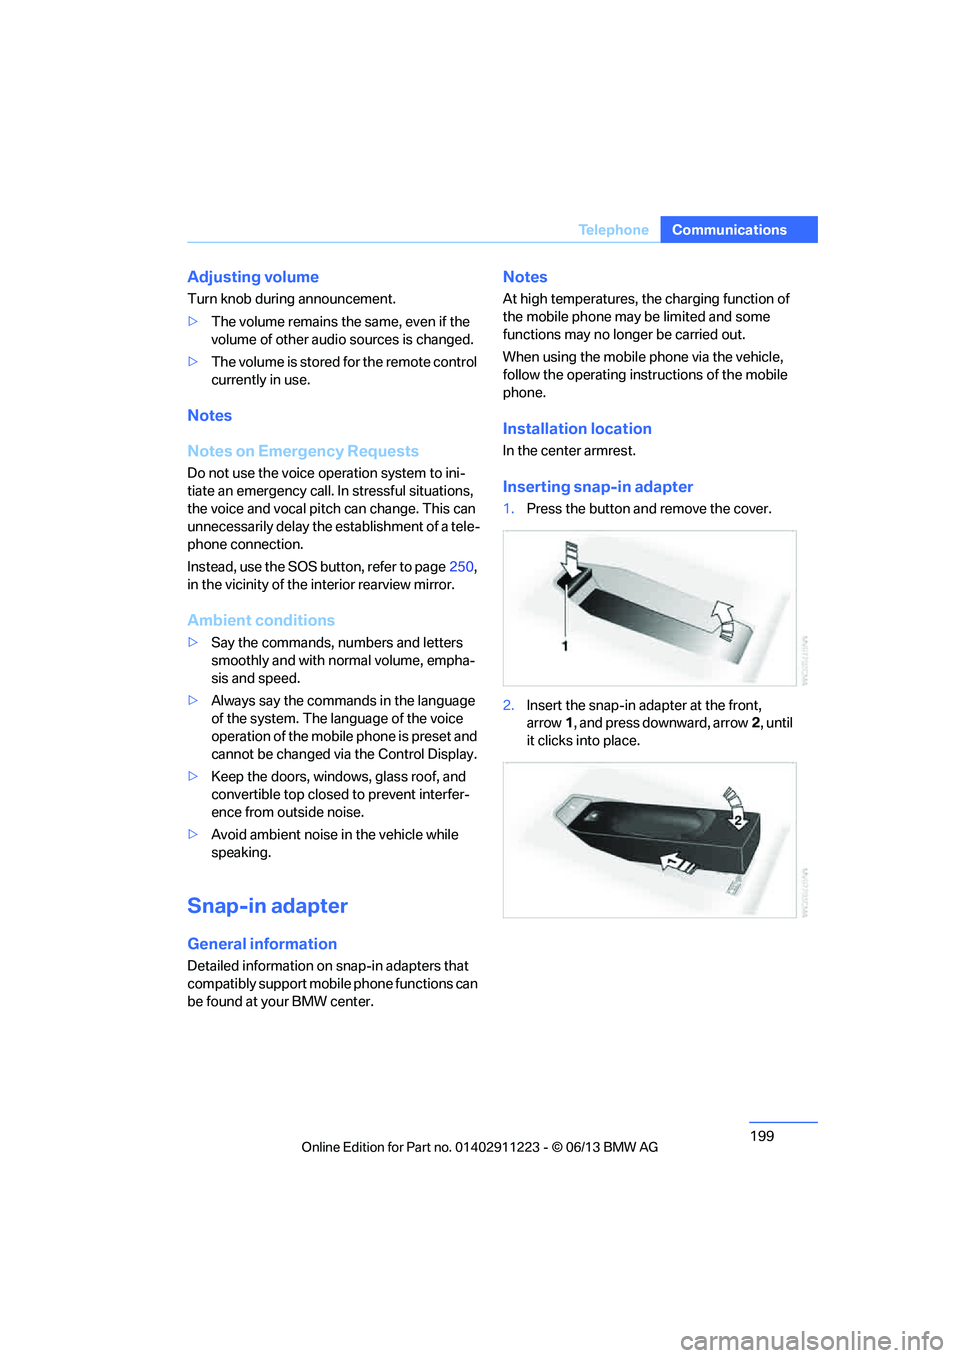
Installation location
In the center armrest.
Inserting snap-in adapter
1. Press the button and remove the cover.
2. Insert the snap-in adapter at the front,
arrow 1, and press downward, arrow 2, until
it clicks into place.
00320051004F004C00510048000300280047004C0057004C005200510003