2013 BMW 128I jump
[x] Cancel search: jumpPage 71 of 284
70
ControlsDriving
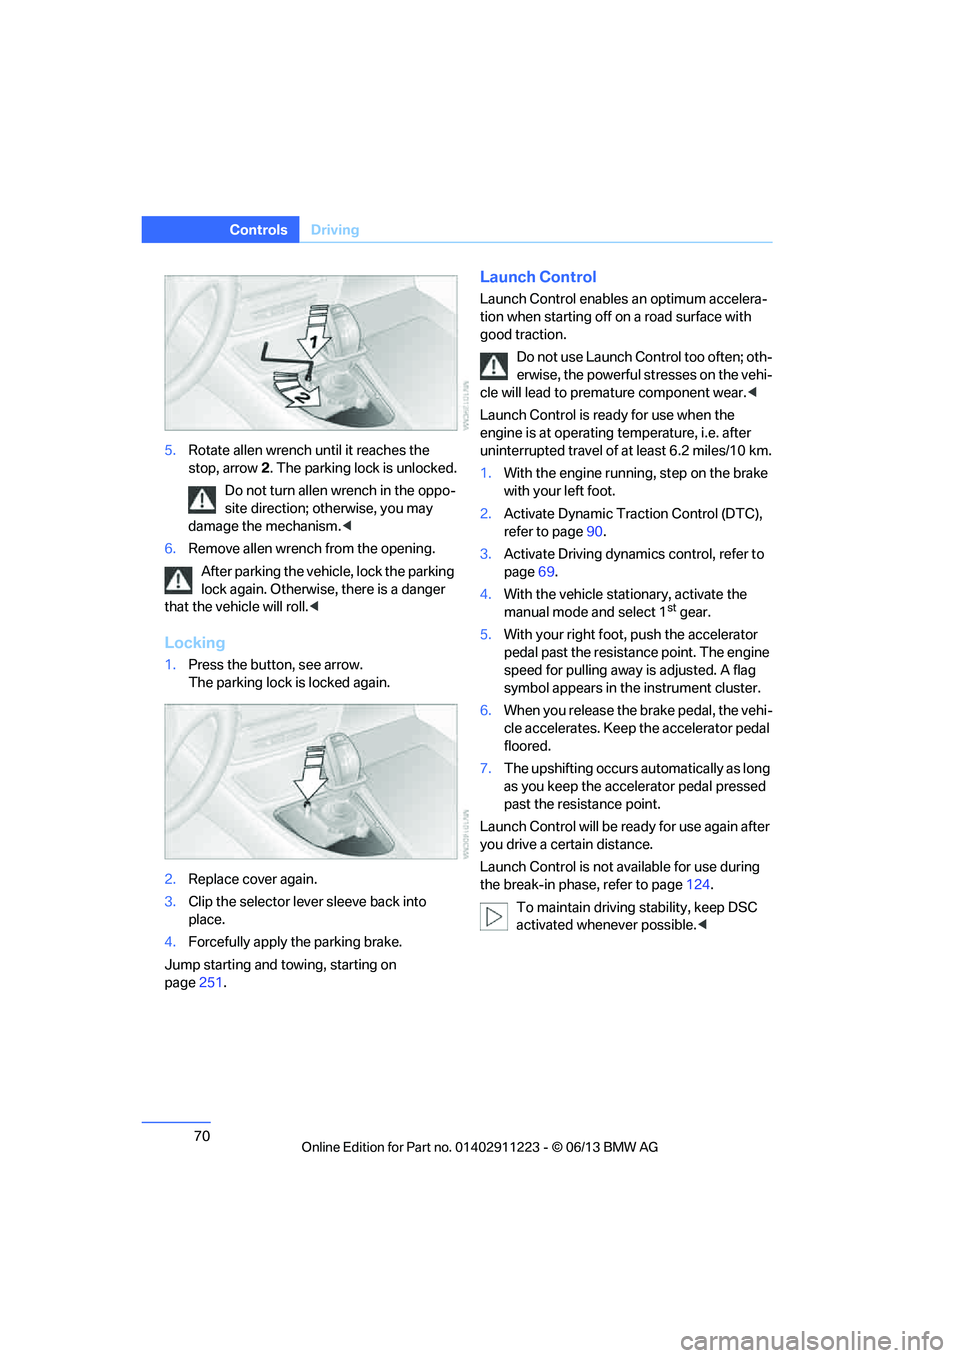
5.Rotate allen wrench until it reaches the
stop, arrow 2. The parking lock is unlocked.
Do not turn allen wrench in the oppo-
site direction; otherwise, you may
damage the mechanism. <
6. Remove allen wrench from the opening.
After parking the vehicle, lock the parking
lock again. Otherwise, there is a danger
that the vehicle will roll. <
Locking
1.Press the button, see arrow.
The parking lock is locked again.
2. Replace cover again.
3. Clip the selector lever sleeve back into
place.
4. Forcefully apply the parking brake.
Jump starting and towing, starting on
page 251.
Launch Control
Launch Control enables an optimum accelera-
tion when starting off on a road surface with
good traction.
Do not use Launch Control too often; oth-
erwise, the powerful stresses on the vehi-
cle will lead to premature component wear. <
Launch Control is ready for use when the
engine is at operating temperature, i.e. after
uninterrupted travel of at least 6.2 miles/10 km.
1. With the engine running, step on the brake
with your left foot.
2. Activate Dynamic Trac tion Control (DTC),
refer to page 90.
3. Activate Driving dynami cs control, refer to
page 69.
4. With the vehicle stationary, activate the
manual mode and select 1
stgear.
5. With your right foot, push the accelerator
pedal past the resistance point. The engine
speed for pulling away is adjusted. A flag
symbol appears in the instrument cluster.
6. When you release the brake pedal, the vehi-
cle accelerates. Keep the accelerator pedal
floored.
7. The upshifting occurs automatically as long
as you keep the accelerator pedal pressed
past the resistance point.
Launch Control will be ready for use again after
you drive a certain distance.
Launch Control is not available for use during
the break-in phase, refer to page 124.
To maintain driving stability, keep DSC
activated whenever possible. <
00320051004F004C00510048000300280047004C0057004C005200510003
Page 162 of 284
161
Satellite radio
Entertainment
Satellite radio
Vehicle equipment
In this chapter, all production, country, and
optional equipment that is offered in the model
range is described. Equipment is also described
that is not available because of, for example,
selected options or coun
try version. This also
applies to safety related functions and systems.
General information
The channels are offered in fixed packages.
Packages must be ac tivated by telephone.
Navigation bar
The functions of the navigation bar symbols can
also be stored on the programmable memory
buttons, refer to page 25.
Managing subscription
Clear reception is required for activating and
deactivating channels. Re ception is best when
you have an unobstructed view to the sky. The
channel name is displayed in the status line.
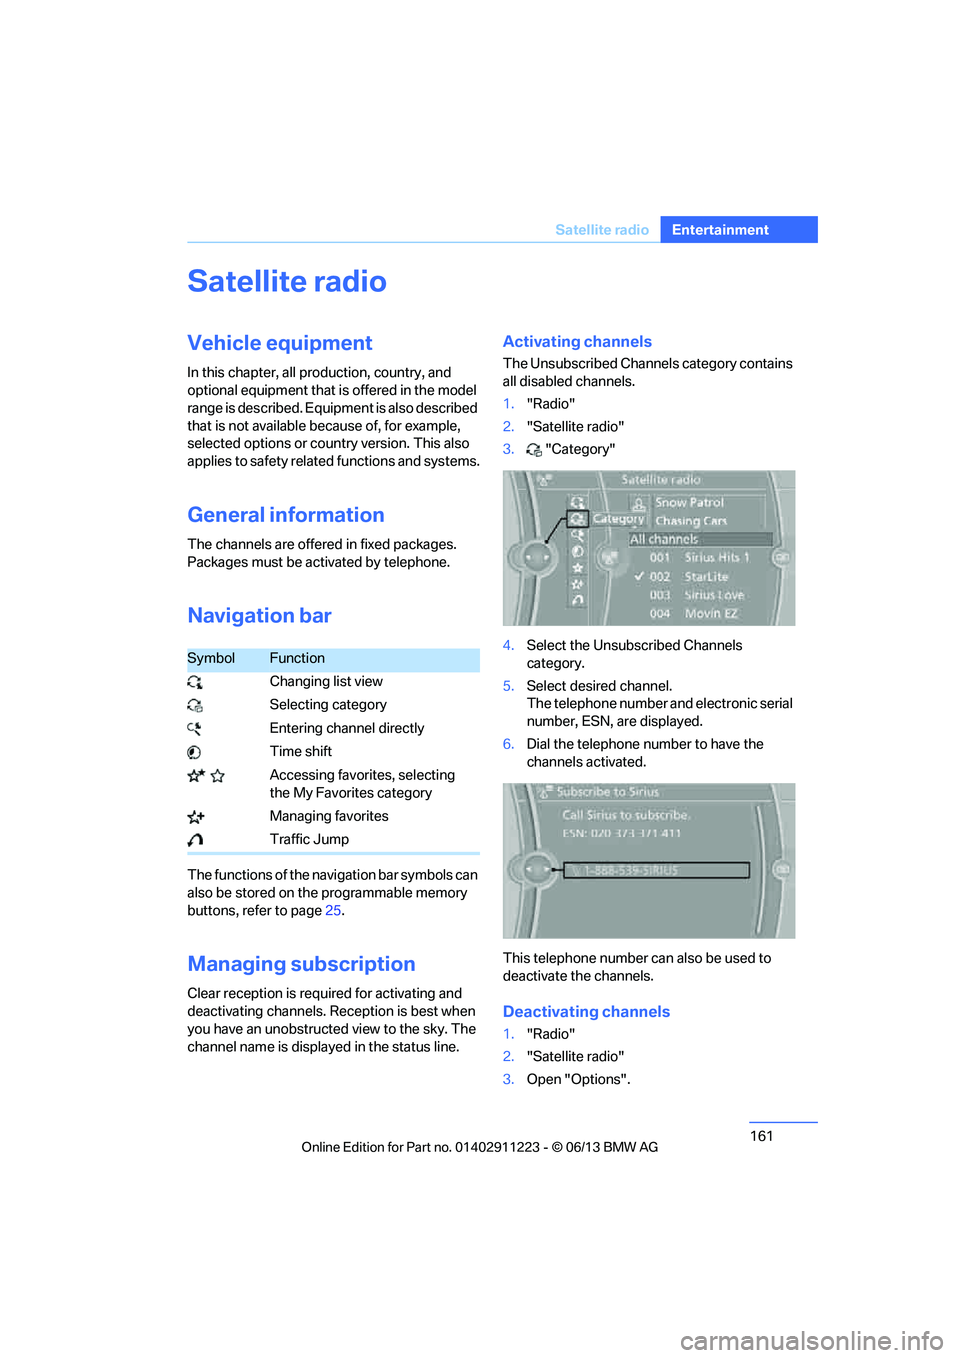
Activating channels
The Unsubscribed Channels category contains
all disabled channels.
1. "Radio"
2. "Satellite radio"
3. "Category"
4. Select the Unsubscribed Channels
category.
5. Select desired channel.
The telephone number and electronic serial
number, ESN, are displayed.
6. Dial the telephone number to have the
channels activated.
This telephone number can also be used to
deactivate the channels.
Deactivating channels
1. "Radio"
2. "Satellite radio"
3. Open "Options".
SymbolFunction
Changing list view
Selecting category
Entering channel directly
Time shift
Accessing favorites, selecting the My Favorites category
Managing favorites
Traffic Jump
00320051004F004C00510048000300280047004C0057004C005200510003
Page 166 of 284
165
Satellite radio
Entertainment
Traffic Jump
Traffic and weather information for a selected
region are broadcast at intervals of a few
minutes.
Selecting region
1.
"Radio"
2. "Satellite radio"
3. Open "Options".
4. "Set jump"
5. Select the desired region.
The region is stored for the remote control
currently in use.
Activating/deactivating Jump
1. "Radio"
2. "Satellite radio"
3. "Jump to:"
As soon as information about the selected
region becomes availabl e, it is broadcast.
A new panel appears in the display.
Cancel Traffic Jump: "Cancel".
Select one of the symbol s to deactivate Traffic
Jump.
Automatic update
About twice a year, Sirius carries out an update
of the names and positions of the channels. The
update occurs automa tically and can take
several minutes.
Notes
> Under some circumstances, reception may
not be possible, e.g. under certain environ-
mental or topographical conditions. The
satellite radio has no influence on this.
> The signal may not be available in tunnels or
underground garages or near trees, moun-
tains, or other powerful sources of radio
interference.
SymbolMeaning
Information will be broadcast
soon.
Information is currently being
broadcast.
00320051004F004C00510048000300280047004C0057004C005200510003
Page 233 of 284
232
MobilityEngine compartment
Engine compartment
Vehicle equipment
In this chapter, all pr oduction, country, and
optional equipment that is offered in the model
range is described. For this reason, descrip- tions will be given of some equipment that may
not be available in a vehi
cle, for example due to
the special options or national-market version
selected. This also app lies to safety related
functions and systems.
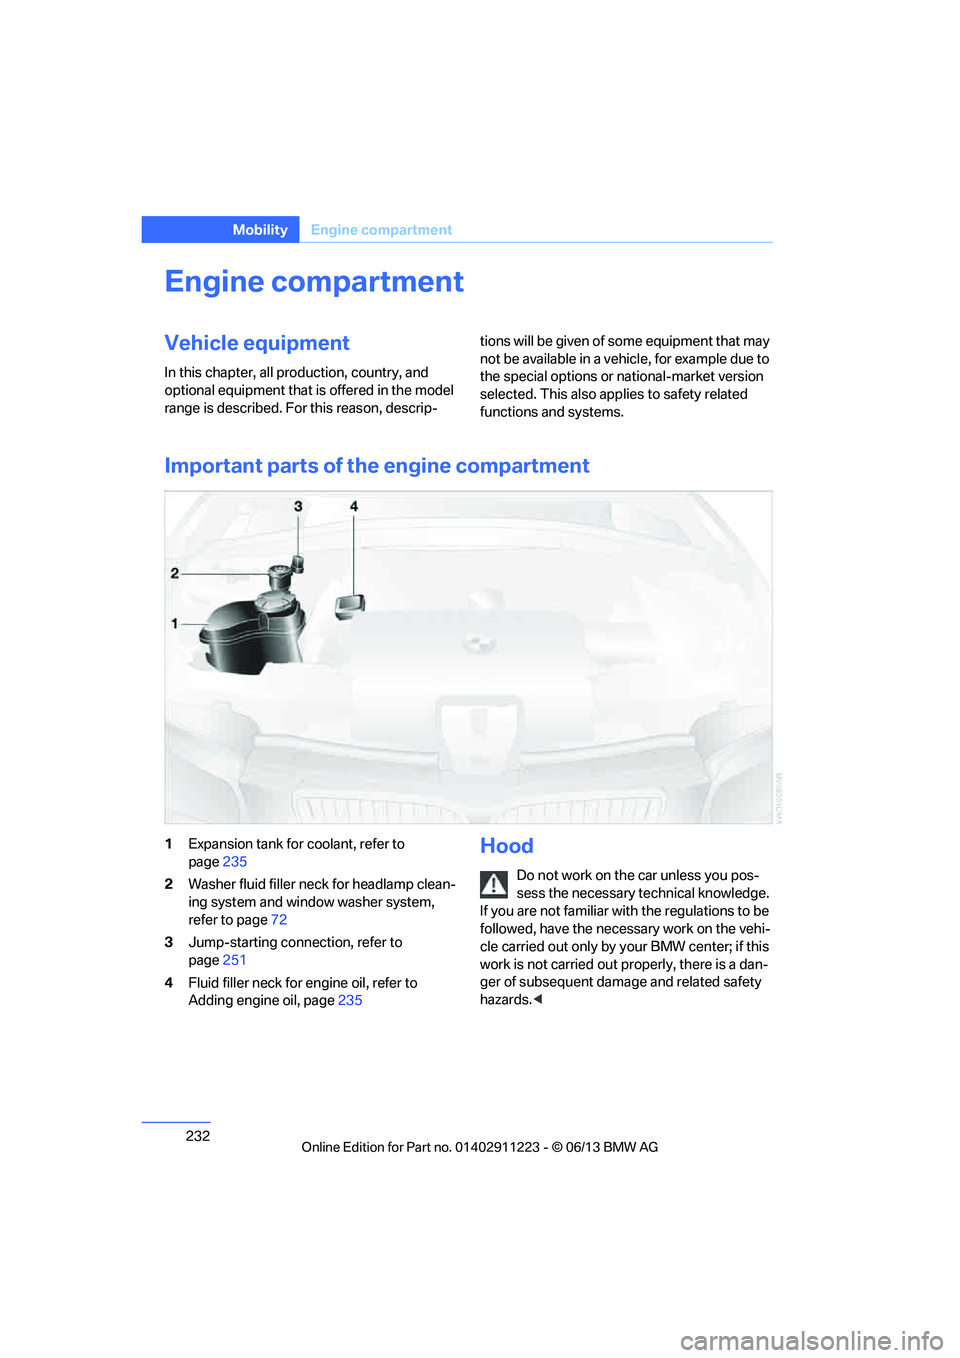
Important parts of th e engine compartment
1Expansion tank for coolant, refer to
page 235
2 Washer fluid filler neck for headlamp clean-
ing system and window washer system,
refer to page 72
3 Jump-starting connection, refer to
page 251
4 Fluid filler neck for engine oil, refer to
Adding engine oil, page 235Hood
Do not work on the car unless you pos-
sess the necessary technical knowledge.
If you are not familiar with the regulations to be
followed, have the necessary work on the vehi-
cle carried out only by your BMW center; if this
work is not carried out properly, there is a dan-
ger of subsequent dama ge and related safety
hazards. <
00320051004F004C00510048000300280047004C0057004C005200510003
Page 249 of 284
248
MobilityReplacing components
Changing wheels
Your BMW is equipped with run-flat tires as
standard. This eliminates the need to change a
wheel immediately in the event of a puncture.
For information on continuing to drive with a
damaged tire, refer to Indica tion of a flat tire on
page 92.
The symbol identifying run- flat tires is a circle
with the letters RSC on the sidewall, refer to
New wheels and tires, page 230.
When mounting new tires or changing over
from summer to winter tires and vice versa,
mount run-flat tires for your own safety. In the
event of a flat, no spare wheel is available. Your
BMW center will be glad to advise you. Refer
also to New wheels and tires, page 230.
The tools for changing wheels are avail-
able as optional accessories from your
BMW center. <
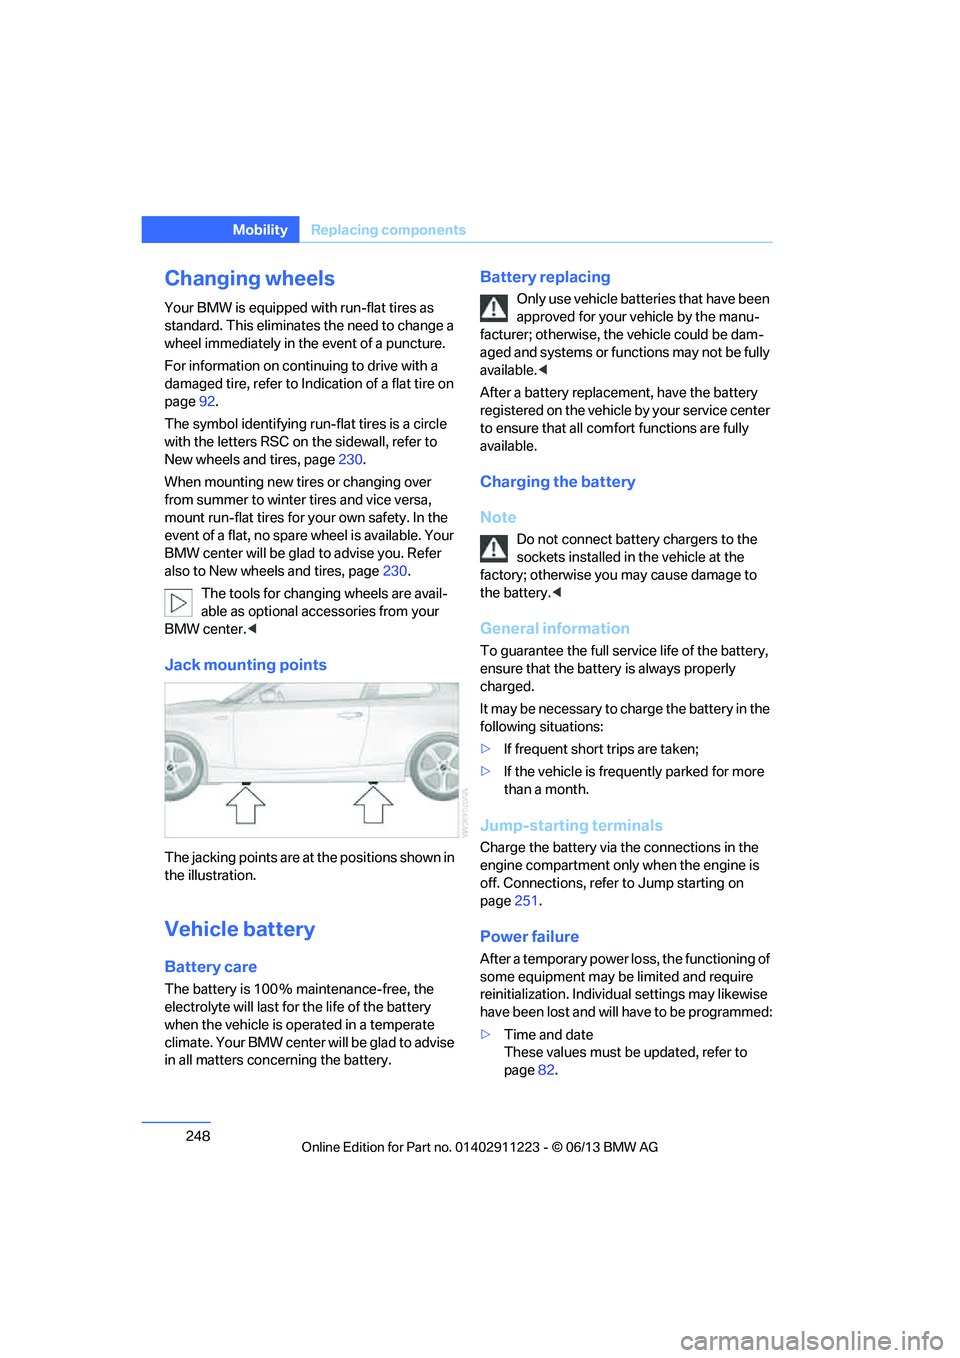
Jack mounting points
The jacking points are at the positions shown in
the illustration.
Vehicle battery
Battery care
The battery is 100 % maintenance-free, the
electrolyte will last for the life of the battery
when the vehicle is operated in a temperate
climate. Your BMW center will be glad to advise
in all matters conc erning the battery.
Battery replacing
Only use vehicle batteries that have been
approved for your vehicle by the manu-
facturer; otherwise, the vehicle could be dam-
aged and systems or functions may not be fully
available. <
After a battery replacem ent, have the battery
registered on the vehicle by your service center
to ensure that all comfort functions are fully
available.
Charging the battery
Note
Do not connect battery chargers to the
sockets installed in the vehicle at the
factory; otherwise you may cause damage to
the battery. <
General information
To guarantee the full serv ice life of the battery,
ensure that the battery is always properly
charged.
It may be necessary to ch arge the battery in the
following situations:
> If frequent short trips are taken;
> If the vehicle is frequently parked for more
than a month.
Jump-starting terminals
Charge the battery via the connections in the
engine compartment only when the engine is
off. Connections, refer to Jump starting on
page 251.
Power failure
After a temporary power lo ss, the functioning of
some equipment may be limited and require
reinitialization. Individual settings may likewise
have been lost and will have to be programmed:
> Time and date
These values must be updated, refer to
page 82.
00320051004F004C00510048000300280047004C0057004C005200510003
Page 252 of 284
251
Giving and receiving assistance
Mobility
Automatically triggering an Emergency
Request
Under certain conditions, an Emergency
Request is sent automatically immediately after
a severe accident. An automatic Emergency
Request is not affected by pressing the SOS
button.
Roadside Assistance
BMW Roadside Assistance is available by
phone around the clock in many countries. You
can obtain support there in the event of a break-
down.
First aid pouch
Some of the articles co
ntained in the first aid
pouch have a limited service life. Therefore,
check the expiration dates of the contents
regularly and replace any items in good time, if
necessary.
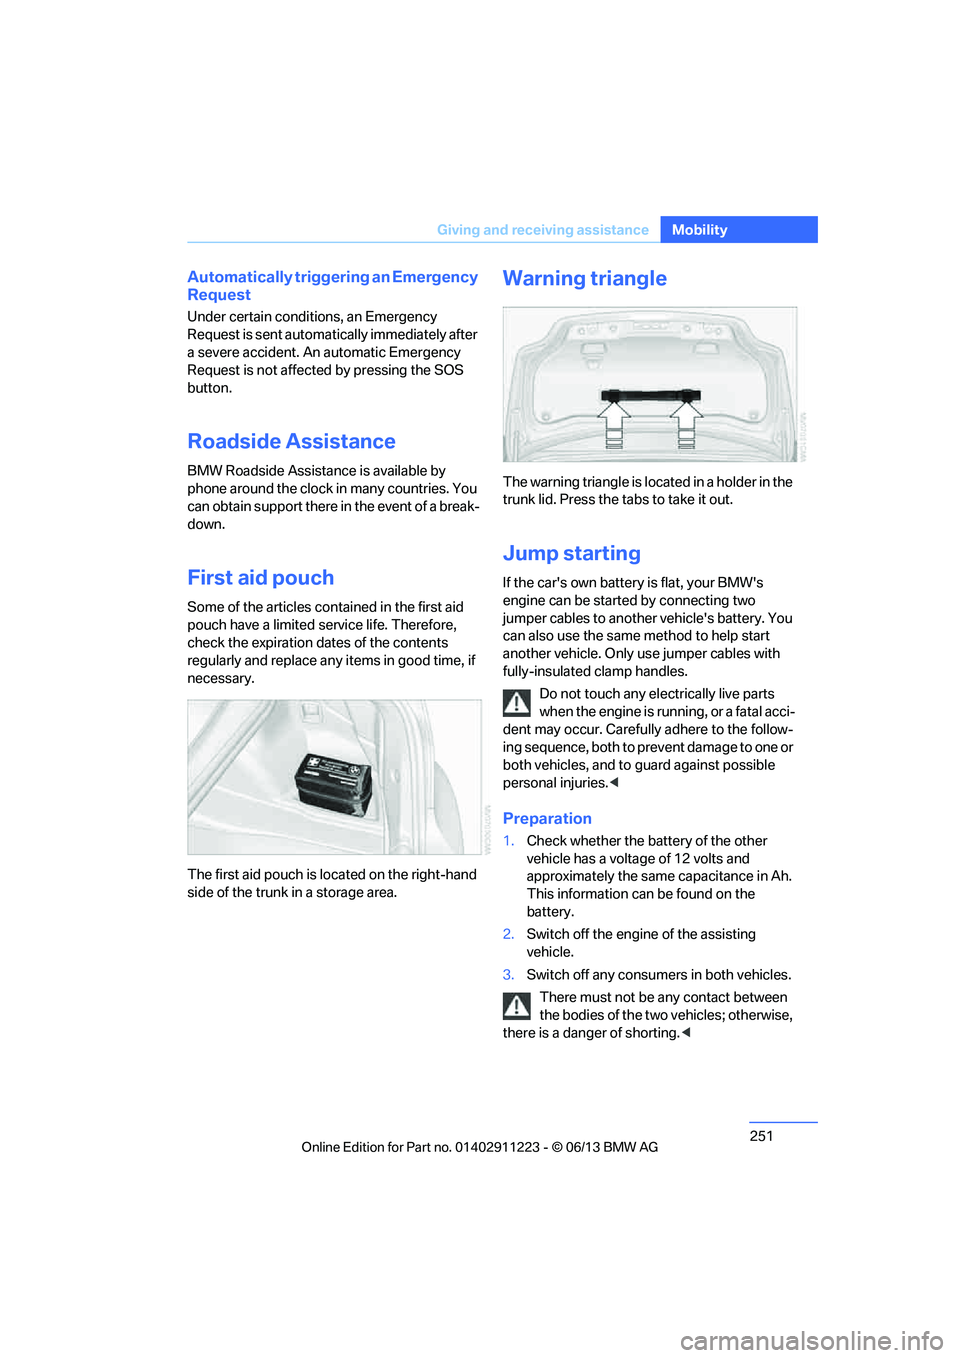
The first aid pouch is located on the right-hand
side of the trunk in a storage area.
Warning triangle
The warning triangle is lo cated in a holder in the
trunk lid. Press the tabs to take it out.
Jump starting
If the car's own battery is flat, your BMW's
engine can be started by connecting two
jumper cables to another vehicle's battery. You
can also use the same method to help start
another vehicle. Only use jumper cables with
fully-insulated clamp handles.
Do not touch any electrically live parts
when the engine is running, or a fatal acci-
dent may occur. Carefully adhere to the follow-
ing sequence, both to pr event damage to one or
both vehicles, and to guard against possible
personal injuries.<
Preparation
1. Check whether the ba ttery of the other
vehicle has a voltage of 12 volts and
approximately the same capacitance in Ah.
This information can be found on the
battery.
2. Switch off the engine of the assisting
vehicle.
3. Switch off any consumers in both vehicles.
There must not be any contact between
the bodies of the two vehicles; otherwise,
there is a danger of shorting. <
00320051004F004C00510048000300280047004C0057004C005200510003
Page 253 of 284
252
MobilityGiving and receiving assistance
Connecting jumper cables
Connect the jumper cables in the correct
order to prevent sparking at the battery,
which could cause injury. <
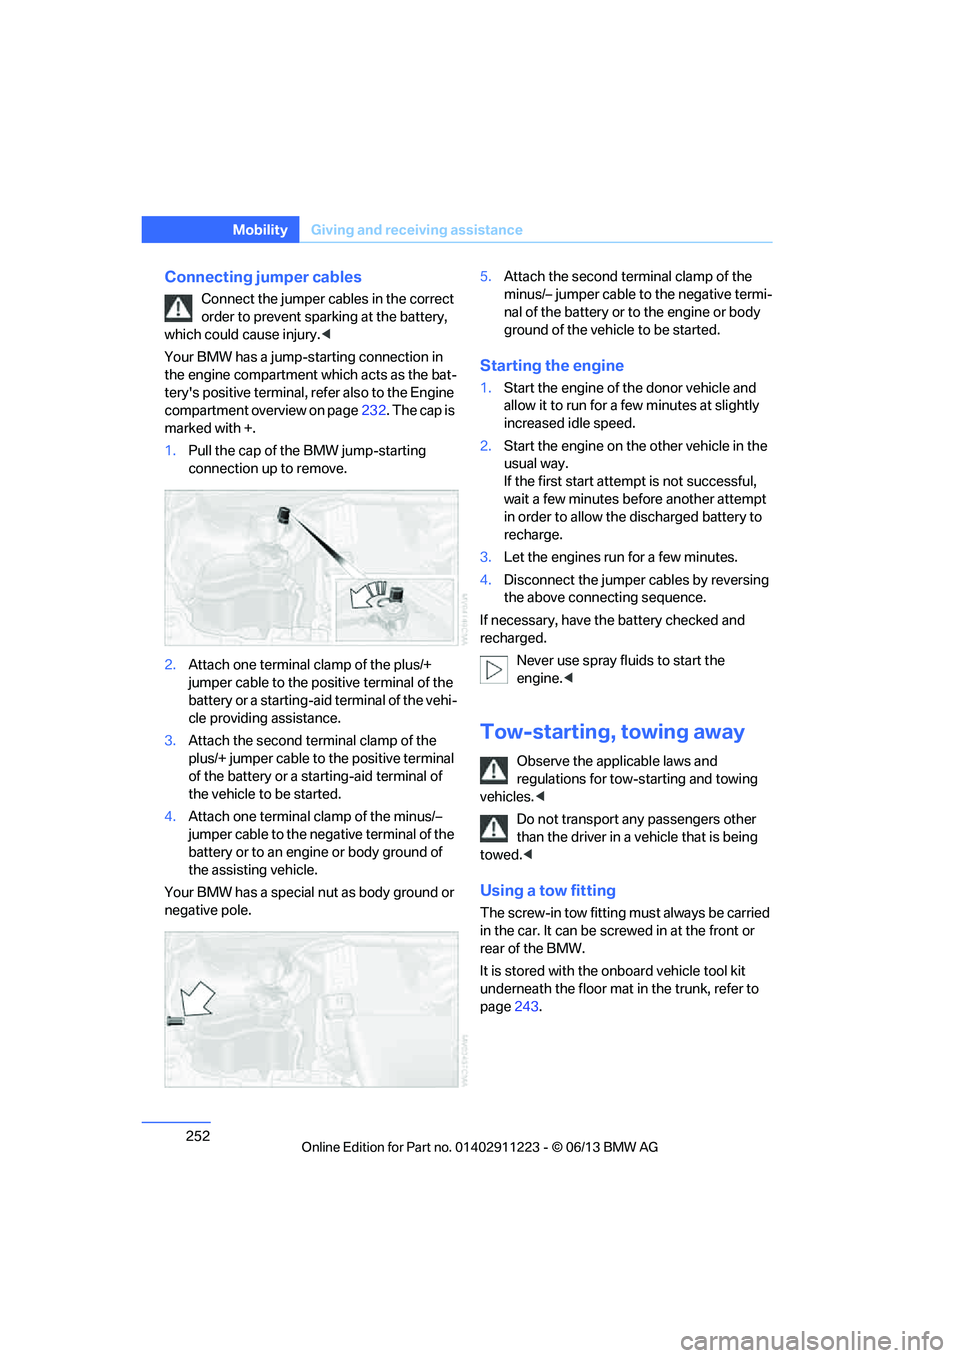
Your BMW has a jump-starting connection in
the engine compartment which acts as the bat-
tery's positive terminal, refer also to the Engine
compartment overview on page 232. The cap is
marked with +.
1. Pull the cap of the BMW jump-starting
connection up to remove.
2. Attach one terminal clamp of the plus/+
jumper cable to the positive terminal of the
battery or a starting-aid terminal of the vehi-
cle providing assistance.
3. Attach the second te rminal clamp of the
plus/+ jumper cable to the positive terminal
of the battery or a star ting-aid terminal of
the vehicle to be started.
4. Attach one terminal clamp of the minus/–
jumper cable to the nega tive terminal of the
battery or to an engine or body ground of
the assisting vehicle.
Your BMW has a special nut as body ground or
negative pole. 5.
Attach the second te rminal clamp of the
minus/– jumper cable to the negative termi-
nal of the battery or to the engine or body
ground of the vehicle to be started.
Starting the engine
1. Start the engine of the donor vehicle and
allow it to run for a few minutes at slightly
increased idle speed.
2. Start the engine on the other vehicle in the
usual way.
If the first start attempt is not successful,
wait a few minutes be fore another attempt
in order to allow the discharged battery to
recharge.
3. Let the engines run for a few minutes.
4. Disconnect the jumper cables by reversing
the above connecting sequence.
If necessary, have the battery checked and
recharged. Never use spray fluids to start the
engine. <
Tow-starting, towing away
Observe the applicable laws and
regulations for tow-starting and towing
vehicles. <
Do not transport any passengers other
than the driver in a vehicle that is being
towed. <
Using a tow fitting
The screw-in tow fitting must always be carried
in the car. It can be screwed in at the front or
rear of the BMW.
It is stored with the onboard vehicle tool kit
underneath the floor mat in the trunk, refer to
page 243.
00320051004F004C00510048000300280047004C0057004C005200510003
Page 255 of 284
254
MobilityGiving and receiving assistance
Attach the tow bar to the tow fittings only,
as attaching it to othe r parts of the vehicle
could result in damage.<
With a tow rope
When starting off in the towing vehicle, make
sure that the tow rope is taut.
To avoid jerking and the associated
stresses on vehicle components when
towing, always use nylon ropes or nylon straps.
Attach the tow rope to the tow fittings only, as
attaching it to other parts of the vehicle could
result in damage. <
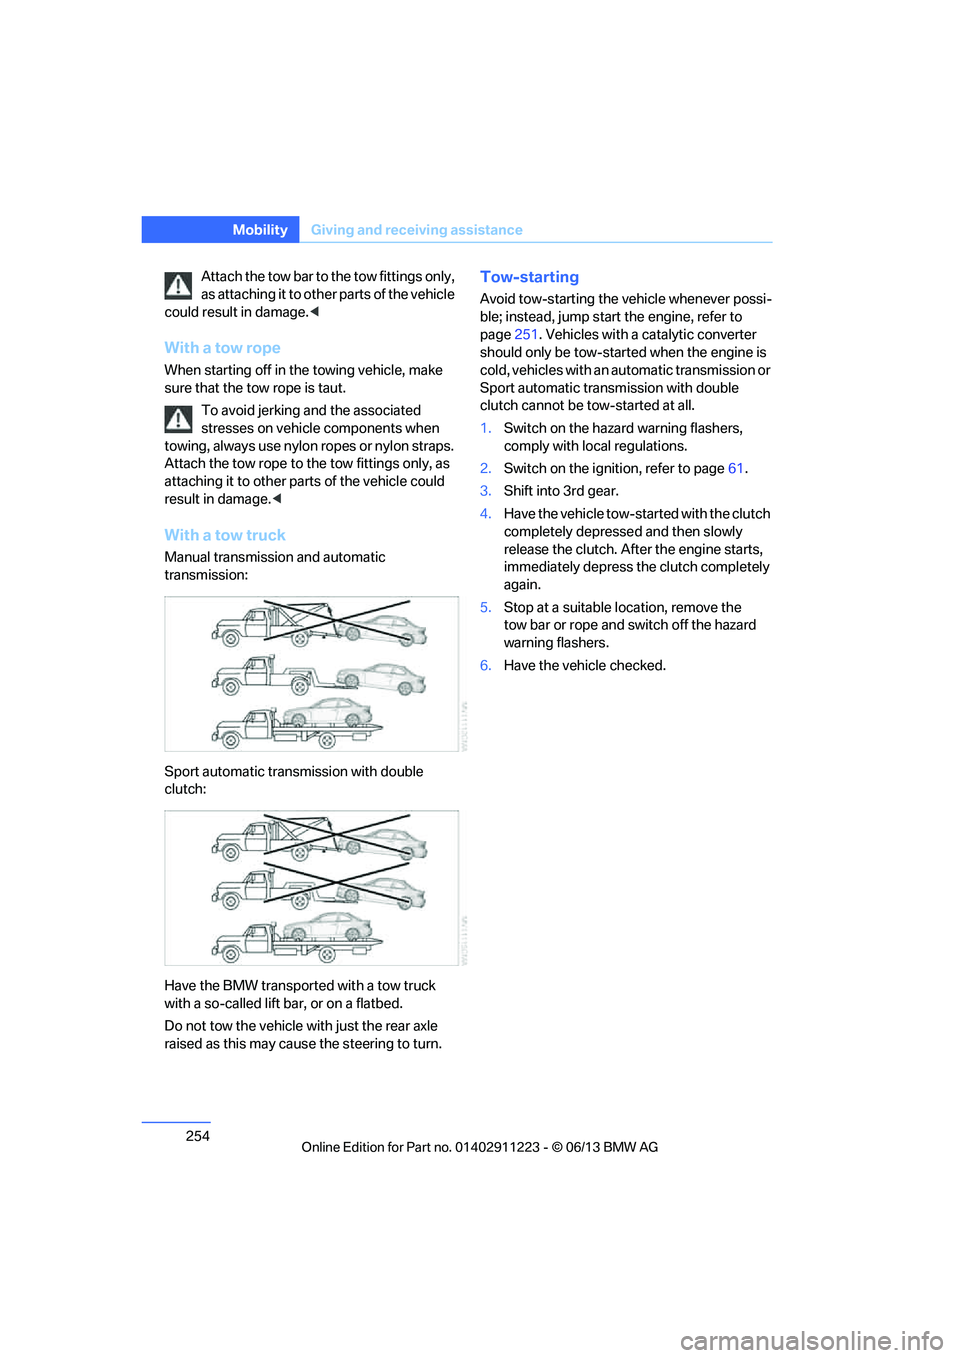
With a tow truck
Manual transmission and automatic
transmission:
Sport automatic transmission with double
clutch:
Have the BMW transported with a tow truck
with a so-called lift bar, or on a flatbed.
Do not tow the vehicle wi th just the rear axle
raised as this may cause the steering to turn.
Tow-starting
Avoid tow-starting the vehicle whenever possi-
ble; instead, jump start the engine, refer to
page 251. Vehicles with a catalytic converter
should only be tow-started when the engine is
cold, vehicles with an automatic transmission or
Sport automatic transmission with double
clutch cannot be tow-started at all.
1. Switch on the hazard warning flashers,
comply with local regulations.
2. Switch on the ignition, refer to page 61.
3. Shift into 3rd gear.
4. Have the vehicle tow-started with the clutch
completely depresse d and then slowly
release the clutch. Afte r the engine starts,
immediately depress the clutch completely
again.
5. Stop at a suitable location, remove the
tow bar or rope and switch off the hazard
warning flashers.
6. Have the vehicle checked.
00320051004F004C00510048000300280047004C0057004C005200510003