2013 AUDI S4 SEDAN roof rack
[x] Cancel search: roof rackPage 4 of 294
2 Table of contents Vehicle literature .. .. .. .. .. ... .
5
About this Owner's Manual . . . 6
Controls and equipment .. ... .
Ins truments and controls .. . .
General illus tration .... ... .. .. ... .
Instruments and warning /
indicator lights ........ .. .. .. . .
Ins truments . .. .. ..... ... .. .. ... .
War ning/ indi cator lights ... .. ... .. .
Driver information d isplay .. . .
Introduct ion . .. .. ..... ... .. .. ... .
Trip computer .. .. ..... ... .. .. ... .
Gearshift Indicator ........ .. .. ... .
Efficiency program ........ .. .. .. . .
Service interval d isp lay .. .. .. .. .. . .
On -Board Diagnostic system (OBD) .. .
Opening and closing .... .. .. . .
Power locking system .. ... .. .. .. . .
R ear lid .. .. ................ ... . . 8
8
8
10
1 0
1 3
24
24
25
27
27
29
30
32
32
39
C hil d safety locks . . . . . . . . . . . . . . . . . 40
P ower wi ndows ........ .. .. .. .. . .
Sliding/ tilt ing su nroof ..... .. .. .. . .
Va let par king .. .. ..... ... .. .. ... .
Clear vision .. ........ .. .. .. .. . .
Lig hts ..... ... . ...... ... .. .. ... .
I nter ior lights .. .. ..... ... .. .. ... .
V1s 1on ..... ... .. ..... ... .. .. ... .
W iper and washer system .. .. .. .. . .
Dig ita l compass .............. ... .
Seats and storage ... .. .. ... .. .
General recommendat ions . .. .. ... .
Front seats .............. .. .. ... .
H ead restraints . .......... ... .. . .
Seat memory ............. ... .. . .
Ashtr ay .. .. ... .... ...... .. .. .. . .
C igarette lig hte r .......... .. .. .. . .
12-vo lt socket ........... .... ... .
S torage . ... .. . .. ..... ... .. .. ... .
Roo f rack . .... .. ..... ... .. .. ... .
Luggage compartment . ... .. .. ... . 4
0
42
4 3
44
4 4
47
4 7
so
52
54
54
55
57
58
59
5 9
60
60
63
64
Warm and cold ... .. ..... .... . .
Climate co ntrols . ... ... ..... ... .. .
68
68
On the road . . . . . . . . . . . . . . . . . . . 72
Stee ring . . . . . . . . . . . . . . . . . . . . . . . . 72
Ign it io n lock . . . . . . . . . . . . . . . . . . . . . 72
Convenience key . . . . . . . . . . . . . . . . . . 75
Driver messages . . . . . . . . . . . . . . . . . . 76
E lectromechanical parking brake . . . . 77
Speed warning system . . . . . . . . . . . . . 79
Cru ise cont ro l . . . . . . . . . . . . . . . . . . . . 81
Transmission . . . . . . . . . . . . . . . . . . 83
Manua l transm ission . . . . . . . . . . . . . . 83
mult it ron ic ® , t ipt ron ic . . . . . . . . . . . . . 83
S troni c® . . . . . . . . . . . . . . . . . . . . . . . . 89
Audi adaptive cruise control
and braking guard . . . . . . . . . . . .
97
I n troduc tion . . . . . . . . . . . . . . . . . . . . . 9 7
Genera l informa tion . . . . . . . . . . . . . . 9 7
Audi adaptive cruise contro l . . . . . . . . 99
Audi braking gua rd . . . . . . . . . . . . . . . 103
Messages . . . . . . . . . . . . . . . . . . . . . . . 105
Audi side assist .... ..... ... .. .
Lane change ass istant 107
107
Audi drive select
. . . . . . . . . . . . . . 111
Driving settings . . . . . . . . . . . . . . . . . . 111
Park assist . . . . . . . . . . . . . . . . . . . . . 114
Pa rking system . . . . . . . . . . . . . . . . . . . 114
Pa rking system (rear) . . . . . . . . . . . . . . 114
Pa rking system (rear, with rear view
camera) . . . . . . . . . . . . . . . . . . . . . . . . 115
Homelink ® . . . . . . . . . . . . . . . . . . . . 121
U niversa l remote control........ ... 121
Safety first . . . . . . . . . . . . . . . . . . . . 126
Driving Safely . . . . . . . . . . . . . . . . . 126
Genera l notes . . . . . . . . . . . . . . . . . . . . 126
Proper occupant seating positions . . . 127
Pedal a rea . . . . . . . . . . . . . . . . . . . . . . . 131
Stow ing luggage . ............. .. . 132
Repo rting Safe ty Defe cts . . . . . . . . . . . 13 4
Page 65 of 294
Roof rack
Description and mounting locations
Additional cargo can be carried with a roof luggage rack .
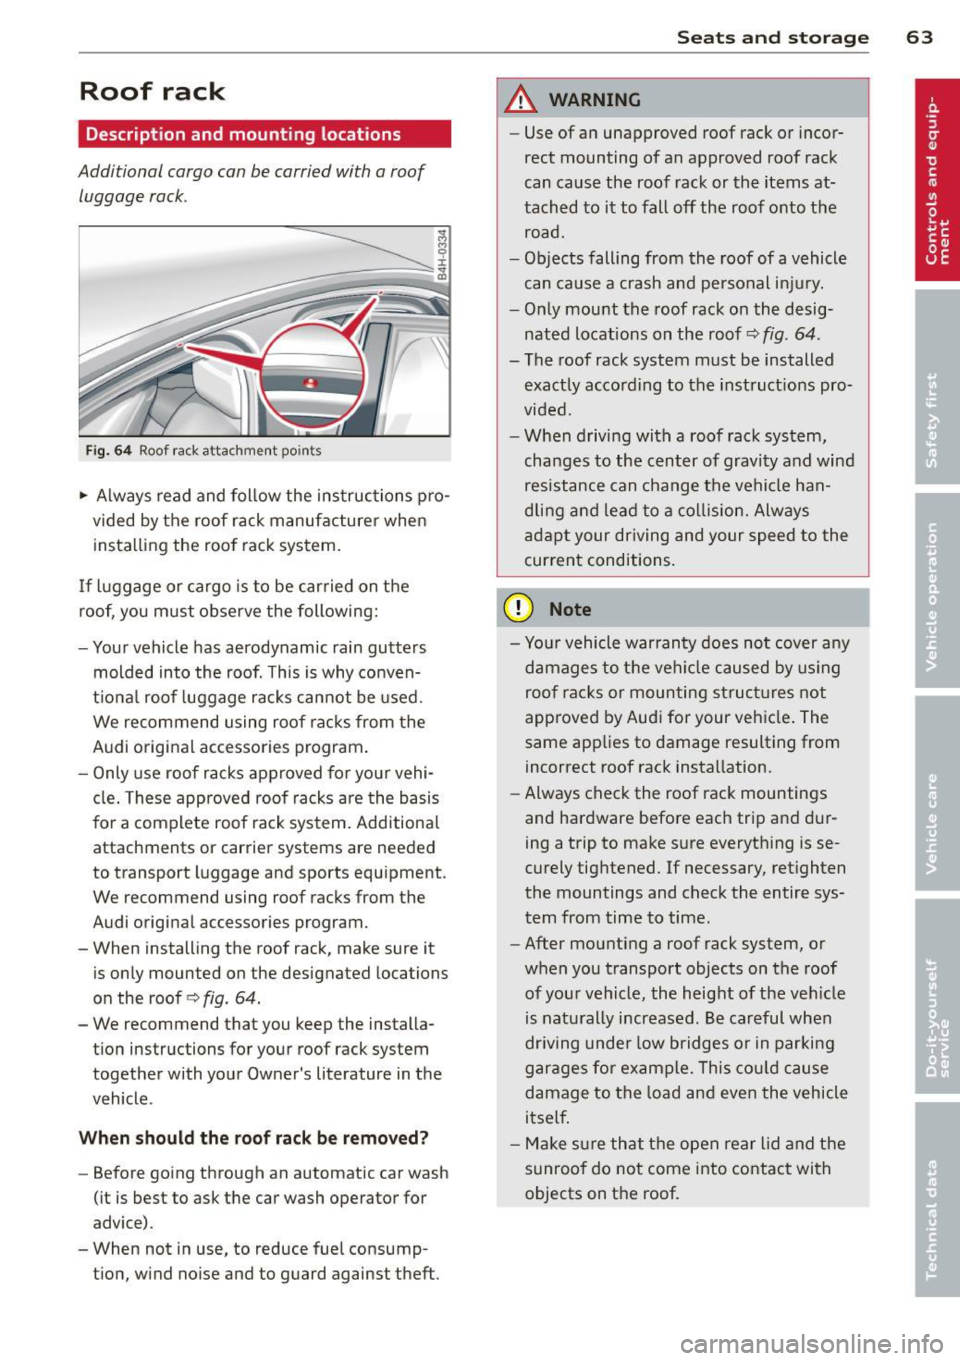
Fig. 64 Roof rack attachment poin ts
.,. Always read and follow the instructions pro
vided by the roof rack manufacturer when installing the roof rack system.
If luggage or cargo is to be carried on the
roof, you must observe the following:
- Your vehicle has aerodynamic rain gutters
molded into the roof. This is why conven
tional roof luggage racks cannot be used.
We recommend using roof racks from the
Audi original accessories program.
- Only use roof racks approved for your vehi
cle. These approved roof racks are the basis
for a complete roof rack system. Additional
attachments or carrier systems are needed
to transport luggage and sports equipment.
We recommend using roof racks from the
Audi original accessories program.
- When installing the roof rack, make sure it
is only mounted on the designated locations
on the roof ¢
fig. 64.
-We recommend that you keep the installa
tion instructions for your roof rack system
together with your Owner's literature in the
vehicle .
When shoul d th e r oof ra ck be re moved?
- Before going through an automatic car wash
(it is best to ask the car wash operator for
advice).
- When not in use, to reduce fuel consump
tion, wind noise and to guard against theft .
Sea ts a nd s to rage 63
A WARNING
- Use of an unapproved roof rack or incor
rect mounting of an approved roof rack
can cause the roof rack or the items at
tached to it to fall off the roof onto the
road.
- Objects falling from the roof of a vehicle can cause a crash and personal injury.
- Only mount the roof rack on the desig nated locations on the roof¢
fig. 64.
- The roof rack system must be installed
exactly according to the instructions pro
vided.
- When driving with a roof rack system, changes to the center of gravity and wind resistance can change the vehicle han
dling and lead to a col lision. Always
adapt your driving and your speed to the
current conditions .
(D Note
-Your vehicle warranty does not cover any
damages to the vehi cle caused by us ing
roof racks or mounting structures not
approved by Audi for your vehicle. The
same applies to damage resulting from
incorrect roof rack installation.
- Always check the roof rack mountings
and hardware before each trip and dur
ing a trip to make sure everything is se
curely tightened. If necessary, retighten
the mountings and check the entire sys
tem from time to time.
- After mounting a roof rack system, or
when you transport objects on the roof of your vehicle, the height of the veh icle
is naturally increased . Be careful when
dr iving under low bridges or in parking
garages for example. This cou ld cause
damage to the load and even the vehicle
itself .
- Make sure that t he open rear lid and the
sunroof do not come into contact with
objects on the roof.
Page 66 of 294
64 Seats and storage
loading the roof rack
Always distribute loads evenly . Make sure
anything on the roof rack is securely tied
down.
,. Always distribute the loads on the roof rack
evenly .
,. Always attach items to the roof rack secure-
ly befo re you dr ive off.
The maximum perm iss ible roof we ight is
2 00 lb (90 kg ). The roof weight is the total of
the we ight of the roof rack, the attachments
and the cargo you are car ry ing. You m ust also
not exceed the maximum load weight for the
roof rack you are using.
When us ing a roof rack system which has a
l owe r load carry ing capac ity, you must not use
up the total max imum pe rm issib le load carry
i ng capac ity specified
above . Instead, you
should load the roof rack system only to the
maximum capacity specified by the manufac
turer of the roof rack system.
A WARNING
Weak, damaged or improper straps used to secure items to the roof rack can fail
during hard braking or in a collision and
cause se rious personal injury .
- Make sure the roof rack is insta lled exact
ly as specified
above ¢ page 63.
- Always use suitable mounting straps for
sec uring items to the roof rack to help
prevent items from shift ing o r fly ing for
wa rd.
- Items on the roof rack must always be sec urely mounted.
- The use of a roof rack can negative ly af
fect the way a vehicle handles . Ca rgo
that is larg e, h eavy, bulky, long o r flat
will have a g reater negative influence on
the vehicle's aerodynamics, center of
gravity and overal l ha ndling. Always
dr ive slowly, avo id sudden braking and
mane uvers when transporting cargo o n
the roof of your vehicle.
- Never exceed the maxim um permissible
load carrying capacity of the roof of your
veh icle, the permissible axle weights and
the permissible total weight of your vehi cle ¢
page 268, Weights.
(D Note
Make sure that the opened rear lid does
not come in contact with the cargo on the
r oof.
@ For the sake of the environment
As a result of the increased wind resist
ance created by a roof rack, your vehicle is
us ing fuel unnecessarily. So
remove the
r oof rack after using it .
Luggage compartment
, General information
A WARNING
-Read and follow the important safety pre-
cautions on¢
page 132, Stowing lug
gage.
Enlarging the luggage compartment
Applies to vehicles: with folding rear seatback
The rear seat backrests can be folded forward
either separately or together .
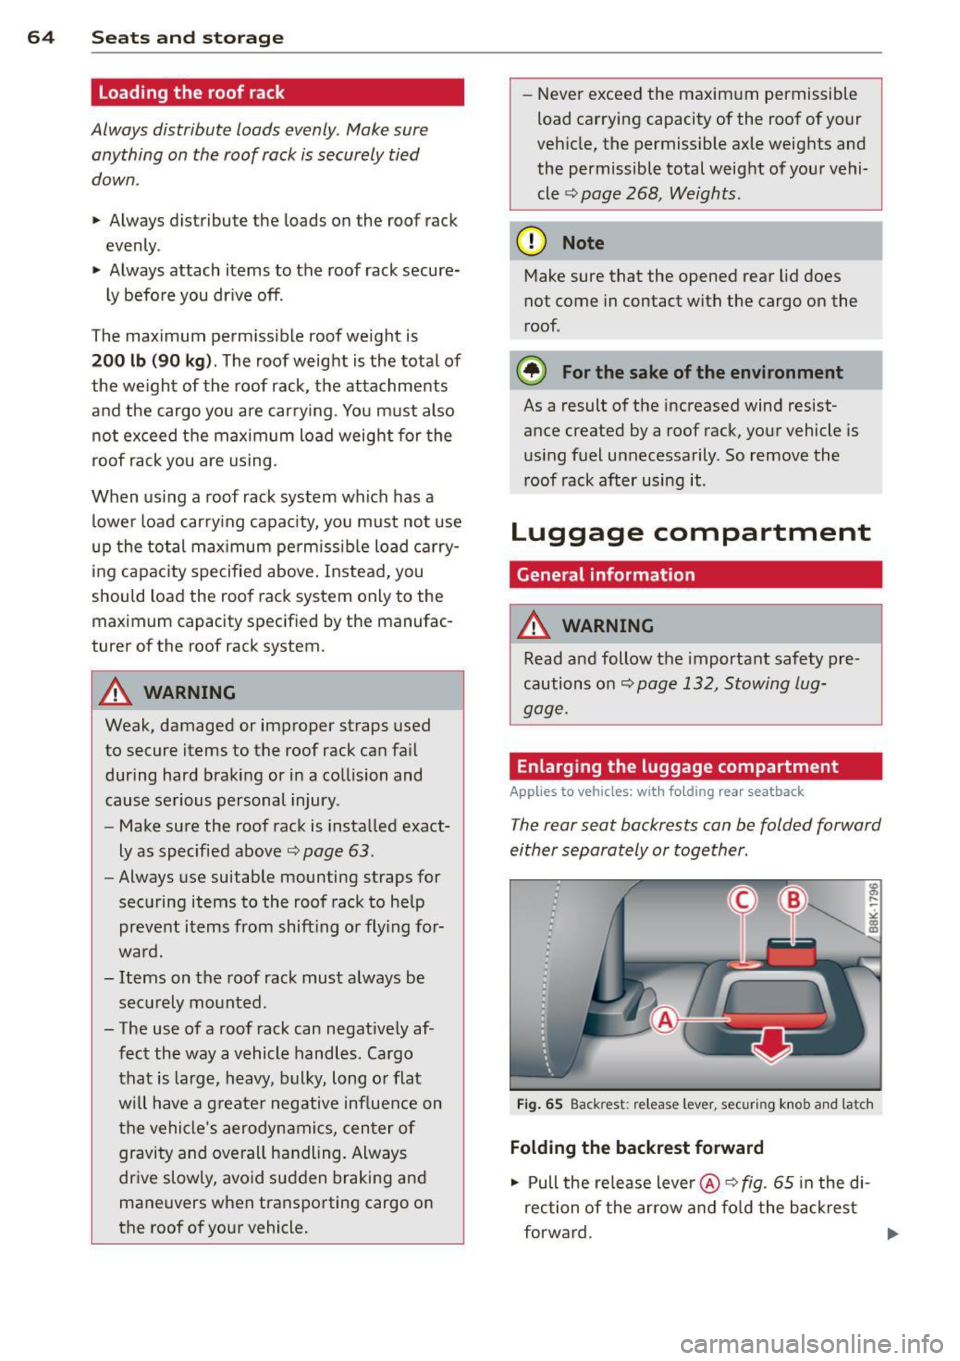
Fig . 65 Back rest : re lease lever , securing knob and latch
Folding the backr est forward
,. Pull the release lever @¢
fig. 65 in the di
rection of the arrow and fo ld the back rest
forward.
IJ,-
Page 156 of 294
154 Airbag system
must always sit in an upright position,
must not lean against or place any part
of their body too close to the area where
the airbags are located .
- Occupants who are unbelted, out of posi
tion or too close to the airbag can be se riously injured by an airbag as it unfolds
with great force in the blink of an eye
~page 145.
A WARNING
A child in a rearward-facing child safety
seat installed on the front passenger seat
will be seriously injured and can be killed if
the front airbag inflates -even with an Ad
vanced Airbag System.
- The inflating airbag will hit the child
safety seat or infant carrier with great
force and will smash the child safety seat
and child against the backrest, center
armrest, door or roof.
- Always install rear-facing child safety
seats on the rear seat.
- If you must install a rearward facing
child safety seat on the front passenger
seat because of exceptional circumstan
ces and the
PASSENGER AIR BAG OFF
light does not come on and stay on, im
mediately install the rear-facing child
safety seat in a rear seating position and
have the airbag system inspected by your
authorized Audi dealer.
A WARNING
Objects between you and the airbag will
increase the risk of injury in a crash by in
terfering with the way the airbag unfolds
or by being pushed into you as the airbag
inflates.
- Never hold things in your hands or on
your lap when the vehicle is in use.
- Never transport items on or in the area of the front passenger seat. Objects
could move into the area of the front air
bags during braking or other sudden ma
neuver and become dangerous projec- tiles that can cause serious personal in
jury if the airbags inflate.
- Never place or attach accessories or oth
er objects (such as cupholders, tele phone brackets, large, heavy or bulky ob
jects) on the doors, over or near the area marked "AIRBAG" on the steering wheel,
instrument panel, seat backrests or be
tween those areas and yourself. These
objects could cause injury in a crash, es
pecially when the airbags inflate.
- Never recline the front passenger's seat
to transport objects. Items can also
move into the area of the side airbag or
the front airbag during braking or in a
sudden maneuver. Objects near the air
bags can become projectiles and cause
injury, particularly when the seat is re
clined.
A WARNING
'-
The fine dust created when airbags deploy
can cause breathing problems for people
with a history of asthma or other breath
ing conditions.
- To reduce the risk of breathing problems, those with asthma or other respiratory
conditions should get fresh air right
away by getting out of the vehicle or
opening windows or doors.
- If you are in a collision in which airbags
deploy, wash your hands and face with
mild soap and water before eating.
- Be careful not to get the dust into your
eyes, or into any cuts or scratches.
- If the residue should get into your eyes,
flush them with water.
Page 164 of 294

162 Airbag system
-Objects between you and the airbag can
increase the risk of injury in an accident
by interfering with the way the airbag
unfolds or by being pushed into you as
the airbag inflates .
- Never place or attach accessories or other objects (such as cupholders, tele
phone brackets, or even large, bulky
objects) on the doors, over or near the
area marked "AIRBAG" on the seat
backrests.
- Such objects and accessories can be
come dangerous projectiles and cause
injury when the supplemental side air
bag deploys.
- Never carry any objects or pets in the
deployment space between them and
the airbags or allow children or other
passengers to travel in this position .
- Always use the built-in coat hooks only
for lightweight clothing . Never leave any
heavy or sharp-edged objects in the
pockets that may interfere with side air
bag dep loyment and can cause personal
injury in an accident.
- Always prevent the side airbags from be
ing damaged by heavy objects knocking
against or hitting the sides of the seat
backs.
- The airbag system can only be triggered
once. If the airbag has been triggered,
the system must be replaced by an au
thorized Audi dealership.
- Damage (cracks, deep scratches etc.) to
the original seat covers or to the seam in
the area of the side airbag module must always be repaired immedia tely by an au
thorized Audi dealer .
- If children are seated improperly, their
risk of injury increases in the case of an
accident
q page 165, Child Safety .
- Never attempt to modify any compo
nents of the airbag system in any way .
- In a side collision, side airbags will not
function properly if sensors cannot cor
rectly measure increasing air pressure in
side the doors when air escapes through larger, unclosed openings in the door
panel.
- Never drive with interior door trim pan
els removed.
- Never drive when parts have been re
moved from the inside door panel and
the openings they leave have not been properly closed.
- Never drive when loudspeakers in the
doors have been removed unless the
speaker holes have been properly
closed.
- Always make certain that openings are
covered or filled if additional speakers
or other equipment is installed in the
inside door panels.
- Always have work on the doors done by
an authorized Audi dealer or qualified
workshop.
Side curtain airbags
Description of side curtain airbags
The side cur tain airbag system can provide
supplemental protection to properly restrain
ed occupants.
Fig. 146 S ide curta in sy stem , driver's s ide: sid e cur tain
airb ag loc ation
The side cur tain airbags are located on both
sides of the interior above the front and rear
side windows
q fig . 146 . They are identified
by the word "AIRBAG " on the windshield
frame and the center roof pillar .
T he side curtain airbag system supplements
the safety belts and can help to reduce the
risk of injury for occupants' heads and upper
torso on the side of the vehicle that is struck ..,.
Page 202 of 294
200 Cleaning and protec tio n
Automatic car wash
The vehicle can be washed in almost any
modern automatic car wash .
The vehicle paint is so durable that the vehicle
can normally be washed without problems in
an automatic car wash. However, the effect on
the paint depends to a large extent on the de
sign of the facility, the filtering of the wash
water, the type of wash and care mater ial , etc.
I f the pa int has a dull appearance afte r going
through the car wash or is scratched, bring
this to the attention of the operator immedi
ately.
If necessary, use a different car wash.
Before going through a car wash, be sure to
take the usual precautions such as closing the
windows and the roof . Factory installed an
tennas must not be removed.
I f you have installed additional accessor ies on
the vehicle - such as spoilers, roof rack, etc. -
it is best to ask the car wash operator if these
should be removed .
A WARNING
Always read and heed all WARNINGS and
other information
c;, page 199.
Before washing the vehic le in an automatic
car wash, p lease make sure to retract the
exterior m irrors to prevent them from be
ing damaged.
Washing the vehicle by hand
A lot of water is needed when washing a vehi cle by hand.
• Before you start washing, make sure you
have read and understood the WARNINGS
r:::;, A in General information on page 199 .
• First soak all dried di rt until it is soft, then
rinse it off .
• As you clean your vehicle, start with the
roof and work your way down to the bottom,
us ing a sponge, a sponge glove o r a clean
brush. •
Rinse the sponge or the sponge g love often,
flushing it clean each time .
• Use spec ial car shampoo only for very per
sistent d irt .
• Rinse the car thoroughly with wa ter .
• Use a chamo is leather to gently w ipe the ex-
ter ior dry .
Use a separate sponge for cleaning the
wheels, door sills and other regions exposed
to road dirt . In this way, you will not scratch
the pa int with coarse particles imbedded in
the sponge the next t ime you wash the car.
&_ WARNING
- Do not clean the underside of the chas
sis, fenders, wheel covers, or o ther ha rd
to reach parts withou t protecting you r
hands and arms. You may cut yourself on
sharp-edged metal parts .
-A lways read and heed a ll WARNINGS and
other info rmation
c;, page 199.
{D Note
- N ever try to remove dirt, mud or dust if
t he su rface of the veh icle is dry . Neve r
use a dry cloth or sponge, since this
cou ld scratch your vehicle's paint or win
dows .
- Never wash your car in bright s unli ght .
Drops of wate r act as magn ifying lenses
and may damage your paint .
- When you wash your car in the winter: if
you rinse yo ur vehicle with a hose, be
careful not to aim the stream of water
directly at locks, or at door or hatch
openings - they can freeze shut .
- Never use sponges designed to remove
insects, or any k itchen scouring sponges
o r simi lar p roducts . They can damage
your pai nt finish .
- You should remove debris (such as in
sects) from the headlight lenses on a
regu lar basis, for example when refuel
ing your vehicle . Never use a d ry cloth o r
sponge to clean the headlights. On ly use
wet cloths o r sponges to prevent
scratches. It is best to use soapy water.
-
Page 205 of 294
If a spot starts to rust, however , a simple
touch-up job will not be enoug h. The affected
surface must be sanded smooth and coated
with an anti -rust pr imer before the painted
finish can be restored.
The number for the origina l vehicle paint can
be found on the vehicle ident ification labe l
<=:>page 268.
A WARNING
Always read and heed all WARNINGS and
other information
c::> page 199 .
Windows
Clear vision to all sides.
Clean all windows regularly to remove road
fi lm and car wash wax b uildup .
.,. Remove snow from windows using a brush .
.,. Use a plast ic ice scraper to remove ice from
windows and mirrors .
.,. Remove other residue on the windows with
a spray •on glass cleaner .
.,. Wipe the windows dry with a clean piece of
cloth or kitchen paper towel.
The best way to remove snow from windows
and mirrors is to use a brush. Use a non-abra
sive
pl astic ice sc ra p er -better still, a spray
de icer -to remove
ic e from windows and mir
rors .
The windows must not be cleaned with insect
remover or wax since these can interfere with
the function of the windshield wiper blades
(chatter) .
Oi l, grease, o r silicone residue can be removed
with
glass cleaner or silicone remo ver . How
ever, wax residue requires the use of a special
ly formulated solvent . Please contact your au
thor ized Audi dealer for adv ice on safe prod
ucts for wax removal.
W indows should also be cleaned on the inside
at regular intervals.
Never dry w indows with the same chamois
that you use to dry painted surfaces. Wax resi-
Cleaning and protec tion 203
due on the chamois can impair vis ion through
the windows .
A WARNING
-Always read and heed all WARNINGS and
other information
c::> page 199.
-The windshield must not be treated with
water-repellent materials. They can in
crease glare under poor v is ibility condi
tions such as wetness, darkness, or when
the sun is low on the hor izon. In addi
tion, they can cause the w indshield w ip
ers to chatter.
(D Note
- Never use warm o r hot water to remove
snow and ice from w indows and mirrors.
Th is could cause the glass to crack.
- To prevent damage to the wires of the
rear defogger, do not place any adhesive
st ickers on t he ins ide of the rear w indow
over the wires .
- T o help prevent dirt from scratch ing the
w indow, always sc rape in a forward di
rec tion -pushing the sc raper away from
yo u -never bac k and forth.
- Wate r lea king from the i nside of the rear
w indows may damage sens itive e lec trica l
c omponents located ei ther under the
rear parcel shelf or in the rear trunk area .
Always ensure that water never leaks
through the body section of the vehicle.
Yo u can do th is by using waterproof pro
tection over the vehicle's electrical com
ponents (e .g. when instal ling window
tint ing) .
- Damage or malfunction of electrical
compone nts due to water damage or any
other outside influence is not covered by
the Audi New Ve hicle Limited War ranty.
See you r Wa rranty
& M ain tenance boo k
let for addit ional detai ls about your war
ranty.
•
•
Page 234 of 294
232 Tires and wheels
Maximum loaded vehicle weight
means the sum of:
(a) Curb weight
(b) Accessory weight
(c) Vehicle capacity weight, and
(d) Production options weight
Maximum (permissible) inflation pressure
means the maximum cold inflation pressu re
to which a tire may be inflated. Also called
"maximum inflation p ressure."
Normal occupant weight
means 150 lbs. (68 kilograms) times the
number of occupants seated in the vehicle up
to the total seating capacity of your vehicle.
Occupant distribution means distribution of occupants in a vehicle .
Outer diameter means the overa ll diameter of an inf lated new
tire.
Overall width
means the linear distance between the exteri
ors of the sidewalls of an inflated tire, includ
ing e levations due to labeling, decorations, or
protective bands or ribs.
Ply
means a layer of rubber-coated parallel cords.
Production options weight
means the comb ined weight of those installed
regular production options weighing over 5
lbs . (2 .3 kg) in excess of those standard items
which they replace, not previously considered
in curb weight or accessory weight, including
heavy duty brakes, r ide leve lers, roof rack,
heavy duty battery, and specia l trim .
Radial ply tire
means a pneumatic tir e in which the p ly cords
that extend to the beads are laid at substan
tially 90 degrees to the centerline of the
tread . Recommended inflation pressure
see
~
page 231, Cold tire inflation pressure.
Reinforced tire
means a t ire design to operate at higher loads
and at h igher inflation pressures than the cor
responding standard tire. Reinforced tires
may be identified as "XL", "xl", "EXTRA LOAD",
o r "R F" on the sidewall.
Rim
means a metal support for a tire or a t ire and
tube assembly upon which the tire beads are
seated.
Rim diameter
means nom inal d iameter of the bead seat. If
you change your wheel s ize, you will have to
purchase new tires to match the new rim di
ameter .
Rim size designation
means rim diameter and width.
Rim width
means nominal distance between rim flanges.
Sidewall
means that portion of a tire between the
t read and bead.
Speed rating (letter code)
means the speed at which a tire is designed to
be driven for extended periods of time. The
ratings range from 93 mph (150 km/h) to
186 mph (298 km/h)
~ page 242. You may
not find this information on all tires because
it is not requ ired by law.
The speed rating letter code, where applica
ble , is molded on the tire sidewall and indi
cates the max imum perm issible road speeds
~ A in Winter tires on page 246.
Tire pressure monitoring system*
means a system that detects when one or
more of a veh icle's tires are underinflated and
illuminates a low tire pressure warning tell
tale.