Page 123 of 325
uuAdjusting the Seats uAdjusting the Seat Positions
122Controls
The driver’s and front passenger’s seats have active head restraints. In a rear impact,
an occupant properly secured by a seat belt will be pushed against the seat-back and
the head restraint will move forward. This reduces the distance between the
restraint and the occupant’s head, which helps reduce the likelihood of whiplash
and injuries to the neck and upper spine.■
Active Head Restraints
1 Active Head Restraints
In order for the active head restraints to operate
properly:•Do not hang any items on the head restraints, or
from the restraint legs.•Do not place any object between an occupant and
the seat-back.•Install each restraint in its proper location.
After a collision, the activated restraint should return
to its normal position. If the restraint does not return
to its normal position, or in the event of a severe
collision, have the vehicle inspected by a dealer.
Page 124 of 325

123
uuAdjusting the Seats uRear Seats
Controls
Rear Seats
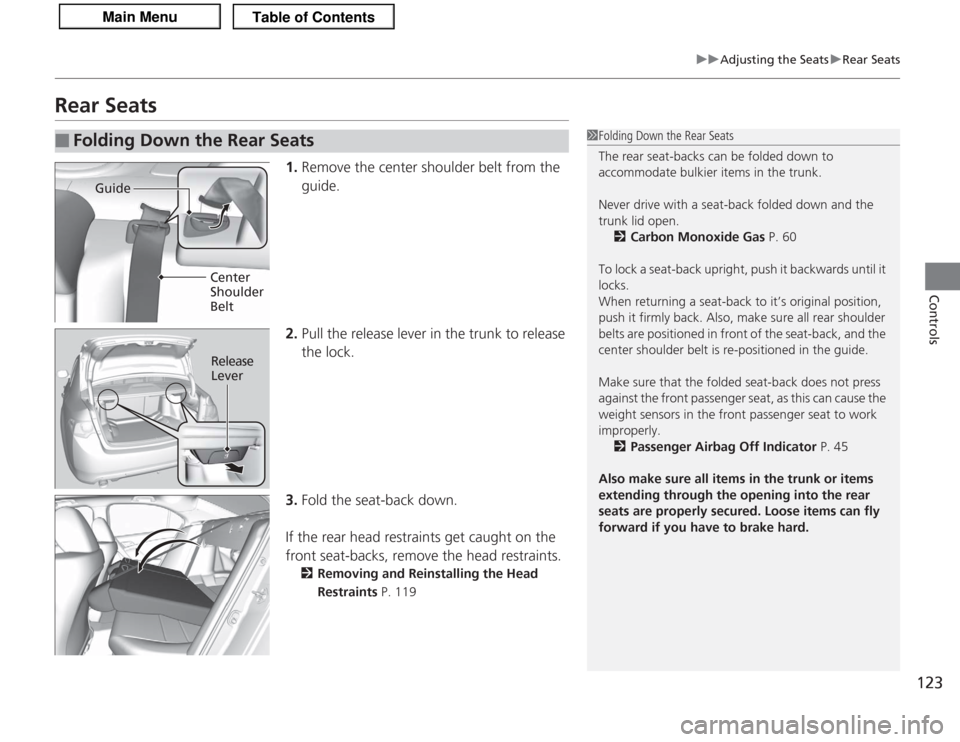
1. Remove the center shoulder belt from the
guide.
2. Pull the release lever in the trunk to release
the lock.
3. Fold the seat-back down.
If the rear head restraints get caught on the
front seat-backs, remove the head restraints.
2 Removing and Reinstalling the Head
Restraints P. 119
■
Folding Down the Rear Seats
1Folding Down the Rear Seats
The rear seat-backs can be folded down to
accommodate bulkier items in the trunk.
Never drive with a seat-back folded down and the
trunk lid open.
2 Carbon Monoxide Gas P. 60
To lock a seat-back upright, push it backwards until it
locks.
When returning a seat-back to it’s original position,
push it firmly back. Also, make sure all rear shoulder
belts are positioned in front of the seat-back, and the
center shoulder belt is re-positioned in the guide.
Make sure that the folded seat-back does not press
against the front passenger seat, as this can cause the
weight sensors in the front passenger seat to work
improperly.
2 Passenger Airbag Off Indicator P. 45
Also make sure all items in the trunk or items
extending through the opening into the rear
seats are properly secured. Loose items can fly
forward if you have to brake hard.
Guide
Center
Shoulder
Belt
Release
Lever
Page 127 of 325
126
uuInterior Lights/Interior Convenience Items uInterior Convenience Items
Controls
Interior Convenience Items
Pull the handle to open the glove box. You
can lock the glove box with the master key.■
Detachable shelf
The shelf in the glove box is detachable. To
remove it, disengage the tabs.
■
Glove Box
1 Glove Box
The glove box light comes on when the parking lights
are on.
3
WARNING
An open glove box can cause serious injury
to your passenger in a crash, even if the
passenger is wearing the seat belt.
Always keep the glove box closed while
driving.
Glove Box
To Lock
Shelf
Page 185 of 325
184
uuBefore Driving uDriving Preparation
Driving
• Be sure items placed on the floor behind the front seats cannot roll under the
seats.
u They can interfere with the driver’s ability to operate the pedals, the operation
of the seats, or the operation of the sensors under the seats.
• Everyone in the vehicle must fasten their seat belt.
2 Fastening a Seat Belt P. 29
•Make sure that the indicators in the instrument panel come on when you start the
vehicle, and go off soon after.
u Always have a dealer check the vehicle if a problem is indicated.
2 Indicators P. 64
Page 228 of 325

227
uuMaintenance Minder
TMu
Continued
Maintenance
■
Maintenance Service Items
1Maintenance Service Items•Independent of the Maintenance Minder
information, replace the brake fluid every 3 years.•Inspect idle speed every 160,000 miles (256,000
km).•Adjust the valves during services A, B, 1, 2, or 3 if
they are noisy.
Maintenance Minder Message
System Message
Indicator
Sub Items
Main Items
*1: If message, SERVICE DUE NOW does not appear more than 12 months after the display is reset,
change the engine oil every year.
*2: If you drive primarily in dusty conditions, replace the air cleaner element every 15,000 miles (24,000 km).
*3: If you drive primarily in urban areas that have high concentrations of soot in the air from industry and from diesel-powered vehicles, replace the dust and pollen filter every 15,000 miles (24,000 km).CODE
Maintenance Main Items
A
●
Replace engine oil
*1
B
●
Replace engine oil
*1 and oil filter
●
Inspect front and rear brakes
●
Check parking brake adjustment
●
Inspect tie rod ends, steering gear box, and boots
●
Inspect suspension components
●
Inspect driveshaft boots
●
Inspect brake hoses and lines (Including ABS)
●
Inspect all fluid levels and condition of fluids
●
Inspect exhaust system
#
●
Inspect fuel lines and connections
#
*4: Driving in mountainous areas at very low vehicle speeds or trailer towing results in higher transmission temperatures. This requires transmission fluid changes more frequently than recommended by the
Maintenance Minder. If you regularly drive your vehicle under these conditions, have the transmission
fluid changed at 60,000 miles (100,000 km), then every 30,000 miles (48,000 km). (For A/T only.)
*5: If you drive regularly in very high temperatures (over 110°F, 43 °C), in very low temperatures (under -20°F, -29°C), or tow a trailer, replace every 60,000 miles/100,000 km. (6-cylinder models only)
# : See information on maintenance and emissions warranty.CODE
Maintenance Sub Items
1
●
Rotate tires
2
●
Replace air cleaner element
*2
●
Replace dust and pollen filter
*3
●
Inspect drive belt
3
●
Replace transmission fluid
*4
4
●
Replace spark plugs
●
Replace timing belt and inspect water pump
*5
●
Inspect valve clearance
5
●
Replace engine coolant
Page 261 of 325

260
uuChecking and Maintaining Tires uTire and Loading Information Label
Maintenance
Tire and Loading Information LabelThe label attached to the driver’s doorjamb provides necessary tire and loading
information.Tire Labeling
The tires that came on your vehicle have a
number of markings. Those you should be
aware of are described below.
Whenever tires are replaced, they should be replaced with tires of the same size.
1 Tire and Loading Information Label
The tire and loading information label attached to the
driver’s doorjamb contains:a
The number of people your vehicle can carry.
b
The total weight your vehicle can carry. Do not
exceed this weight.
c
The original tire sizes for front, rear and spare.
d
The proper cold tire pressure for front, rear and
spare.
Label ExampleExample
Tire Size
Tire
Identification
Number (TIN)
Maximum
Tire Load
Maximum
Tire Pressure
Tire Size■
Tire Sizes
1 Tire Sizes
Following is an example of tire size with an
explanation of what each component means.
P225/50 R17 93V
P: Vehicle type (P indicates passenger vehicle).
225: Tire width in millimeters.
50: Aspect ratio (the tire’s section height as a
percentage of its width).
R: Tire construction code (R indicates radial).
17: Rim diameter in inches.
93: Load index (a numerical code associated with the
maximum load the tire can carry).
V: Speed symbol (an alphabetical code indicating the
maximum speed rating).
Page 272 of 325

271
Continued
Maintenance
CleaningInterior CareUse a damp cloth with a mixture of mild detergent and warm water to remove dirt.
Use a clean cloth to remove detergent residue.
Use a soft brush with a mixture of mild soap and warm water to clean the seat belts.
Let the belts air dry. Wipe the openings of the seat belt anchors using a clean cloth.■
Cleaning Seat Belts
1Interior Care
Do not spill liquids inside the vehicle.
Electrical devices and systems may malfunction if
liquids are splashed on them.
Do not use silicone based sprays on electrical devices
such as audio devices and switches.
Doing so may cause the items to malfunction or a fire
inside the vehicle.
If a silicone based spray is inadvertently used on
electrical devices, consult a dealer.
Depending on their composition, chemicals and
liquid aromatics may cause discoloration, wrinkles,
and cracking to resin-based parts and textiles.
Do not use alkali solvents or organic solvents such as
benzene or gasoline.
After using chemicals, make sure to gently wipe them
off using a dry cloth.
Do not place used cloths on top of resin based parts
or textiles for long periods of time without washing.
Opening
Page 314 of 325

313
Continued
Information
Warranty Coverages■
U.S. Owners
Your new vehicle is covered by these warranties:
New Vehicle Limited Warranty – covers your new vehicle, except for the
emissions control systems, and accessories, against defects in materials and
workmanship.
Emissions Control Systems Defects Warranty and Emissions Performance
Warranty – these two warranties cover your vehicle’s emissions control systems.
Time, mileage, and coverage are conditional. Please read your warranty booklet for
exact information.
Seat Belt Limited Warranty – a seat belt that fails to function properly is covered
by a limited warranty. Please read your warranty booklet for details.
Rust Perforation Limited Warranty – all exterior body panels are covered for
rust-through from the inside for the specified time period with no mileage limit.
Accessory Limited Warranty – Acura accessories are covered under this warranty.
Time and mileage limits depend on the type of accessory and other factors. Please
read your warranty booklet for details.
Replacement Parts Limited Warranty – covers all Acura replacement parts
against defects in materials and workmanship.