Page 124 of 325
123
uuAdjusting the Seats uRear Seats
Controls
Rear Seats
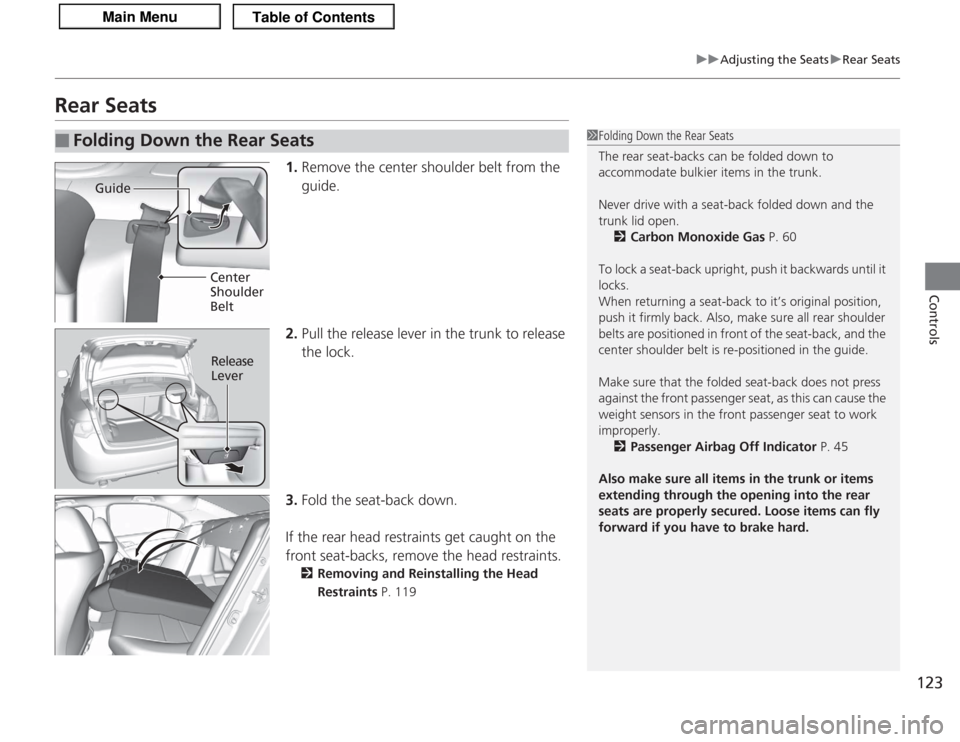
1. Remove the center shoulder belt from the
guide.
2. Pull the release lever in the trunk to release
the lock.
3. Fold the seat-back down.
If the rear head restraints get caught on the
front seat-backs, remove the head restraints.
2 Removing and Reinstalling the Head
Restraints P. 119
■
Folding Down the Rear Seats
1Folding Down the Rear Seats
The rear seat-backs can be folded down to
accommodate bulkier items in the trunk.
Never drive with a seat-back folded down and the
trunk lid open.
2 Carbon Monoxide Gas P. 60
To lock a seat-back upright, push it backwards until it
locks.
When returning a seat-back to it’s original position,
push it firmly back. Also, make sure all rear shoulder
belts are positioned in front of the seat-back, and the
center shoulder belt is re-positioned in the guide.
Make sure that the folded seat-back does not press
against the front passenger seat, as this can cause the
weight sensors in the front passenger seat to work
improperly.
2 Passenger Airbag Off Indicator P. 45
Also make sure all items in the trunk or items
extending through the opening into the rear
seats are properly secured. Loose items can fly
forward if you have to brake hard.
Guide
Center
Shoulder
Belt
Release
Lever
Page 131 of 325
uuInterior Lights/Interior Convenience Items uInterior Convenience Items
130Controls
There are coat hooks on the rear left and right
grab handles. Pull them down to use them.
The cargo hooks in the trunk can be used to
install a net for securing items.
■
Coat Hooks
1Coat Hooks
The coat hooks are not designed for large or heavy
items.
■
Cargo Hooks
1Cargo Hooks
Distribute cargo evenly on the floor of the trunk,
placing the heaviest items on the bottom and as far
forward as possible.
2 Maximum Load Limit P. 185
Hooks
Page 141 of 325
140
uuAudio System uAuxiliary Input Jack
Features
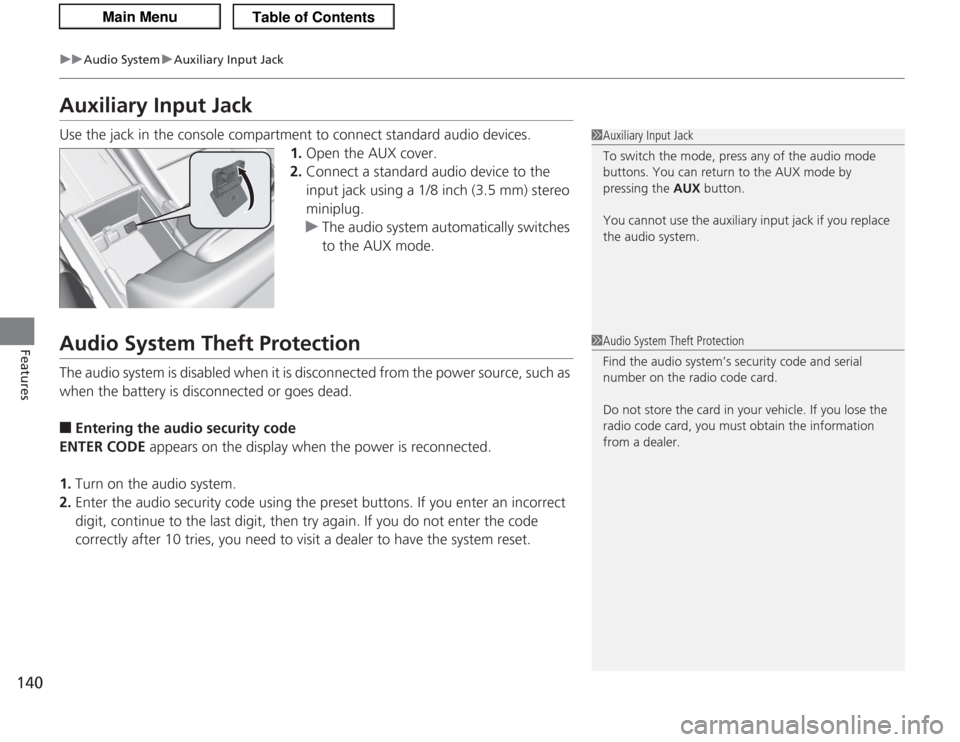
Auxiliary Input JackUse the jack in the console compartment to connect standard audio devices.
1.Open the AUX cover.
2. Connect a standard audio device to the
input jack using a 1/8 inch (3.5 mm) stereo
miniplug.
u The audio system automatically switches
to the AUX mode.Audio System Theft ProtectionThe audio system is disabled when it is disconnected from the power source, such as
when the battery is disconnected or goes dead.■
Entering the audio security code
ENTER CODE appears on the display when the power is reconnected.
1. Turn on the audio system.
2. Enter the audio security code using the preset buttons. If you enter an incorrect
digit, continue to the last digit, then try again. If you do not enter the code
correctly after 10 tries, you need to visit a dealer to have the system reset.
1Auxiliary Input Jack
To switch the mode, press any of the audio mode
buttons. You can return to the AUX mode by
pressing the AUX button.
You cannot use the auxiliary input jack if you replace
the audio system.1 Audio System Theft Protection
Find the audio system’s security code and serial
number on the radio code card.
Do not store the card in your vehicle. If you lose the
radio code card, you must obtain the information
from a dealer.
Page 165 of 325
164
uuGeneral Information on the Audio System uCompatible iPod ® and USB Flash Drives
Features
Compatible iPod ® and USB Flash Drives• Use a recommended USB flash drive of 256 MB or higher.
• Some digital audio players may not be compatible.
• Some USB flash drives (e.g., a device with security lockout) may not work.
• Some software files may not allow for audio play or text data display.
• Some versions of MP3, WMA, or AAC formats may be unsupported.■
iPod ® Model Compatibility
Model
iPod ® (5th generation)iPod classic ® 80/160GB (launched in 2007)iPod classic® 120GB (launched in 2008)iPod classic® 160GB (launched in 2009)iPod touch® (launched in 2011)iPod nano® (launched in 2011)■
USB Flash Drives
1iPod ® Model Compatibility
This system may not work with all software versions
of these devices.1 USB Flash Drives
Files on the USB flash drive are played in their stored
order. This order may be different from the order
displayed on your PC or device.
Page 166 of 325
165
Continued
Features
HomeLink® Universal TransceiverThe HomeLink ® Universal Transceiver can be programmed to operate up to three
remote controlled devices around your home, such as garage doors, lighting, or
home security systems.
Refer to the safety information that comes with your garage door opener to test that
the safety features are functioning properly. If you do not have the safety
information, contact the manufacturer.
Before programming HomeLink, make sure that people and objects are out of the
way of the garage or gate to prevent potential injury or damage.
When programming a garage door opener, park just outside the garage door’s
path.Training HomeLink
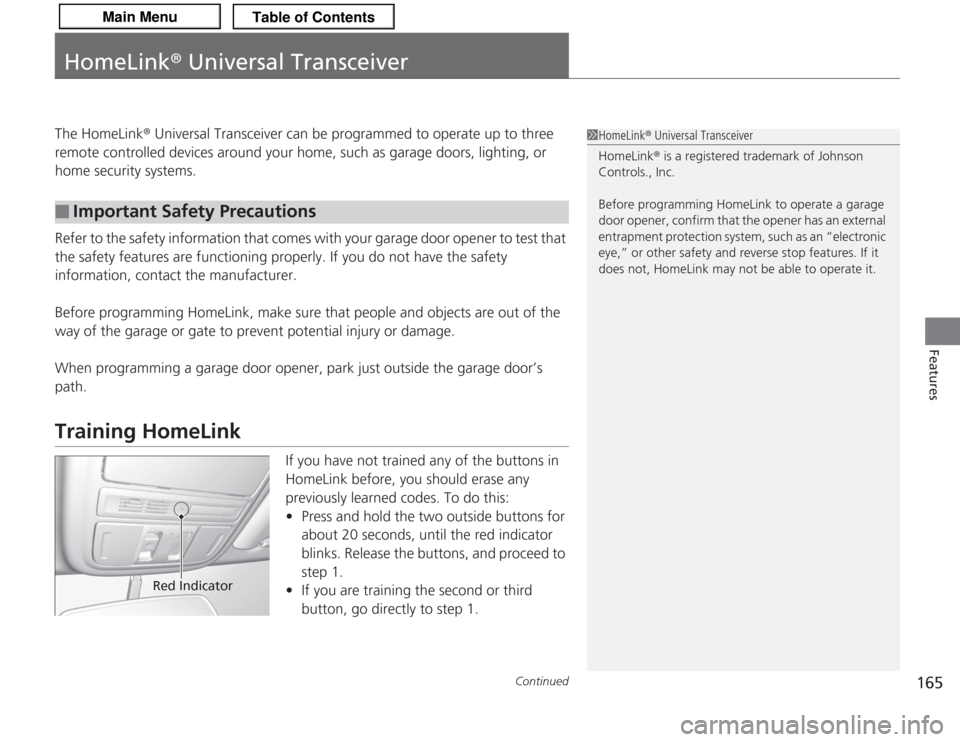
If you have not trained any of the buttons in
HomeLink before, you should erase any
previously learned codes. To do this:
• Press and hold the two outside buttons for
about 20 seconds, until the red indicator
blinks. Release the buttons, and proceed to
step 1.
• If you are training the second or third
button, go directly to step 1.
■
Important Safety Precautions
1HomeLink ® Universal Transceiver
HomeLink® is a registered trademark of Johnson
Controls., Inc.
Before programming HomeLink to operate a garage
door opener, confirm that the opener has an external
entrapment protection system, such as an “electronic
eye,” or other safety and reverse stop features. If it
does not, HomeLink may not be able to operate it.
Red Indicator
Page 171 of 325
170
uuBluetooth ® HandsFreeLink ®u HFL Menus
Features
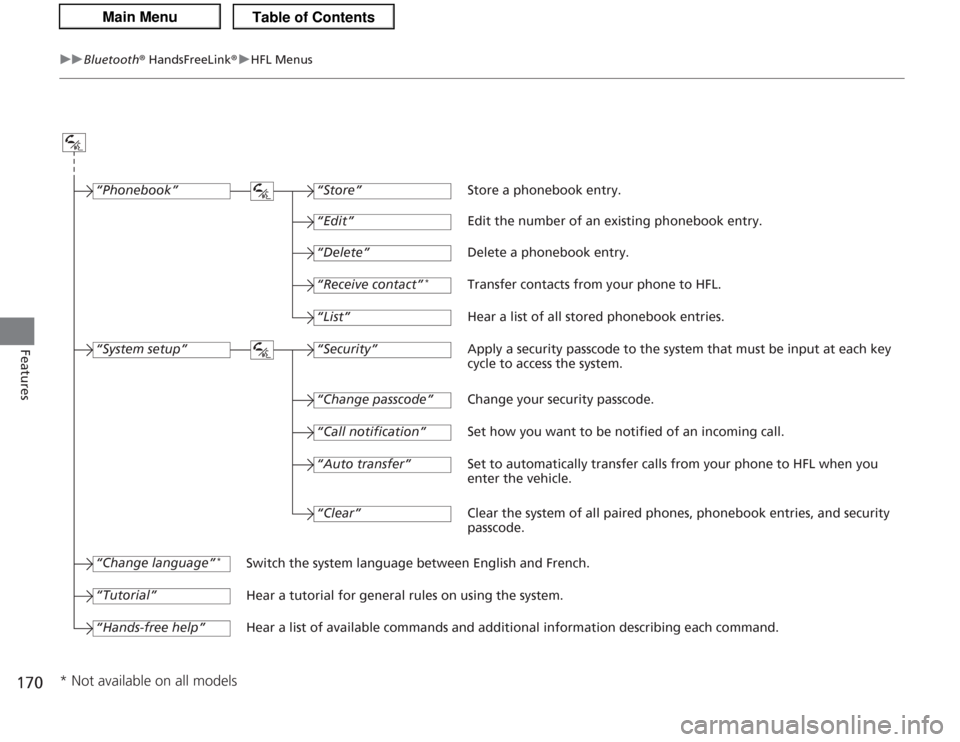
“Change passcode”
Store a phonebook entry.
Edit the number of an existing phonebook entry.
Delete a phonebook entry.
Transfer contacts from your phone to HFL.
Hear a list of all stored phonebook entries.
Apply a security passcode to the system that must be input at each key
cycle to access the system.
Change your security passcode.
Set how you want to be notified of an incoming call.
Set to automatically transfer calls from your phone to HFL when you
enter the vehicle.
Switch the system language between English and French.
Hear a tutorial for general rules on using the system.
Hear a list of available commands and additional information describing each command. “Store”
“Edit”“Delete”“Receive contact”
*
“List”“Security”“Call notification”“Auto transfer”
“Phonebook”“System setup”“Change language”
*
“Tutorial”“Hands-free help”
Clear the system of all paired phones, phonebook entries, and security
passcode.
“Clear”
* Not available on all models
Page 178 of 325
Continued
177
uuBluetooth ® HandsFreeLink ®u HFL Menus
Features
This command group allows you to change or customize HFL basic settings.■
To set a four-digit passcode to lock the HFL system for security
1. Say “System Setup.”
2. Say “Security.”
3. Follow the HFL prompts and say the four-digit number of your choice.
4. Follow the HFL prompts and confirm the number.
■
To change the security passcode
1. Say “System Setup.”
2. Say “Change Passcode” after the prompts.
3. Say the new four-digit passcode after the HFL prompts.
4. Follow the HFL prompts.
■
To select a ring tone or a prompt as the incoming call notification
1. Say “System Setup.”
2. Say “Call Notification” after the prompts.
3. Say “Ring Tone” or “Prompt” after the prompts. For no audible notification, say
“Off.”
■
System Setup
1 System Setup
Press the button before a command.
Once a passcode is set, you are required to enter the
passcode with every new key cycle to use HFL.
If you forget the code, go to your dealer to have the
passcode reset. You can also cancel the passcode by
clearing all the data stored in the HFL system.
2 To clear the system P. 178
The default setting of the incoming notification is a
ring tone.
Page 183 of 325
182Driving
Before DrivingDriving PreparationCheck the following items before you start driving.
•Make sure there are no obstructions on the windows, door mirrors, exterior
lights, or other parts of the vehicle.
u Remove any frost, snow, or ice.
u Remove any snow on the roof, as this can slip down and obstruct your field of
vision while driving. If frozen solid, remove ice once it has softened.
u When removing ice from around the wheels, be sure not to damage the wheel
or wheel components.
• Make sure the hood is securely closed.
u If the hood opens while driving, your front view will be blocked.
• Make sure the tires are in good condition.
u Check air pressure, check for damage and excessive wear.
2 Checking and Maintaining Tires P. 259
•Make sure there are no people or objects behind or around the vehicle.
u There are blind spots from the inside.■
Exterior Checks
1Exterior Checks
NOTICEWhen doors are frozen shut, use warm water around
the door edges to melt any ice. Do not try to force
them open, as this can damage the rubber trim
around the doors. When done, wipe dry to avoid
further freezing.
Do not pour warm water into the key cylinder.
You will be unable to insert key if the water freezes in
the hole.
Heat from the engine and exhaust can ignite
flammable materials left under the hood, causing a
fire. If you’ve parked your vehicle for an extended
period, inspect and remove any debris that may have
collected, such as dried grass and leaves that have
fallen or have been carried in for use as a nest by a
small animal. Also check under the hood for leftover
flammable materials after you or someone else has
performed maintenance on your vehicle.