Page 98 of 325
97
uuOpening and Closing the Trunk uTrunk Main Switch
Controls
Trunk Main Switch
The trunk main switch disables the trunk
opener on the driver’s side and the trunk
release button on the trunk lid to protect
luggage in the trunk.
1. Make sure the rear seat-backs are not
folded down.
2. Turn off the trunk main switch in the glove
box.
3. Lock the glove box.
Emergency Trunk Opener
The trunk release lever allows you to open the
trunk from inside for your safety.
Slide the release lever in the direction of the
arrow.
1Trunk Main Switch
If you need to give the key to someone else, give
them the valet key.
The trunk release button on the remote transmitter is
always enabled, even when the trunk main switch is
off.
Main Switch
ONOFF
1Emergency Trunk Opener
Parents should decide if their children should be
shown how to use this feature.
Lever
Page 99 of 325

98Controls
Security SystemImmobilizer SystemThe immobilizer system prevents a key that has not been pre-registered from
starting the engine. Each key contains electronic transmitters that use electronic
signals to verify the key.
Pay attention to the following when inserting the key into the ignition switch.
•Do not allow objects that emit strong radio waves near the ignition switch.
• Make sure the key is not covered by or touching a metal object.
• Do not bring a key from another vehicle’s immobilizer system near the ignition
switch.Security System AlarmThe security system alarm activates when the doors, trunk, or hood are opened
without the key, or remote transmitter. It also activates if you turn the ignition
switch to ON
(w
after locking the doors with the remote transmitter.
■
When the security system alarm activates
The horn sounds intermittently, and all the exterior lights flash.
■
To deactivate the security system alarm
Unlock the vehicle using the key, or remote transmitter. The system, along with the
horn and flashing lights, are deactivated.
1 Immobilizer System
NOTICELeaving the ignition key in the vehicle can result in
theft or accidental movement of the vehicle.
Always take the ignition key with you whenever you
leave the vehicle unattended.
Do not alter the system or add other devices to it.
Doing so may damage the system and make your
vehicle inoperable.1Security System Alarm
The security alarm continues for a maximum of two
minutes until the security system deactivates.
Page 100 of 325

99
uuSecurity System uSecurity System Alarm
Controls
■
Setting the security system alarm
The security system alarm automatically sets when the following conditions have
been met:
• The ignition switch is in LOCK
(0
, and the key has been removed from the
ignition switch.
• The hood and trunk are closed.
• All doors are locked with the remote transmitter.
■
When the security system alarm sets
The security system alarm indicator in the instrument panel blinks. When the
blinking interval changes after about 15 seconds, the security system alarm is set.
■
To cancel the security system alarm
The security system alarm is canceled when the vehicle is unlocked using the key or
remote transmitter. The security system alarm indicator goes off at the same time.
■
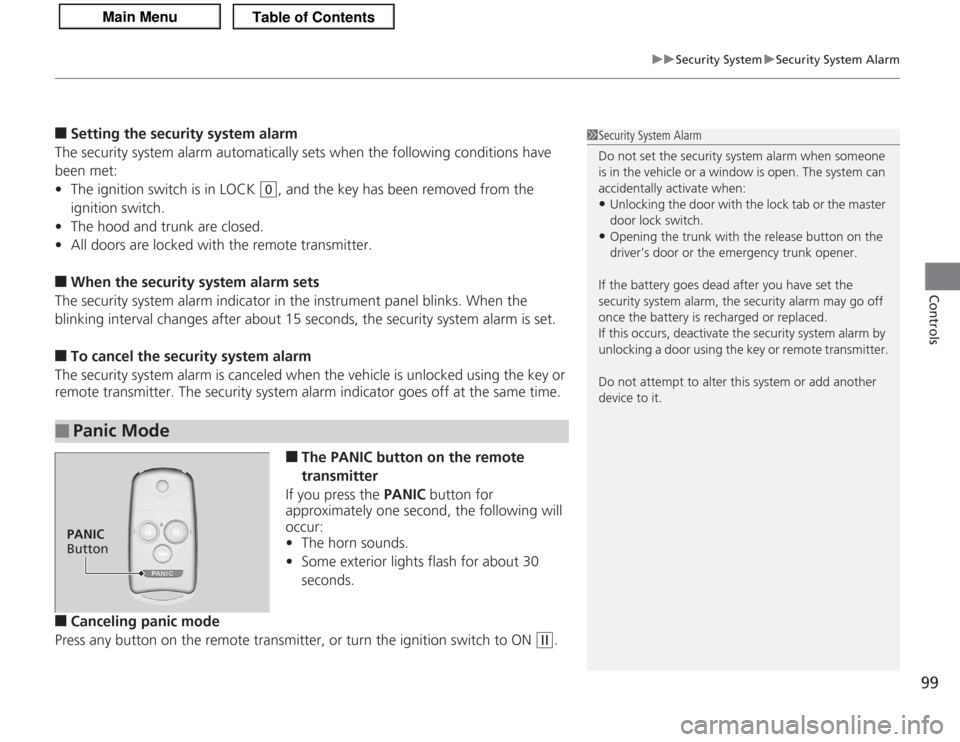
The PANIC button on the remote
transmitter
If you press the PANIC button for
approximately one second, the following will
occur:
• The horn sounds.
• Some exterior lights flash for about 30
seconds.
■
Canceling panic mode
Press any button on the remote transmitter, or turn the ignition switch to ON
(w
.
■
Panic Mode
1 Security System Alarm
Do not set the security system alarm when someone
is in the vehicle or a window is open. The system can
accidentally activate when:•Unlocking the door with the lock tab or the master
door lock switch.•Opening the trunk with the release button on the
driver’s door or the emergency trunk opener.
If the battery goes dead after you have set the
security system alarm, the security alarm may go off
once the battery is recharged or replaced.
If this occurs, deactivate the security system alarm by
unlocking a door using the key or remote transmitter.
Do not attempt to alter this system or add another
device to it.
PANIC
Button
Page 124 of 325

123
uuAdjusting the Seats uRear Seats
Controls
Rear Seats
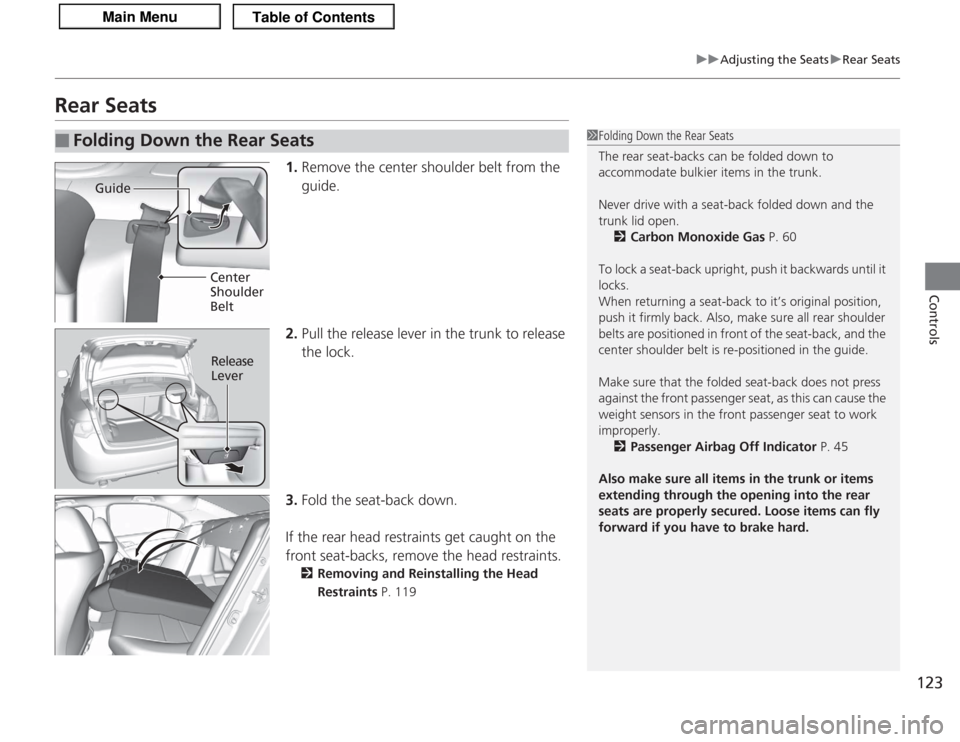
1. Remove the center shoulder belt from the
guide.
2. Pull the release lever in the trunk to release
the lock.
3. Fold the seat-back down.
If the rear head restraints get caught on the
front seat-backs, remove the head restraints.
2 Removing and Reinstalling the Head
Restraints P. 119
■
Folding Down the Rear Seats
1Folding Down the Rear Seats
The rear seat-backs can be folded down to
accommodate bulkier items in the trunk.
Never drive with a seat-back folded down and the
trunk lid open.
2 Carbon Monoxide Gas P. 60
To lock a seat-back upright, push it backwards until it
locks.
When returning a seat-back to it’s original position,
push it firmly back. Also, make sure all rear shoulder
belts are positioned in front of the seat-back, and the
center shoulder belt is re-positioned in the guide.
Make sure that the folded seat-back does not press
against the front passenger seat, as this can cause the
weight sensors in the front passenger seat to work
improperly.
2 Passenger Airbag Off Indicator P. 45
Also make sure all items in the trunk or items
extending through the opening into the rear
seats are properly secured. Loose items can fly
forward if you have to brake hard.
Guide
Center
Shoulder
Belt
Release
Lever
Page 131 of 325
uuInterior Lights/Interior Convenience Items uInterior Convenience Items
130Controls
There are coat hooks on the rear left and right
grab handles. Pull them down to use them.
The cargo hooks in the trunk can be used to
install a net for securing items.
■
Coat Hooks
1Coat Hooks
The coat hooks are not designed for large or heavy
items.
■
Cargo Hooks
1Cargo Hooks
Distribute cargo evenly on the floor of the trunk,
placing the heaviest items on the bottom and as far
forward as possible.
2 Maximum Load Limit P. 185
Hooks
Page 184 of 325

Continued
183
uuBefore Driving uDriving Preparation
Driving
• Store or secure all items on board properly.
u Carrying too much cargo, or improperly storing it, can affect your vehicle’s
handling, stability, stopping distance, and tires, and make it unsafe.
2 Maximum Load Limit P. 185
•Do not pile items higher than the seat height.
u They can block your view and may be thrown forward in the event of sudden
braking.
• Do not place anything in the front seat footwells. Make sure to secure the floor
mat.
u An object or unsecured floor mat can interfere with your brake and accelerator
pedal operation while driving.
• If you have any animals on board, do not let them move around in the vehicle.
u They may interfere with driving and a crash could occur.
• Securely close and lock all doors and the trunk.
2 Locking/Unlocking the Doors from the Inside P. 93
•Adjust your seating position properly.
u Adjust the head restraint, too.
2 Adjusting the Seats P. 116
2 Adjusting the Head Restraints P. 118
•Adjust the mirrors and steering wheel properly for your driving.
u Adjust them while sitting in the proper driving position.
2 Adjusting the Mirror P. 114
2 Adjusting the Steering Wheel P. 113
■
Interior Checks
1Interior Checks
The headlight aim is set by the factory, and does not
need to be adjusted. However, if you regularly carry
heavy items in the trunk or tow a trailer, have the
aiming readjusted at a dealer or by a qualified
technician.
Page 248 of 325

247
Continued
Maintenance
Replacing Light BulbsHeadlight BulbsWhen replacing, use the following bulbs.1.Remove all the engine compartment covers.
2 Engine Compartment Covers
* P. 233
2.Remove the engine coolant reservoir.
High beam headlight:
60 W (HB3)
Low beam headlight:
55 W (H1 for halogen bulb Type)
35 W (D2S for high voltage discharge type)
■
High Beam Headlight
1Headlight Bulbs
NOTICEHalogen bulbs get very hot when lit.
Oil, perspiration, or a scratch on the glass can cause
the bulb to overheat and shatter.
The headlight aim is set by the factory, and does not
need to be adjusted. However, if you regularly carry
heavy items in the trunk or tow a trailer, have the
aiming readjusted at a dealer or by a qualified
technician.
The HB3 and H1 types are halogen bulbs.
When replacing a bulb, handle it by its base, and
protect the glass from contact with your skin or hard
objects. If you touch the glass, clean it with
denatured alcohol and a clean cloth.
Engine Coolant Reservoir
4-cylinder models
6-cylinder modelsPassenger sideAll models
6-cylinder models
Engine Coolant Reservoir
* Not available on all models
Page 255 of 325
254
uuReplacing Light Bulbs uBack-Up Light Bulbs
Maintenance
2. Turn the socket to the left and remove it.
Remove the old bulb.
3. Remove the old bulb a nd insert a new bulb.
Back-Up Light BulbsWhen replacing, use the following bulbs.
1.Remove the clip in the trunk using a flat-tip
screwdriver.
2. Pull out the lining.Back-Up Light: 21 W Lining
Clip