Page 144 of 364

143
Continued
Controls
Interior Lights/Interior Convenience ItemsInterior Lights
■
ON
The interior lights come on regardless of
whether the doors are open or closed.
■
Door activated
The interior lights come on in the following
situations:
• When any of the doors are opened.
• You unlock the driver's door.
• When the power mode is set to VEHICLE
OFF (LOCK).
■
OFF
The interior lights remain off regardless of
whether the doors are open or closed.
The map lights can be turned on and off by
pressing the button.
■
Interior Light Switches
1 Interior Light Switches
In the door activated position, the interior lights fade
out and go off about 30 seconds after the doors are
closed.
The lights go off after 30 seconds in the following
situations:•When you unlock the driver's door but do not open
it.•When you set the power mode to VEHICLE OFF
(LOCK) but do not open a door.
You can change the interior lights dimming time. 2 Customized Features P. 87
The interior lights go off immediately in the following
situations:•When you lock the driver's door.•When you close the driver's door in ACCESSORY
mode.•When you set the power mode to ON.
If you leave any of the doors open in VEHICLE OFF
(LOCK) mode, the interior lights go off after about 15
minutes.
Door Activated
Position
Off
Front
Door Activated Position
On
Off
Rear
On
■
Map Lights
1
Map Lights
When the interior light switch is in the door activated
position and any door is open, the map light will not
go off when you press the button.
Page 162 of 364

161Features
Audio System Basic OperationTo use the audio system function, the power mode must be in ACCESSORY or ON.Use the selector knob or SETUP button to
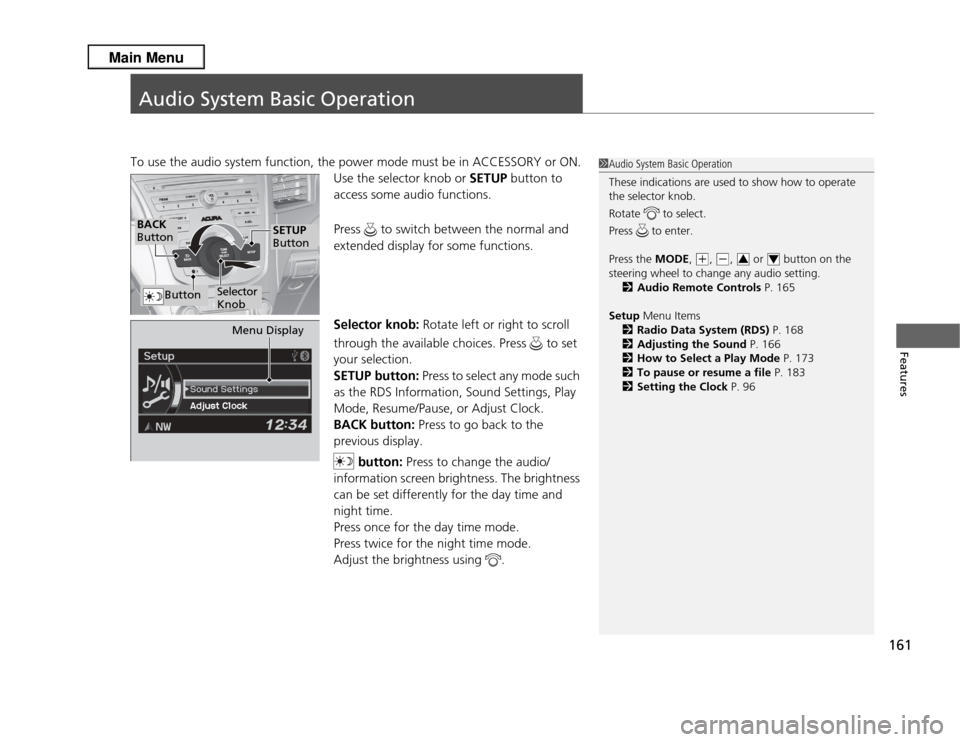
access some audio functions.
Press to switch between the normal and
extended display for some functions.
Selector knob: Rotate left or right to scroll
through the available choices. Press to set
your selection.
SETUP button: Press to select any mode such
as the RDS Information, Sound Settings, Play
Mode, Resume/Pause, or Adjust Clock.
BACK button: Press to go back to the
previous display.
button: Press to change the audio/
information screen brightness. The brightness
can be set differently for the day time and
night time.
Press once for the day time mode.
Press twice for the night time mode.
Adjust the brightness using .
1 Audio System Basic Operation
These indications are used to show how to operate
the selector knob.
Rotate to select.
Press to enter.
Press the MODE,
(+
, (-
, or button on the
steering wheel to change any audio setting. 2 Audio Remote Controls P. 165
Setup Menu Items
2 Radio Data System (RDS) P. 168
2 Adjusting the Sound P. 166
2 How to Select a Play Mode P. 173
2 To pause or resume a file P. 183
2 Setting the Clock P. 963
4
BACK
Button
Selector
Knob
SETUP
Button
Button
Menu Display
Page 185 of 364

184
uuAudio System Basic Operation uWallpaper Setup
Features
Wallpaper SetupYou can change, store, and delete the wallpaper on the audio/information screen.
See the navigation system manual for how to change the wallpaper.
You can import up to three images, one at a time, for wallpaper from a USB flash
drive.
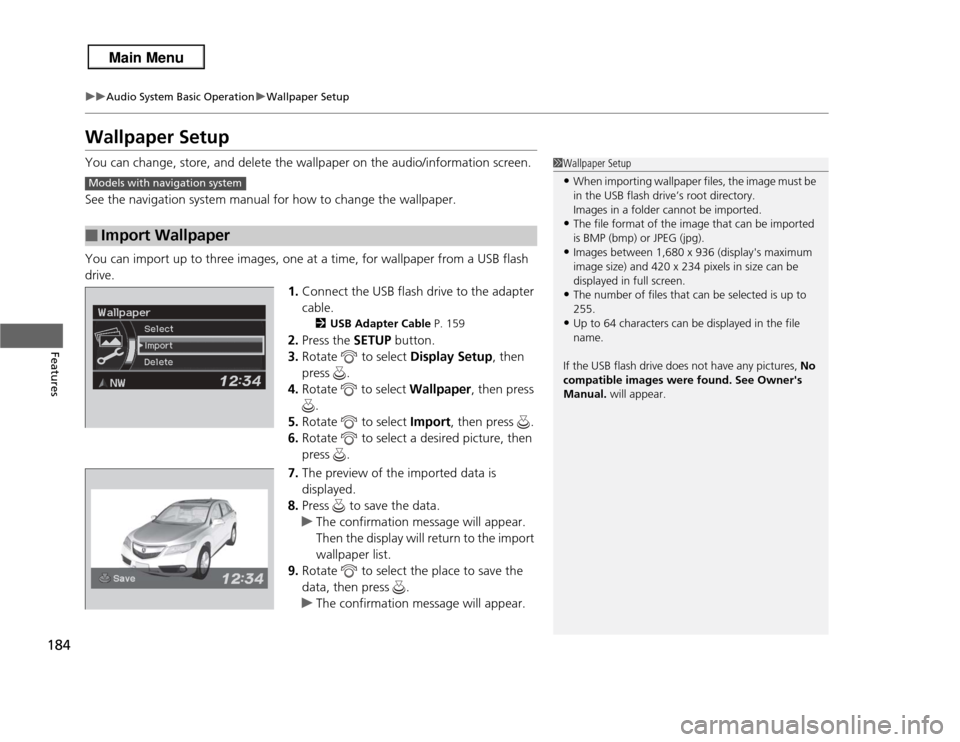
1.Connect the USB flash drive to the adapter
cable.
2 USB Adapter Cable P. 159
2.Press the SETUP button.
3. Rotate to select Display Setup, then
press .
4. Rotate to select Wallpaper, then press
.
5. Rotate to select Import, then press .
6. Rotate to select a desired picture, then
press .
7. The preview of the imported data is
displayed.
8. Press to save the data.
u The confirmation message will appear.
Then the display will return to the import
wallpaper list.
9. Rotate to select the place to save the
data, then press .
u The confirmation message will appear.
■
Import Wallpaper
1Wallpaper Setup•When importing wallpaper files, the image must be
in the USB flash drive’s root directory.
Images in a folder cannot be imported.•The file format of the image that can be imported
is BMP (bmp) or JPEG (jpg).•Images between 1,680 x 936 (display's maximum
image size) and 420 x 234 pixels in size can be
displayed in full screen.•The number of files that can be selected is up to
255.•Up to 64 characters can be displayed in the file
name.
If the USB flash drive does not have any pictures, No
compatible images were found. See Owner's
Manual. will appear.
Models with navigation system
Page 207 of 364
uuBluetooth® HandsFreeLink ®u HFL Menus
206Features
■
To change the pairing code setting
1. Press the PHONE button or the button.
2. Rotate to select Phone Setup, then
press .
3. Rotate to select Connection, then press
.
4. Rotate to select Pairing Code, then
press .
5. Rotate to select Fixed or Random , then
press .
1 To change the pairing code setting
The default pairing code is “0000” until you change
the setting.
To create your own, select Fixed, and delete the
current code, then enter a new one.
For a randomly generated pairing code each time you
pair a phone, select Random.
Page 263 of 364

262Driving
Multi-View Rear CameraAbout Your Multi-View Rear CameraFor models with navigation system, see Navigation System Manual.
The audio/information screen can display your vehicle’s rear view. The display
automatically changes to the rear view when the shift lever is moved to
(R
.
You can view three different camera angles on the rearview display. Press the
selector knob to switch the angle.
If the last used viewing mode is Wide or Normal, the same mode is selected the next
time you shift into
(R
. If Top view was last used, Wide mode is selected.
■
Multi-View Rear Camera Display Area
1 About Your Multi-View Rear Camera
The rear camera view is restricted. You cannot see
the corner ends of the bumper or what is underneath
the bumper. Its unique lens also makes objects
appear closer or farther than they actually are.
Visually confirm that it is safe to drive before backing
up. Certain conditions (such as weather, lighting, and
high temperatures) may also restrict the rear view. Do
not rely on the rearview display which does not give
you all information about conditions at the back of
your vehicle.
If the camera lens is covered with dirt or moisture,
use a soft, moist cloth to keep the lens clean and free
of debris.
Models with navigation systemModels without navigation system
Guidelines
BumperCamera Approx. 20 inches (50 cm)
Tailgate Open Range
Approx. 39 inches (1 m)
Approx. 79 inches (2 m)
Approx. 118 inches (3 m)
Wide View Mode
Normal View ModeTop Down View Mode
Page 272 of 364

271
Continued
Maintenance
Maintenance Minder
TM
If the engine oil life is less than 15%, you will see the Maintenance Minder messages
appear on the multi-information display every time you set the power mode to ON.
The messages notify you when to change the engine oil, or when to bring your
vehicle to a dealer for indicated maintenance services.To Use Maintenance Minder
TM
1.Set the power mode to ON.
2. Press the / button repeatedly until the engine oil life appears on the
multi-information display.■
Displaying the Engine Oil Life
1Displaying the Engine Oil Life
Based on the engine operating conditions, the
remaining engine oil life is calculated and displayed
as a percentage.
There is a list of maintenance main and sub items you
can view on the multi-information display.
2 Maintenance Service Items P. 273
Displayed Engine Oil
Life (%)
Calculated Engine Oil Life (%)
100 100 to 91
90
90 to 81
80 80 to 71
70
70 to 61
60 60 to 51
50
50 to 41
40 40 to 31
30
30 to 21
20 20 to 16
15
15 to 11
10 10 to 6
5
5 to 1
00
Remaining Engine Oil Life
/ Button
Page 328 of 364
327
uuEngine Does Not Start uEmergency Engine Stop
Handling the Unexpected
Emergency Engine StopIf you cannot stop the engine by pressing the ENGINE START/STOP button, do
either of the following operations:
• Press and hold the ENGINE START/STOP button for three seconds.
• Firmly press the ENGINE START/STOP button three times.
The steering wheel will not lock. The power mode changes to VEHICLE OFF with the
shift lever in
(P
, and to ACCESSORY with the shift lever in any position other than
(P
.
1 Emergency Engine Stop
Do not press the button while driving unless it is
absolutely necessary for the engine to be switched
off.
Page:
< prev 1-8 9-16 17-24