2013 Acura RDX change wheel
[x] Cancel search: change wheelPage 129 of 364

128
uuOperating the Switches Around the Steering Wheel uBrightness Control
Controls
Brightness Control
When the power mode is in ON, you can use
the brightness control knob to adjust
instrument panel brightness.
Brighten: Turn the knob to the right.
Dim: Turn the knob to the left.
You will hear a beep when the brightness
reaches minimum or maximum. The multi-
information display will return to its original
state several seconds after you adjust the
brightness.■
Brightness level indicator
The brightness level is shown on the multi-
information display while you are adjusting it.
1 Brightness Control
Instrument panel brightness varies, depending on
whether the exterior lights are on or off. The
instrument panel dims to reduce glare when they are
on.
When it is bright outside and the headlight
integration with the wiper is activated, the
instrument panel brightness does not change.
Pressing the (SEL/RESET) knob switches the
display.
If you turn the knob to the right until the brightness
display is up to max, a beep sound. This cancels the
reduced instrument panel brightness when the
exterior lights are on.
Control Knob
Page 162 of 364
161Features
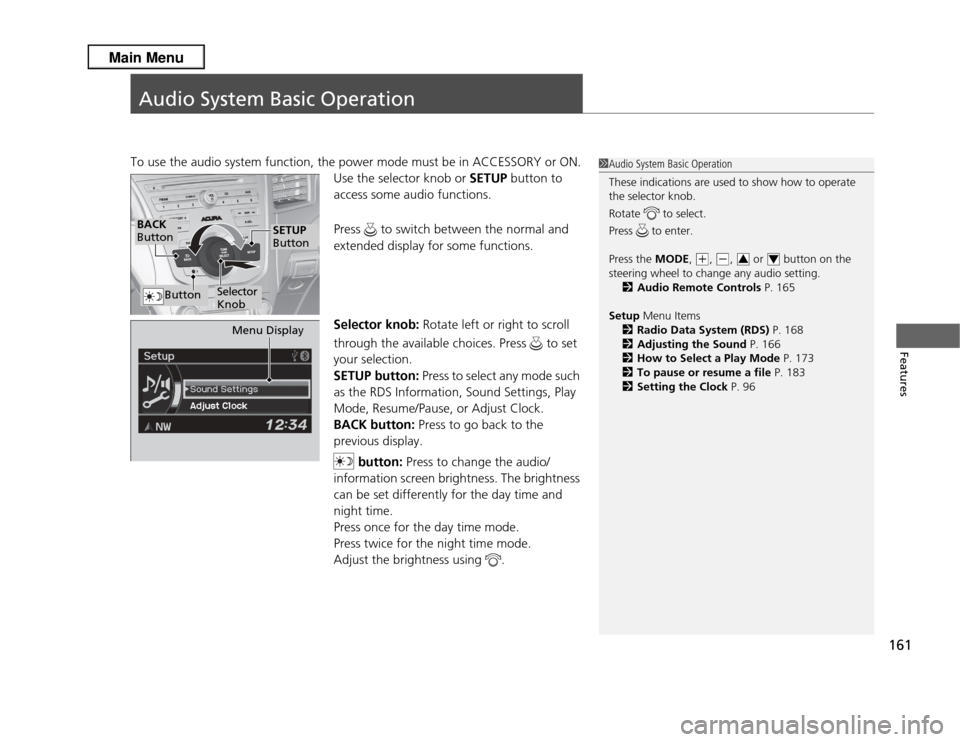
Audio System Basic OperationTo use the audio system function, the power mode must be in ACCESSORY or ON.Use the selector knob or SETUP button to
access some audio functions.
Press to switch between the normal and
extended display for some functions.
Selector knob: Rotate left or right to scroll
through the available choices. Press to set
your selection.
SETUP button: Press to select any mode such
as the RDS Information, Sound Settings, Play
Mode, Resume/Pause, or Adjust Clock.
BACK button: Press to go back to the
previous display.
button: Press to change the audio/
information screen brightness. The brightness
can be set differently for the day time and
night time.
Press once for the day time mode.
Press twice for the night time mode.
Adjust the brightness using .
1 Audio System Basic Operation
These indications are used to show how to operate
the selector knob.
Rotate to select.
Press to enter.
Press the MODE,
(+
, (-
, or button on the
steering wheel to change any audio setting. 2 Audio Remote Controls P. 165
Setup Menu Items
2 Radio Data System (RDS) P. 168
2 Adjusting the Sound P. 166
2 How to Select a Play Mode P. 173
2 To pause or resume a file P. 183
2 Setting the Clock P. 963
4
BACK
Button
Selector
Knob
SETUP
Button
Button
Menu Display
Page 197 of 364

196Features
Bluetooth® HandsFreeLink ®For models with navigation system, s ee Navigation System Manual for how to
operate Bluetooth ® HandsFreeLink ®.
Bluetooth ® HandsFreeLink ® (HFL) allows you to place and receive phone calls using
your vehicle's audio system, without handling your cell phone.Using HFL
(Pick-up) button: Press to go directly to the Phone screen or to answer an
incoming call.
(Hang-up) button: Press to end a call.
(TALK) button: Press to call a number with a stored voice tag.
(Back) button: Press to cancel a command.
PHONE button: Press to go directly to the Phone screen.
Selector knob: Rotate to select an item on the screen, then press .
■
HFL Buttons
1Bluetooth ® HandsFreeLink ®
To use HFL, you need a Bluetooth-compatible cell
phone. For a list of compatible phones, pairing
procedures, and special feature capabilities:•U.S.: Visit www.acura.com/handsfreelink, or call 1-
888-528-7876.•Canada: Visit www.handsfreelink.ca , or call 1-888-
528-7876.
Voice control tips•Aim the vents away from the ceiling and close the
windows, as noise coming from them may interfere
with the microphone.•Press and release the button when you want to
call a number using a stored voice tag. Speak
clearly and naturally after a beep.•If the microphone picks up voices other than yours,
the command may be misinterpreted.•To change the volume level, use the audio system's
volume knob or the remote audio controls on the
steering wheel.
State or local laws may prohibit the operation of
handheld electronic devices while operating a
vehicle.
Models with navigation systemModels without navigation systemTALK Button
Volume up
Microphone
Hang-up Button
Pick-up Button
Volume down
Selector KnobPHONE Button
Back Button
Page 247 of 364

246
uuWhen Driving uShifting
Driving
Use the paddle shifters to change between 1st and 6th gears without removing your
hands from the steering wheel. The transmission will switch to the sequential shift
mode.■
When the shift lever is in
(D
:
The vehicle will go into the sequential shift mode momentarily, and the gear position
indicator will come on.
Once you start traveling at a constant speed, the sequential shift mode will
automatically switch off, and the gear position indicator will go off.
Hold the
(+
paddle shifter for two seconds to return to normal drive.
■
When the shift lever is in
(S
:
The vehicle will go into the sequential shift mode, and the M (sequential shift mode)
indicator and gear position indicator will come on. At speeds of 6 mph (10 km/h) or
less, the vehicle automatically shifts down into 1st gear. It will not automatically shift
up, even if vehicle speed increases.
You can only pull away in 1st or 2nd gear.
When switching out of the sequential shift mode, move the shift lever from
(S
to
(D
. When the sequential shift mode is canceled, the M indicator and gear position
indicator go off.
■
Sequential Shift Mode
Page 254 of 364

253
uuWhen Driving uAWD (All-Wheel Drive) with Intelligent Control System
*
Continued
Driving
AWD (All-Wheel Drive) with Intelligent Control System
*
Your vehicle is equipped with the AWD with intelligent control system. When the
system senses a loss of front wheel traction, it automatically transfers some power
to the rear wheels. This allows you to utilize all available traction and may increase
mobility.
You still need to exercise the same care when accelerating, steering, and braking
that you would in a two wheel drive vehicle.
If you excessively spin all four wheels and overheat the AWD with intelligent control
system, only the front wheels receive power. Stop until the system cools down.TPMS (Tire Pressure Monitoring System)
Monitors the tire pressure while you are
driving. If your vehicle's tire pressure becomes
significantly low, the low tire pressure/TPMS
indicator comes on and a message appears on
the multi-information display.
1AWD (All-Wheel Drive) with Intelligent Control System
*
NOTICEDo not continuously spin the front tires of your
vehicle. Continuously spinning the front tires can
cause transmission or rear differential damage.
The AWD with intelligent control system may not
function properly if tire type and size are mixed.
Make sure to use the same size and type of tire, and
the air pressures as specified.
2 Tire and Wheel Replacement P. 3071TPMS (Tire Pressure Monitoring System)
Conditions such as low ambient temperature and
altitude change directly affect tire pressure and can
trigger the low tire pressure/TPMS indicator to come
on.
2 If the Low Tire Pressure/TPMS Indicator
Comes On or Blinks P. 336
Tire pressure checked and inflated in:•Warm weather can become under-inflated in
colder weather.•Cold weather can become over-inflated in warmer
weather.
The low tire pressure/TPMS indicator will not come
on as a result of over inflation.
* Not available on all models
Page 323 of 364

uuIf a Tire Goes Flat uChanging a Flat Tire
322Handling the Unexpected
1. Place the jack under the jacking point
closest to the tire to be changed.
2. Turn the end bracket (as shown in the
image) clockwise until the top of the jack
contacts the jacking point.
u Make sure that the jacking point tab is
resting in the jack notch.
3. Raise the vehicle, using the jack handle bar
and the jack handle, until the tire is off the
ground.
■
How to Set Up the Jack
1How to Set Up the Jack
Do not use the jack with people or luggage in the
vehicle.
Use the jack provided in your vehicle.
Other jacks may not support the weight (“load”) or
their shape may not match.
The following instructions must be followed to use
the jack safely.•Do not use while the engine is running.•Use only where the ground is firm and level.•Use only at the jacking points.•Do not get in the vehicle while using the jack.•Do not put anything on top of or underneath the
jack.
3
WARNING
The vehicle can easily roll off the jack,
seriously injuring anyone underneath.
Follow the directions for changing a tire
exactly, and never get under the vehicle
when it is supported only by the jack.
Jack
Handle
BarWheel Nut Wrench as Jack Handle
Page 328 of 364

327
uuEngine Does Not Start uEmergency Engine Stop
Handling the Unexpected
Emergency Engine StopIf you cannot stop the engine by pressing the ENGINE START/STOP button, do
either of the following operations:
• Press and hold the ENGINE START/STOP button for three seconds.
• Firmly press the ENGINE START/STOP button three times.
The steering wheel will not lock. The power mode changes to VEHICLE OFF with the
shift lever in
(P
, and to ACCESSORY with the shift lever in any position other than
(P
.
1 Emergency Engine Stop
Do not press the button while driving unless it is
absolutely necessary for the engine to be switched
off.
Page 346 of 364

345
uuSpecifications u
Information
■Automatic Transmission Fluid
■ Rear Differential Fluid
*
■Transfer Assembly Fluid
*
Specified
Acura ATF DW-1(automatic transmission fluid)
Capacity Change 3.3 US qt (3.1 ℓ)
Specified
Acura All Wheel Drive Fluid (DPSF)
Capacity Change 1.32 US qt (1.25 ℓ)
Specified
Acura HGO-1
Capacity Change 0.43 US qt (0.41 ℓ)
■ Engine Oil
■ Engine CoolantRecommended
·Genuine Acura Motor Oil 0W-20
·API Premium-grade 0W-20 detergent oil
Capacity Change 4.23 US qt (4.0 ℓ)
Change
including
filter
4.55 US qt (4.3 ℓ)
Specified
Honda Long-Life Antifreeze/Coolant Type2
Ratio 50/50 with distilled water
Capacity
1.75 US gal (6.6 ℓ)
(change including the remaining 0.193 US gal
(0.73 ℓ) in the reserve tank)
■ TireRegular
Size
P235/60R18 102V
Pressure
psi (kPa[kgf/cm
2])
33 (230 [2.3])
Compact
Spare Size
T165/90R17 105M
Pressure
psi (kPa[kgf/cm
2]) 60 (420 [4.2])
Wheel Size
Regular
18 x 7.5J
Compact Spare
17 x 4T
* Not available on all models