2013 Acura MDX change time
[x] Cancel search: change timePage 49 of 184

Navigation System49
Entering a Destination
The system has a talk back function. If
your spoken letter is not recognized, the
system will talk back to you. For
example, if you say “E” but the system
does not recognize the command, it will
ask you “Please select the number of the
input letter from the list” and the
following pop-up box will appear:
You should select a letter by saying the
number.
Alternatively, to improve voice
recognition, you can say “Echo” or
“Edward” instead of “E.” See page 17
for a list of available words for each
letter.By Interface Dial:
With the City selection, the display
changes to the Enter city name screen.
For instructions on entering the city
name, see Selecting the City on page30.
When you have entered the desired city,
the display changes to a map. The
starting location will be the central
position in the selected city.
See Showing the Map of Current
Position on page 47 for instructions on
finding and entering your desired
destination.
Showing the Map of State
By Voice Control:
Say “State” on the Show map of
screen, and the display changes to the
Select a state screen. Say the state
name (e.g., California or CA) or the
state number (1-7).
You can select the “USA” or “Canada/
AK” tab by moving the Interface Dial
to the left and right.
If you select Canada/AK , Canada and
Alaska will be displayed. If you choose
USA , the American mainland, Hawaii,
and Puerto Rico will be displayed.
Say the state name by saying individual
letters, or words that represent the
letters, one at a time.
Intro
SEC
2013 MDX
Page 50 of 184

50Navigation System
Entering a Destination
By Interface Dial:
With the State selection, the display
changes to the Select a state screen.
After you select the desired state, the
display changes to a map of the state,
with the crosshairs located near the
middle.
The yellow box indicates the area you
will see when you cl ick on the current
map with the Interface Dial . The scale
will decrease each time you push in on
the Interface Dial.
Use the Interface Dial to move the
crosshairs to the area of the state close
to your intended destination. If desired,
rotate the Interface Dial knob to
change the map scale. When you have
the crosshairs in the desired area, push in on the Interface Dial
. The address
of the location you have selected will
appear at the top of the screen.
NOTE:
Information icons are displayed at
scales from 1 mile to 1/4 mile, POI icons
are displayed at 1/8 mile or less, and
roads are displayed at 1/4 mile or less.
If this is the desired address, push in on
the Interface Dial again. If not, use the
Interface Dial to reposition the
crosshairs, then push in on the
Interface Dial again to display the new
address.
If you selected a single icon or road
segment, select Set as Dest. to
calculate a route to the selected
destination. If you selected multiple
icons within the cursor radius, select an
item from the list. Then select OK to
calculate a route to the selected
destination.
Showing the Map of
Continental USA and Canada
With the USA and Canada selection,
the display changes to:
The yellow box indicates the area you
will see when you click on the current
map with the Interface Dial . The scale
will decrease each time you push in on
the Interface Dial .
Use the Interface Dial to move the
crosshairs to the area of the country
close to your intended destination. Then
push in on the Interface Dial.
Intro
SEC
2013 MDX
Page 53 of 184

Navigation System53
Driving to Your Destination
Changing the Route Preference
The system lets you select the way you
want to drive to your destination. Select
Route Pref. on the Calculate route to
screen by rotating the Interface Dial
knob .
You can choose MAX or MIN for
four settings: Freeways, Toll
Roads , ETC Roads , and Ferries .
The route calculations for the current
selection will be displayed in the
upper right-hand corn er of the screen.
NOTE:
If you select MIN or MAX of ETC
Roads as your route preference, the
system finds the route with as few
electronic toll collection (ETC) gates as
possible in MIN or as many ETC gates
as possible in MAX. The generated route may not be the
route you would choose. For safety
reasons, the system generally applies the
following rules to your route:
Shortcuts through
residential areas
are avoided.
Right turns are favored over left turns or U-turns.
Restricted turns (turns that cannot be made during or at certain times of the
day) are not used.
Viewing the Routes
If you select View Routes on the
Calculate route to screen, you can
view three possible routes to your
destination. You can also use the
Interface Dial to verify the areas
peripheral to the map. If you select
View Routes , the display changes to: These different routes are shown and
calculated based on the setup options in
Route Pref.
.
You can select one of the three routes
(1-3) by rotating the Interface Dial
knob . The system will calculate the
selected route and display the map
screen.
NOTE:
The driving distance and time
estimated for the various routes is
displayed.
It is not unusual for the different methods to pick the same route. Voice
commands cannot be used while the
system is calculating.
Intro
SEC
2013 MDX
Page 54 of 184

54Navigation System
Driving to Your Destination
moving the Interface Dial and
scrolling through the map, you can
then zoom in or out on the map
screen to view your route in details.
Based on the route data, you can change
the routing method by rotating the
Interface Dial knob .
Once you confirm your selection, say
the number of the desired routing
method or push in on the Interface
Dial.
The calculated route will be highlighted
as a blue line, and a voice prompt will
tell you how to proceed along the
highlighted route.
Push in on the Interface Dial and
select Voice to have the guidance
repeated.
Viewing the Destination Map
If you move the Interface Dial down
and select DESTINATION MAP on the
Calculate route to screen, a map of the
destination vicinity is displayed. Press
the CANCEL or BACK button, or
select Return to return to the previous
screen. You can view the destination
map anytime while en route by saying
“Display destination map.”
Map Screen
When you select OK on the Calculate
route to screen, the map screen
appears, showing your highlighted route
(blue line) in real time.
Route Line
When driving on unverified streets
(purple), the route line changes to either
a purple dotted “vector line” pointing to
your destination, or a blue-pink line. See
Unverified Area Routing on page106
for a detailed explanation of how to
enable unverified routing, and the
related cautions and disclaimers.
NOTE:
You can always view the entire route by simply saying, “Display entire
route.”
When your route line uses streets that display traffic information, the route
line may consist of orange or red
segments. This is normal. See Traffic
Display Legend on page 22, and
Viewing Flow Data on page 24.
Intro
SEC Zoom IN/OUT to view route details
or traffic conditions is not available
on the View routes screen. After
2013 MDX
Page 64 of 184

64Navigation System
Driving to Your Destination
Select North-up or Heading-up on
the Map information screen, or say
“Display heading up” or “Display north
up.”
In the larger map scales (above 2 mile),
the map is always oriented with north
facing upward. You cannot change the
orientation.
NOTE:
For information on the available voice
commands, see Voice Command Index
on page 163.Current Location
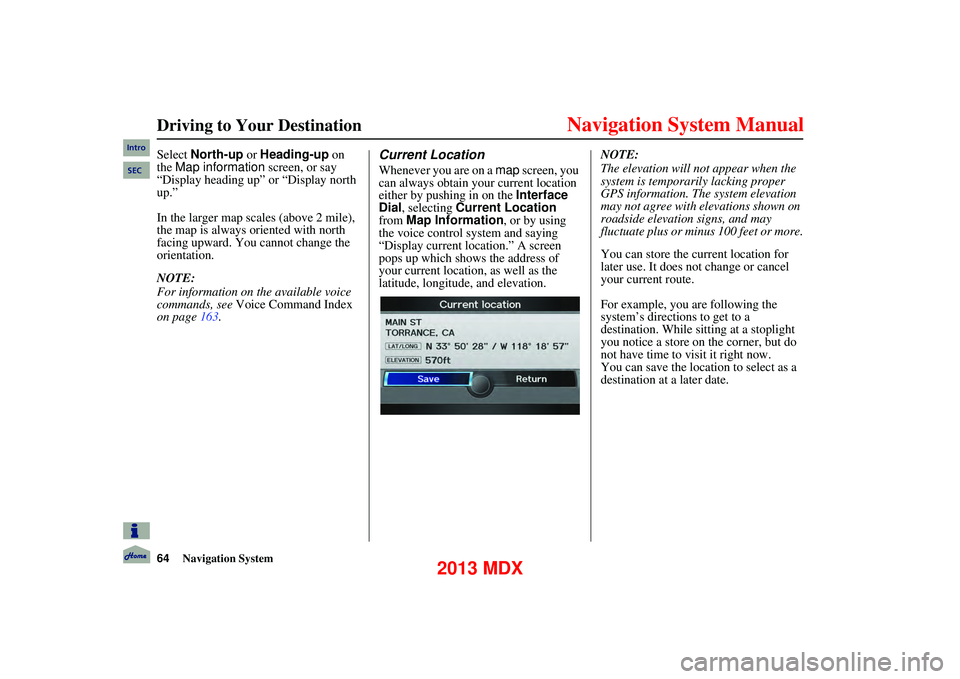
Whenever you are on a map screen, you
can always obtain your current location
either by pushing in on the Interface
Dial , selecting Current Location
from Map Information , or by using
the voice control system and saying
“Display current location.” A screen
pops up which shows the address of
your current location, as well as the
latitude, longitude , and elevation. NOTE:
The elevation will no
t appear when the
system is temporarily lacking proper
GPS information. The system elevation
may not agree with elevations shown on
roadside elevation signs, and may
fluctuate plus or minus 100 feet or more.
You can store the current location for
later use. It does not change or cancel
your current route.
For example, you are following the
system’s directions to get to a
destination. While sitting at a stoplight
you notice a store on the corner, but do
not have time to visit it right now.
You can save the location to select as a
destination at a later date.
Intro
SEC
2013 MDX
Page 76 of 184

76Navigation System
Driving to Your Destination
Waypoint
Waypoints allow you to add an interim
“pit stop” while traveling to a
destination. For instance, you may want
to stop for gas or food, and then
continue on to your destination.
Although you can enter up to five places
including the destination at a time,
typically you may never use more than
one at a time.
Waypoints are routed to in the order
they were entered (number 1 first, etc.),
with your final destination routed to last.
When you enter waypoints, they appear
on the map screen as small red flags
numbered 1-4.
Adding Waypoint
From the MENU screen ( Route), if you
say or select Waypoint, the Add
waypoint screen is displayed.
Select either SEARCH AROUND or
SEARCH ALONG by rotating
Interface Dial knob .Next, select the category from the
“Main” or “Fav. Subcategory” tab on
the
Category screen, then follow the
menu prompts to select a destination.
When the system performs a search
from SEARCH ALONG , it displays
matches that lie within a corridor on
either side and in front of your route.
From SEARCH AROUND , the system
displays matches that are a uniform
distance from the departure point/
waypoint/destination.
The search “corridor” distance value
can be changed in Edit Waypoint
Search Area in SETUP (see
page 112).
Intro
SEC
2013 MDX
Page 89 of 184

Navigation System89
Information Features
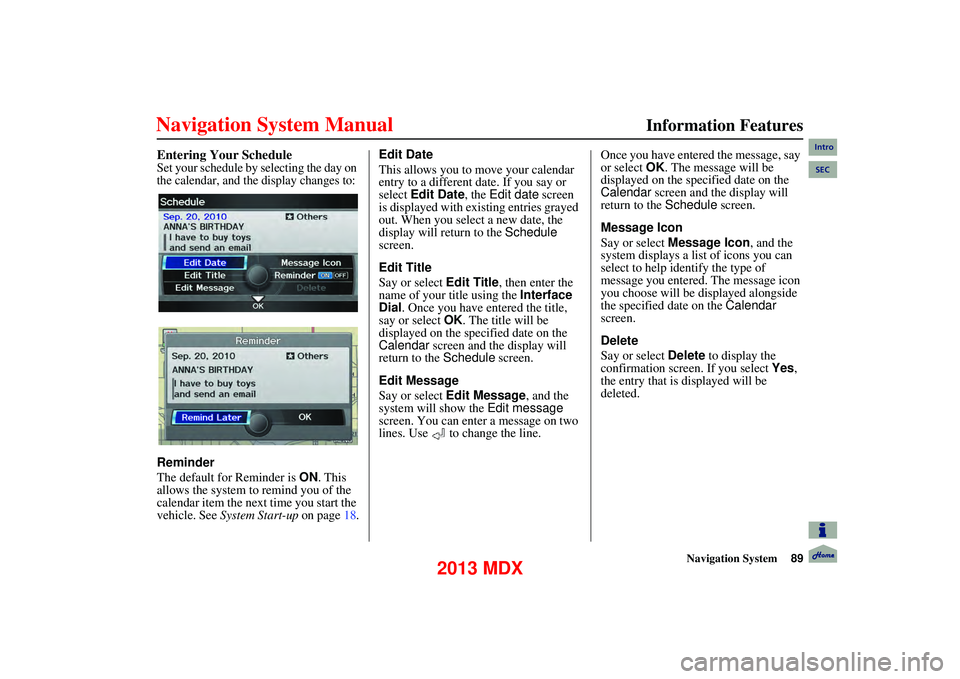
Entering Your Schedule
Set your schedule by selecting the day on
the calendar, and the display changes to:
Reminder
The default for Reminder is ON. This
allows the system to remind you of the
calendar item the next time you start the
vehicle. See System Start-up on page18.Edit Date
This allows you to
move your calendar
entry to a different date. If you say or
select Edit Date , the Edit date screen
is displayed with ex isting entries grayed
out. When you select a new date, the
display will return to the Schedule
screen.
Edit Title
Say or select Edit Title, then enter the
name of your title using the Interface
Dial . Once you have entered the title,
say or select OK. The title will be
displayed on the specified date on the
Calendar screen and the display will
return to the Schedule screen.
Edit Message
Say or select Edit Message , and the
system will show the Edit message
screen. You can enter a message on two
lines. Use to change the line. Once you have entered the message, say
or select
OK. The message will be
displayed on the specified date on the
Calendar screen and the display will
return to the Schedule screen.
Message Icon
Say or select Message Icon, and the
system displays a list of icons you can
select to help identify the type of
message you entered. The message icon
you choose will be displayed alongside
the specified date on the Calendar
screen.
Delete
Say or select Delete to display the
confirmation screen. If you select Yes ,
the entry that is displayed will be
deleted.
Intro
SEC
2013 MDX
Page 94 of 184

94Navigation System
SETUP Mode
The SETUP function consists of two
main screens that allow you to change
and update information in the system.
NOTE:
For information on the available voice
commands, see page 173.
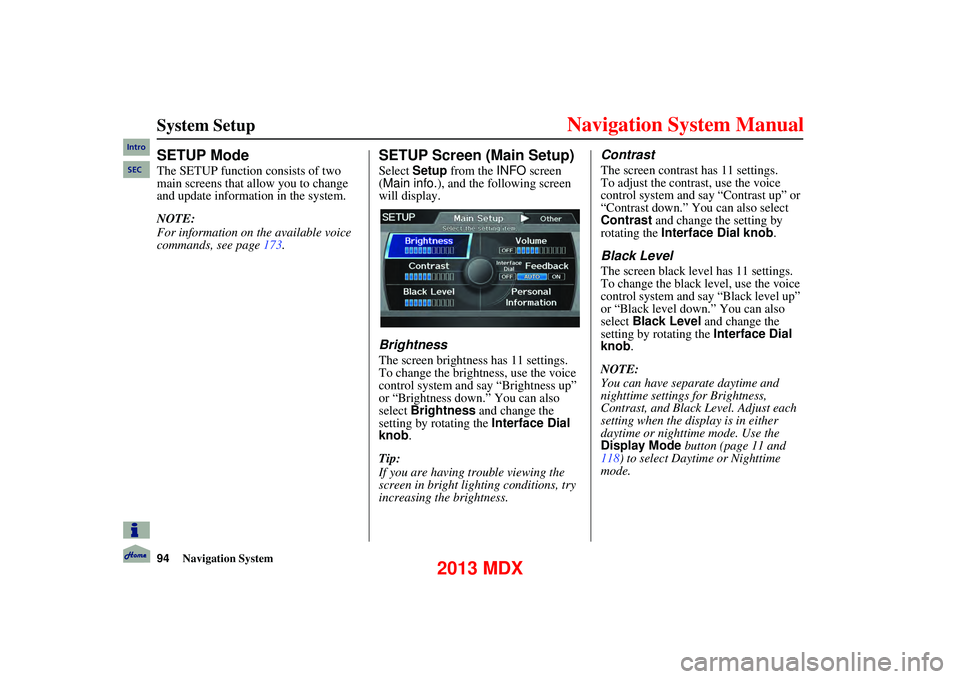
SETUP Screen (Main Setup)
Select Setup from the INFO screen
(Main info.), and the following screen
will display.
Brightness
The screen brightness has 11 settings.
To change the brightness, use the voice
control system and say “Brightness up”
or “Brightness down.” You can also
select Brightness and change the
setting by rotating the Interface Dial
knob.
Tip:
If you are having trouble viewing the
screen in bright lig hting conditions, try
increasing the brightness.
Contrast
The screen contrast has 11 settings.
To adjust the contrast, use the voice
control system and say “Contrast up” or
“Contrast down.” You can also select
Contrast and change the setting by
rotating the Interface Dial knob .
Black Level
The screen black level has 11 settings.
To change the black level, use the voice
control system and say “Black level up”
or “Black level down.” You can also
select Black Level and change the
setting by rotating the Interface Dial
knob .
NOTE:
You can have separate daytime and
nighttime settings for Brightness,
Contrast, and Black Level. Adjust each
setting when the disp lay is in either
daytime or nighttime mode. Use the
Display Mode button (page 11 and
118) to select Daytime or Nighttime
mode.
System Setup
Intro
SEC
2013 MDX