2013 Acura ILX Hybrid wheel
[x] Cancel search: wheelPage 240 of 365

239
uuWhen DrivinguCruise Control
Driving
Increase or decrease the vehicle speed using the RES/ACCEL or DECEL/SET buttons
on the steering wheel.
•Each time you press the button, the vehicle speed is increased or decreased by
about 1 mph (1.6 km/h).
•If you keep the button pressed, the vehicle speed increased or decreased by about
10 mph (16 km/h).
To cancel cruise control, do any of the
following:
•Press the CANCEL button.
•Press the CRUISE button.
•Depress the brake pedal.
The CRUISE CONTROL indicator goes off.■To Adjust the Vehicle Speed
1To Adjust the Vehicle Speed
You can set the vehicle speed using the DECEL/SET
button on the steering wheel when adjusting the
speed with the accelerator and brake pedals.
■To Cancel
To decrease speedTo increase speed
1To Cancel
Resuming the prior set speed:
After cruise control has been canceled, you can still
resume the prior set speed by pressing the RES/
ACCEL button while driving at a speed of at least 25
mph (40 km/h) or more.
You cannot set or resume in the following situations:•When vehicle speed is less than 25 mph (40 km/h)•When the CRUISE button is turned off
At vehicle speeds of 22 mph (35 km/h) or less, cruise
control is canceled automatically.
CRUISE ButtonCANCEL Button
Page 245 of 365

244
uuWhen DrivinguTire Pressure Monitoring System (TPMS) - Required Federal Explanation
Driving
Please note that the TPMS is not a substitute for proper tire
maintenance, and it is the driver's responsibility to maintain
correct tire pressure, even if under-inflation has not reached the
level to trigger illumination of the TPMS low tire pressure telltale.
Your vehicle has also been equipped with a TPMS malfunction
indicator to indicate when the system is not operating properly.
The TPMS malfunction indicator is combined with the low tire
pressure telltale. When the system detects a malfunction, the
telltale will flash for approximately one minute and then remain
continuously illuminated. This sequence will continue upon
subsequent vehicle start-ups as long as the malfunction exists.
When the malfunction indicator is illuminated, the system may
not be able to detect or signal low tire pressure as intended.
TPMS malfunctions may occur for a variety of reasons, including
the installation of replacement or alternate tires or wheels on the
vehicle that prevent the TPMS from functioning properly.
Always check the TPMS malfunction telltale after replacing one or
more tires or wheels on your vehicle to ensure that the
replacement or alternate tires and wheels allow the TPMS to
continue to function properly.
Page 247 of 365

uuBrakinguBrake System
246Driving
Your vehicle is equipped with disc brakes at all four wheels. A vacuum power assist
helps reduce the effort needed on the brake pedal. The brake assist system increases
the stopping force when you depress the brake pedal hard in an emergency
situation. The anti-lock brake system (ABS) helps you retain steering control when
braking very hard.2Brake Assist System P. 248
2ABS (Anti-lock Brake System) P. 247■Foot Brake
1Foot Brake
Check the brakes after driving through deep water,
or if there is a buildup of road surface water. If
necessary, dry the brakes by lightly depressing the
pedal several times.
If you hear a continuous metallic friction sound when
applying the brakes, the brake pads need to be
replaced. Have the vehicle checked by a dealer.
Constantly using the brake pedal while going down a
long hill builds up heat, which reduces the brake
effectiveness. Apply engine braking by taking your
foot off the accelerator pedal and downshifting to a
lower speed position.
Do not rest your foot on the brake pedal while
driving, as it will lightly apply the brakes and cause
them to lose effectiveness over time and reduce pad
life. It will also confuse drivers behind you.
Page 248 of 365

247
uuBrakinguABS (Anti-lock Brake System)
Driving
ABS (Anti-lock Brake System)Helps prevent the wheels from locking up, and helps you retain steering control by
pumping the brakes rapidly, much faster than you.
The electronic brake distribution (EBD) system, which is part of the ABS, also
balances the front-to-rear braking distribution according to vehicle loading.
You should never pump the brake pedal. Let the ABS work for you by always
keeping firm, steady pressure on the brake pedal. This is sometimes referred to as
“stomp and steer.”■ABS operation
The brake pedal may pulsate slightly when the ABS is working. Keep holding the
pedal firmly down. On dry pavement, you will need to press on the brake pedal very
hard before the ABS activates. However, you may feel the ABS activate immediately
if you are trying to stop on snow or ice.
When the vehicle speed goes under 6 mph (10 km/h), the ABS stops.■ABS
1ABS (Anti-lock Brake System)NOTICEThe ABS may not function correctly if you use an
incorrect tire type and size.
When the ABS indicator comes on while driving,
there may be a problem with the system.
While normal braking is not affected, there is a
possibility of the ABS not operating. Have the vehicle
checked by a dealer immediately.
The ABS does not reduce the time or distance it takes
to stop the vehicle. It only helps with steering control
during hard braking.
In the following cases, your vehicle may need more
stopping distance than a vehicle without the ABS:•When driving on rough road surfaces, including
when driving on uneven surfaces, such as gravel or
snow.•When tire chains are installed.
You may hear a motor sound coming from the
engine compartment while system checks are being
performed immediately after starting the engine or
while driving. This is normal.
Page 260 of 365

259
Maintenance
This chapter discusses basic maintenance.
Before Performing Maintenance
Inspection and Maintenance ............ 260Safety When Performing Maintenance .... 261Parts and Fluids Used in Maintenance
Service ........................................... 262
Maintenance Minder
TM..................... 263
Maintenance Under the Hood
Maintenance Items Under the Hood ..... 268Opening the Hood ........................... 269
Engine Compartment Cover ............. 270
Recommended Engine Oil ................ 272
Oil Check ......................................... 273
Adding Engine Oil ............................ 274
Changing the Engine Oil and Oil Filter . 275Engine Coolant ................................ 277
Transmission Fluid ............................ 279
Brake Fluid ....................................... 280
Refilling Window Washer Fluid......... 281
Replacing Light Bulbs....................... 282Checking and Maintaining Wiper
Blades.......................................... 292Checking and Maintaining Tires
Checking Tires ................................. 294
Tire and Loading Information Label .. 295
Tire Labeling .................................... 295DOT Tire Quality Grading (U.S. Vehicles) .. 297
Wear Indicators ............................... 299
Tire Service Life ................................ 299
Tire and Wheel Replacement ........... 300
Tire Rotation .................................... 301
Winter Tires ..................................... 302
12 Volt Battery.................................. 303
Remote Transmitter Care
Replacing the Button Battery ........... 304Climate Control System Maintenance...... 305Cleaning
Interior Care .................................... 306
Exterior Care.................................... 308
Page 287 of 365
286
uuReplacing Light BulbsuFront Turn Signal Light Bulbs
Maintenance
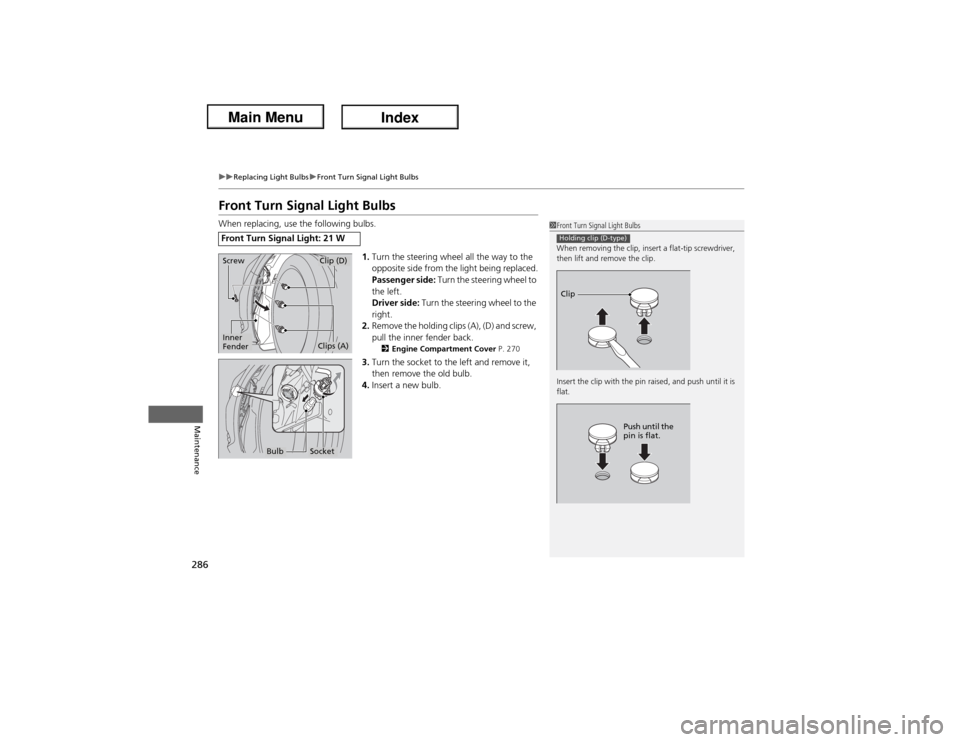
Front Turn Signal Light BulbsWhen replacing, use the following bulbs.
1.Turn the steering wheel all the way to the
opposite side from the light being replaced.
Passenger side: Turn the steering wheel to
the left.
Driver side: Turn the steering wheel to the
right.
2.Remove the holding clips (A), (D) and screw,
pull the inner fender back.
2Engine Compartment Cover P. 270
3.Turn the socket to the left and remove it,
then remove the old bulb.
4.Insert a new bulb.
Front Turn Signal Light: 21 W
1Front Turn Signal Light Bulbs
When removing the clip, insert a flat-tip screwdriver,
then lift and remove the clip.
Insert the clip with the pin raised, and push until it is
flat.Holding clip (D-type)Clip
Push until the
pin is flat.
ScrewInner
Fender
Clip (D)Clips (A)
Bulb
Socket
Page 288 of 365

287
uuReplacing Light BulbsuParking/Side Marker Light Bulbs
Maintenance
Parking/Side Marker Light BulbsWhen replacing, use the following bulbs.
Turn the steering wheel and pull the inner
fender back in the same way as when
replacing the front turn signal light bulbs.
2Front Turn Signal Light Bulbs P. 2861.Push the tab to remove the coupler.
2.Turn the socket to the left and remove it.
3.Remove the old bulb and insert a new bulb.
4.Insert the coupler into the connector of the
bulb.
Parking/Side Marker Light: 5 W
Coupler
Tab
BulbSocket
Page 295 of 365

294Maintenance
Checking and Maintaining TiresChecking TiresTo safely operate your vehicle, your tires must be of the proper type and size, in
good condition with adequate tread, and properly inflated.■Inflation guidelines
Properly inflated tires provide the best combination of handling, tread life, and comfort.
Refer to the driver’s doorjamb label or specification’s page for the specified pressure.
Underinflated tires wear unevenly, adversely affect handling and fuel economy, and
are more likely to fail from overheating.
Overinflated tires make your vehicle ride harshly, are more prone to road hazards,
and wear unevenly.
Every day before you drive, look at each of the tires. If one looks lower than the
others, check the pressure with a tire gauge.
At least once a month or before long trips, use a gauge to measure the pressure in
all tires. Even tires in good condition can lose 1 to 2 psi (10 to 20 kPa, 0.1 to 0.2 kgf/
cm2) per month.
■Inspection guidelines
Every time you check inflation, also examine the tires and valve stems.
Look for:
•Bumps or bulges on the side or in the tread. Replace the tire if you find any cuts,
splits, or cracks in the side of the tire. Replace it if you see fabric or cord.
•Remove any foreign objects and inspect for air leaks.
•Uneven tread wear. Have a dealer check the wheel alignment.
•Excessive tread wear.2Wear Indicators P. 299
•Cracks or other damage around valve stem.
1Checking Tires
Measure the air pressure when tires are cold. This
means the vehicle has been parked for at least three
hours, or driven less than 1 mile (1.6 km). If
necessary, add or release air until the specified
pressure is reached.
If checked when hot, tire pressure can be as much as
4 – 6 psi (30 – 40 kPa, 0.3 – 0.4 kgf/cm
2) higher than
if checked when cold.
Have a dealer check the tires if you feel a consistent
vibration while driving. New tires and any that have
been removed and reinstalled should be properly
balanced.
Measure the spare tire pressure once a month or
before long trips.
3
WARNING
Using tires that are excessively worn or
improperly inflated can cause a crash in
which you can be seriously hurt or killed.
Follow all instructions in this owner’s
manual regarding tire inflation and
maintenance.Models with a spare tire