Page 234 of 365

Continued
233
uuWhen DrivinguShifting
Driving
Use the paddle shifters to change between 1st and 7th speeds without removing
your hands from the steering wheel. The transmission switches to the 7-speed
manual shift mode when you pull a paddle shifter while driving. This mode is useful
when engine braking is needed.■When the shift lever is in
(D:
The shift mode goes into the 7-speed manual shift mode temporarily, and the
number is displayed in the shift indicator.
The 7-speed manual shift mode is canceled automatically if you drive at constant
speed or accelerate, and the number in the shift indicator goes off.
You can also cancel this mode by pulling the
(+ paddle shifter for a few seconds.
The 7-speed manual shift mode is especially useful when reducing the vehicle speed
temporarily before making a turn.
■When the shift lever is in
(S:
The shift mode goes into the 7-speed manual shift mode. The (M indicator and the
speed number are displayed in the shift indicator. As the vehicle speed slows down,
the transmission automatically shifts down accordingly. When the vehicle comes to
a stop, it automatically shifts down into 1st.
If the vehicle speed increases and the engine speed reaches near the tachometer's
red zone, the transmission automatically shifts up.
You can only pull away in 1st speed.
When canceling out of the 7-speed manual shift mode, move the shift lever from
(S
to
(D. When the 7-speed manual shift mode is cancelled, the M indicator and shift
indicator go off.
■7-Speed Manual Shift Mode
17-Speed Manual Shift Mode
In the 7-speed manual shift mode, the transmission
shifts up or down by operating either paddle shifter
under the following conditions:
Shift Up: The engine speed reaches the lowest
threshold of the higher speed position.
Shift Down: The engine speed reaches the highest
threshold of the lower speed position.
When the engine speed reaches near the
tachometer’s red zone, the transmission shifts up
automatically.
When the engine speed reaches the lowest threshold
of the selected speed position, the transmission shifts
down automatically.
Operating the paddle shifters on slippery surfaces
may cause the tires to lock up. In this case, the 7-
speed manual shift mode is canceled and goes back
to the normal D driving mode.
Page 238 of 365

237
uuWhen DrivinguCruise Control
Continued
Driving
Cruise ControlMaintains a constant vehicle speed without having to keep your foot on the
accelerator. Use cruise control on freeways or open roads where you can travel at a
constant speed with little acceleration or deceleration.
1Cruise Control
It may not be possible to maintain a constant speed
when driving uphill or downhill.
When not using cruise control:
Turn off cruise control by pressing the CRUISE
button.
While in the ECON mode, it may take relatively more
time to accelerate to maintain the set speed.
3
WARNING
Improper use of the cruise control can lead
to a crash.
Use the cruise control only when traveling
on open highways in good weather.
■Shift positions for cruise control:
In (D or
(S
When to use
Always keep sufficient distance
between you and the vehicle in
front of you.
■Vehicle speed for cruise control:
Desired speed in a range above
roughly 25 mph (40 km/h) ~
How to use
CRUISE MAIN is on in the
instrument panel.
Cruise control is ready to use.
■Press the
CRUISE
button on
the steering wheel.
Page 240 of 365

239
uuWhen DrivinguCruise Control
Driving
Increase or decrease the vehicle speed using the RES/ACCEL or DECEL/SET buttons
on the steering wheel.
•Each time you press the button, the vehicle speed is increased or decreased by
about 1 mph (1.6 km/h).
•If you keep the button pressed, the vehicle speed increased or decreased by about
10 mph (16 km/h).
To cancel cruise control, do any of the
following:
•Press the CANCEL button.
•Press the CRUISE button.
•Depress the brake pedal.
The CRUISE CONTROL indicator goes off.■To Adjust the Vehicle Speed
1To Adjust the Vehicle Speed
You can set the vehicle speed using the DECEL/SET
button on the steering wheel when adjusting the
speed with the accelerator and brake pedals.
■To Cancel
To decrease speedTo increase speed
1To Cancel
Resuming the prior set speed:
After cruise control has been canceled, you can still
resume the prior set speed by pressing the RES/
ACCEL button while driving at a speed of at least 25
mph (40 km/h) or more.
You cannot set or resume in the following situations:•When vehicle speed is less than 25 mph (40 km/h)•When the CRUISE button is turned off
At vehicle speeds of 22 mph (35 km/h) or less, cruise
control is canceled automatically.
CRUISE ButtonCANCEL Button
Page 247 of 365

uuBrakinguBrake System
246Driving
Your vehicle is equipped with disc brakes at all four wheels. A vacuum power assist
helps reduce the effort needed on the brake pedal. The brake assist system increases
the stopping force when you depress the brake pedal hard in an emergency
situation. The anti-lock brake system (ABS) helps you retain steering control when
braking very hard.2Brake Assist System P. 248
2ABS (Anti-lock Brake System) P. 247■Foot Brake
1Foot Brake
Check the brakes after driving through deep water,
or if there is a buildup of road surface water. If
necessary, dry the brakes by lightly depressing the
pedal several times.
If you hear a continuous metallic friction sound when
applying the brakes, the brake pads need to be
replaced. Have the vehicle checked by a dealer.
Constantly using the brake pedal while going down a
long hill builds up heat, which reduces the brake
effectiveness. Apply engine braking by taking your
foot off the accelerator pedal and downshifting to a
lower speed position.
Do not rest your foot on the brake pedal while
driving, as it will lightly apply the brakes and cause
them to lose effectiveness over time and reduce pad
life. It will also confuse drivers behind you.
Page 248 of 365

247
uuBrakinguABS (Anti-lock Brake System)
Driving
ABS (Anti-lock Brake System)Helps prevent the wheels from locking up, and helps you retain steering control by
pumping the brakes rapidly, much faster than you.
The electronic brake distribution (EBD) system, which is part of the ABS, also
balances the front-to-rear braking distribution according to vehicle loading.
You should never pump the brake pedal. Let the ABS work for you by always
keeping firm, steady pressure on the brake pedal. This is sometimes referred to as
“stomp and steer.”■ABS operation
The brake pedal may pulsate slightly when the ABS is working. Keep holding the
pedal firmly down. On dry pavement, you will need to press on the brake pedal very
hard before the ABS activates. However, you may feel the ABS activate immediately
if you are trying to stop on snow or ice.
When the vehicle speed goes under 6 mph (10 km/h), the ABS stops.■ABS
1ABS (Anti-lock Brake System)NOTICEThe ABS may not function correctly if you use an
incorrect tire type and size.
When the ABS indicator comes on while driving,
there may be a problem with the system.
While normal braking is not affected, there is a
possibility of the ABS not operating. Have the vehicle
checked by a dealer immediately.
The ABS does not reduce the time or distance it takes
to stop the vehicle. It only helps with steering control
during hard braking.
In the following cases, your vehicle may need more
stopping distance than a vehicle without the ABS:•When driving on rough road surfaces, including
when driving on uneven surfaces, such as gravel or
snow.•When tire chains are installed.
You may hear a motor sound coming from the
engine compartment while system checks are being
performed immediately after starting the engine or
while driving. This is normal.
Page 267 of 365

266
uuMaintenance Minder
TMuTo Use Maintenance Minder
TM
Maintenance
■Maintenance Service Items
1Maintenance Service Items•Independent of the Maintenance Minder
information, replace the brake fluid every 3 years.•Inspect idle speed every 160,000 miles (256,000
km).•Adjust the valves during services A, B, 1, 2, or 3 if
they are noisy.
Maintenance Minder Message System Message
Indicator
Sub
Items Main
Item
*1: If a message SERVICE does not appear more than 12 months after the display is reset, change the
engine oil every year.
# : See information on maintenance and emissions warranty.CODE
Maintenance Main Items
A
●Replace engine oil
*1
B
●Replace engine oil
*1 and oil filter
●Inspect front and rear brakes/service as necessary●Check parking brake adjustment●Inspect tie rod ends, steering gearbox, and boots●Inspect suspension components●Inspect driveshaft boots●Inspect brake hoses and lines (Including ABS/VSA)●Inspect all fluid levels and condition of fluids●Inspect exhaust system
#
●Inspect fuel lines and connections
#
*2: If you drive in dusty conditions, replace the air cleaner element every 15,000 miles (24,000 km).
*3: If you drive primarily in urban areas that have high concentrations of soot in the air from industry and
from diesel-powered vehicles, replace the dust and pollen filter every 15,000 miles (24,000 km).CODE
Maintenance Sub Items
1
●Rotate tires
2
●Replace air cleaner element
*2
●Replace dust and pollen filter
*3
●Inspect drive belt
3●Replace transmission fluid
4
●Replace spark plugs●Inspect valve clearance
5●Replace engine coolant
Page 287 of 365
286
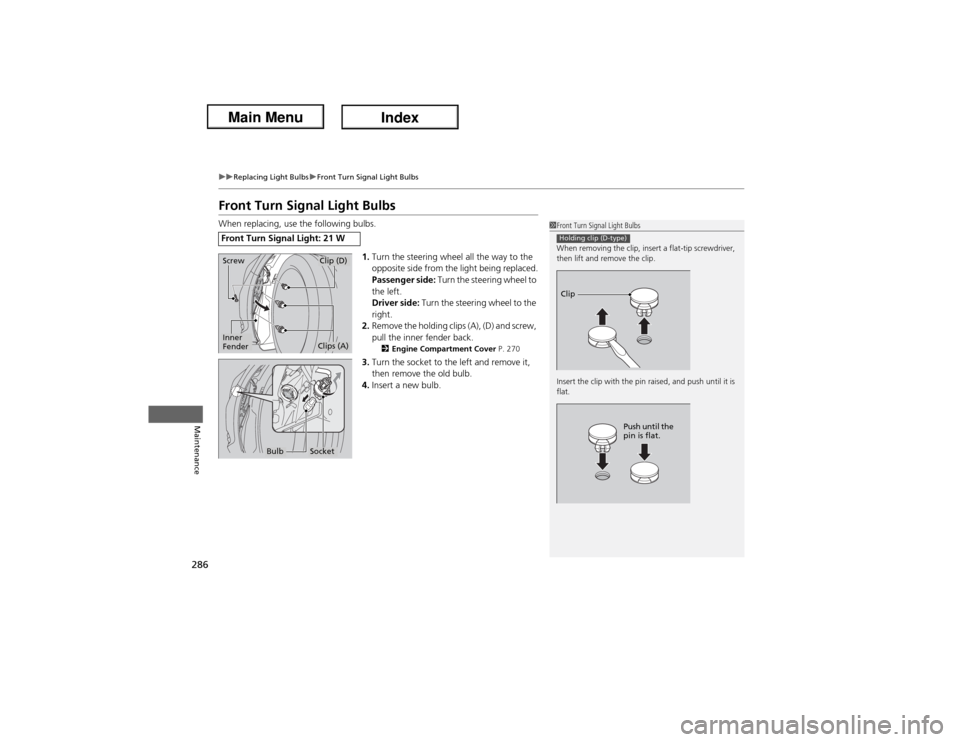
uuReplacing Light BulbsuFront Turn Signal Light Bulbs
Maintenance
Front Turn Signal Light BulbsWhen replacing, use the following bulbs.
1.Turn the steering wheel all the way to the
opposite side from the light being replaced.
Passenger side: Turn the steering wheel to
the left.
Driver side: Turn the steering wheel to the
right.
2.Remove the holding clips (A), (D) and screw,
pull the inner fender back.
2Engine Compartment Cover P. 270
3.Turn the socket to the left and remove it,
then remove the old bulb.
4.Insert a new bulb.
Front Turn Signal Light: 21 W
1Front Turn Signal Light Bulbs
When removing the clip, insert a flat-tip screwdriver,
then lift and remove the clip.
Insert the clip with the pin raised, and push until it is
flat.Holding clip (D-type)Clip
Push until the
pin is flat.
ScrewInner
Fender
Clip (D)Clips (A)
Bulb
Socket
Page 288 of 365
287
uuReplacing Light BulbsuParking/Side Marker Light Bulbs
Maintenance
Parking/Side Marker Light BulbsWhen replacing, use the following bulbs.
Turn the steering wheel and pull the inner
fender back in the same way as when
replacing the front turn signal light bulbs.
2Front Turn Signal Light Bulbs P. 2861.Push the tab to remove the coupler.
2.Turn the socket to the left and remove it.
3.Remove the old bulb and insert a new bulb.
4.Insert the coupler into the connector of the
bulb.
Parking/Side Marker Light: 5 W
Coupler
Tab
BulbSocket