Page 5 of 404

.
.
Contents
Direction indicators 152Hazard warning lamps 152Hor n 152Tyre under-infl ation detection 153ESC system 155Front seat belts 158Airbags 162
Safety
Electric parking brake 166Hill start assist 170Head-up display 173Distance alert 175Speed limiter 178Cruise control 181Manual gearbox 184Gear shift indicator 185Electronic gearbox 186Automatic gearbox 191Stop & Start 195Parking sensors 198Reversing camera 200Parking space sensors 201
Driving
Emergency or assistance 265PEUGEOT Connect Media Navigation (NG4 3D) 269PEUGEOT Connect Navigation (RT6) 313PEUGEOT Connect Sound (RD5) 367
Audio equipment and telematics
Visual search
Alphabetical index
Bonnet
204Running out of fuel (Diesel) 205Petrol engines 206Diesel engines 207Checking levels 208C h e c k s 2 11
Checks
Temporary puncture repair kit 213Changing a wheel 223Snow chains 230Changing a bulb 231Changing a fuse 23712 V battery 244Energy economy mode 247Changing a wiper blade 248Towing the vehicle 248Towing a trailer 250Fitting roof bars 252Very cold climate screen 253Accessories 254
Practical information
Petrol engines 256Petrol weights 257Diesel engines 258Diesel weights 259Dimensions 263Identifi cation markings 264
Technical data
Page 109 of 404

5
Visibility107
Manual adjustment of halogen headlamps
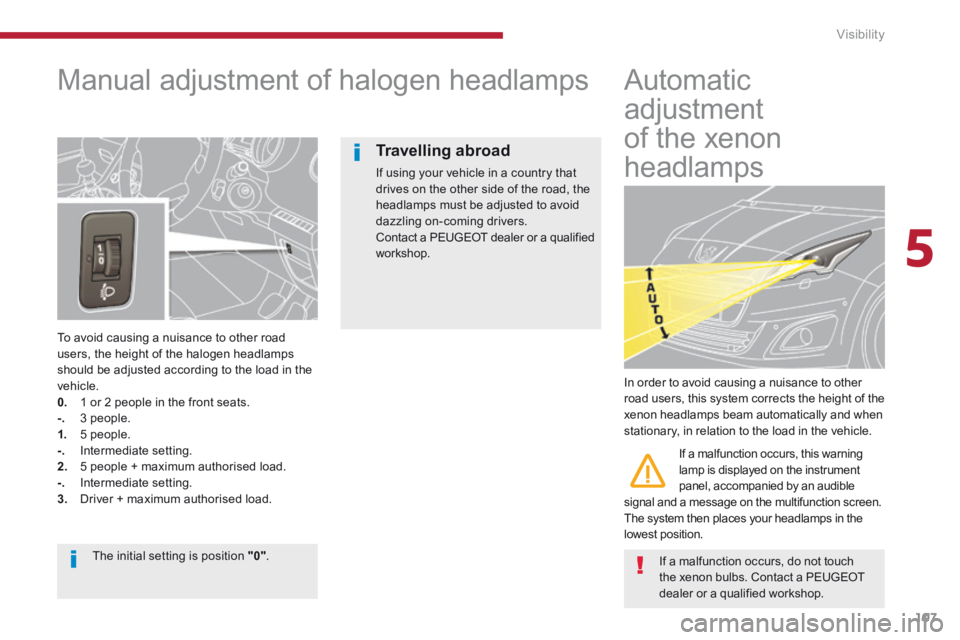
To avoid causing a nuisance to other road users, the height of the halogen headlamps should be adjusted according to the load in the vehicle. 0. 1 or 2 people in the front seats. -. 3 people. 1. 5 people. -. Intermediate setting. 2. 5 people + maximum authorised load. -. Intermediate setting. 3. Driver + maximum authorised load.
Automatic
adjustment
of the xenon
headlamps
In order to avoid causing a nuisance to other road users, this system corrects the height of the xenon headlamps beam automatically and when stationary, in relation to the load in the vehicle.
If a malfunction occurs, this warning lamp is displayed on the instrument panel, accompanied by an audible signal and a message on the multifunction screen. The system then places your headlamps in the
lowest position.
If a malfunction occurs, do not touch the xenon bulbs. Contact a PEUGEOT
dealer or a qualified workshop.
Travelling abroad
If using your vehicle in a country that drives on the other side of the road, the headlamps must be adjusted to avoid dazzling on-coming drivers. Contact a PEUGEOT dealer or a qualified workshop.
The initial setting is position "0" .
Page 132 of 404
Fittings
130
The hooks permit the securing of shopping bags.
Hooks
To connect a 12 V accessory (max power: 120 W), remove the cap and connect an appropriate adaptor. Turn the key to the ignition on position.
12 V accessory socket
Raise the concertina board to gain access to the storage box. Depending on the configuration, this has areas for storing: - a box of spare bulbs, - a first aid kit, - a tyre repair kit, - two warning triangles, - ...
Storage box (5 seat version)
Page 233 of 404

11
Practical information231
Changing a bulb
Model with halogen headlamps
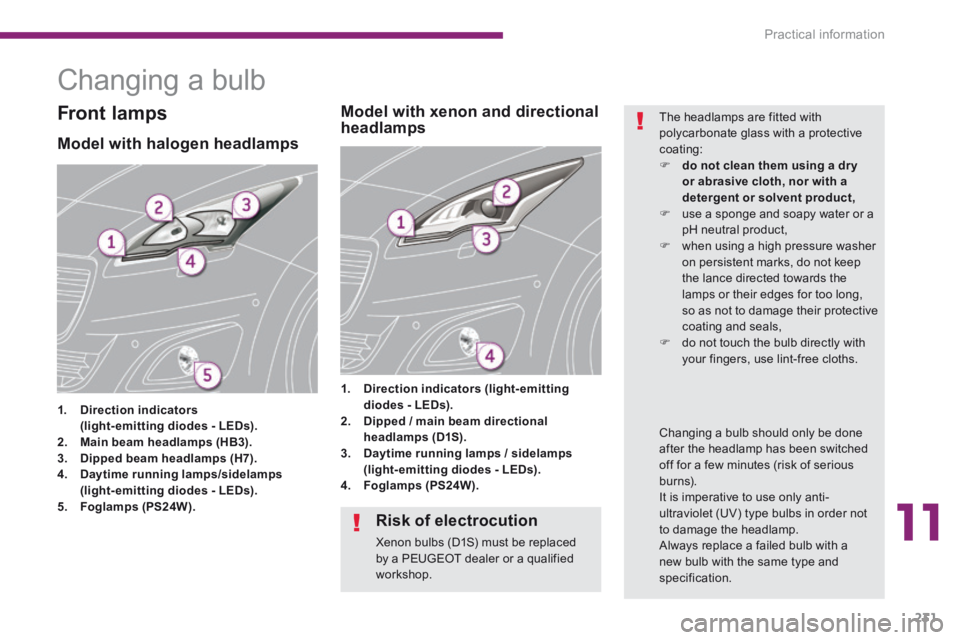
1. Direction indicators (light-emitting diodes - LEDs).2. Main beam headlamps (HB3).3. Dipped beam headlamps (H7).4. Daytime running lamps/sidelamps (light-emitting diodes - LEDs).5. Foglamps (PS24W).
1. Direction indicators (light-emitting diodes - LEDs).2. Dipped / main beam directional headlamps (D1S).3. Daytime running lamps / sidelamps (light-emitting diodes - LEDs).4. Foglamps (PS24W).
Model with xenon and directional headlamps Front lamps The headlamps are fitted with polycarbonate glass with a protective coating: do not clean them using a dr y or abrasive cloth, nor with a detergent or solvent product, use a sponge and soapy water or a pH neutral product, when using a high pressure washer on persistent marks, do not keep the lance directed towards the lamps or their edges for too long, so as not to damage their protective coating and seals, do not touch the bulb directly with your fingers, use lint-free cloths.
Changing a bulb should only be done after the headlamp has been switched off for a few minutes (risk of serious burns). It is imperative to use only anti-ultraviolet (UV) type bulbs in order not to damage the headlamp.
Always replace a failed bulb with a new bulb with the same type and specification.
Risk of electrocution
Xenon bulbs (D1S) must be replaced by a PEUGEOT dealer or a qualified workshop.
Page 234 of 404
Practical information
232
Changing main beam headlamp bulbs (halogen model) Changing dipped beam headlamp bulbs (models with halogen headlamps)
Remove the protective plastic cover by pulling the tab. Disconnect the bulb connector. Extract the bulb by pulling and change it. To refit, carry out these operations in reverse o r d e r.
Remove the protective plastic cover by pulling the tab. Without disconnecting the connector, turn the body of the bulb a quarter of a turn to the left to disengage the assembly. Disconnect the connector to release the bulb. To refit, carry out these operations in reverse
o r d e r.
Changing direction indicators and daytime running lamps / sidelamps
For the replacement of these LED (light emitting diode) lamps, contact a PEUGEOT dealer or a qualified workshop.
Page 235 of 404
11
Practical information233
Changing foglamp bulbs
Contact a PEUGEOT dealer or a qualified workshop. Insert a screwdriver towards the centre of the repeater between the repeater and the base of the mirror. Tilt the screwdriver to extract the repeater and remove it. Disconnect the repeater connector.
Changing integrated direction indicator side repeaters Changing dipped beam and main beam headlamp bulbs (models with xenon headlamps)
D1S xenon bulbs must be changed by a PEUGEOT dealer or a qualified workshop as there is a risk of electrocution. It is recommended that all D1S bulbs are changed at the same time if one of them fails.
You can also contact a PEUGEOT dealer or a qualified workshop to have these lamps changed.
To refit, carry out these operations in reverse o r d e r. Contact a PEUGEOT dealer or a qualified workshop to obtain a new repeater.
Page 236 of 404
Practical information
234
Rear lamps
1. Direction indicators (PY21W-21W ).
2. Brake lamps (P21W-21W ).3. Sidelamps (LEDs).4. Reversing lamp (P21W ).5. Foglamp (P21W ).
Remove the two lamp unit fixing nuts. Pull the lamp rear wards (a positioning lug retains the lamp). Disconnect the lamp connector.
Press the four tabs and remove the bulb h o l d e r.
Changing brake lamp and direction indicator bulbs
Page 237 of 404
11
Practical information235
Turn the bulb a quarter of a turn and change it. To refit, carry out these operations in reverse o r d e r.
For the replacement of this type of LED lamp, contact a PEUGEOT dealer or a qualified workshop.
Reach under the bumper. Turn the bulb a quarter of a turn and change it.
Changing sidelamps (LEDs) Changing foglamp or reversing lamp bulbs