Page 52 of 404

Multifunction screens
50
Display confi guration
Once this menu has been selected, you have access to the following settings: - brightness-video setting, - date and time setting, - selection of the units.
Adjusting the date and time Press the " " or " " button to select the "Display configuration" menu, then the "OK" button.
Press the " " or " " button, to select the "Adjust date and time" line, then on the "OK" button. Press the " " or " " button to select the setting to modify. Conform by pressing the "OK" button then adjust the setting and confirm again to save the modification.
Example: setting of the duration of the guide-me-home lighting
Press the " " or " " buttons, then the " OK " button to select the menu required.
Press the " " or " " buttons, then the " OK " button to select the "Guide-me-home headlamps" line.
Press the " " or " " buttons to set the value required (15, 30 or 60 seconds), then press the " OK " button to confirm.
Press the " " or " " buttons, then the " OK " button to select the " OK " box and confirm or press the " < ] arrow " button to cancel.
"Telephone" menu
With the audio equipment switched on, once this menu has been selected you can configure your Bluetooth hands-free kit (pairing), consult the various telephone directories (calls log, services...) and manage your communications (pick up, hang up, call waiting, secret mode...).
For more information on the telephone application, refer to the PEUGEOTConnect Sound (RD5) section.
For safety reasons, configuration of the multifunction screen by the driver must only be done when stationary.
Choice of language
Once this menu has been selected, you can change the screen display language.
Adjust the settings one by one, confirming with the " OK " button. Press the " " or " " button, then the "OK"button to select the "OK" box and confirm, or the "Back" button to cancel.
Page 53 of 404

2
Multifunction screens51
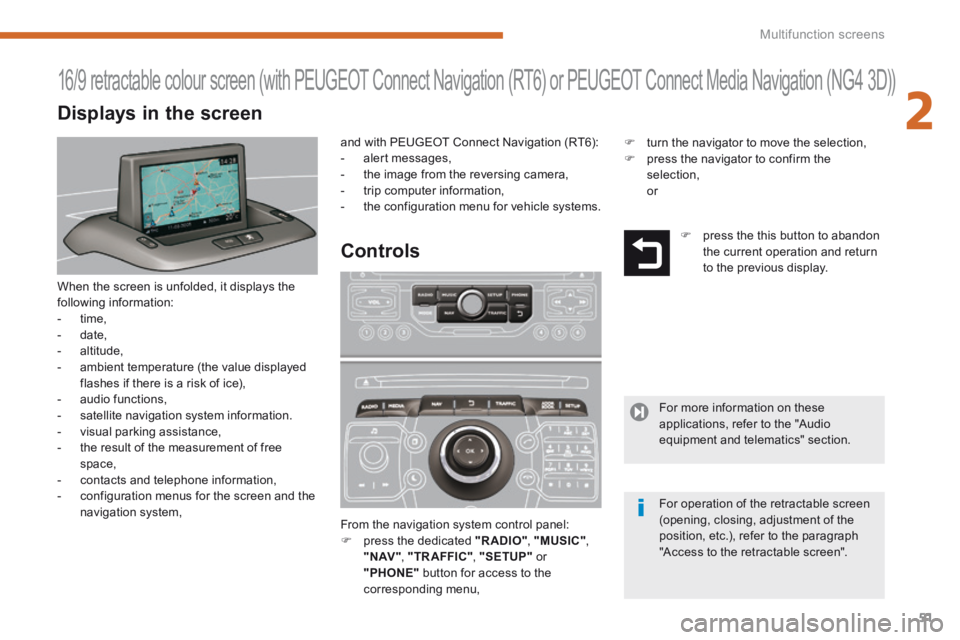
When the screen is unfolded, it displays the following information: - time, - date, - altitude, - ambient temperature (the value displayed flashes if there is a risk of ice), - audio functions, - satellite navigation system information.
- visual parking assistance, - the result of the measurement of free space, - contacts and telephone information, - configuration menus for the screen and the navigation system, From the navigation system control panel: press the dedicated "RADIO" , "MUSIC" , " N AV " , "TR AFFIC" , "SETUP" or "PHONE" button for access to the corresponding menu,
16/9 retractable colour screen (with PEUGEOT Connect Navigation (RT6) or PEUGEOT Connect Media Navigation (NG4 3D))
Controls
and with PEUGEOT Connect Navigation (RT6): - alert messages, - the image from the reversing camera, - trip computer information, - the configuration menu for vehicle systems.
press the this button to abandon the current operation and return to the previous display.
For more information on these applications, refer to the "Audio equipment and telematics" section.
For operation of the retractable screen (opening, closing, adjustment of the position, etc.), refer to the paragraph "Access to the retractable screen".
Displays in the screen
turn the navigator to move the selection, press the navigator to confirm the selection, or
Page 55 of 404

2
Multifunction screens53
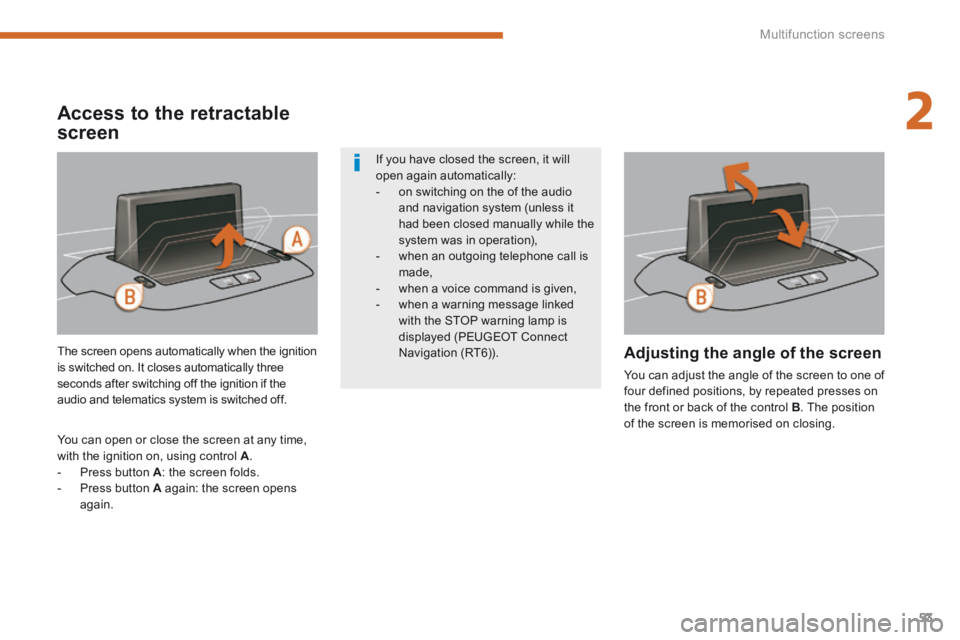
The screen opens automatically when the ignition is switched on. It closes automatically three seconds after switching off the ignition if the audio and telematics system is switched off.
You can open or close the screen at any time, with the ignition on, using control A . - Press button A : the screen folds. - Press button A again: the screen opens again.
Adjusting the angle of the screen
You can adjust the angle of the screen to one of four defined positions, by repeated presses on the front or back of the control B . The position of the screen is memorised on closing.
If you have closed the screen, it will open again automatically: - on switching on the of the audio and navigation system (unless it
had been closed manually while the system was in operation), - when an outgoing telephone call is made, - when a voice command is given, - when a warning message linked with the STOP warning lamp is displayed (PEUGEOT Connect Navigation (RT6)).
Access to the retractable
screen
Page 86 of 404

Access
84
Electronic engine immobiliser
The key contains an electronic chip which has a special code. When the ignition is switched on, this code must be recognised in order for starting to be possible. This electronic engine immobiliser locks the engine management system a few minutes after the ignition is switched off and prevents starting of the engine by anyone who does not have the key.
Anti-theft protection
In the event of a fault, you are informed by illumination of this warning lamp, an audible signal and a message in the screen. In this case, your vehicle will not start; contact a PEUGEOT dealer as soon as possible. Keep safely the label attached to the keys given to you on acquisition of the vehicle.
Starting the vehicle
Insert the key in the ignition switch. The system recognises the starting code. Turn the key fully towards the dashboard to position 3 (Starting) . When the engine starts, release the key.
Switching the vehicle off
Immobilise the vehicle. Turn the key fully towards you to position 1 (Stop) . Remove the key from the ignition switch.
Energy economy mode
After switching off the engine (position 1- Stop ), 1- Stop ), 1- Stopyou can still use functions such as the audio and telematics system, the wipers, the dipped headlamps, the courtesy lamps, etc. for a maximum combined period of thirty minutes.
A heavy object (key fob...), attached to
the key and weighing down on its shaft in the ignition switch, could cause a malfunction.
For more information, refer to the "Practical information - Energy economy mode" section.
Switching off the engine leads to a loss of braking assistance.
Page 120 of 404
Fittings
118
Driver's storage
compartments
Storage box
This has storage areas for the handbook pack, ... To open, pull the handle then tilt the box.
Illuminated glove
box
This has storage areas, audio sockets for a portable player and a location for the SIM card (only with PEUGEOT Connect Media Navigation (NG4 3D)), ... To open the glove box, raise the handle. The lamp comes on when the lid is opened.
Sun visor
Component which protects against sunlight from the front or the side, also equipped with an illuminated courtesy mirror. With the ignition on, raise the concealing flap; the mirror is lit automatically. This sun visor is also equipped with a ticket h o l d e r. Card holder
This can be used for a toll payment ticket or parking card, for example.
Coin storage
Storage
To connect a portable player or a SIM card, refer to the "Audio equipment and telematics" section.
Page 121 of 404
6
Fittings119
Centre console
Storage
Slide the cover for access to the 10.5 litre storage compartment. This can contain 2 half-litre bottles. A ventilation outlet distributes cooled air.
USB Player - Plug
This connection box consists of a jack auxiliary socket and/or a USB port. It permits the connection of portable equipment, such as a digital audio player of the iPod ® type or a USB memory stick. ® type or a USB memory stick. ®
It reads the audio file formats (mp3, ogg, wma, wav...) which are transmitted to your audio equipment and played via the vehicle's speakers. You can manage these files using the steering mounted controls or the audio equipment control panel and display them on the multifunction screen.
Connected to the USB port, the portable equipment charges automatically.
For more information on the use of this equipment, refer to the "Audio equipment and telematics" section.
Storage device for the driver and front passenger.
Page 124 of 404

Fittings
122
Rear multimedia
This multimedia system allows rear passengers to connect one or two external portable systems (audio or video player, games consoles, DVD player...). The sound is played through two Bluetooth ® wireless headphone ® wireless headphone ®
sets, while the video content is displayed in two 7-inch screens built into the backs of the front seat head restraints.
Description
This system operates only with the engine running.
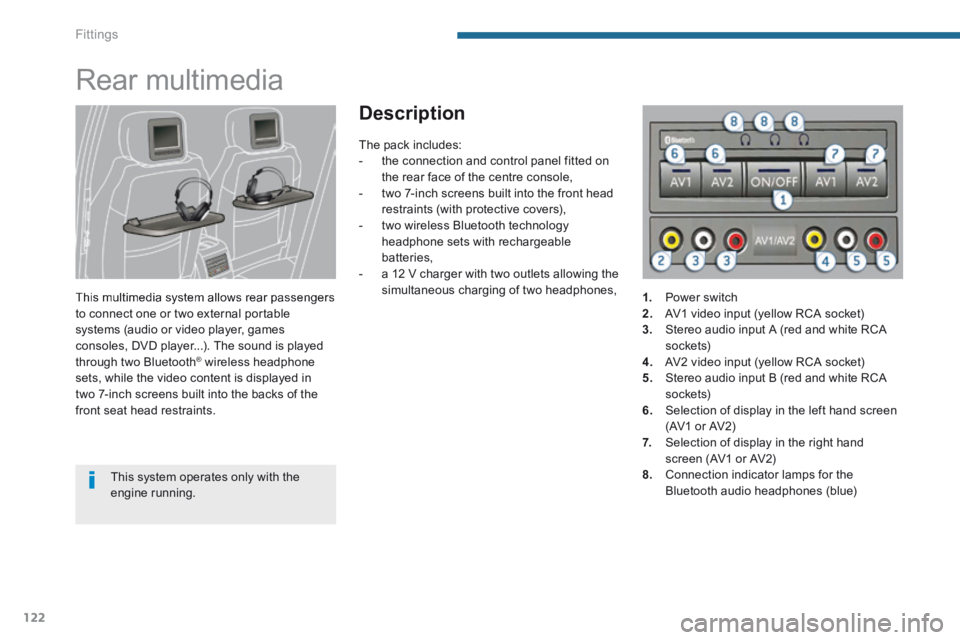
The pack includes: - the connection and control panel fitted on the rear face of the centre console, - two 7-inch screens built into the front head restraints (with protective covers), - two wireless Bluetooth technology headphone sets with rechargeable batteries, - a 12 V charger with two outlets allowing the simultaneous charging of two headphones, 1. Power switch 2. AV1 video input (yellow RCA socket) 3. Stereo audio input A (red and white RCA s o c ket s) 4. AV2 video input (yellow RCA socket) 5. Stereo audio input B (red and white RCA s o c ket s) 6. Selection of display in the left hand screen (AV1 or AV2)
7. Selection of display in the right hand screen (AV1 or AV2) 8. Connection indicator lamps for the Bluetooth audio headphones (blue)
Page 125 of 404

6
Fittings123
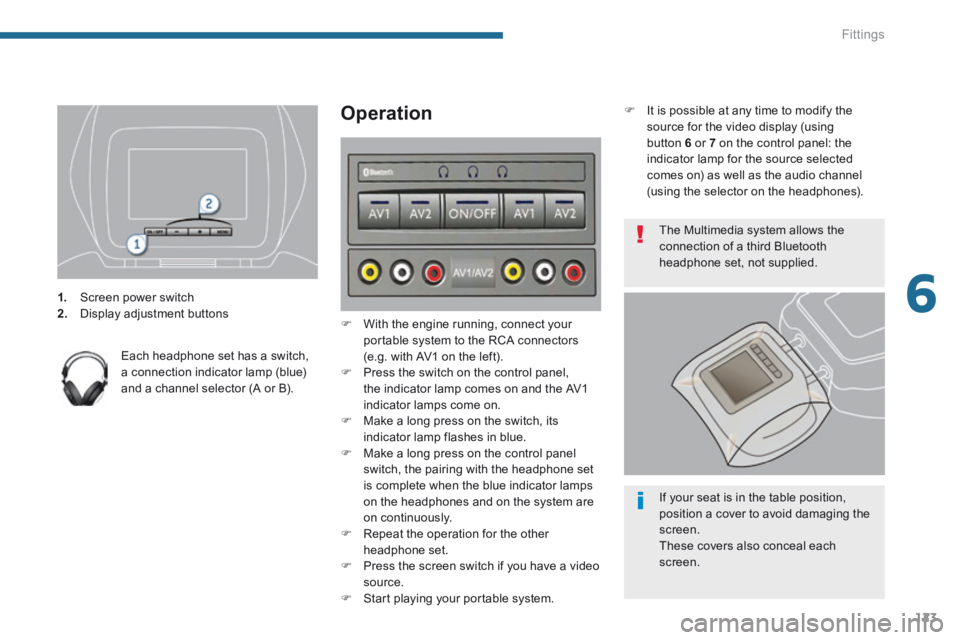
1. Screen power switch 2. Display adjustment buttons
Each headphone set has a switch, a connection indicator lamp (blue) and a channel selector (A or B).
Operation
With the engine running, connect your portable system to the RCA connectors (e.g. with AV1 on the left). Press the switch on the control panel, the indicator lamp comes on and the AV1 indicator lamps come on. Make a long press on the switch, its
indicator lamp flashes in blue. Make a long press on the control panel switch, the pairing with the headphone set is complete when the blue indicator lamps on the headphones and on the system are on continuously. Repeat the operation for the other headphone set. Press the screen switch if you have a video source. Start playing your portable system.
It is possible at any time to modify the source for the video display (using button 6 or 7 on the control panel: the indicator lamp for the source selected comes on) as well as the audio channel (using the selector on the headphones).
The Multimedia system allows the connection of a third Bluetooth headphone set, not supplied.
If your seat is in the table position, position a cover to avoid damaging the screen. These covers also conceal each screen.