Page 4 of 404

.
.
Contents
Interior fi ttings 117Centre console 119Rear multimedia 122Panoramic sunroof 124Boot fi ttings 5 seat version 125Boot fi ttings 7 seat version 126
Fittings
Child seats 132Deactivating the passenger's front airbag 134ISOFIX mountings 144Child lock 151
Child safety
Instrument panels 27Indicator and warning lamps 30Indicators 39Adjustment buttons 43
Monitoring
Familiarisation
Screen A without audio equipment 44Screen A with audio equipment
46Screen C (PEUGEOT Connect Sound (RD5)) 4816/9 retractable colour screen (PEUGEOT Connect Navigation (RT6) or PEUGEOT Connect Media Navigation (NG4 3D)) 51Trip computer 54
Multifunction screens
Heating and Ventilation 58Manual air conditioning 60Rear screen demist - defrost 62Dual-zone digital air conditioning 63Front seats 66Rear seats, 2nd row 72Access to the 3rd row 74Rear seats, 3rd row 75Seat modularity 77Mirrors 78Steering wheel adjustment 80
Comfort
Remote control key 81Alarm 87Electric windows 89Doors 91Boot 94Fuel tank 96Misfuel prevention (Diesel) 99
Access
Lighting controls 100Daytime running lamps 104Automatic illumination of headlamps 106Headlamp adjustment 107Directional lighting 108Wiper controls 109Automatic rain sensitive wipers 112Courtesy lamps 114Interior mood lighting 115
Visibility
Eco-driving
Page 13 of 404
.
66
67
Familiarisation11
Sitting comfortably
Driver's seat
Forwards-backwards Height
Manual adjustment
Electric adjustment
Seat back angle
Page 14 of 404
68, 69
80
119, 122
Familiarisation
12
Sitting comfortably
Front seats
Head restraint height and angle
Lumbar
Steering wheel adjustment
1. Releasing the adjustment mechanism. 2. Adjustment of height and reach. 3. Locking the adjustment mechanism.
As a safety precaution, these operations must only be carried out when stationary.
Centre console
This has a large storage area (with recesses for 2 bottles, ...) for the front passengers and, according to version, a multimedia system for the rear passengers.
Page 15 of 404
.
78
79
79158
Familiarisation13
Sitting comfortably
Door mirrors
Adjustment
A. Selection of the mirror to be adjusted. B. Adjustment of the position of the mirror in the four directions.
Rear view mirror
Manual model
1. Selection of the "day" position of the mirror. 2. Adjustment of the mirror.
Automatic day/night model
1. Adjustment of the mirror.
Front seat belts
1. Fastening the buckle.
2. Height adjustment.
Also...C. Folding / Unfolding.
Page 68 of 404
Comfort
66
Front seats with manual adjustments
Height
Pull the control upwards to raise or push it downwards to lower, as many times as required, to obtain the position required.
Seat back angle
Push the control rear wards.
Forwards-backwards
Raise the control and slide the seat for wards or backwards.
Seat consisting of a seat cushion, a seat back and a head restraint which can all be adjusted to adapt your position for ease of driving and comfort.
Before moving the seat backwards, ensure that there is nothing that might prevent the full travel of the seat, so as to avoid the risk of of jamming the seat caused by the presence of objects on the floor behind the seat or rear passengers. If the seat jams, stop the movement immediately.
Page 70 of 404

Comfort
68
Before moving the seat backwards, ensure that there is nothing that might prevent the full travel of the seat, so
as to avoid the risk of of jamming the seat caused by the presence of objects on the floor behind the seat or rear passengers. If the seat jams, stop the movement immediately.
The electrical functions of the driver's seat are active approximately one minute after opening the front door. They are deactivated approximately one minute after the ignition is switched off and in economy mode. To reactivate them, switch on the ignition.
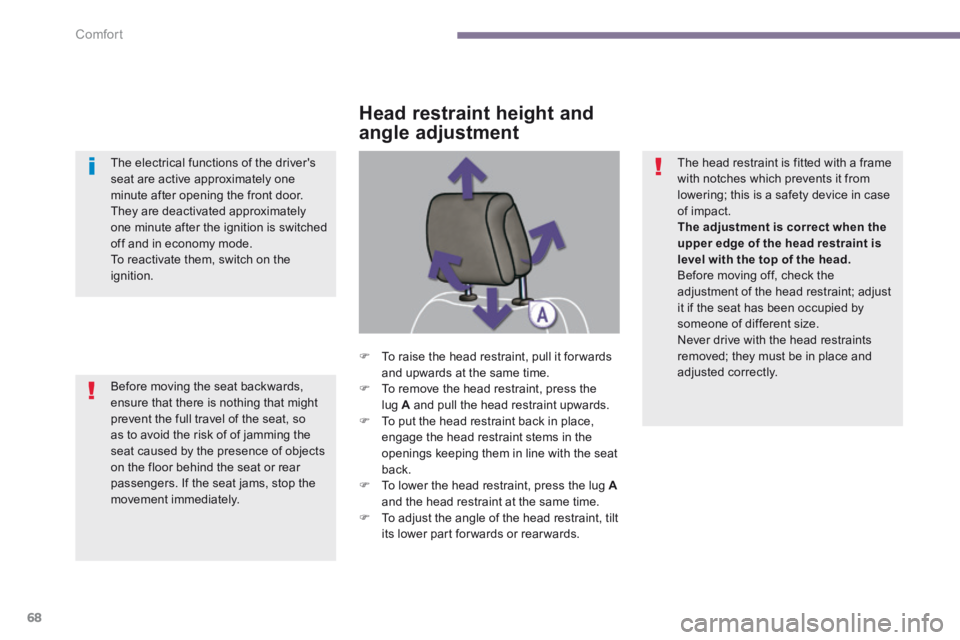
To raise the head restraint, pull it for wards and upwards at the same time. To remove the head restraint, press thelug A and pull the head restraint upwards. To put the head restraint back in place,
engage the head restraint stems in the openings keeping them in line with the seat back. To lower the head restraint, press the lug Aand the head restraint at the same time. To adjust the angle of the head restraint, tilt its lower part forwards or rearwards.
Head restraint height and
angle adjustment
The head restraint is fitted with a frame with notches which prevents it from lowering; this is a safety device in case of impact. The adjustment is correct when the upper edge of the head restraint is level with the top of the head. Before moving off, check the adjustment of the head restraint; adjust it if the seat has been occupied by someone of different size. Never drive with the head restraints removed; they must be in place and adjusted correctly.
Page 71 of 404
3
Comfort69
Heated seats control
With the engine running, the front seats can be heated separately. Use the adjustment dial, placed on the side of each front seat, to switch on and select the level of heating required:
0: Off. 1 : Low. 2 : Medium. 3 : High.
Manual lumbar adjustment
Turn the knob manually to obtain the desired level of lumbar support.
Page 74 of 404
Comfort
72
2 nd row seats
Forwards-backwards adjustment
Lift the control A Lift the control A Lift the control , located at the front of the seat, then adjust the seat to the position desired.
"Comfort" position
The three 2 nd row seats are independent of each other and all the same width. They all have a "comfort" position. Placing a seat in the "comfort" position
Pull on the control B and guide the seat rearwards. The backrest reclines and the seat base moves for ward slightly.
Returning the seat to the initial position
Pull on the control B and allow the seat to come for wards.
Always supervise any movements of seats by children.