2013.5 Peugeot 308 CC ECU
[x] Cancel search: ECUPage 8 of 268
!
!
i
!
6
FAMILIARISATION
ACCESS
Retractable roof
The operation of the roof is the
sole responsibility of the driver.
To avoid any risk of injury when
operating the roof, ensure that no
one is standing near the moving
parts.
You are strongly advised not to op-
erate the roof in strong winds. When washing your vehicle:
- lock the vehicle using the re-
mote control or the key,
- avoid spraying the upper part of the windows,
- keep the end of the high pres- sure nozzle at least 1 metre
from the windows and door
seals.
When the vehicle has been
washed or after rain, wait until the
roof has dried before opening it. It is preferable to operate the roof
with the engine running and the
vehicle stationary. Wait until the
end of operation message ap-
pears in the multifunction screen
before moving off.
On the move, the roof can only be
operated below 6 mph (10 km/h),
driving smoothly on a level sur-
face.
Preliminary conditions
Start the engine.
You must ensure that:
- the electric windows are initialised (see corresponding section),
- the ambient temperature is higher than -15° C.
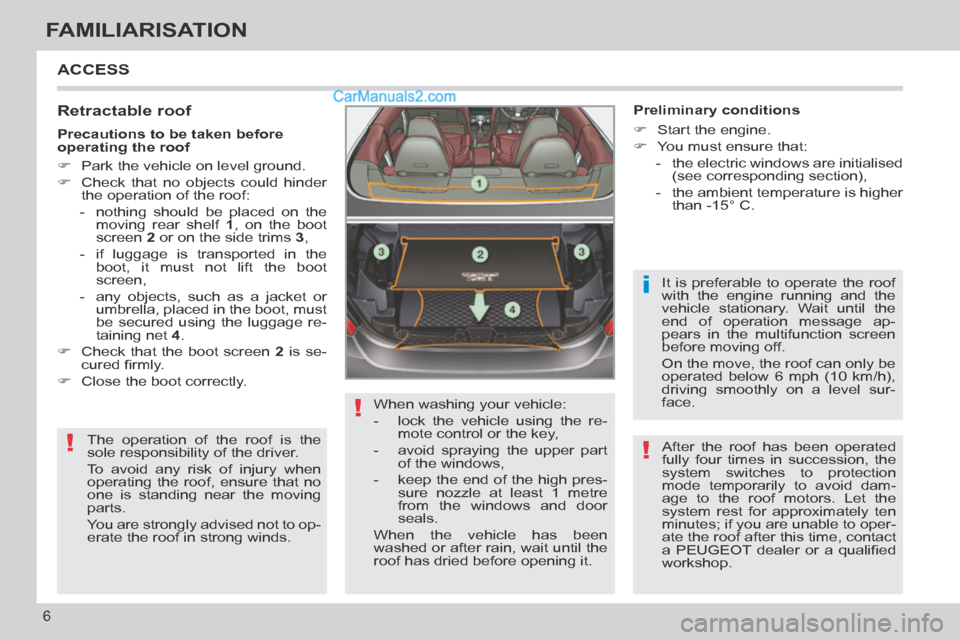
Precautions to be taken before
operating the roof
Park the vehicle on level ground.
Check that no objects could hinder
the operation of the roof:
- nothing should be placed on the moving rear shelf 1 , on the boot
screen 2 or on the side trims 3 ,
- if luggage is transported in the boot, it must not lift the boot
screen,
- any objects, such as a jacket or umbrella, placed in the boot, must
be secured using the luggage re-
taining net 4 .
Check that the boot screen 2 is se-
cured fi rmly.
Close the boot correctly.
After the roof has been operated
fully four times in succession, the
system switches to protection
mode temporarily to avoid dam-
age to the roof motors. Let the
system rest for approximately ten
minutes; if you are unable to oper-
ate the roof after this time, contact
a PEUGEOT dealer or a qualifi ed
workshop.
Page 10 of 268
87, 88 85 56 233
179
8
FAMILIARISATION
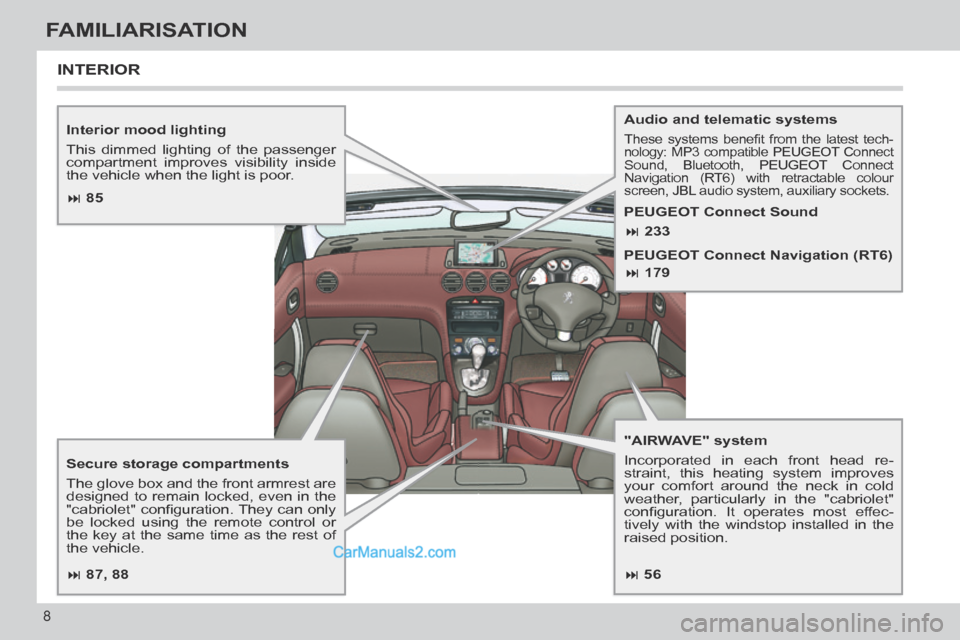
Interior mood lighting
This dimmed lighting of the passenger
compartment improves visibility inside
the vehicle when the light is poor.
"AIRWAVE" system
Incorporated in each front head re-
straint, this heating system improves
your comfort around the neck in cold
weather, particularly in the "cabriolet"
confi guration. It operates most effec-
tively with the windstop installed in the
raised position. Audio and telematic systems These systems benefi t from the latest tech-nology: MP3 compatible PEUGEOT Connect Sound, Bluetooth, PEUGEOT Connect
Navigation (RT6) with retractable colour
screen, JBL audio system, auxiliary sockets.
Secure storage compartments
The glove box and the front armrest are
designed to remain locked, even in the
"cabriolet" confi guration. They can only
be locked using the remote control or
the key at the same time as the rest of
the vehicle.
INTERIOR
PEUGEOT Connect Sound
PEUGEOT Connect Navigation (RT6)
Page 14 of 268
!i
88
60
55
57
56
12
FAMILIARISATION
SITTING COMFORTABLY
Steering wheel adjustment
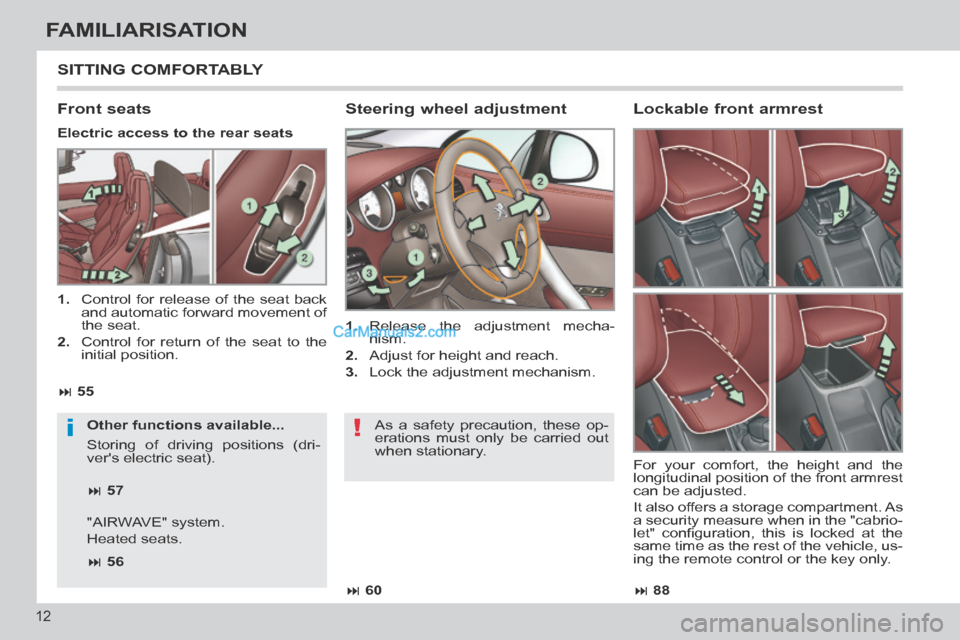
1. Release the adjustment mecha-nism.
2. Adjust for height and reach.
3. Lock the adjustment mechanism.
Front seats
Other functions available...
Storing of driving positions (dri-
ver's electric seat).
Electric access to the rear seats
Lockable front armrest
For your comfort, the height and the
longitudinal position of the front armrest
can be adjusted.
It also offers a storage compartment. As
a security measure when in the "cabrio-
let" confi guration, this is locked at the
same time as the rest of the vehicle, us-
ing the remote control or the key only.
As a safety precaution, these op-
erations must only be carried out
when stationary.
1. Control for release of the seat back
and automatic forward movement of
the seat.
2. Control for return of the seat to the initial position.
"AIRWAVE" system.
Heated seats.
Page 53 of 268
3
i
51
COMFORT
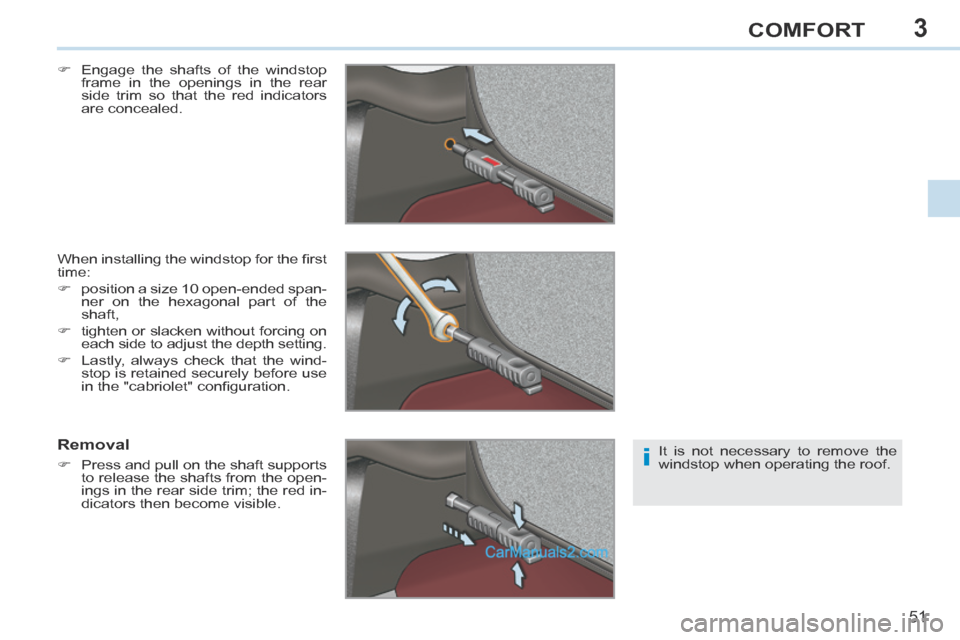
Engage the shafts of the windstop frame in the openings in the rear
side trim so that the red indicators
are concealed.
When installing the windstop for the fi rst
time:
position a size 10 open-ended span- ner on the hexagonal part of the
shaft,
tighten or slacken without forcing on each side to adjust the depth setting.
Lastly, always check that the wind- stop is retained securely before use
in the "cabriolet" confi guration.
Removal
Press and pull on the shaft supports to release the shafts from the open-
ings in the rear side trim; the red in-
dicators then become visible. It is not necessary to remove the
windstop when operating the roof.
Page 54 of 268
3
52
COMFORT
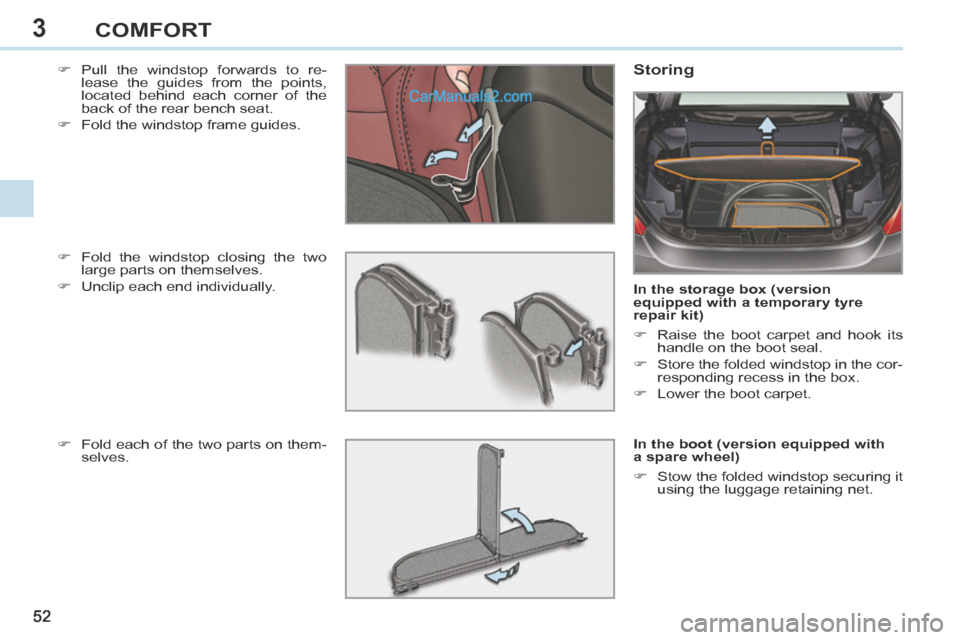
Pull the windstop forwards to re-lease the guides from the points,
located behind each corner of the
back of the rear bench seat.
Fold the windstop frame guides. Storing
In the storage box (version
equipped with a temporary tyre
repair kit)
Raise the boot carpet and hook its handle on the boot seal.
Store the folded windstop in the cor- responding recess in the box.
Lower the boot carpet.
In the boot (version equipped with
a spare wheel)
Stow the folded windstop securing it using the luggage retaining net.
Fold the windstop closing the two
large parts on themselves.
Unclip each end individually.
Fold each of the two parts on them- selves.
Page 59 of 268
3
!
!
57
COMFORT
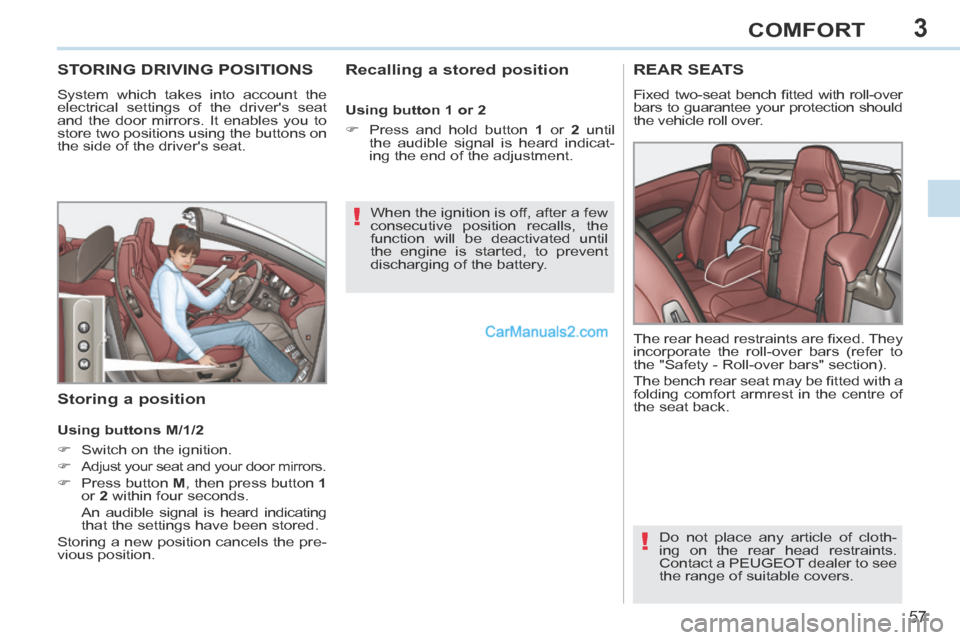
STORING DRIVING POSITIONS
System which takes into account the
electrical settings of the driver's seat
and the door mirrors. It enables you to
store two positions using the buttons on
the side of the driver's seat.
Recalling a stored position
Storing a position
When the ignition is off, after a few
consecutive position recalls, the
function will be deactivated until
the engine is started, to prevent
discharging of the battery.
Using buttons M/1/2
Switch on the ignition.
Adjust your seat and your door mirrors.
Press button M , then press button 1
or 2 within four seconds.
An audible signal is heard indicating that the settings have been stored.
Storing a new position cancels the pre-
vious position.
REAR SEATS
Fixed two-seat bench fi tted with roll-over
bars to guarantee your protection should
the vehicle roll over.
Do not place any article of cloth-
ing on the rear head restraints.
Contact a PEUGEOT dealer to see
the range of suitable covers.
The rear head restraints are fi xed. They
incorporate the roll-over bars (refer to
the "Safety - Roll-over bars" section).
The bench rear seat may be fi tted with a
folding comfort armrest in the centre of
the seat back.
Using button 1 or 2
Press and hold button
1 or 2 until
the audible signal is heard indicat-
ing the end of the adjustment.
Page 74 of 268
4
!
72
ACCESS
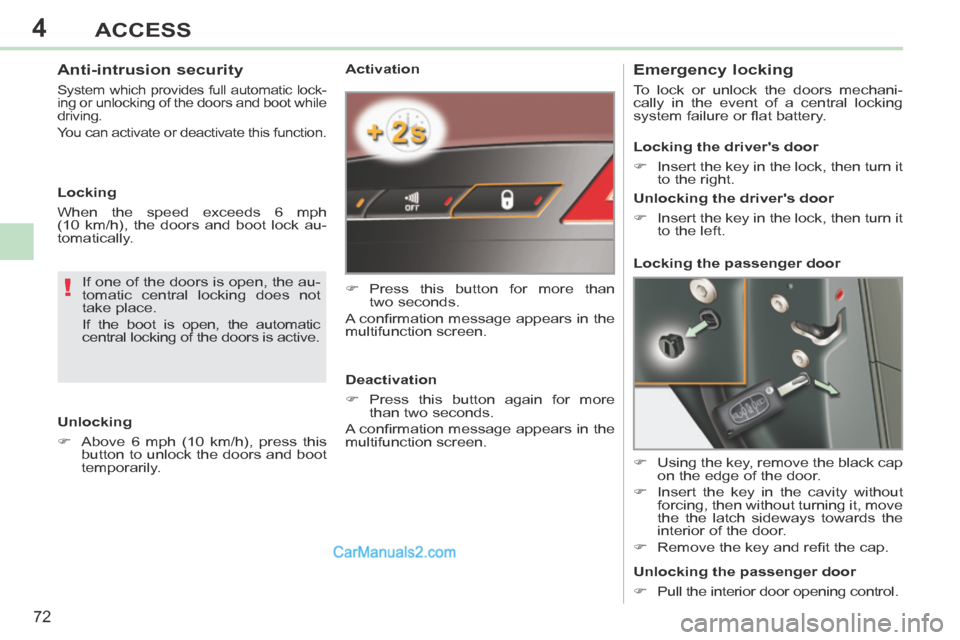
Activation
Press this button for more than two seconds.
A confi rmation message appears in the
multifunction screen.
Deactivation
Press this button again for more than two seconds.
A confi rmation message appears in the
multifunction screen. Emergency locking
To lock or unlock the doors mechani-
cally in the event of a central locking
system failure or fl at battery.
Using the key, remove the black cap on the edge of the door.
Insert the key in the cavity without forcing, then without turning it, move
the the latch sideways towards the
interior of the door.
Remove the key and refi t the cap. Locking the driver's door
Insert the key in the lock, then turn it to the right.
Unlocking the driver's door
Insert the key in the lock, then turn it to the left.
Locking the passenger door
Unlocking the passenger door
Pull the interior door opening control.
If one of the doors is open, the au-
tomatic central locking does not
take place.
If the boot is open, the automatic
central locking of the doors is active.
Anti-intrusion security
System which provides full automatic lock-
ing or unlocking of the doors and boot while
driving.
You can activate or deactivate this function.
Unlocking
Above 6 mph (10 km/h), press this
button to unlock the doors and boot
temporarily.
Locking
When the speed exceeds 6 mph
(10 km/h), the doors and boot lock au-
tomatically.
Page 75 of 268
4
i
i
73
ACCESS
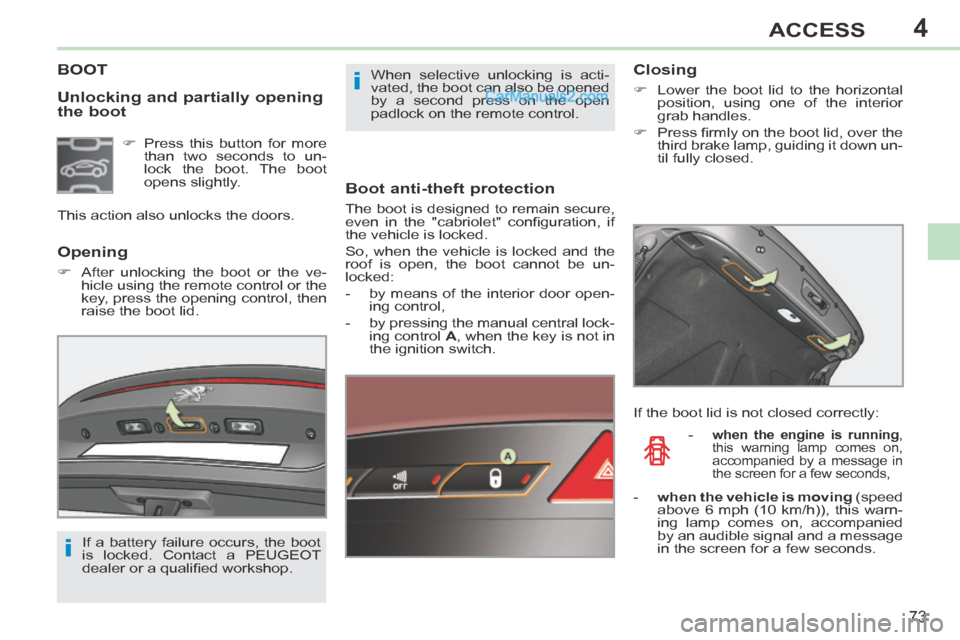
Unlocking and partially opening
the boot
BOOT
Boot anti-theft protection
The boot is designed to remain secure,
even in the "cabriolet" confi guration, if
the vehicle is locked.
So, when the vehicle is locked and the
roof is open, the boot cannot be un-
locked:
- by means of the interior door open-ing control,
- by pressing the manual central lock- ing control A , when the key is not in
the ignition switch.
Opening
After unlocking the boot or the ve- hicle using the remote control or the
key, press the opening control, then
raise the boot lid. When selective unlocking is acti-
vated, the boot can also be opened
by a second press on the open
padlock on the remote control.
Press this button for more than two seconds to un-
lock the boot. The boot
opens slightly.
This action also unlocks the doors.
If a battery failure occurs, the boot
is locked. Contact a PEUGEOT
dealer or a qualifi ed workshop.
Closing
Lower the boot lid to the horizontal position, using one of the interior
grab handles.
Press fi rmly on the boot lid, over the third brake lamp, guiding it down un-
til fully closed.
If the boot lid is not closed correctly: -
when the engine is running ,
this warning lamp comes on,
accompanied by a message in
the screen for a few seconds,
- when the vehicle is moving (speed above 6 mph (10 km/h)), this warn-
ing lamp comes on, accompanied
by an audible signal and a message
in the screen for a few seconds.