2013.5 Peugeot 308 CC engine
[x] Cancel search: enginePage 34 of 268
1
i
32
MONITORING
The level shown will only be cor-
rect if the vehicle is on level ground
and the engine has been off for
more than 30 minutes.
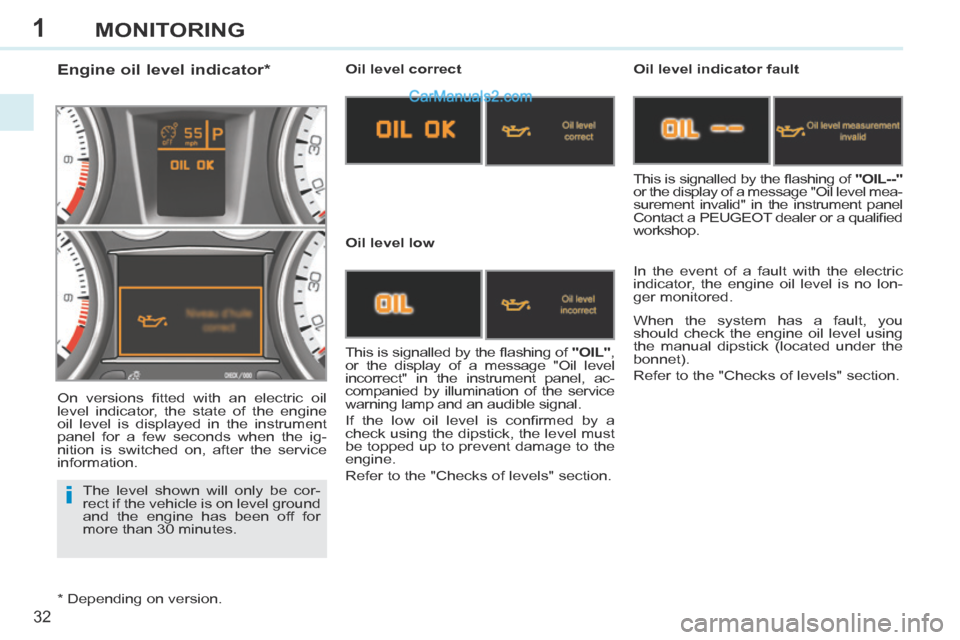
Engine oil level indicator * Oil level correct
Oil level low Oil level indicator fault
In the event of a fault with the electric
indicator, the engine oil level is no lon-
ger monitored.
This is signalled by the fl ashing of "OIL" ,
or the display of a message "Oil level
incorrect" in the instrument panel, ac-
companied by illumination of the service
warning lamp and an audible signal.
If the low oil level is confi rmed by a
check using the dipstick, the level must
be topped up to prevent damage to the
engine.
Refer to the "Checks of levels" section. This is signalled by the fl ashing of
"OIL--"
or the display of a message "Oil level mea-
surement invalid" in the instrument panel
Contact a PEUGEOT dealer or a qualifi ed
workshop.
When the system has a fault, you
should check the engine oil level using
the manual dipstick (located under the
bonnet).
Refer to the "Checks of levels" section.
On versions fi tted with an electric oil
level indicator, the state of the engine
oil level is displayed in the instrument
panel for a few seconds when the ig-
nition is switched on, after the service
information.
* Depending on version.
Page 37 of 268
1
35
MONITORING
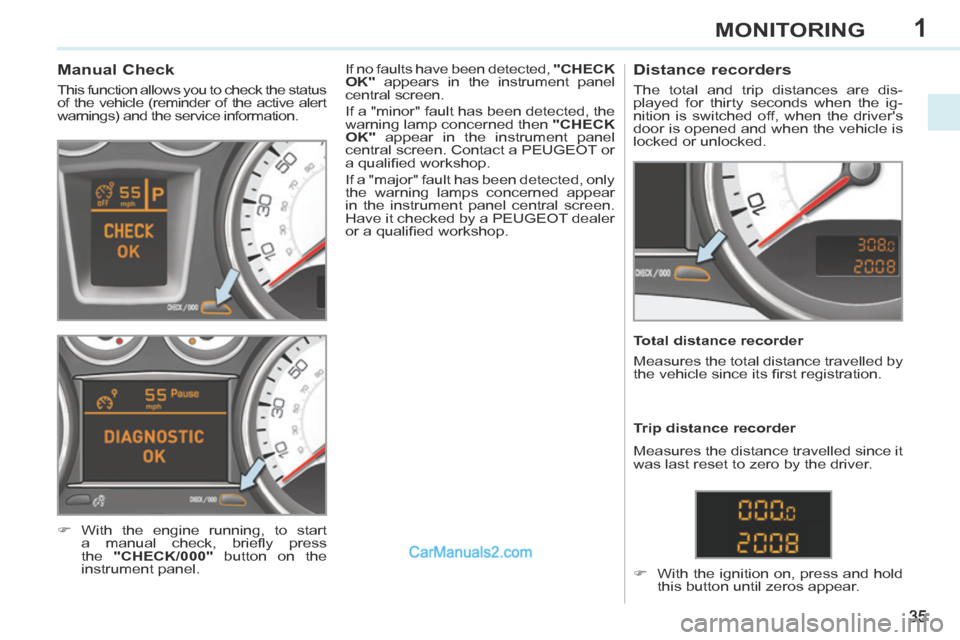
Manual Check
This function allows you to check the status
of the vehicle (reminder of the active alert
warnings) and the service information.
With the engine running, to start a manual check, briefl y press
the "CHECK/000" button on the
instrument panel. If no faults have been detected,
"CHECK
OK" appears in the instrument panel
central screen.
If a "minor" fault has been detected, the
warning lamp concerned then "CHECK
OK" appear in the instrument panel
central screen. Contact a PEUGEOT or
a qualifi ed workshop.
If a "major" fault has been detected, only
the warning lamps concerned appear
in the instrument panel central screen.
Have it checked by a PEUGEOT dealer
or a qualifi ed workshop.
Distance recorders
The total and trip distances are dis-
played for thirty seconds when the ig-
nition is switched off, when the driver's
door is opened and when the vehicle is
locked or unlocked.
Total distance recorder
Measures the total distance travelled by
the vehicle since its fi rst registration.
With the ignition on, press and hold this button until zeros appear.
Trip distance recorder
Measures the distance travelled since it
was last reset to zero by the driver.
Page 48 of 268
3
i
i
46
COMFORT
The condensation created by the
air conditioning results in a dis-
charge of water under the vehicle
which is perfectly normal.
RECOMMENDATIONS FOR VENTILATION AND AIR CONDITIONING
In order for these systems to be fully effective, follow the guidelines on opera-
tion and maintenance below:
To obtain an even air distribution, take care not to obstruct the exterio\
r air intake grilles located at the base of the windscreen, the nozzles, the v\
ents
and the air outlets, as well as the air extractor located in the boot.
Do not cover the sunshine sensor, located on the dashboard; this is used for regulation of the air conditioning system.
Operate the air conditioning system for at least 5 minutes, once or twic\
e a month to keep it in perfect working order.
Ensure that the passenger compartment fi lter is in good condition and have the fi lter elements replaced regularly (refer to the "Checks" section).
We recommend the use of a combined passenger compartment fi lter. Thanks to its second special active fi lter, it contributes to the purifi cation
of the air breathed by the occupants and the cleanness of the passenger \
compartment (reduction of allergic symptoms, bad odours and greasy de-
posits).
To ensure correct operation of the air conditioning system, you are also \
advised to have it checked regularly, as recommended in the warranty and
maintenance record.
If the system does not produce cold air, switch it off and contact a PEUGEOT dealer or a qualifi ed workshop.
In the "cabriolet" confi guration, installing the windstop and using the
"AIRWAVE" systems improves comfort.
When towing the maximum load on a steep gradient in high temperatures,
switching off the air conditioning permits the recovery of engine power and
therefore improvement of the towing capacity. If the interior temperature remains
very high after the vehicle has been
parked in the sun for a considerable
time, fi rst ventilate the passenger
compartment for a few minutes.
Place the air fl ow control at a suf-
fi cient level to provide an adequate
renewal of air in the passenger com-
partment.
The air conditioning system does not
contain chlorine and does not pres-
ent any danger to the ozone layer.
Stop & Start
The heating and air conditioning systems only work when the engine is ru\
n-
ning. To maintain a comfortable temperature in the passenger compartment,
you can temporarily deactivate the Stop & Start system (see the corresp\
ond-
ing section).
Page 49 of 268
3
i
i
47
COMFORT
The control button is located
on the heating or air condition-
ing system control panel.
REAR SCREEN DEMIST - DEFROST
Switching on
The rear screen demisting/defrosting
can only operate when the engine is
running.
Press this button to demist/defrost the rear screen and (depending on
version) the door mirrors. The indi-
cator lamp associated with the but-
ton comes on.
Switching off
The demisting/defrosting switches off
automatically to prevent an excessive
consumption of current.
It is possible to stop the demisting/de-frosting operation before it is switched
off automatically by pressing the button
again. The indicator lamp associated
with the button switches off.
If the engine is switched off before the
demisting/defrosting is switched off au-
tomatically, demisting/defrosting will re-
sume next time the engine is switched on.
Switch off the demisting/de-frosting of the rear screen and
door mirrors as soon as ap-
propriate as lower current con-
sumption results in reduced
fuel consumption.
The demist/defrost is deactivated
when the retractable roof is stored
in the boot.
Page 50 of 268
3
ii
i
48
COMFORT
When the engine is cold, to prevent
too great a distribution of cold air,
the air fl ow will reach its optimum
level gradually.
In cold weather, it favours the dis-
tribution of warm air to the wind-
screen, side windows and footwells
only. On entering the vehicle, if the in-
terior temperature is much colder
or warmer than the comfort value,
there is no need to change the
value displayed in order to obtain
the comfort required. The system
corrects the difference in tempera-
ture automatically and as quickly
as possible.
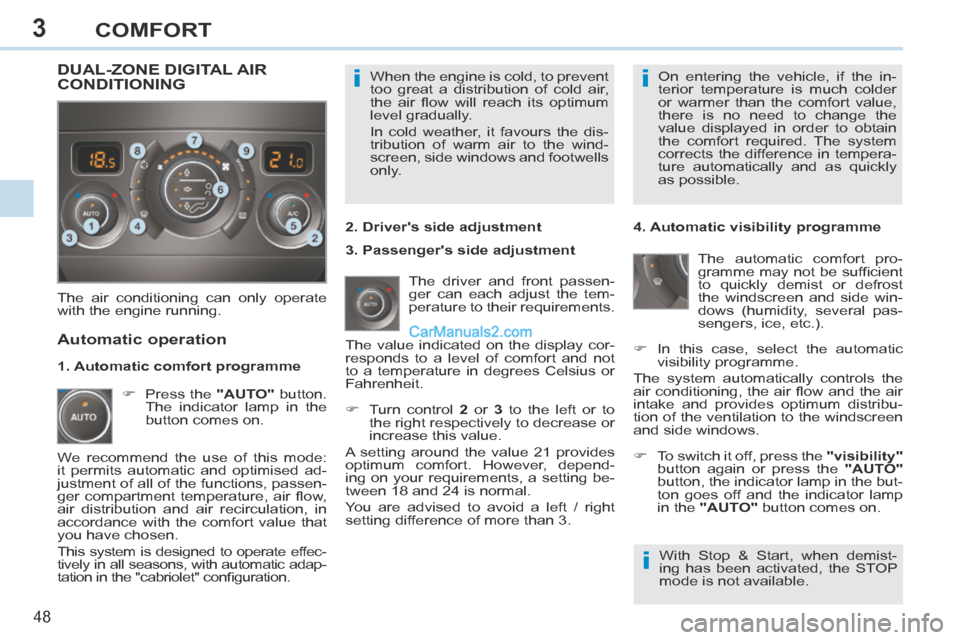
The air conditioning can only operate
with the engine running. The driver and front passen-
ger can each adjust the tem-
perature to their requirements.
Turn control 2 or 3 to the left or to
the right respectively to decrease or
increase this value.
A setting around the value 21 provides
optimum comfort. However, depend-
ing on your requirements, a setting be-
tween 18 and 24 is normal.
You are advised to avoid a left / right
setting difference of more than 3. 4. Automatic visibility programme
The automatic comfort pro-
gramme may not be suffi cient
to quickly demist or defrost
the windscreen and side win-
dows (humidity, several pas-
sengers, ice, etc.).
In this case, select the automatic visibility programme.
The system automatically controls the
air conditioning, the air fl ow and the air
intake and provides optimum distribu-
tion of the ventilation to the windscreen
and side windows.
Automatic operation
Press the "AUTO" button.
The indicator lamp in the
button comes on. 2. Driver's side adjustment
DUAL-ZONE DIGITAL AIR CONDITIONING
We recommend the use of this mode:
it permits automatic and optimised ad-
justment of all of the functions, passen-
ger compartment temperature, air fl ow,
air distribution and air recirculation, in
accordance with the comfort value that
you have chosen.
This system is designed to operate effec-
tively in all seasons, with automatic adap-
tation in the "cabriolet" confi guration. The value indicated on the display cor-
responds to a level of comfort and not
to a temperature in degrees Celsius or
Fahrenheit.
To switch it off, press the "visibility"
button again or press the "AUTO"
button, the indicator lamp in the but-
ton goes off and the indicator lamp
in the "AUTO" button comes on.
1. Automatic comfort programme
3. Passenger's side adjustment
With Stop & Start, when demist-
ing has been activated, the STOP
mode is not available.
Page 58 of 268
3
i!
i
56
COMFORT
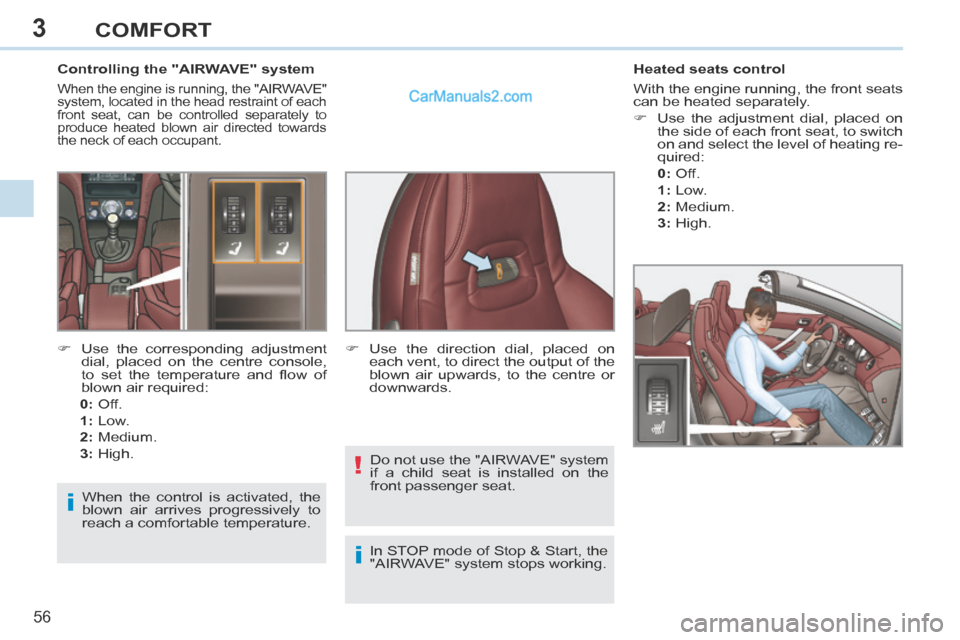
Controlling the "AIRWAVE" system
When the engine is running, the "AIRWAVE"
system, located in the head restraint of each
front seat, can be controlled separately to
produce heated blown air directed towards
the neck of each occupant.
Heated seats control
With the engine running, the front seats
can be heated separately.
Use the adjustment dial, placed on
the side of each front seat, to switch
on and select the level of heating re-
quired:
0 : Off.
1 : Low.
2 : Medium.
3 : High.
Use the corresponding adjustment dial, placed on the centre console,
to set the temperature and fl ow of
blown air required:
0: Off.
1: Low.
2: Medium.
3: High. Use the direction dial, placed on
each vent, to direct the output of the
blown air upwards, to the centre or
downwards.
When the control is activated, the
blown air arrives progressively to
reach a comfortable temperature. Do not use the "AIRWAVE" system
if a child seat is installed on the
front passenger seat.
In STOP mode of Stop & Start, the
"AIRWAVE" system stops working.
Page 59 of 268
3
!
!
57
COMFORT
STORING DRIVING POSITIONS
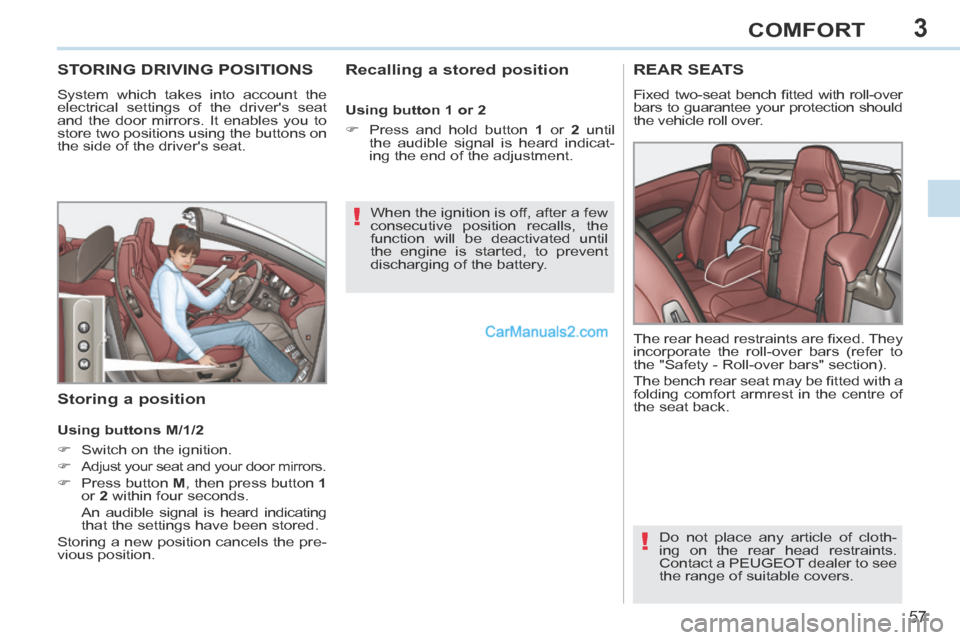
System which takes into account the
electrical settings of the driver's seat
and the door mirrors. It enables you to
store two positions using the buttons on
the side of the driver's seat.
Recalling a stored position
Storing a position
When the ignition is off, after a few
consecutive position recalls, the
function will be deactivated until
the engine is started, to prevent
discharging of the battery.
Using buttons M/1/2
Switch on the ignition.
Adjust your seat and your door mirrors.
Press button M , then press button 1
or 2 within four seconds.
An audible signal is heard indicating that the settings have been stored.
Storing a new position cancels the pre-
vious position.
REAR SEATS
Fixed two-seat bench fi tted with roll-over
bars to guarantee your protection should
the vehicle roll over.
Do not place any article of cloth-
ing on the rear head restraints.
Contact a PEUGEOT dealer to see
the range of suitable covers.
The rear head restraints are fi xed. They
incorporate the roll-over bars (refer to
the "Safety - Roll-over bars" section).
The bench rear seat may be fi tted with a
folding comfort armrest in the centre of
the seat back.
Using button 1 or 2
Press and hold button
1 or 2 until
the audible signal is heard indicat-
ing the end of the adjustment.
Page 61 of 268
3
59
COMFORT
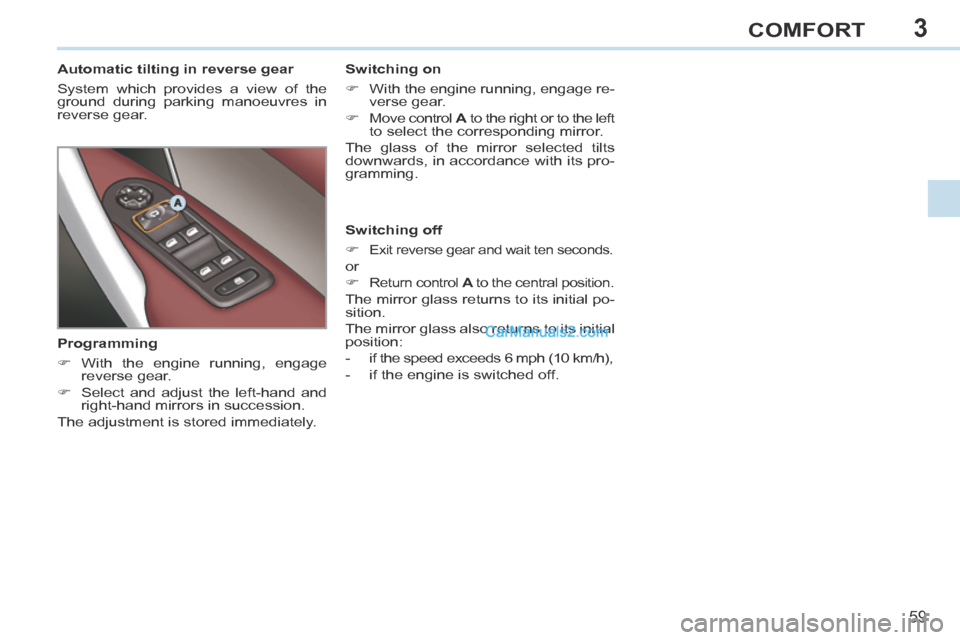
Automatic tilting in reverse gear
System which provides a view of the
ground during parking manoeuvres in
reverse gear. Switching on
With the engine running, engage re-
verse gear.
Move control A to the right or to the left
to select the corresponding mirror.
The glass of the mirror selected tilts
downwards, in accordance with its pro-
gramming.
Programming
With the engine running, engage reverse gear.
Select and adjust the left-hand and right-hand mirrors in succession.
The adjustment is stored immediately. Switching off
Exit reverse gear and wait ten seconds.
or
Return control
A to the central position.
The mirror glass returns to its initial po-
sition.
The mirror glass also returns to its initial
position:
- if the speed exceeds 6 mph (10 km/h),
- if the engine is switched off.