2013.5 Citroen DS5 reset
[x] Cancel search: resetPage 45 of 372

43Monitoring
Service indicator
More than 1 800 miles (3 000 km)
remain before the next service is due
When the ignition is switched on, no ser vice
information appears in the screen. System which informs the driver when the
next ser vice is due, in accordance with the
manufacturer's ser vicing schedule.
The point at which the ser vice is due is
calculated from the last indicator zero reset. It
is determined by two parameters:
- the distance travelled,
- the time elapsed since the last ser vice.
Between 600 miles (1 000 km)
and 1 800 miles (3 000 km) remain
before the next service is due
For 5 seconds after the ignition is switched on, the
spanner symbolising the ser vice operations comes
on. The distance recorder display line indicates the
distance remaining before the next ser vice is due.
Example:
1 700 miles (2 800 km) remain
before the next ser vice is due.
For 5 seconds after the ignition is switched on,
the screen indicates:
5 seconds after the ignition is switched on,
the spanner goes off
; the distance recorder
resumes its normal operation. The screen then
indicates the total and trip distances.
Less than 600 miles (1 000 km)
remain before the next service is due
Example:
560 miles (900 km) remain before
the next ser vice is due.
For 5 seconds after the ignition is switched on,
the screen indicates:
5 seconds after the ignition is switched on,
the distance recorder resumes its normal
operation. The spanner remains on
to
indicate that a ser vice must be carried out
soon.
Illumination of the key is accompanied
by a message in the instrument panel
screen.
Page 46 of 372

Service overdue
For 5 seconds after the ignition is switched on,
the spanner flashes
to indicate that the ser vice
must be carried out as soon as possible.
Example:
the ser vice is overdue by 186 miles
(300 km).
For 5 seconds after the ignition is switched on,
the screen indicates:
With Blue HDi Diesel versions, the
Service
warning lamp also comes on
when the ignition is switched on.
The distance remaining may be
weighted by the time factor, depending
on the driving conditions.
Therefore, the spanner may also come
on if you have exceeded the period
since the last ser vice, indicated in the
maintenance and warranty guide.
Following this operation, if you wish to
disconnect the battery, lock the vehicle
and wait at least five minutes for the
zero reset to be taken into account. 5 seconds after the ignition is switched on,
the distance recorder resumes its normal
operation. The spanner remains on
.
Service indicator zero reset
After each ser vice, the ser vice indicator must
be reset to zero.
The procedure for resetting to zero is as
follows:
switch off the ignition,
press and hold the trip distance recorder
zero reset button,
switch on the ignition; the distance recorder
display begins a countdown,
when the display indicates "=0"
, release
the button; the spanner disappears.
Retrieving the service
information
You can access the ser vice information at any
time.
Press the trip distance recorder zero reset
button.
The ser vice information is displayed for a few
seconds, then disappears.
Page 48 of 372

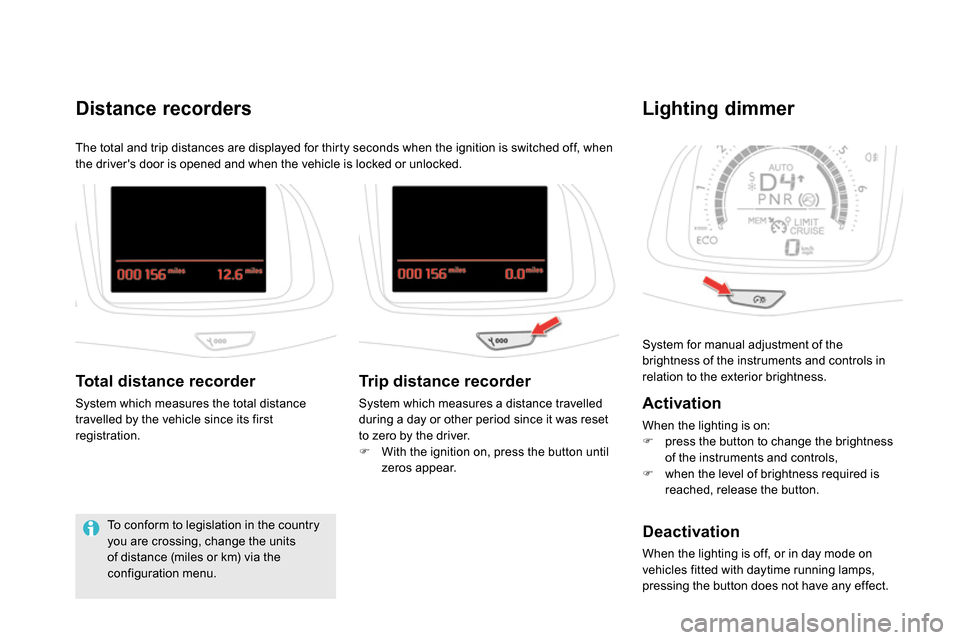
System for manual adjustment of the
brightness of the instruments and controls in
relation to the exterior brightness.
Lighting dimmer
Activation
When the lighting is on:
press the button to change the brightness
of the instruments and controls,
when the level of brightness required is
reached, release the button.
Deactivation
When the lighting is off, or in day mode on
vehicles fitted with daytime running lamps,
pressing the button does not have any effect.
The total and trip distances are displayed for thirty seconds when the ignition is switched off, when
the driver's door is opened and when the vehicle is locked or unlocked.
Distance recorders
Total distance recorder
System which measures the total distance
travelled by the vehicle since its first
registration.
To conform to legislation in the country
you are crossing, change the units
of distance (miles or km) via the
configuration menu.
Trip distance recorder
System which measures a distance travelled
during a day or other period since it was reset
to zero by the driver.
With the ignition on, press the button until
zeros appear.
Page 53 of 372

51Monitoring
If dashes are displayed continuously
while driving in place of the digits,
contact a CITROËN dealer or a
qualified workshop. This value may vary following a change
in the style of driving or the relief,
resulting in a significant change in the
current fuel consumption.
Trip computer, a few definitions…
Range
(miles or km)
This indicates the distance
which can still be travelled with
the fuel remaining in the tank
in relation to the average fuel
consumption over the last few
miles (kilometres) travelled.
When the range falls below 20 miles (30 km),
dashes are displayed. After filling with at least
5 litres of fuel, the range is recalculated and is
displayed when it exceeds 60 miles (100 km). This function is only displayed from
20 mph (30 km/h).
Current fuel consumption
(mpg or l/100 km or km/l)
This is the average fuel consumption
during the last few seconds.
Average fuel
consumption
(mpg or l/100 km or km/l)
This is the average fuel
consumption since the last trip
computer zero reset.
Average speed
(mph or km/h)
This is the average speed calculated
since the last trip computer zero
reset (ignition on).
Stop & Start time
counter
(minutes / seconds or hours /
minutes)
If your vehicle is fitted with Stop & Start, a time
counter calculates the time spent in STOP
mode during a journey.
It resets to zero every time the ignition is
switched on with the START/STOP button.
Page 129 of 372

127Driving
Stop & Start
Operation
Going into engine STOP mode
The "ECO"
warning lamp comes on
in the instrument panel and the engine
goes into standby automatically:
- with a manual gearbox
, at speeds below
12 mph (20 km/h) or vehicle stationary with
the Blue HDi 120 version, when you place
the gear lever in neutral, and you release
the clutch pedal,
- with an electronic gearbox
, at speeds
below 5 mph (8 km/h), when you press
the brake pedal or put the gear lever in
position N
,
- with an automatic gearbox
, vehicle
stationary, when you press the brake pedal
or put the gear lever in position N
. If your vehicle is fitted with the system, a time
counter calculates the sum of the periods in
STOP mode during a journey. It resets itself to
zero every time the ignition is switched on with
the START/STOP button.
Never refuel with the engine in STOP
mode; you must switch off the ignition
with the START/STOP button.
For your comfort, during parking
maoeuvres, STOP mode is not
available for a few seconds after
coming out of reverse gear.
STOP mode does not affect the
functionality of the vehicle, such as for
example, braking, power steering...
Special cases: STOP mode not
available
STOP mode is not invoked when:
- the vehicle is on a steep slop (rising or
falling),
- the driver's door is open,
- the driver's seat belt is not fastened,
- the vehicle has not exceeded 6 mph
(10 km/h) since the last engine start using
the START/STOP button,
- the electric parking brake is applied or
being applied,
- the engine is needed to maintain a
comfortable temperature in the passenger
compartment,
- demisting is active,
- some special conditions (battery charge,
engine temperature, braking assistance,
ambient temperature...) where the engine is
needed to assure control of a system.
In this case, the "ECO"
warning lamp
flashes for a few seconds then goes
off. The Stop & Start system puts the engine temporarily into standby - STOP mode - during stops in the traffic (red lights, traffic jams, or other...).
The engine restarts automatically - START mode - as soon as you want to move off. The restart takes place instantly, quickly and silently.
Per fect for urban use, the Stop & Start system reduces fuel consumption and exhaust emissions as well as the noise level when stationary.
This operation is per fectly normal.
Page 270 of 372

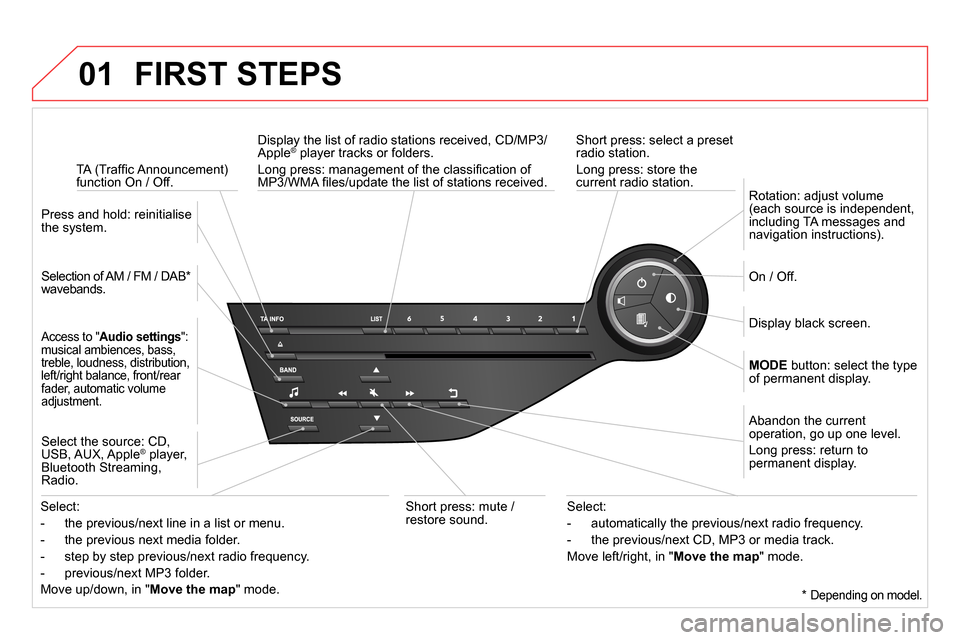
01 FIRST STEPS
Short press: select a preset
radio station.
Long press: store the
current radio station.
TA (Traffi c Announcement)
function On / Off.
Display the list of radio stations received, CD/MP3/
Apple ® player tracks or folders.
Long press: management of the classifi cation of
MP3/WMA fi les/update the list of stations received.
Access to " Audio settings
":
musical ambiences, bass,
treble, loudness, distribution,
left/right balance, front/rear
fader, automatic volume
adjustment.
Selection of AM / FM / DAB *
wavebands.
Press and hold: reinitialise
the system.
Select the source: CD,
USB, AUX, Apple
® player,
Bluetooth Streaming,
Radio.
Abandon the current
operation, go up one level.
Long press: return to
permanent display.
On / Off.
MODE
button: select the type
of permanent display.
Rotation: adjust volume
(each source is independent,
including TA messages and
navigation instructions).
Select:
- the previous/next line in a list or menu.
- the previous next media folder.
- step by step previous/next radio frequency.
- previous/next MP3 folder.
Move up/down, in " Move the map
" mode.
Select:
- automatically the previous/next radio frequency.
- the previous/next CD, MP3 or media track.
Move left/right, in " Move the map
" mode.
Display black screen.
Short press: mute /
restore sound.
*
Depending on model.
Page 272 of 372

SRC
02
-
+
STEERING MOUNTED CONTROLS
- Rotation
Radio - automatic selection of next /
previous frequency.
Media: previous / next track.
- Press then rotation: access to 6 preset
stations.
- Change the audio source.
- TEL button (short press):
Accept an incoming call
Call in progress: access to telephone
menu: hang up, secret mode, hands-free
mode.
- TEL button (long press):
Reject an incoming call or end a call in
progress.
When not making a call, access to the
telephone menu (Dial, Contacts, Calls log,
Voice mailbox).
- Increase volume.
- Decrease volume.
- Radio: display the list of stations.
Media: display the list of tracks.
Page 304 of 372

08
Press RADIO
.
Activate / Deactivate RDS
RDS, if activated, allows you to continue listening to the same
station by automatic retuning to alternative frequencies. However,
in certain conditions, coverage of an RDS station may not be
assured throughout the entire country as radio stations do not
cover 100 % of the territory. This explains the loss of reception
of the station during a journey.
Select " Guidance options
" then
confi rm.
Activate or deactivate " RDS
" then
confi rm.
RADIO
Press the button on the numerical
keypad to recall a preset station.
Or press then turn the thumb wheel at
the steering mounted controls.
Presetting a station
After selecting a station, press one of
the buttons on the numerical keypad for
2 seconds to preset the current station.
An audible signal confi rms that the
station has been preset.