Page 29 of 88

INSTRUMENT AND CONTROL FUNCTIONS
3-14
3
EAU13433
Catalytic converter This model is equipped with a catalytic
converter in the exhaust system.
WARNING
EWA10862
The exhaust system is hot after op-
eration. To prevent a fire hazard or
burns:�
Do not park the vehicle near
possible fire hazards such as
grass or other materials that
easily burn.
�
Park the vehicle in a place
where pedestrians or children
are not likely to touch the hot
exhaust system.
�
Make sure that the exhaust sys-
tem has cooled down before do-
ing any maintenance work.
�
Do not allow the engine to idle
more than a few minutes. Long
idling can cause a build-up of
heat.
NOTICE
ECA10701
Use only unleaded gasoline. The use
of leaded gasoline will cause unre-
pairable damage to the catalytic
converter.
EAU42751
Rider seat To remove the rider seat1. Insert the key into the seat lock, and then turn it counterclockwise.
2. Lift the front of the rider seat up, and then pull the rider seat off.
To install the rider seat 1. Insert the projection on the rear of the rider seat into the rider seat
holder as shown.1. Seat lock
2. Unlock.
2
1
U26PE3E0.book Page 14 Tuesday, June 7, 2011 5:19 PM
Page 68 of 88

PERIODIC MAINTENANCE AND ADJUSTMENT
6-27
6
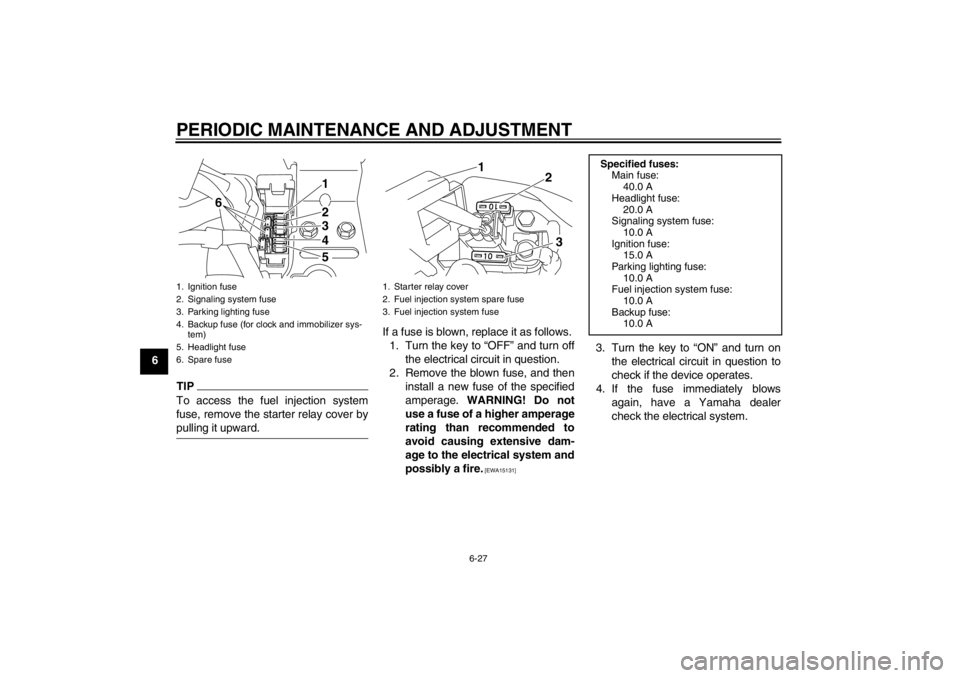
TIPTo access the fuel injection system
fuse, remove the starter relay cover by
pulling it upward.
If a fuse is blown, replace it as follows.1. Turn the key to “ OFF” and turn off
the electrical circuit in question.
2. Remove the blown fuse, and then install a new fuse of the specified
amperage. WARNING! Do not
use a fuse of a higher amperage
rating than recommended to
avoid causing extensive dam-
age to the electrical system and
possibly a fire.
[EWA15131]
3. Turn the key to “ ON” and turn on
the electrical circuit in question to
check if the device operates.
4. If the fuse immediately blows again, have a Yamaha dealer
check the electrical system.
1. Ignition fuse
2. Signaling system fuse
3. Parking lighting fuse
4. Backup fuse (for clock and immobilizer sys-tem)
5. Headlight fuse
6. Spare fuse
1
2
3
4
5
6
1. Starter relay cover
2. Fuel injection system spare fuse
3. Fuel injection system fuse
3
2
1
Specified fuses:
Main fuse:
40.0 A
Headlight fuse:
20.0 A
Signaling system fuse: 10.0 A
Ignition fuse: 15.0 A
Parking lighting fuse:
10.0 A
Fuel injection system fuse: 10.0 A
Backup fuse: 10.0 A
U26PE3E0.book Page 27 Tuesday, June 7, 2011 5:19 PM
Page 70 of 88
PERIODIC MAINTENANCE AND ADJUSTMENT
6-29
65. Install the headlight bulb cover,
and then connect the coupler.
TIPWhen installing the headlight bulb cov-
er, make sure the “TOP ” mark faces up-
wards.6. Install the headlight unit by install- ing the screws.
7. Have a Yamaha dealer adjust the headlight beam if necessary.
EAU24133
Replacing the tail/brake light
bulb 1. Remove the tail/brake light lens byremoving the screws.
2. Remove the burnt-out bulb by pushing it in and turning it counter-
clockwise. 3. Insert a new bulb into the socket,
push it in, and then turn it clock-
wise until it stops.
4. Install the lens by installing the screws. NOTICE: Do not over-
tighten the screws, otherwise
the lens may break.
[ECA10681]
1. “TOP ” mark
TOP
1
1. Screw
1
1. Tail/brake light bulb
1
U26PE3E0.book Page 29 Tuesday, June 7, 2011 5:19 PM
Page 71 of 88
PERIODIC MAINTENANCE AND ADJUSTMENT
6-30
6
EAU24212
Replacing a turn signal light
bulb 1. Remove the turn signal lens by re-moving the screws.
2. Remove the burnt-out bulb by pushing it in and turning it counter-
clockwise. 3. Insert a new bulb into the socket,
push it in, and then turn it clock-
wise until it stops.
4. Install the lens by installing the screws. NOTICE: Do not over-
tighten the screws, otherwise
the lens may break.
[ECA10681] EAU24324
Replacing a license plate light
bulb 1. Remove the license plate light unit
by removing the nuts, washers and
rubber dampers.
2. Remove the license plate light lens by removing the nuts and washers.
1. Screw
1. Turn signal light lens
2. Turn signal light bulb
2
1
1. Nut
2. Washer
3. Rubber damper
123
123
U26PE3E0.book Page 30 Tuesday, June 7, 2011 5:19 PM