2012 YAMAHA XCITY 125 oil change
[x] Cancel search: oil changePage 22 of 86
INSTRUMENT AND CONTROL FUNCTIONS
3-6
3
●
two tripmeters (which show the
distance traveled since they were
last set to zero, the time passed
since the tripmeters were set to ze-
ro, and the average speed traveled
during this time)
●
a fuel reserve tripmeter (which
shows the distance traveled since
the fuel level warning light came
on)
●
a clock
●
an ambient temperature display
●
an oil change indicator (which
comes on when the engine oil
should be changed)
TIP●
For the UK, the distance traveled
is displayed in miles and the tem-
perature reading is displayed in °F.
●
For other countries, the distance
traveled is displayed in kilometers
and the temperature reading is dis-
played in °C.
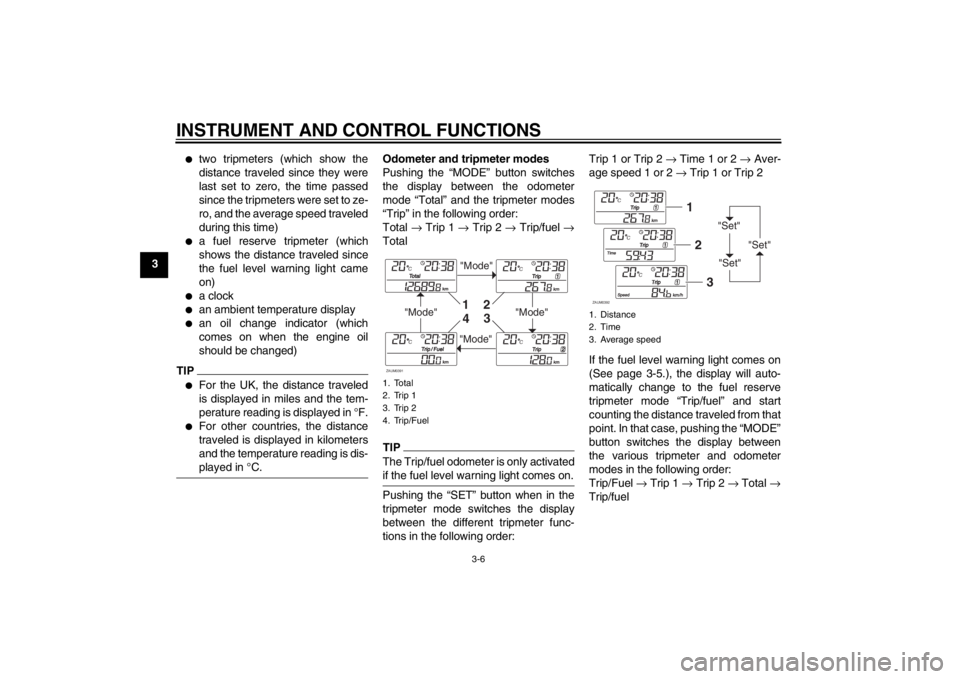
Odometer and tripmeter modes
Pushing the “MODE” button switches
the display between the odometer
mode “Total” and the tripmeter modes
“Trip” in the following order:
Total → Trip 1 → Trip 2 → Trip/fuel →
TotalTIPThe Trip/fuel odometer is only activated
if the fuel level warning light comes on.Pushing the “SET” button when in the
tripmeter mode switches the display
between the different tripmeter func-
tions in the following order:Trip 1 or Trip 2 → Time 1 or 2 → Aver-
age speed 1 or 2 → Trip 1 or Trip 2
If the fuel level warning light comes on
(See page 3-5.), the display will auto-
matically change to the fuel reserve
tripmeter mode “Trip/fuel” and start
counting the distance traveled from that
point. In that case, pushing the “MODE”
button switches the display between
the various tripmeter and odometer
modes in the following order:
Trip/Fuel → Trip 1 → Trip 2 → Total →
Trip/fuel1. Total
2. Trip 1
3. Trip 2
4. Trip/Fuel
"Mode"
"Mode"
"Mode"
"Mode"
1
2
3
4
ZAUM0391
1. Distance
2. Time
3. Average speed
"Set"
"Set""Set"
12
3
ZAUM0392
U16PE3E0.book Page 6 Tuesday, June 19, 2012 5:17 PM
Page 24 of 86
INSTRUMENT AND CONTROL FUNCTIONS
3-8
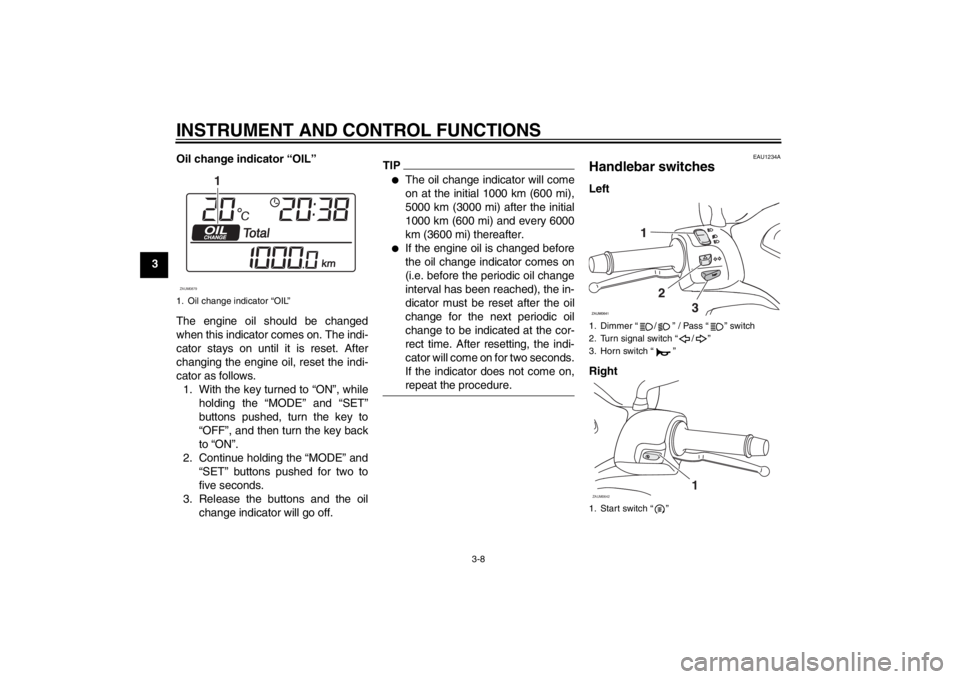
3Oil change indicator “OIL”
The engine oil should be changed
when this indicator comes on. The indi-
cator stays on until it is reset. After
changing the engine oil, reset the indi-
cator as follows.
1. With the key turned to “ON”, while
holding the “MODE” and “SET”
buttons pushed, turn the key to
“OFF”, and then turn the key back
to “ON”.
2. Continue holding the “MODE” and
“SET” buttons pushed for two to
five seconds.
3. Release the buttons and the oil
change indicator will go off.
TIP●
The oil change indicator will come
on at the initial 1000 km (600 mi),
5000 km (3000 mi) after the initial
1000 km (600 mi) and every 6000
km (3600 mi) thereafter.
●
If the engine oil is changed before
the oil change indicator comes on
(i.e. before the periodic oil change
interval has been reached), the in-
dicator must be reset after the oil
change for the next periodic oil
change to be indicated at the cor-
rect time. After resetting, the indi-
cator will come on for two seconds.
If the indicator does not come on,
repeat the procedure.
EAU1234A
Handlebar switches Left
Right
1. Oil change indicator “OIL”
1
ZAUM0879
1. Dimmer ì / î / Pass ì î switch
2. Turn signal switch ì / î
3. Horn switch ì î
1. Start switch ì îZAUM0642
1
U16PE3E0.book Page 8 Tuesday, June 19, 2012 5:17 PM
Page 40 of 86
OPERATION AND IMPORTANT RIDING POINTS
5-4
5
EAU16820
Tips for reducing fuel con-
sumption Fuel consumption depends largely on
your riding style. Consider the following
tips to reduce fuel consumption:●
Avoid high engine speeds during
acceleration.
●
Avoid high engine speeds with no
load on the engine.
●
Turn the engine off instead of let-
ting it idle for an extended length of
time (e.g., in traffic jams, at traffic
lights or at railroad crossings).
EAU16830
Engine break-in There is never a more important period
in the life of your engine than the period
between 0 and 1000 km (600 mi). For
this reason, you should read the follow-
ing material carefully.
Since the engine is brand new, do not
put an excessive load on it for the first
1000 km (600 mi). The various parts in
the engine wear and polish themselves
to the correct operating clearances.
During this period, prolonged full-throt-
tle operation or any condition that might
result in engine overheating must be
avoided.
EAUM2281
0–500 km (0–300 mi)
Avoid prolonged operation above 1/3
throttle.
500–1000 km (300–600 mi)
Avoid prolonged operation above 1/2
throttle. NOTICE: After 1000 km (600
mi) of operation, the engine oil and
final transmission oil must be
changed, and the engine oil filter el-
ement replaced.
[ECAM1091]
1000 km (600 mi) and beyond
The vehicle can now be operated nor-
mally.NOTICE
ECA10270
If any engine trouble should occur
during the engine break-in period,
immediately have a Yamaha dealer
check the vehicle.
U16PE3E0.book Page 4 Tuesday, June 19, 2012 5:17 PM
Page 46 of 86

PERIODIC MAINTENANCE AND ADJUSTMENT
6-5
6
9*Steering bearings Check bearing play and steering
for roughness.√√√√√
Lubricate with lithium-soap-based
grease.Every 24000 km (14000 mi)
10*Chassis fasteners Make sure that all nuts, bolts and
screws are properly tightened.√√√√√
11Front brake lever
pivot shaft Lubricate with silicone grease.√√√√√
12Rear brake lever
pivot shaft Lubricate with silicone grease.√√√√√
13Sidestand, center-
stand Check operation.
Lubricate with lithium-soap-based
grease.√√√√√
14*Sidestand switch Check operation.√√√√√√
15*Front fork Check operation and for oil leak-
age.√√√√
16*Shock absorber as-
semblies Check operation and shock ab-
sorbers for oil leakage.√√√√
17 Engine oil Change. (See page 3-3.)√When the oil change indicator light comes on [5000 km (3000 mi)
after the initial 1000 km (600 mi) and every 6000 km (3500 mi)
thereafter]
Check oil level and vehicle for oil
leakage.Every 3000 km (1800 mi)√
18Engine oil filter ele-
ment Replace.√√√ NO. ITEM CHECK OR MAINTENANCE JOBODOMETER READING
ANNUAL
CHECK 1000 km
(600 mi)6000 km
(3500 mi)12000 km
(7000 mi)18000 km
(10500 mi)24000 km
(14000 mi)
U16PE3E0.book Page 5 Tuesday, June 19, 2012 5:17 PM
Page 47 of 86

PERIODIC MAINTENANCE AND ADJUSTMENT
6-6
6
EAU18670
TIP●
The air filter needs more frequent service if you are riding in unusually wet or dusty areas.
●
Hydraulic brake service
Regularly check and, if necessary, correct the brake fluid level.
Every two years replace the internal components of the brake master cylinders and calipers, and change the brake
fluid.
19*Cooling system Check coolant level and vehicle
for coolant leakage.√√√√√
Change coolant. Every 3 years
20Final transmission
oil Check vehicle for oil leakage.√√ √
Change.√√√
21*V- b e l t Replace. Every 18000 km (10500 mi)
22*Front and rear brake
switches Check operation.√√√√√√
23Moving parts and
cables Lubricate.√√√√√
24*Throttle grip Check operation.
Check throttle grip free play, and
adjust if necessary.
Lubricate cable and grip housing.√√√√√
25*Lights, signals and
switches Check operation.
Adjust headlight beam.√√√√√√ NO. ITEM CHECK OR MAINTENANCE JOBODOMETER READING
ANNUAL
CHECK 1000 km
(600 mi)6000 km
(3500 mi)12000 km
(7000 mi)18000 km
(10500 mi)24000 km
(14000 mi)
U16PE3E0.book Page 6 Tuesday, June 19, 2012 5:17 PM
Page 51 of 86
PERIODIC MAINTENANCE AND ADJUSTMENT
6-10
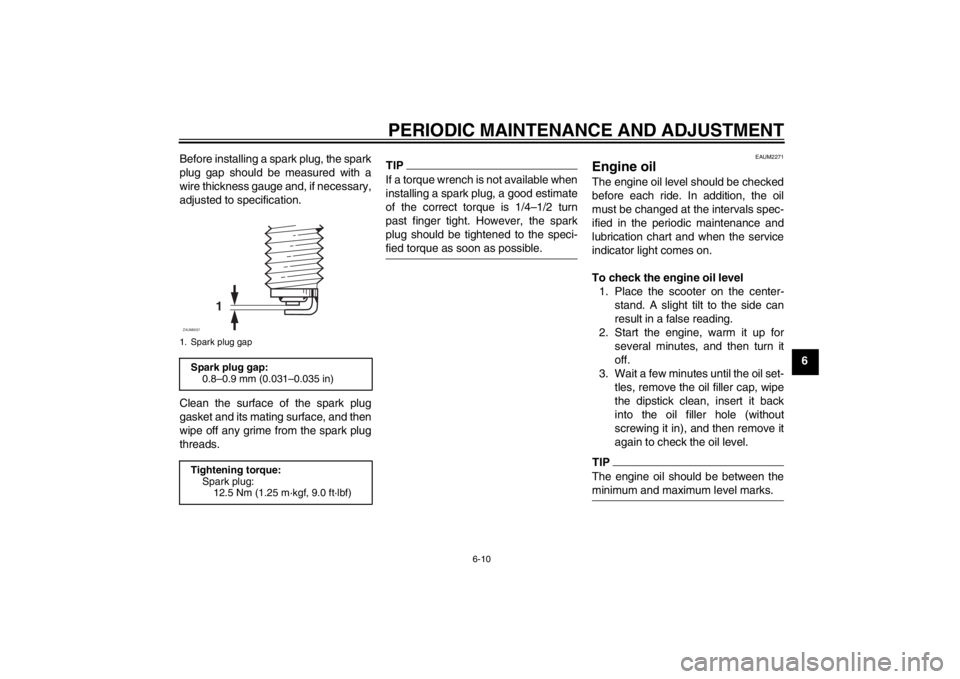
6 Before installing a spark plug, the spark
plug gap should be measured with a
wire thickness gauge and, if necessary,
adjusted to specification.
Clean the surface of the spark plug
gasket and its mating surface, and then
wipe off any grime from the spark plug
threads.
TIPIf a torque wrench is not available when
installing a spark plug, a good estimate
of the correct torque is 1/4–1/2 turn
past finger tight. However, the spark
plug should be tightened to the speci-
fied torque as soon as possible.
EAUM2271
Engine oil The engine oil level should be checked
before each ride. In addition, the oil
must be changed at the intervals spec-
ified in the periodic maintenance and
lubrication chart and when the service
indicator light comes on.
To check the engine oil level
1. Place the scooter on the center-
stand. A slight tilt to the side can
result in a false reading.
2. Start the engine, warm it up for
several minutes, and then turn it
off.
3. Wait a few minutes until the oil set-
tles, remove the oil filler cap, wipe
the dipstick clean, insert it back
into the oil filler hole (without
screwing it in), and then remove it
again to check the oil level.TIPThe engine oil should be between the
minimum and maximum level marks.
1. Spark plug gapSpark plug gap:
0.8–0.9 mm (0.031–0.035 in)
Tightening torque:
Spark plug:
12.5 Nm (1.25 m·kgf, 9.0 ft·lbf)
1
ZAUM0037
U16PE3E0.book Page 10 Tuesday, June 19, 2012 5:17 PM
Page 52 of 86
PERIODIC MAINTENANCE AND ADJUSTMENT
6-11
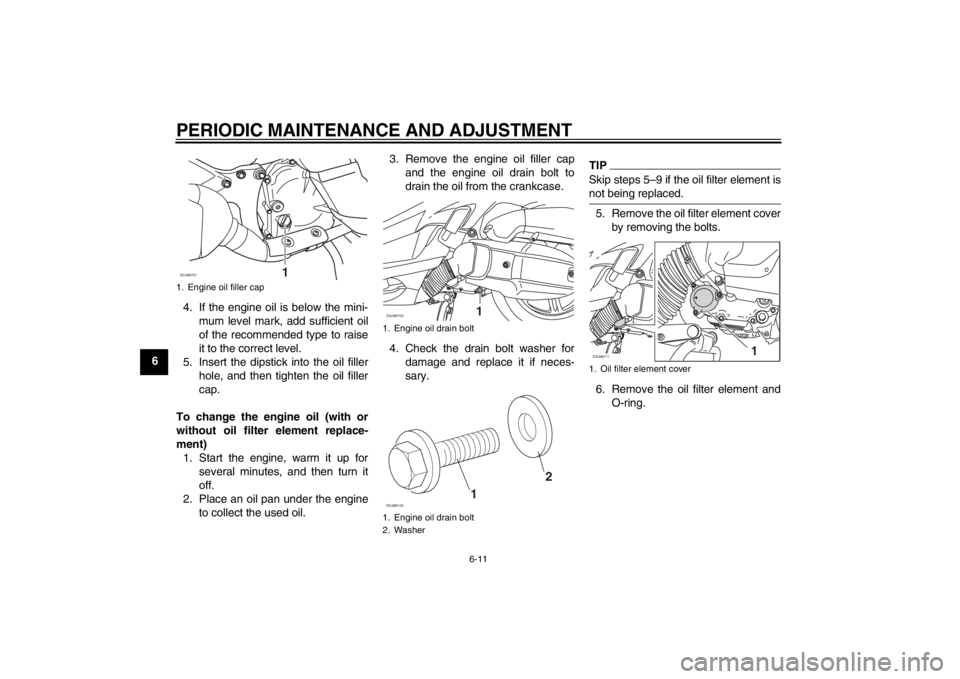
64. If the engine oil is below the mini-
mum level mark, add sufficient oil
of the recommended type to raise
it to the correct level.
5. Insert the dipstick into the oil filler
hole, and then tighten the oil filler
cap.
To change the engine oil (with or
without oil filter element replace-
ment)
1. Start the engine, warm it up for
several minutes, and then turn it
off.
2. Place an oil pan under the engine
to collect the used oil.3. Remove the engine oil filler cap
and the engine oil drain bolt to
drain the oil from the crankcase.
4. Check the drain bolt washer for
damage and replace it if neces-
sary.
TIPSkip steps 5–9 if the oil filter element is
not being replaced.5. Remove the oil filter element cover
by removing the bolts.
6. Remove the oil filter element and
O-ring.
1. Engine oil filler capZAUM0701
1
1. Engine oil drain bolt
1. Engine oil drain bolt
2. WasherZAUM0702
112
ZAUM0129
1. Oil filter element coverZAUM0711
1
U16PE3E0.book Page 11 Tuesday, June 19, 2012 5:17 PM
Page 53 of 86
PERIODIC MAINTENANCE AND ADJUSTMENT
6-12
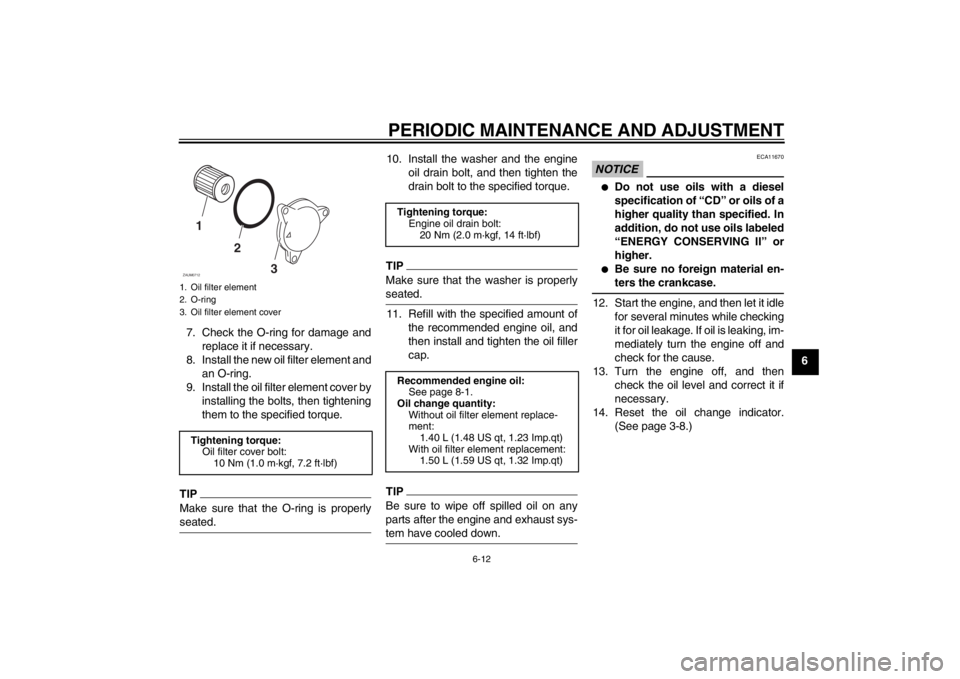
6 7. Check the O-ring for damage and
replace it if necessary.
8. Install the new oil filter element and
an O-ring.
9. Install the oil filter element cover by
installing the bolts, then tightening
them to the specified torque.
TIPMake sure that the O-ring is properly
seated.
10. Install the washer and the engine
oil drain bolt, and then tighten the
drain bolt to the specified torque.TIPMake sure that the washer is properly
seated.11. Refill with the specified amount of
the recommended engine oil, and
then install and tighten the oil filler
cap.TIPBe sure to wipe off spilled oil on any
parts after the engine and exhaust sys-
tem have cooled down.
NOTICE
ECA11670
●
Do not use oils with a diesel
specification of “CD” or oils of a
higher quality than specified. In
addition, do not use oils labeled
“ENERGY CONSERVING II” or
higher.
●
Be sure no foreign material en-
ters the crankcase.
12. Start the engine, and then let it idle
for several minutes while checking
it for oil leakage. If oil is leaking, im-
mediately turn the engine off and
check for the cause.
13. Turn the engine off, and then
check the oil level and correct it if
necessary.
14. Reset the oil change indicator.
(See page 3-8.)
1. Oil filter element
2. O-ring
3. Oil filter element coverTightening torque:
Oil filter cover bolt:
10 Nm (1.0 m·kgf, 7.2 ft·lbf)1
2
3
ZAUM0712
Tightening torque:
Engine oil drain bolt:
20 Nm (2.0 m·kgf, 14 ft·lbf)
Recommended engine oil:
See page 8-1.
Oil change quantity:
Without oil filter element replace-
ment:
1.40 L (1.48 US qt, 1.23 Imp.qt)
With oil filter element replacement:
1.50 L (1.59 US qt, 1.32 Imp.qt)
U16PE3E0.book Page 12 Tuesday, June 19, 2012 5:17 PM