Page 66 of 86

PERIODIC MAINTENANCE AND ADJUSTMENT
6-25
6
EAU45511
Checking the steering Worn or loose steering bearings may
cause danger. Therefore, the operation
of the steering must be checked as fol-
lows at the intervals specified in the pe-
riodic maintenance and lubrication
chart.
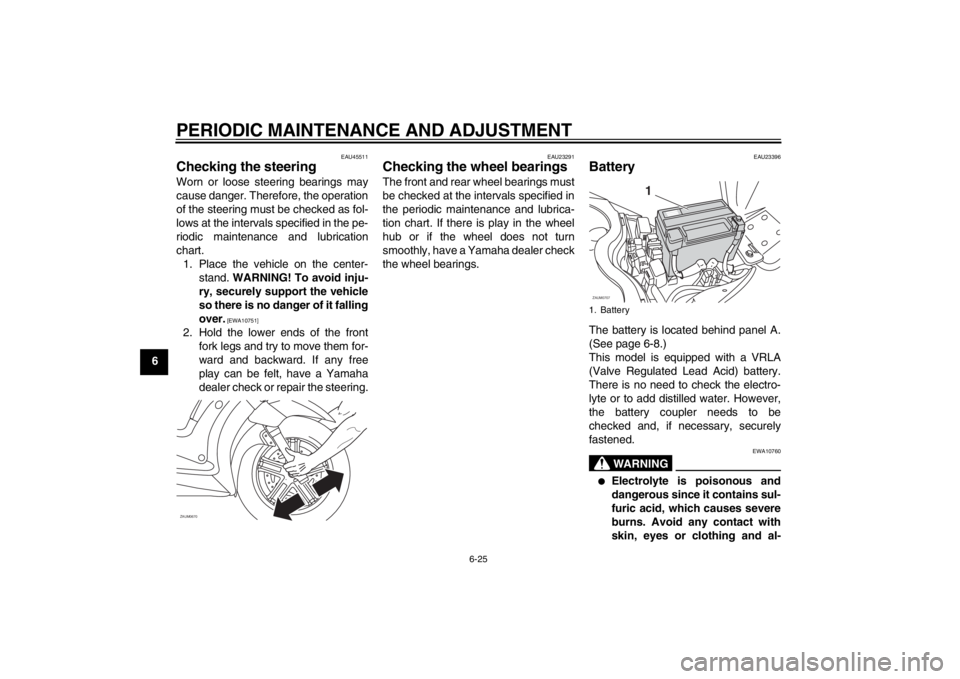
1. Place the vehicle on the center-
stand. WARNING! To avoid inju-
ry, securely support the vehicle
so there is no danger of it falling
over.
[EWA10751]
2. Hold the lower ends of the front
fork legs and try to move them for-
ward and backward. If any free
play can be felt, have a Yamaha
dealer check or repair the steering.
EAU23291
Checking the wheel bearings The front and rear wheel bearings must
be checked at the intervals specified in
the periodic maintenance and lubrica-
tion chart. If there is play in the wheel
hub or if the wheel does not turn
smoothly, have a Yamaha dealer check
the wheel bearings.
EAU23396
Battery The battery is located behind panel A.
(See page 6-8.)
This model is equipped with a VRLA
(Valve Regulated Lead Acid) battery.
There is no need to check the electro-
lyte or to add distilled water. However,
the battery coupler needs to be
checked and, if necessary, securely
fastened.
WARNING
EWA10760
●
Electrolyte is poisonous and
dangerous since it contains sul-
furic acid, which causes severe
burns. Avoid any contact with
skin, eyes or clothing and al-
ZAUM0670
1. Battery
1
ZAUM0707
U16PE3E0.book Page 25 Tuesday, June 19, 2012 5:17 PM
Page 68 of 86

PERIODIC MAINTENANCE AND ADJUSTMENT
6-27
6
EAU23526
Replacing the fuses The main fuse and the fuse box, which
contains the fuses for the individual cir-
cuits, are located behind panel A. (See
page 6-8.)
If a fuse is blown, replace it as follows.
1. Turn the key to “OFF” and turn off
the electrical circuit in question.
2. Remove the blown fuse, and then
install a new fuse of the specified
amperage. WARNING! Do not
use a fuse of a higher amperage
rating than recommended to
avoid causing extensive dam-
age to the electrical system and
possibly a fire.
[EWA15131]
3. Turn the key to “ON” and turn on
the electrical circuit in question to
check if the device operates.
4. If the fuse immediately blows
again, have a Yamaha dealer
check the electrical system.
1. Main fuse
2. Spare fuse
12
ZAUM0708
1. Fuse box
2. Radiator fan fuse
3. ECU fuse
4. Backup fuse
5. Signaling system fuse
6. Headlight fuse
7. Ignition fuse
8. Spare fuse
9. Spare fuse
10.Spare fuse
1
ZAUM0709
23
8910 456 7
Specified fuses:
Main fuse:
30.0 A
ECU fuse:
5.0 A
Signaling system fuse:
15.0 A
Ignition fuse:
10.0 A
Headlight fuse:
15.0 A
Backup fuse:
5.0 A
Radiator fan fuse:
10.0 A
U16PE3E0.book Page 27 Tuesday, June 19, 2012 5:17 PM
Page 69 of 86

PERIODIC MAINTENANCE AND ADJUSTMENT
6-28
6
EAUM2182
Replacing a headlight bulb This model is equipped with halogen
bulb headlights. If a headlight bulb
burns out, replace it as follows.NOTICE
ECA10650
Take care not to damage the follow-
ing parts:●
Headlight bulb
Do not touch the glass part of
the headlight bulb to keep it free
from oil, otherwise the transpar-
ency of the glass, the luminosity
of the bulb, and the bulb life will
be adversely affected. Thor-
oughly clean off any dirt and fin-
gerprints on the headlight bulb
using a cloth moistened with al-
cohol or thinner.
●
Headlight lens
Do not affix any type of tinted
film or stickers to the headlight
lens.
Do not use a headlight bulb of a
wattage higher than specified.
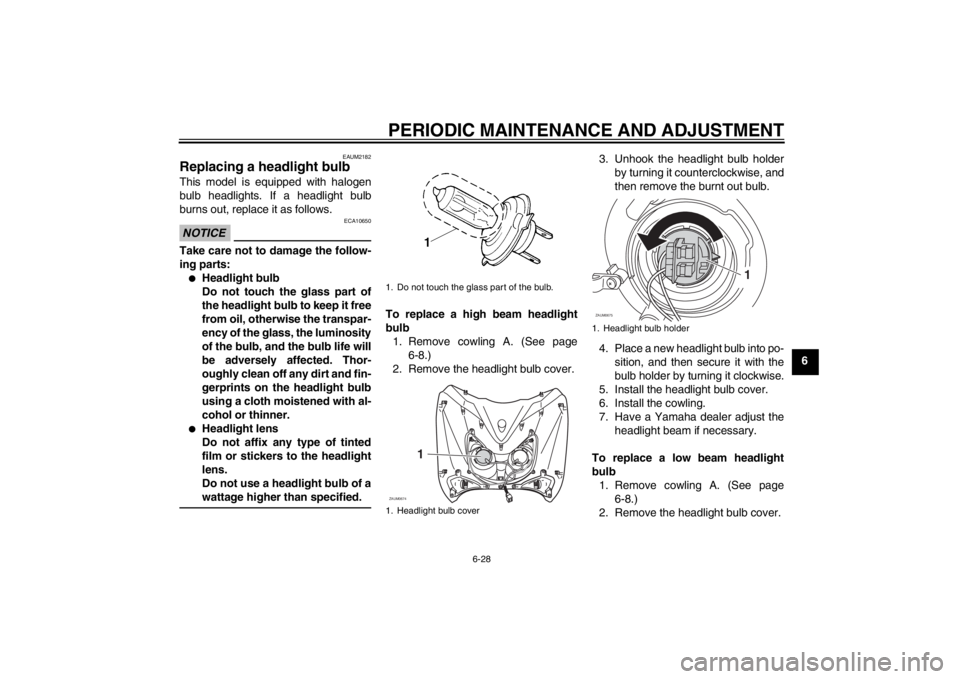
To replace a high beam headlight
bulb
1. Remove cowling A. (See page
6-8.)
2. Remove the headlight bulb cover.3. Unhook the headlight bulb holder
by turning it counterclockwise, and
then remove the burnt out bulb.
4. Place a new headlight bulb into po-
sition, and then secure it with the
bulb holder by turning it clockwise.
5. Install the headlight bulb cover.
6. Install the cowling.
7. Have a Yamaha dealer adjust the
headlight beam if necessary.
To replace a low beam headlight
bulb
1. Remove cowling A. (See page
6-8.)
2. Remove the headlight bulb cover.1. Do not touch the glass part of the bulb.
1. Headlight bulb cover
1
ZAUM0674
1. Headlight bulb holderZAUM0675
1
U16PE3E0.book Page 28 Tuesday, June 19, 2012 5:17 PM
Page 70 of 86
PERIODIC MAINTENANCE AND ADJUSTMENT
6-29
63. Disconnect the headlight coupler.
4. Unhook the headlight bulb holder,
and then remove the burnt out
bulb.5. Place a new headlight bulb into po-
sition, and then secure it with the
bulb holder.
6. Connect the headlight coupler.
7. Install the headlight bulb cover.
8. Install the cowling.
9. Have a Yamaha dealer adjust the
headlight beam if necessary.
EAUT1263
Replacing a front turn signal
light bulb NOTICE
ECA10670
It is advisable to have a Yamaha
dealer perform this job.1. Place the scooter on the center-
stand.
2. Remove cowling A. (See page
6-8.)
3. Remove the turn signal light bulb
socket (together with the bulb) by
turning it counterclockwise.
4. Remove the burnt-out bulb by
pushing it in and turning it counter-
clockwise.
1. Headlight bulb cover
1. Headlight bulb
2. Headlight coupler
1
ZAUM0677 ZAUM0678
1
2
1. Turn signal light bulb socket
1
ZAUM0465
U16PE3E0.book Page 29 Tuesday, June 19, 2012 5:17 PM
Page 82 of 86
SPECIFICATIONS
8-3
8
Auxiliary light:
12 V, 5.0 W × 2
License plate light:
12 V, 5.0 W × 1
Meter lighting:
LED
High beam indicator light:
LED
Turn signal indicator light:
LED x 2
Fuel level warning light:
LED
Engine trouble warning light:
LED
Immobilizer system indicator light:
LEDFuses:Main fuse:
30.0 A
Headlight fuse:
15.0 A
Signaling system fuse:
15.0 A
Ignition fuse:
10.0 A
Radiator fan fuse:
10.0 A
ECU fuse:
5.0 A
Backup fuse:
5.0 A
U16PE3E0.book Page 3 Tuesday, June 19, 2012 5:17 PM