Page 127 of 172
8-38
8 23. Stop the engine and allow it to cool. If the cool-
ant level has dropped after the engine has
cooled, add sufficient coolant until it reaches
the top of the radiator, and then install the ra-
diator cap.
24. Start the engine, and then check for coolant
leakage.
TIPIf any leakage is found, have a Yamaha dealer
check the cooling system.25. Install the V-belt cooling duct, and then tighten
the clamp screw.
26. Install the footboard by installing the bolts and
nuts, and then tighten them to the specified
torques.
27. Install the panels.
1. Footboard nut
2. Footboard bolt A
3. Footboard bolt BTightening torques:
Footboard nut:
4.0 Nm (0.40 m·kgf, 2.9 ft·lbf)
Footboard bolt A:
4.0 Nm (0.40 m·kgf, 2.9 ft·lbf)
Footboard bolt B:
7 Nm (0.7 m·kgf, 5.1 ft·lbf)
3
1
2
1
U1HP60E0.book Page 38 Monday, April 11, 2011 7:56 PM
Page 132 of 172
8-43
82. Remove the tailpipe by pulling it out of the
muffler, and then remove the gasket.
3. Tap the tailpipe lightly, and then use a wire
brush to remove any carbon deposits from the
spark arrester portion of the tailpipe and inside
of the tailpipe housing.4. Check the gasket for damage, and replace it if
necessary.
5. Install the gasket, and then insert the tailpipe
into the muffler and align the bolt holes.
6. Install the bolts and tighten them to the speci-
fied torque.
7. Remove the purging bolt and its gasket.
1. Tailpipe bolt
1. Tailpipe
2. Spark arrester
3. GasketTightening torque:
Tailpipe bolt:
10 Nm (1.0 m·kgf, 7.2 ft·lbf)
U1HP60E0.book Page 43 Monday, April 11, 2011 7:56 PM
Page 133 of 172

8-44
8 8. Start the engine and rev it up approximately
twenty times while momentarily creating ex-
haust system back pressure by blocking the
end of the muffler with a shop towel.
9. Stop the engine and allow the exhaust pipe to
cool.
10. Check the gasket for damage, and replace it if
necessary.
11. Install the purging bolt and its gasket, and
then tighten the bolt to the specified torque.
WARNING
EWB02380Never run the engine in an enclosed area when
purging the spark arrester, otherwise it could
cause injury to the eyes, burns, carbon monox-
ide poisoning, possibly leading to death, and
start a fire.�Always let the exhaust system cool prior to
touching exhaust components.�Always wear eye protection, and make sure
no one is behind the ATV.�Make sure there are no combustible materi-
als in the area.EBU23931V-belt case drain plug After riding in water deep enough to allow it to en-
ter the V-belt case, remove the V-belt case drain
plug to drain the water from the case.
1. Purging bolt
2. Gasket
2
Tightening torque:
Purging bolt:
27 Nm (2.7 m·kgf, 20 ft·lbf)
U1HP60E0.book Page 44 Monday, April 11, 2011 7:56 PM
Page 148 of 172
8-59
82. Connect the positive battery lead first, then
connect the negative battery lead by installing
their bolt. NOTICE: When installing the bat-
tery, the main switch must be off, and the
positive lead must be connected before
the negative lead.
[ECB01110]
3. Install the battery holding plate by installing
the nuts.
4. Install the front carrier by installing the bolts
and tightening them to the specified torques.5. Install the panel.
EBU30520Replacing a fuse
1. Positive battery lead (red)
2. Negative battery lead (black)
12
Tightening torques:
Carrier bolt (top):
34 Nm (3.4 m·kgf, 25 ft·lbf)
Carrier bolt (under the fenders):
7 Nm (0.7 m·kgf, 5.1 ft·lbf)1. Fuse box
2. Main fuse
3. EPS fuse
4. Fuel injection system spare fuse
5. Fuel injection system fuse
U1HP60E0.book Page 59 Monday, April 11, 2011 7:56 PM
Page 154 of 172
8-65
8
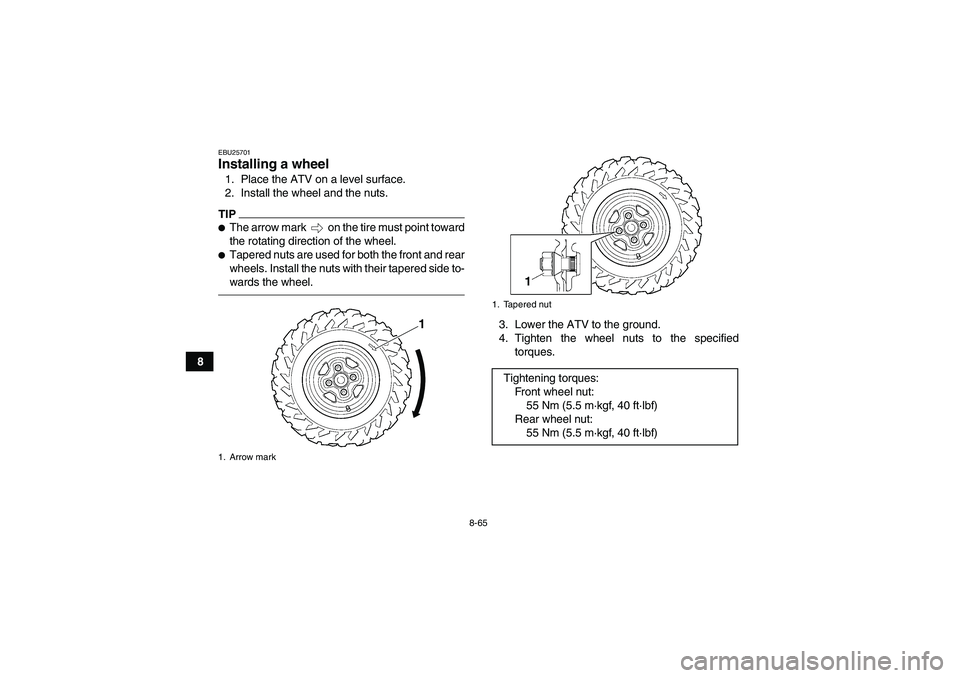
EBU25701Installing a wheel 1. Place the ATV on a level surface.
2. Install the wheel and the nuts.TIP�The arrow mark on the tire must point toward
the rotating direction of the wheel.�Tapered nuts are used for both the front and rear
wheels. Install the nuts with their tapered side to-
wards the wheel.
3. Lower the ATV to the ground.
4. Tighten the wheel nuts to the specified
torques.
1. Arrow mark
1
1. Tapered nutTightening torques:
Fro nt wh ee l nu t:
55 Nm (5.5 m·kgf, 40 ft·lbf)
Rear wheel nut:
55 Nm (5.5 m·kgf, 40 ft·lbf)
U1HP60E0.book Page 65 Monday, April 11, 2011 7:56 PM
Page:
< prev 1-8 9-16 17-24