2012 YAMAHA FZ1 S air filter
[x] Cancel search: air filterPage 6 of 106

TABLE OF CONTENTSSAFETY INFORMATION ..................1-1
DESCRIPTION ..................................2-1
Left view ..........................................2-1
Right view ........................................2-2
Controls and instruments.................2-3
INSTRUMENT AND CONTROL
FUNCTIONS .......................................3-1
Immobilizer system .........................3-1
Main switch/steering lock ................3-2
Indicator lights and warning lights ..............................3-4
Multi-function meter unit .................3-8
Anti-theft alarm (optional) .............3-12
Handlebar switches ......................3-13
Clutch lever ...................................3-14
Shift pedal .....................................3-14
Brake lever ...................................3-15
Brake pedal ..................................3-15
ABS (for ABS models) ..................3-15
Fuel tank cap ................................3-16
Fuel ...............................................3-17
Fuel tank breather hose and
overflow hose ............................3-18
Catalytic converters ......................3-19
Seats ............................................3-19
Storage compartment ...................3-21
Rear view mirrors .........................3-21
Adjusting the front fork ..................3-22 Adjusting the shock absorber
assembly ................................... 3-24
Luggage strap holders ................. 3-25
EXUP system ............................... 3-26
Sidestand ..................................... 3-26
Ignition circuit cut-off system ........ 3-27
FOR YOUR SAFETY –
PRE-OPERATION CHECKS ............. 4-1
OPERATION AND IMPORTANT
RIDING POINTS ................................. 5-1
Starting the engine ......................... 5-1
Shifting ........................................... 5-2
Tips for reducing fuel consumption ............................... 5-3
Engine break-in .............................. 5-3
Parking ........................................... 5-4
PERIODIC MAINTENANCE AND
ADJUSTMENT ................................... 6-1
Owner’s tool kit ............................... 6-2
Periodic maintenance chart for the emission control system ....... 6-3
General maintenance and lubrication chart .......................... 6-4
Removing and installing panels ..... 6-8
Checking the spark plugs ............... 6-9
Engine oil and oil filter cartridge ... 6-10
Coolant ......................................... 6-13
Replacing the air filter element ..... 6-14 Adjusting the engine idling
speed ........................................ 6-17
Checking the throttle grip free play ........................................... 6-17
Valve clearance ........................... 6-18
Tires ............................................. 6-18
Cast wheels ................................. 6-20
Adjusting the clutch lever free
play ........................................... 6-21
Checking the brake lever free play ........................................... 6-21
Brake light switches (for ABS models) ...................... 6-22
Brake light switches
(for non-ABS models) ............... 6-22
Checking the front and rear brake pads ........................ 6-23
Checking the brake fluid level ...... 6-23
Changing the brake fluid .............. 6-25
Drive chain slack .......................... 6-25
Cleaning and lubricating the drive chain .......................... 6-26
Checking and lubricating
the cables ................................. 6-27
Checking and lubricating the throttle grip and cable ......... 6-27
Checking and lubricating the brake and shift pedals ........ 6-28
Checking and lubricating
the brake and clutch levers ...... 6-28U1CAE1E0.book Page 1 Tuesday, September 13, 2011 5:02 PM
Page 13 of 106

DESCRIPTION
2-1
2
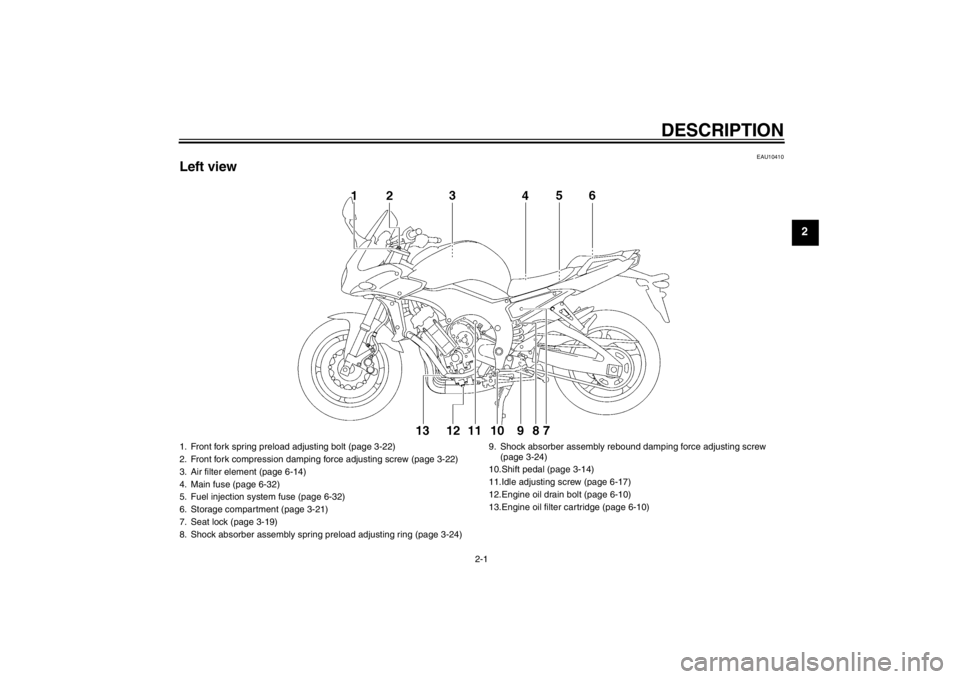
EAU10410
Left view1. Front fork spring preload adjusting bolt (page 3-22)
2. Front fork compression damping force adjusting screw (page 3-22)
3. Air filter element (page 6-14)
4. Main fuse (page 6-32)
5. Fuel injection system fuse (page 6-32)
6. Storage compartment (page 3-21)
7. Seat lock (page 3-19)
8. Shock absorber assembly spring preload adjusting ring (page 3-24) 9. Shock absorber assembly rebo
und damping force adjusting screw
(page 3-24)
10.Shift pedal (page 3-14)
11.Idle adjusting screw (page 6-17)
12.Engine oil drain bolt (page 6-10)
13.Engine oil filter cartridge (page 6-10)
U1CAE1E0.book Page 1 Tuesday, September 13, 2011 5:02 PM
Page 25 of 106

INSTRUMENT AND CONTROL FUNCTIONS
3-10
3
Fuel meter
The fuel meter indicates the amount of
fuel in the fuel tank. The display seg-
ments of the fuel meter disappear to-
wards “E” (Empty) as the fuel level
decreases. When the last segment on
the left starts flashing, refuel as soon as
possible.
TIPThis fuel meter is equipped with a self-
diagnosis system. If a problem is de-
tected in the electrical circuit, the follow-
ing cycle will be repeated until the
malfunction is corrected: “E” (Empty),
“F” (Full) and symbol “ ” will flash
eight times, then go off for approxi- mately 3 seconds. If this occurs, have a
Yamaha dealer check the electrical cir-
cuit.
Coolant temperature mode
The coolant temperature display indi-
cates the temperature of the coolant.TIPWhen the coolant temperature display
is selected, “C” is displayed for one
second, and then the coolant tempera-
ture is displayed.NOTICE
ECA10021
Do not continue to operate the en-
gine if it is overheating.
Air intake temperature mode
The air intake temperature display indi-
cates the temperature of the air drawn
into the air filter case. Turn the key to
“ON”, and push the “RESET” button to
switch the coolant temperature display
to the air intake temperature display.
Push the “RESET” button again to re-
turn to the coolant temperature display.TIP●
Even if the air intake temperature
is set to be displayed, the coolant
temperature warning light comes
on if the engine overheats.
1. Fuel meter
1. Coolant temperature display
1. Air intake temperature display
U1CAE1E0.book Page 10 Tuesday, September 13, 2011 5:02 PM
Page 54 of 106

PERIODIC MAINTENANCE AND ADJUSTMENT
6-4
6
EAU1770C
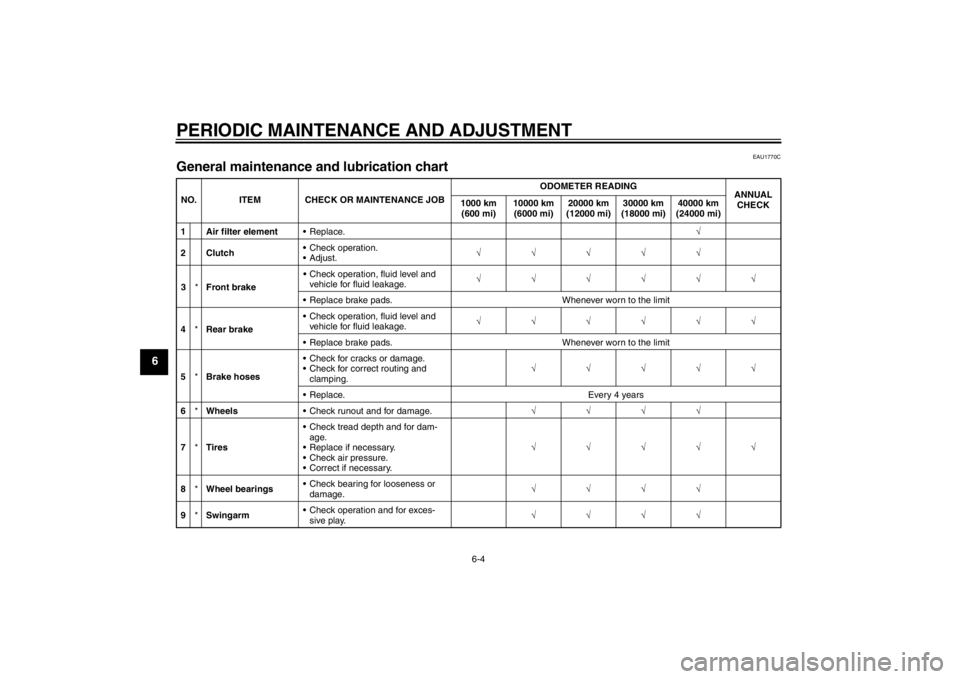
General maintenance and lubrication chart NO. ITEM CHECK OR MAINTENANCE JOB ODOMETER READING
ANNUAL
CHECK
1000 km
(600 mi) 10000 km
(6000 mi) 20000 km
(12000 mi) 30000 km
(18000 mi) 40000 km
(24000 mi)
1 Air filter element Replace. √
2Clutch Check operation.
Adjust.
√√√√√
3 *Front brake Check operation, fluid level and
vehicle for fluid leakage. √√√√√√
Replace brake pads. Whenever worn to the limit
4 *Rear brake Check operation, fluid level and
vehicle for fluid leakage. √√√√√√
Replace brake pads. Whenever worn to the limit
5 *Brake hoses Check for cracks or damage.
Check for correct routing and
clamping. √√√√√
Replace. Every 4 years
6 *Wheels Check runout and for damage. √√√√
7 *Tires Check tread depth and for dam-
age.
Replace if necessary.
Check air pressure.
Correct if necessary. √√√√√
8 *Wheel bearings Check bearing for looseness or
damage. √√√√
9 *Swingarm Check operation and for exces-
sive play. √√√√
U1CAE1E0.book Page 4 Tuesday, September 13, 2011 5:02 PM
Page 57 of 106

PERIODIC MAINTENANCE AND ADJUSTMENT
6-7
6
EAU18680
TIP●
Air filter This model’s air filter is equipped with a disposable oil-coated paper element, which must not be cleaned with com- pressed air to avoid damaging it.
The air filter element needs to be replaced more frequently when riding in unusually wet or dusty areas.
●
Hydraulic brake service Regularly check and, if necessary, correct the brake fluid level.
Every two years replace the internal components of the brake master cylinders and calipers, and change the brake fluid.
Replace the brake hoses every four years and if cracked or damaged.
U1CAE1E0.book Page 7 Tuesday, September 13, 2011 5:02 PM
Page 64 of 106

PERIODIC MAINTENANCE AND ADJUSTMENT
6-14
6If water has been used instead
of coolant, replace it with cool-
ant as soon as possible, other-
wise the cooling system will not
be protected against frost and
corrosion. If water has been
added to the coolant, have a
Yamaha dealer check the anti-
freeze content of the coolant as
soon as possible, otherwise the
effectiveness of the coolant will
be reduced.
[ECA10472]
5. Install the panel.
EAU33031
Changing the coolant
The coolant must be changed at the in-
tervals specified in the periodic mainte-
nance and lubrication chart. Have a
Yamaha dealer change the coolant.
WARNING! Never attempt to remove the radiator cap when the engine is
hot.
[EWA10381] EAU40054
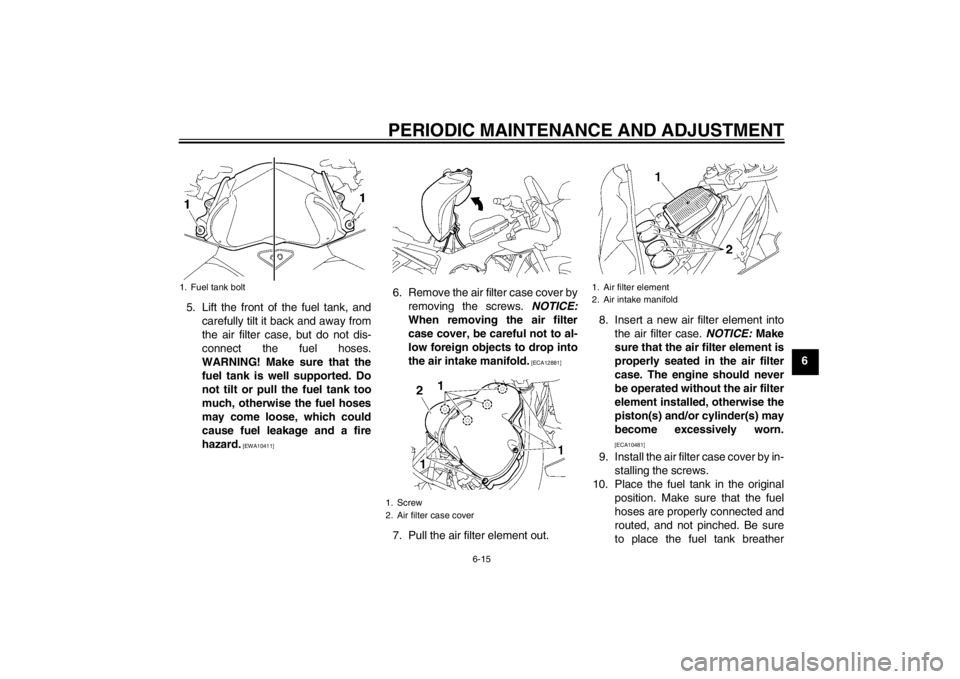
Replacing the air filter element The air filter element should be re-
placed at the intervals specified in the
periodic maintenance and lubrication
chart. Replace the air filter element
more frequently if you are riding in un-
usually wet or dusty areas.
1. Remove the rider seat. (See page 3-19.)
2. Remove panels A and B. (See page 6-8.)
3. Remove the fuel tank cowling bolts, and then pull the fuel tank
cowling off.
4. Remove the fuel tank bolts.
1. Coolant reservoir capCoolant reservoir capacity (up to
the maximum level mark): 0.25 L (0.26 US qt, 0.22 Imp.qt)
1. Fuel tank cowling
2. Fuel tank cowling bolt
U1CAE1E0.book Page 14 Tuesday, September 13, 2011 5:02 PM
Page 65 of 106

PERIODIC MAINTENANCE AND ADJUSTMENT
6-15
6
5. Lift the front of the fuel tank, and
carefully tilt it back and away from
the air filter case, but do not dis-
connect the fuel hoses.
WARNING! Make sure that the fuel tank is well supported. Do
not tilt or pull the fuel tank too
much, otherwise the fuel hoses
may come loose, which could
cause fuel leakage and a fire
hazard.
[EWA10411]
6. Remove the air filter case cover by removing the screws. NOTICE:
When removing the air filter
case cover, be careful not to al-
low foreign objects to drop into
the air intake manifold.
[ECA12881]
7. Pull the air filter element out. 8. Insert a new air filter element into
the air filter case. NOTICE: Make
sure that the air filter element is
properly seated in the air filter
case. The engine should never
be operated without the air filter
element installed, otherwise the
piston(s) and/or cylinder(s) may
become excessively worn.
[ECA10481]
9. Install the air filter case cover by in- stalling the screws.
10. Place the fuel tank in the original position. Make sure that the fuel
hoses are properly connected and
routed, and not pinched. Be sure
to place the fuel tank breather
1. Fuel tank bolt
1. Screw
2. Air filter case cover
1. Air filter element
2. Air intake manifold
U1CAE1E0.book Page 15 Tuesday, September 13, 2011 5:02 PM
Page 98 of 106

SPECIFICATIONS
8-1
8
Dimensions:Overall length:2140 mm (84.3 in)
Overall width:
770 mm (30.3 in)
Overall height: 1205 mm (47.4 in)
Seat height: 815 mm (32.1 in)
Wheelbase:
1460 mm (57.5 in)
Ground clearance: 135 mm (5.31 in)
Minimum turning radius: 3000 mm (118.1 in)Weight:Curb weight:FZ1-S 220 kg (485 lb)
FZ1-SA 226 kg (498 lb)Engine:Engine type:Liquid cooled 4-stroke, DOHC
Cylinder arrangement:
Inline 4-cylinder
Displacement: 998 cm³
Bore × stroke:
77.0 × 53.6 mm (3.03 × 2.11 in)
Compression ratio:
11.50 : 1
Starting system: Electric starter
Lubrication system: Wet sump
Engine oil:Recommended brand:YAMALUBE
Type:
SAE 10W-30, 10W-40, 10W-50, 15W-40,
20W-40 or 20W-50
Recommended engine oil grade: API service SG type or higher, JASO
standard MA
Engine oil quantity:
Without oil filter cartridge replacement: 2.90 L (3.07 US qt, 2.55 Imp.qt)
With oil filter cartridge replacement:
3.10 L (3.28 US qt, 2.73 Imp.qt)Cooling system:Coolant reservoir capacity (up to the
maximum level mark):0.25 L (0.26 US qt, 0.22 Imp.qt)
Radiator capacity (including all routes): 2.25 L (2.38 US qt, 1.98 Imp.qt)Air filter:Air filter element:Oil-coated paper element
Fuel:Recommended fuel:Regular unleaded gasoline only
Fuel tank capacity:
18.0 L (4.76 US gal, 3.96 Imp.gal)
Fuel reserve amount: 3.4 L (0.90 US gal, 0.75 Imp.gal)Fuel injection:Throttle body:
ID mark: 2D11 20Spark plug(s):Manufacturer/model:NGK/CR9E
Spark plug gap: 0.7–0.8 mm (0.028–0.031 in)Clutch:Clutch type:Wet, multiple-discTransmission:Primary reduction ratio:
1.512 (65/43)
Final drive: Chain
Secondary reduction ratio: 2.647 (45/17)
Transmission type:
Constant mesh 6-speed
Operation: Left foot operation
Gear ratio: 1st: 2.533 (38/15)
–20 –10 0 1020 30 40 50 �C
10 30 50 70 90 110
0 130 �F
SAE 10W-30
SAE 15W-40SAE 20W-40SAE 20W-50
SAE 10W-40SAE 10W-50
U1CAE1E0.book Page 1 Tuesday, September 13, 2011 5:02 PM