2012 YAMAHA FZ1-N fuel
[x] Cancel search: fuelPage 6 of 106

TABLE OF CONTENTSSAFETY INFORMATION ..................1-1
DESCRIPTION ..................................2-1
Left view ..........................................2-1
Right view ........................................2-2
Controls and instruments.................2-3
INSTRUMENT AND CONTROL
FUNCTIONS .......................................3-1
Immobilizer system .........................3-1
Main switch/steering lock ................3-2
Indicator lights and warning lights ..............................3-4
Multi-function meter unit .................3-8
Anti-theft alarm (optional) .............3-12
Handlebar switches ......................3-13
Clutch lever ...................................3-14
Shift pedal .....................................3-14
Brake lever ...................................3-15
Brake pedal ..................................3-15
ABS (for ABS models) ..................3-15
Fuel tank cap ................................3-16
Fuel ...............................................3-17
Fuel tank breather hose and
overflow hose ............................3-18
Catalytic converters ......................3-19
Seats ............................................3-19
Storage compartment (FZ1-N) ......3-21
Adjusting the front fork ..................3-21
Adjusting the shock absorber
assembly ...................................3-23 Luggage strap holders ................. 3-25
EXUP system ............................... 3-26
Sidestand ..................................... 3-26
Ignition circuit cut-off system ........ 3-27
FOR YOUR SAFETY –
PRE-OPERATION CHECKS ............. 4-1
OPERATION AND IMPORTANT
RIDING POINTS ................................. 5-1
Starting the engine ......................... 5-1
Shifting ........................................... 5-2
Tips for reducing fuel consumption ............................... 5-3
Engine break-in .............................. 5-3
Parking ........................................... 5-4
PERIODIC MAINTENANCE AND
ADJUSTMENT ................................... 6-1
Owner’s tool kit ............................... 6-2
Periodic maintenance chart for
the emission control system ....... 6-3
General maintenance and
lubrication chart .......................... 6-4
Removing and installing the cowling and panel ................. 6-8
Checking the spark plugs ............... 6-9
Engine oil and oil filter cartridge ... 6-10
Coolant ......................................... 6-13
Replacing the air filter element ..... 6-14 Adjusting the engine idling
speed ........................................ 6-16
Checking the throttle grip free play ........................................... 6-17
Valve clearance ........................... 6-17
Tires ............................................. 6-18
Cast wheels ................................. 6-20
Adjusting the clutch lever free
play ........................................... 6-20
Checking the brake lever free play ........................................... 6-21
Brake light switches (for ABS models) ...................... 6-22
Brake light switches
(for non-ABS models) ............... 6-22
Checking the front and rear brake pads ........................ 6-22
Checking the brake fluid level ...... 6-23
Changing the brake fluid .............. 6-24
Drive chain slack .......................... 6-25
Cleaning and lubricating the drive chain .......................... 6-26
Checking and lubricating
the cables ................................. 6-27
Checking and lubricating the throttle grip and cable ......... 6-27
Checking and lubricating the brake and shift pedals ........ 6-27
Checking and lubricating
the brake and clutch levers ...... 6-28U1ECE1E0.book Page 1 Monday, August 8, 2011 11:52 AM
Page 12 of 106

SAFETY INFORMATION
1-5
1
●
Check that the fuel cock (if
equipped) is in the “OFF” position
and that there are no fuel leaks.
●
Point the front wheel straight
ahead on the trailer or in the truck
bed, and choke it in a rail to pre-
vent movement.
●
Shift the transmission in gear (for
models with a manual transmis-
sion).
●
Secure the motorcycle with tie-
downs or suitable straps that are
attached to solid parts of the mo-
torcycle, such as the frame or up-
per front fork triple clamp (and not,
for example, to rubber-mounted
handlebars or turn signals, or parts
that could break). Choose the lo-
cation for the straps carefully so
the straps will not rub against
painted surfaces during transport.
●
The suspension should be com-
pressed somewhat by the tie-
downs, if possible, so that the mo-
torcycle will not bounce excessive-
ly during transport.
U1ECE1E0.book Page 5 Monday, August 8, 2011 11:52 AM
Page 13 of 106

DESCRIPTION
2-1
2
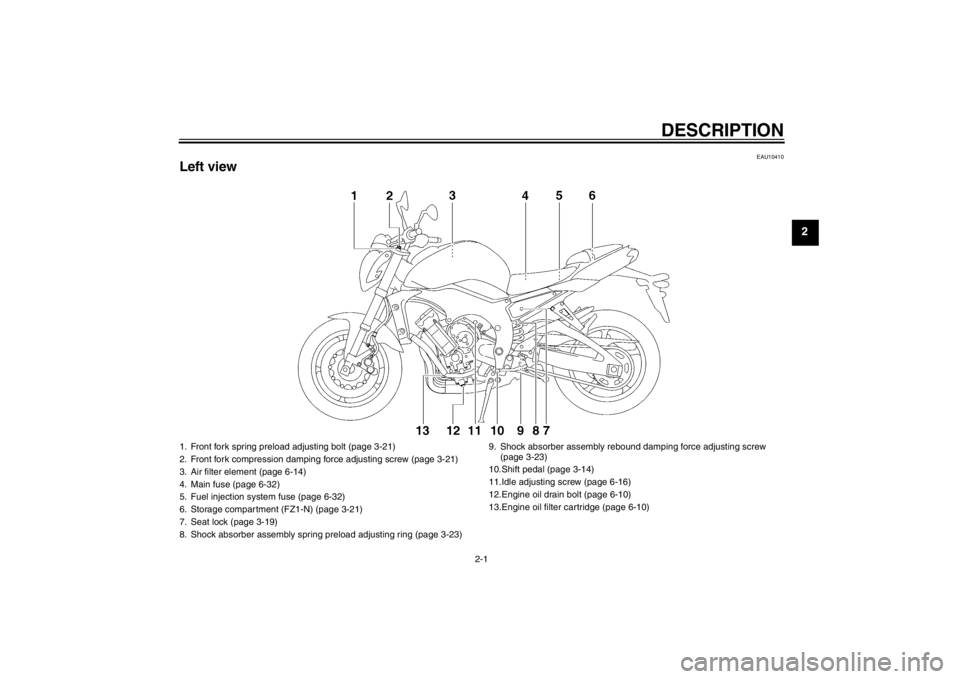
EAU10410
Left view1. Front fork spring preload adjusting bolt (page 3-21)
2. Front fork compression damping force adjusting screw (page 3-21)
3. Air filter element (page 6-14)
4. Main fuse (page 6-32)
5. Fuel injection system fuse (page 6-32)
6. Storage compartment (FZ1-N) (page 3-21)
7. Seat lock (page 3-19)
8. Shock absorber assembly spring preload adjusting ring (page 3-23) 9. Shock absorber assembly rebo
und damping force adjusting screw
(page 3-23)
10.Shift pedal (page 3-14)
11.Idle adjusting screw (page 6-16)
12.Engine oil drain bolt (page 6-10)
13.Engine oil filter cartridge (page 6-10)
U1ECE1E0.book Page 1 Monday, August 8, 2011 11:52 AM
Page 23 of 106

INSTRUMENT AND CONTROL FUNCTIONS
3-8
3
EAU3942H
Multi-function meter unit
WARNING
EWA12422
Be sure to stop the vehicle before
making any setting changes to the
multi-function meter unit. Changing
settings while riding can distract the
operator and increase the risk of an
accident.
The multi-function meter unit is
equipped with the following:●
a speedometer
●
a tachometer
●
an odometer
●
two tripmeters (which show the
distance traveled since they were
last set to zero)
●
a fuel reserve tripmeter (which
shows the distance traveled since
the left segment of the fuel meter
started flashing)
●
a clock
●
a fuel meter
●
a coolant temperature display
●
an air intake temperature display
●
a self-diagnosis device
●
an LCD and tachometer bright-
ness control mode
TIP●
Be sure to turn the key to “ON” be-
fore using the “SELECT” and “RE-
SET” buttons except for setting the
LCD and tachometer brightness
control mode.
●
For the U.K. only: To switch the
speedometer and odometer/trip-
meter displays between kilometers
and miles, press the “SELECT”
button for at least one second.
Tachometer
The electric tachometer allows the rider
to monitor the engine speed and keep it
within the ideal power range.
When the key is turned to “ON”, the ta-
chometer needle will sweep once
across the r/min range and then return
to zero r/min in order to test the electri-
cal circuit.
1. Coolant temperature display/air intake tem-perature display
2. Speedometer
3. Tachometer
4. Odometer/tripmeter/fuel reserve tripmeter
5. “SELECT” button
6. “RESET” button
7. Clock
8. Fuel meter
1. Tachometer
2. Tachometer red zone
U1ECE1E0.book Page 8 Monday, August 8, 2011 11:52 AM
Page 24 of 106

INSTRUMENT AND CONTROL FUNCTIONS
3-9
3
NOTICE
ECA10031
Do not operate the engine in the ta-
chometer red zone.
Red zone: 12000 r/min and aboveClock
The clock displays when the key is
turned to “ON”. In addition, the clock
can be displayed for 10 seconds by
pushing the “SELECT” button when the
main switch is in the “OFF”, “LOCK”
or “ ” position.
To set the clock1. Turn the key to “ON”.2. Push the “SELECT” button and
“RESET” button together for at
least two seconds.
3. When the hour digits start flashing, push the “RESET” button to set the
hours.
4. Push the “SELECT” button, and the minute digits will start flashing.
5. Push the “RESET” button to set the minutes.
6. Push the “SELECT” button and then release it to start the clock.
Odometer and tripmeter modes Push the “SELECT” button to switch
the display between the odometer
mode “ODO” and the tripmeter modes
“TRIP A” and “TRIP B” in the following
order:
TRIP A
→ TRIP B → ODO → TRIP A
When the fuel amount in the fuel tank
decreases to 3.4 L (0.90 US gal,
0.75 Imp.gal), the left segment of the
fuel meter will start flashing, and the
odometer display will automatically
change to the fuel reserve tripmeter
mode “F-TRIP” and start counting the
distance traveled from that point. In that
case, push the “SELECT” button to
switch the display between the various
tripmeter and odometer modes in the
following order:
F-TRIP → TRIP A → TRIP B → ODO
→ F-TRIP
To reset a tripmeter, select it by push-
ing the “SELECT” button, and then
push the “RESET” button for at least
one second. If you do not reset the fuel
reserve tripmeter manually, it will reset
itself automatically and the display will
return to the prior mode after refueling
and traveling 5 km (3 mi).1. Clock
1. Odometer/tripmeter/fuel reserve tripmeter
U1ECE1E0.book Page 9 Monday, August 8, 2011 11:52 AM
Page 25 of 106

INSTRUMENT AND CONTROL FUNCTIONS
3-10
3
Fuel meter
The fuel meter indicates the amount of
fuel in the fuel tank. The display seg-
ments of the fuel meter disappear to-
wards “E” (Empty) as the fuel level
decreases. When the last segment on
the left starts flashing, refuel as soon as
possible.
TIPThis fuel meter is equipped with a self-
diagnosis system. If a problem is de-
tected in the electrical circuit, the follow-
ing cycle will be repeated until the
malfunction is corrected: “E” (Empty),
“F” (Full) and symbol “ ” will flash
eight times, then go off for approxi- mately 3 seconds. If this occurs, have a
Yamaha dealer check the electrical cir-
cuit.
Coolant temperature mode
The coolant temperature display indi-
cates the temperature of the coolant.TIPWhen the coolant temperature display
is selected, “C” is displayed for one
second, and then the coolant tempera-
ture is displayed.NOTICE
ECA10021
Do not continue to operate the en-
gine if it is overheating.
Air intake temperature mode
The air intake temperature display indi-
cates the temperature of the air drawn
into the air filter case. Turn the key to
“ON”, and push the “RESET” button to
switch the coolant temperature display
to the air intake temperature display.
Push the “RESET” button again to re-
turn to the coolant temperature display.TIP●
Even if the air intake temperature
is set to be displayed, the coolant
temperature warning light comes
on if the engine overheats.
1. Fuel meter
1. Coolant temperature display
1. Air intake temperature display
U1ECE1E0.book Page 10 Monday, August 8, 2011 11:52 AM
Page 31 of 106

INSTRUMENT AND CONTROL FUNCTIONS
3-16
3
●
This ABS has a test mode which
allows the owner to experience the
pulsating at the brake lever or
brake pedal when the ABS is oper-
ating. However, special tools are
required, so please consult your
Yamaha dealer when performing this test.
NOTICE
ECA16120
Keep any type of magnets (including
magnetic pick-up tools, magnetic
screwdrivers, etc.) away from the
front and rear wheel hubs, otherwise
the magnetic rotors equipped in the
wheel hubs may be damaged, result-
ing in improper performance of the
ABS system.
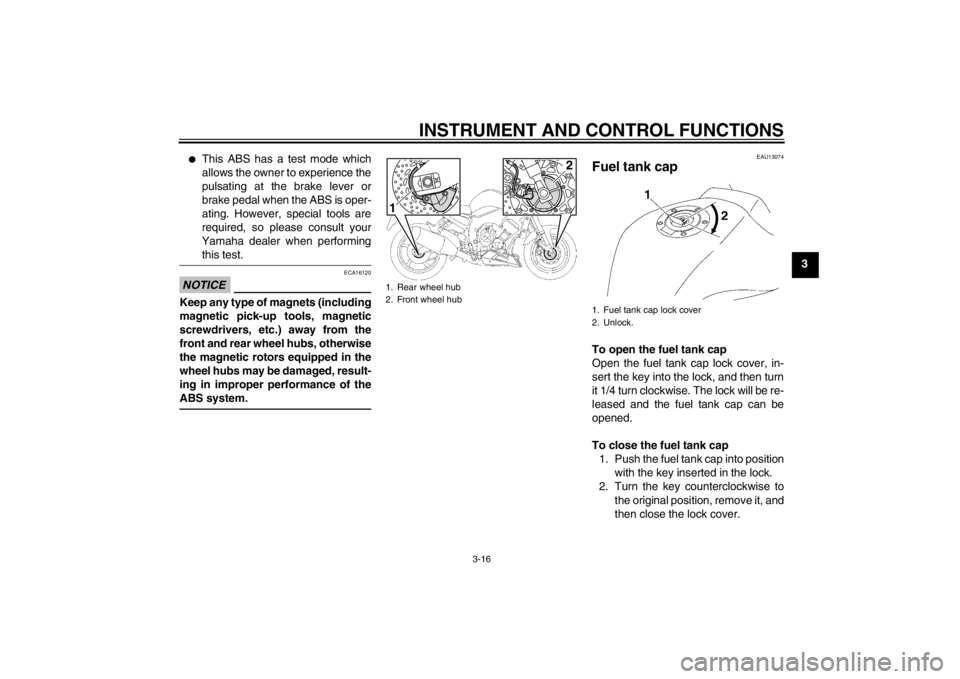
EAU13074
Fuel tank cap To open the fuel tank cap
Open the fuel tank cap lock cover, in-
sert the key into the lock, and then turn
it 1/4 turn clockwise. The lock will be re-
leased and the fuel tank cap can be
opened.
To close the fuel tank cap 1. Push the fuel tank cap into position with the key inserted in the lock.
2. Turn the key counterclockwise to the original position, remove it, and
then close the lock cover.
1. Rear wheel hub
2. Front wheel hub
2
1
1. Fuel tank cap lock cover
2. Unlock.
U1ECE1E0.book Page 16 Monday, August 8, 2011 11:52 AM
Page 32 of 106

INSTRUMENT AND CONTROL FUNCTIONS
3-17
3
TIPThe fuel tank cap cannot be closed un-
less the key is in the lock. In addition,
the key cannot be removed if the cap is
not properly closed and locked.
WARNING
EWA11091
Make sure that the fuel tank cap is
properly closed after filling fuel.
Leaking fuel is a fire hazard.
EAU13221
Fuel Make sure there is sufficient gasoline in
the tank.
WARNING
EWA10881
Gasoline and gasoline vapors are
extremely flammable. To avoid fires
and explosions and to reduce the
risk of injury when refueling, follow
these instructions.1. Before refueling, turn off the en-gine and be sure that no one is sit-
ting on the vehicle. Never refuel
while smoking, or while in the vi-
cinity of sparks, open flames, or
other sources of ignition such as
the pilot lights of water heaters and
clothes dryers.
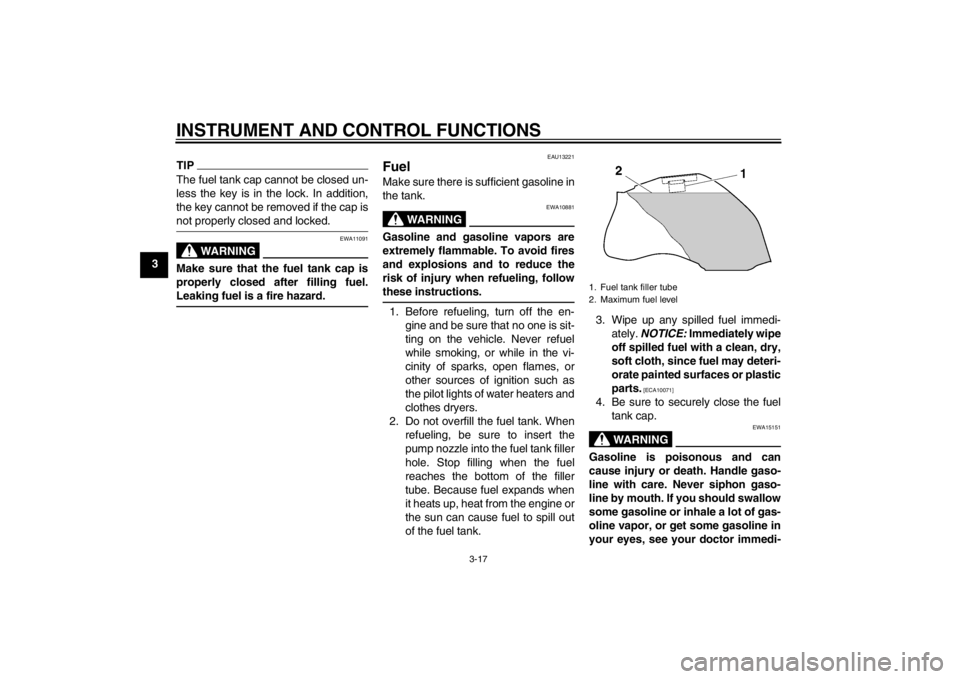
2. Do not overfill the fuel tank. When refueling, be sure to insert the
pump nozzle into the fuel tank filler
hole. Stop filling when the fuel
reaches the bottom of the filler
tube. Because fuel expands when
it heats up, heat from the engine or
the sun can cause fuel to spill out
of the fuel tank. 3. Wipe up any spilled fuel immedi-
ately. NOTICE: Immediately wipe
off spilled fuel with a clean, dry,
soft cloth, since fuel may deteri-
orate painted surfaces or plastic
parts.
[ECA10071]
4. Be sure to securely close the fuel tank cap.
WARNING
EWA15151
Gasoline is poisonous and can
cause injury or death. Handle gaso-
line with care. Never siphon gaso-
line by mouth. If you should swallow
some gasoline or inhale a lot of gas-
oline vapor, or get some gasoline in
your eyes, see your doctor immedi-1. Fuel tank filler tube
2. Maximum fuel level
U1ECE1E0.book Page 17 Monday, August 8, 2011 11:52 AM