Page 154 of 400

04 Comfort and driving pleasure
Climate control
04
152* Option/accessory, for more information, see Introduction.
General
Climate controlThe car is equipped with electronic climate
control. The climate control system cools or
heats as well as dehumidifies the air in the pas-
senger compartment.
NOTE
The air conditioning system (AC) can be
switched off, but to ensure the best possible
climate comfort in the passenger compart-
ment and to prevent the windows from mist-
ing, it should always be on.
Actual temperatureThe temperature you select corresponds to the
physical experience with reference to factors
such as air speed, humidity and solar radiation
etc. in and around the car.
The system includes a sun sensor
1 which
detects on which side the sun is shining into
the passenger compartment. This means that
the temperature can differ between the right
and left-hand air vents despite the controls
being set for the same temperature on both
sides.
Sensor location
•The sun sensor1 is located on the top side
of the dashboard.
•The temperature sensor for the passenger
compartment is located below the climate
control panel.
•The outside temperature sensor is located
on the door mirror.
•The humidity sensor* is located by the inte-
rior rearview mirror.
NOTE
Do not cover or block the sensors with
clothing or other objects.
Side windows and sunroof*To ensure that the air conditioning works opti-
mally, the side windows, and sunroof* if speci-
fied, should be closed.
Misting windowsRemove misting on the insides of the windows
by primarily using the defroster function.
To reduce the risk of misting, keep the win-
dows clean and use window cleaner.
Temporary shut-off of the air
conditioning
When the engine requires full power, e.g. for full
acceleration or driving uphill with a trailer, the
air conditioning can be temporarily switched
off. There may then be a temporary increase in
temperature in the passenger compartment.
CondensationIn warm weather, condensation from the air
conditioning may drip under the car. This is
normal.
Ice and snowRemove ice and snow from the climate control
system air intake (the grille between the bonnet
and the windscreen).
Fault tracing and repairEngage a workshop that has authorisation for
the fault tracing and repair of the climate con-
trol system. Volvo recommends that you con-
tact an authorised Volvo workshop.
RefrigerantThe air conditioning system contains a refrig-
erant. This refrigerant contains no chlorine,
which means that it is harmless to the ozone
layer. Engage a workshop that has authorisa-
tion for filling/changing refrigerant to carry out
1Only applies to ECC.
ProCarManuals.com
Page 157 of 400
04 Comfort and driving pleasure
Climate control
04
��
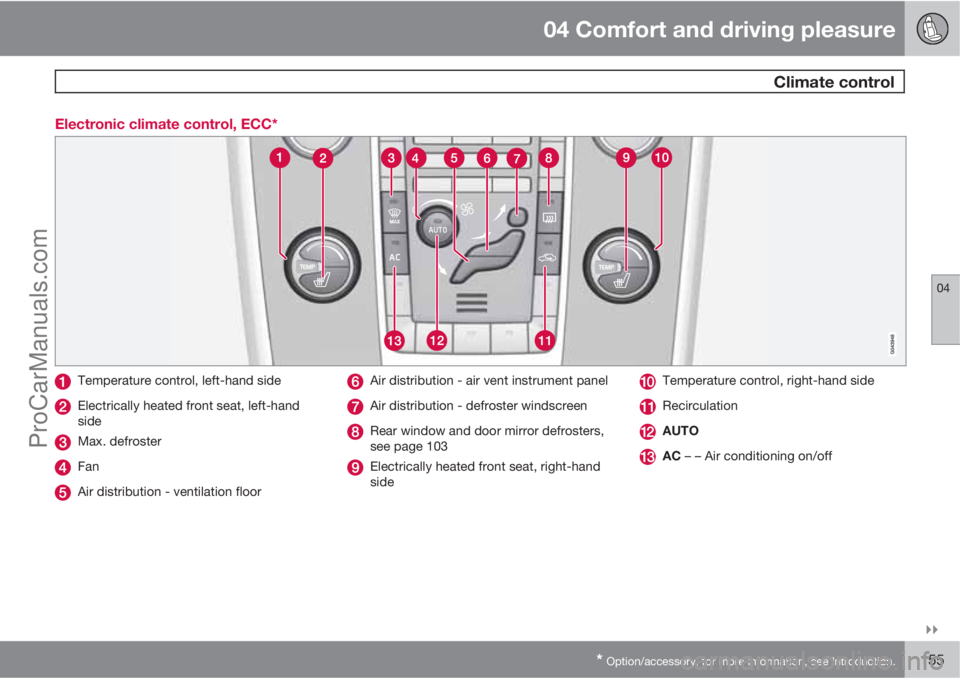
* Option/accessory, for more information, see Introduction.155 Electronic climate control, ECC*
Temperature control, left-hand side
Electrically heated front seat, left-hand
side
Max. defroster
Fan
Air distribution - ventilation floor
Air distribution - air vent instrument panel
Air distribution - defroster windscreen
Rear window and door mirror defrosters,
see page 103
Electrically heated front seat, right-hand
side
Temperature control, right-hand side
Recirculation
AUTO
AC – – Air conditioning on/off
ProCarManuals.com
Page 158 of 400
04 Comfort and driving pleasure
Climate control
04
156
Electronic Temperature Control, ETC
Fan
Electrically heated front seat, left-hand
side
AC – – Air conditioning on/off
Max. defroster
Air distribution - ventilation floor
Air distribution - air vent instrument panel
Air distribution - defroster windscreen
Rear window and door mirror defrosters,
see page 103
Recirculation
Electrically heated front seat, right-hand
side
Temperature control
ProCarManuals.com
Page 211 of 400

04 Comfort and driving pleasure
Park assist camera*
04
* Option/accessory, for more information, see Introduction.209
Light conditionsThe camera image is adjusted automatically
according to prevailing light conditions.
Because of this, the image may vary slightly in
brightness and quality. Poor light conditions
can result in a slightly reduced image quality.
NOTE
Keep camera lenses clear of dirt, snow and
ice to ensure the best possible function.
This is particularly important in poor light.
Park assist lines
Examples of how the park assist lines can be dis-
played for the driver.
The lines on the screen are projected as if they
were at ground level behind the car and are
directly related to steering wheel movement,which shows the driver the path the car will
take, even when turning.
NOTE
•When reversing with a trailer which is
not connected electrically to the car, the
lines on the display show the route the
car will take - not the trailer.
•The screen shows no lines when a trailer
is connected electrically to the car's
electrical system.
•The parking camera is deactivated
automatically when towing a trailer if a
Volvo genuine trailer cable is used.
IMPORTANT
Bear in mind that the screen only shows the
area behind the car - pay attention to the
sides and front of the car when manoeuvring
during reversing.
Boundary lines
The system's lines.
Boundary line, 30 cm zone backwards
from the car
Boundary line, free reversing zone
"Wheel tracks"
The unbroken line (1) frames in a zone that is
within about 30 cm from the bumper.
The dashed line (2) frames in a zone up to
about 1.5 m back from the bumper. It is also
the limit of the car's most protruding parts,
such as door mirrors and corners - also during
turning.
The wide "wheel tracks" (3) between the side
lines indicate where the wheels will roll and can
extend about 3.2 m back from the bumper if no
obstacle is in the way.
ProCarManuals.com
Page 213 of 400

04 Comfort and driving pleasure
BLIS* – Blind Spot Information System
04
* Option/accessory, for more information, see Introduction.211 General information on BLIS
G021426
BLIS camera1
Indicator lamp
BLIS symbol
BLIS is an information system based on cam-
era technology that under certain conditions
can help the driver to notice vehicles moving in
the same direction as the host vehicle in the so-
called "blind spot".
WARNING
The system is a supplement to, not a
replacement for, a safe driving style and use
of the rearview mirrors. It can never replace
the driver's attention and responsibility. The
responsibility for changing lanes safely
always rests with the driver.
The system is designed to work most effec-
tively when driving in dense traffic on multi-lane
highways.
When a camera (1) has detected a vehicle
inside the blind spot zone the indicator lamp (2)
illuminates with a constant glow.
NOTE
The lamp illuminates on the side of the car
where the system has detected the vehicle.
If the car is overtaken on both sides at the
same time then both lamps illuminate.
BLIS advises the driver with a message if a fault
arises in the system. If for example the sys-
tem's cameras are obscured then the BLIS
indicator lamp flashes and a message is shown
on the information display. In such cases,
check and clean the lenses.If necessary, the system can be switched off
temporarily, see the section "Activate/deacti-
vate".
Blind spots
A = approx. 9.5 m and B = approx. 3.0 m.
1NOTE: The illustration is schematic - details may vary depending on car model.
ProCarManuals.com
Page 219 of 400

04 Comfort and driving pleasure
Comfort inside the passenger compartment
04
* Option/accessory, for more information, see Introduction.217 Vanity mirror
G021438
Vanity mirror with lighting.
The light illuminates automatically when the
cover is lifted.
12 V socket
12 V socket in tunnel console, front seat.
The electrical socket can be used for various
accessories designed for 12 V, e.g. TV screens,
music players and mobile phones. For the
socket to supply current, the remote control
key must be in at least key position I, see
page 80.
IMPORTANT
Max. socket is 10 A (120 W) if one socket is
used at a time. If both sockets are used
simultaneously, 7.5 A (90 W) per socket is
applicable.
WARNING
Always leave the plug in the socket when
the socket is not in use.
NOTE
Optional equipment and accessories - e.g.
TV screens, music players and mobile
phones - which are connected to one of the
passenger compartment's 12V electrical
sockets, could be activated by the climate
control system, even when the remote con-
trol key has been removed or when the car
is locked, for example, when the parking
heater is activated at a preset time.
For this reason remove the plugs from the
electrical sockets for optional equipment or
accessories when not in use because the
battery could be drained in the event of such
an occurrence!
Electrical socket in cargo area*For more information, see page 279.
ProCarManuals.com
Page 321 of 400

08 Maintenance and service
Lamps
08
319 General
All bulbs are specified, see page 324. The fol-
lowing list contains locations of bulbs and
other light sources that are specialised or
unsuitable for changing except at a workshop:
•Active Xenon headlamps - ABL (Xenon
lamps)
•Direction indicators, door mirrors
•Approach lighting, door mirrors
•Courtesy lighting
•Glovebox lighting
•General interior lighting in the roof
•Reading lamps
•Side position, position lamps rear
•Brake light
•LED lights, general
WARNING
On cars with Xenon headlamps, the
replacement of Xenon lamps must be car-
ried out at a workshop - an authorised Volvo
workshop is recommended. Working with
Xenon lamps demands extreme caution
because the headlamp is equipped with a
high voltage unit.
IMPORTANT
Never touch the glass part of the bulbs with
your fingers. Grease and oils from your fin-
gers are vaporised by the heat, coating the
reflector and then causing damage.
Headlamps front
All of the headlamp bulbs are replaced via the
engine compartment. Loosen and remove the
whole headlamp.
WARNING
The remote control key must not be turned
to key position I or II during bulb replace-
ment.
See the section "Key positions" - for a
description of the remote control key's 3 key
positions.
Removing the headlamp1. Make sure the remote control key is in key
position 0, see page 80:
2. (First illustration)
ProCarManuals.com
Page 325 of 400
08 Maintenance and service
Lamps
08
��
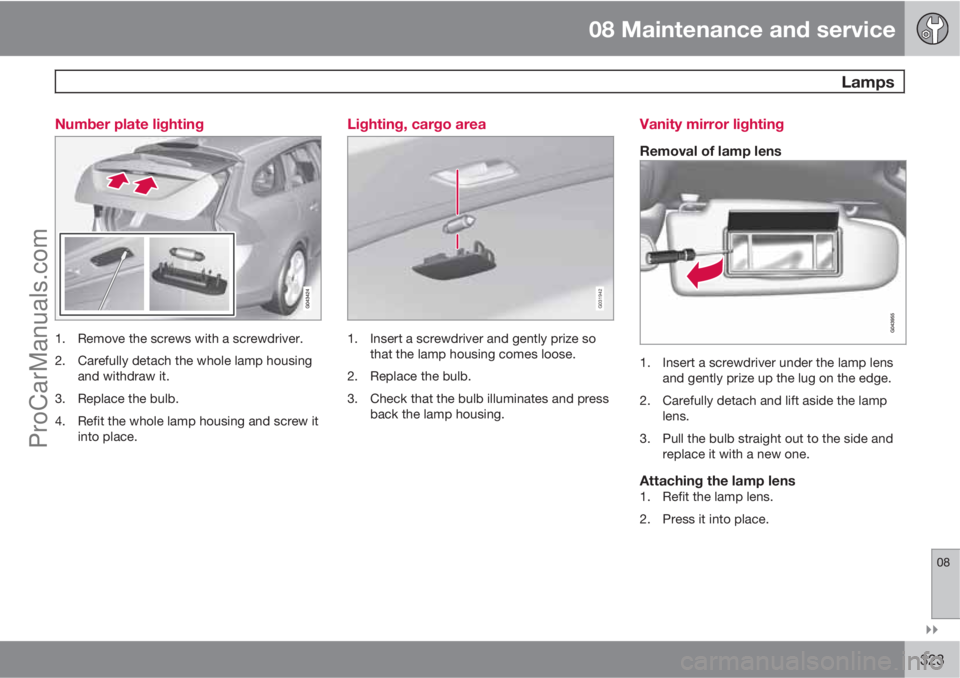
323 Number plate lighting
1. Remove the screws with a screwdriver.
2. Carefully detach the whole lamp housing
and withdraw it.
3. Replace the bulb.
4. Refit the whole lamp housing and screw it
into place.
Lighting, cargo area
G031942
1. Insert a screwdriver and gently prize so
that the lamp housing comes loose.
2. Replace the bulb.
3. Check that the bulb illuminates and press
back the lamp housing.
Vanity mirror lighting
Removal of lamp lens
1. Insert a screwdriver under the lamp lens
and gently prize up the lug on the edge.
2. Carefully detach and lift aside the lamp
lens.
3. Pull the bulb straight out to the side and
replace it with a new one.
Attaching the lamp lens1. Refit the lamp lens.
2. Press it into place.
ProCarManuals.com