2012 VOLKSWAGEN TRANSPORTER fuel filler
[x] Cancel search: fuel fillerPage 237 of 486
• Keep the knob pressed in for approx. 15 sec-onds to temporarily bridge the igniter safety device. If you let go of the knob too quickly, the gas flame goes out. If this occurs, re-light the burner as de-scribed above.
• Release the regulating knob and adjust the gas flame as required.
Turning off the gas flame
• Turn the appropriate knob@ fully clockwise to turn off the gas flame.
• Close the gas shut-off valve in the kitchen unit.
• Close the safety valve on the gas bottle.
• Remove all objects from the gas cooker and al-low the cooker to cool fully.
• Place the backrest of the left front seat in an upright position or turn the left front seat so that you can close the kitchen unit's cover plate.
• Lower the kitchen unit cover plate and latch it securely. <1
Water supply and disposal, California
n::n Introduction
This chapter contains information on the following subjects:
Fresh water system . . . . . . . . . . . . . . . . . . . . . . 238
Sterilising agent . . . . . . . . . . . . . . . . • . . . . . . . . 239
Cleaning the fresh water tank . . . . . . . . . . . . . 239 Waste water tank . . . . . . . . . . . . . . . . . . . . . . . . 240
Turning the water on and off . . . . . . . . . . . . . . 240
Cleaning the drain . . . . . . . . . . . . . . . . . . . . . . . 241
Additional information:
• Central control panel 204
• Rectifying faults on the camping equipment 254
• Fuses for the camping equipment 249
• Winter conditions 253
• Filling the tank 340
A WARNING
Improper use of the fresh water system can lead to poisoning and illness.
• The fresh water tank should only be filled with drinking water from the public water supply.
• Never fill the fresh water tank from springs or streams. Such water could be con-taminated or contain debris.
• Never use commercially available house-hold cleaners to clean the fresh water tank.
• Never leave water in the fresh water tank for long periods without replacing it with fresh water.
,A WARNING (Continued)
• Drain the fresh water system completely when it will not be used for a long time.
A WARNING
Both the fresh water tank and the waste water tank drain out underneath the vehicle. In very cold conditions this poses a danger from the formation of ice.
• Be especially careful when fresh or waste water are drained during freezing or very cold weather.
CD
In very cold weather the fresh and waste water systems should be emptied to prevent them from becoming damaged if the vehicle is not to be kept heated continuously or Is only to be used for short periods.
CD
Do not allow the water pump to run dry as this will damage the pump.
• Only switch on the water pump when there Is water in the fresh water tank.
m if you do not use the sink for a long period' it L.:!J should be kept dry and free of salt.
m Never confuse the fresh water tank filler neck L.:!J with the fuel tank filler neck. <1
Equipment, California 237
Page 340 of 486
At the filling station
Filling the tank
o:n Introduction
This chapter contains information on the following subjects:
Indicator lamps and fuel gauge . . . . . . . . . . . . 341
Filling the tank with petrol or diesel . . . . . . . . . 342
Capacities . . . . . . . . . . . 343
Checks when filling the tank . . . . . . . . . . . . . . . 343
The fuel cap is located at the left-hand side of the vehicle.
Additional information and warnings:
• Exterior views 5
• Fuel 343
• Preparation for working in the engine ccmpart-ment page 350
A WARNING
Filling the tank incorrectly and incorrect han-dling of fuel can cause explosions, fire, seri-ous burns and other injuries.
• Always ensure that the tank cap is proper-ly closed, to prevent the evaporation and spillage of fuel.
• Fuel is highly explosive and inflammable and can cause serious burns and other inju-ries.
• Fuel can spill out if the engine is not switched off or the filler nozzle is not fully in-serted into the fuel filler neck when filling the tank. This could cause fire, explosions, seri-ous burns and other Injuries.
• When refilling with fuel, the engine , sup-plementary heating system(=> page 332) and the ignition must be switched off for security reasons.
• When filling the tank, always switch off your mobile telephone and two-way radio or any other radio equipment. Electromagnetic radiation can generate sparks which can in turn start a fire.
• Never get back into the vehicle while fill-ing the tank. If in exceptional cases you have to enter the vehicle, close the door and touch a metal object before touching the filler noz-zle again. This will remove any electrostatic
340 I While driving
A WARNING (Continued)
charge from you. Failure to do so could gen-erate a spark. Sparks can cause a fire when filling the tank.
• Never refuel or fill a spare canister near open flames, sparks or smouldering Items, e.g. cigarettes.
• Electrostatic discharge and electromag-netic radiation must be avoided when filling the tank.
• Follow all applicable safety information provided by the filling station when filling the tank.
• Never spill fuel in the vehicle or In the lug-gage compartment
A WARNING
For safety reasons, Volkswagen Commercial Vehicles does not recommend carrying a spare fuel canister In the vehicle. Fuel can spill out of the full or empty canister and catch fire, especially In the event of an acci-dent. This could cause explosions, fire and injuries.
• If, In exceptional circumstances, you have to transport a spare fuel canister, please note the following:
-When refilling never place the canister In or on top of the vehicle, for example In the luggage compartment or on the tall-gate. There may be an electrostatic charge during refilling causing the fuel fumes to Ignite.
-Always place the spare fuel canister on the ground.
-When filling a spare fuel canister, place the filler nozzle as far as possible Into the filler opening.
-If the spare fuel canister Is made of met-al, the filler nozzle must have constant contact with the canister In order to avoid static charging.
-Please follow all legislation concerning the use, stowage and transport of a spare fuel canister.
Page 342 of 486
A WARNING_tContlnued)
• The power steering, all driver assist sys-tems and brake assist systems will not func-tion if the engine "sputters" or stops com-pletely due to a lack of fuel or Irregular fuel supply.
• Always fill the tank when it is stlll1/4 full. This reduces the risk of running out of fuel and breaking down.
Filling the tank with petrol or diesel
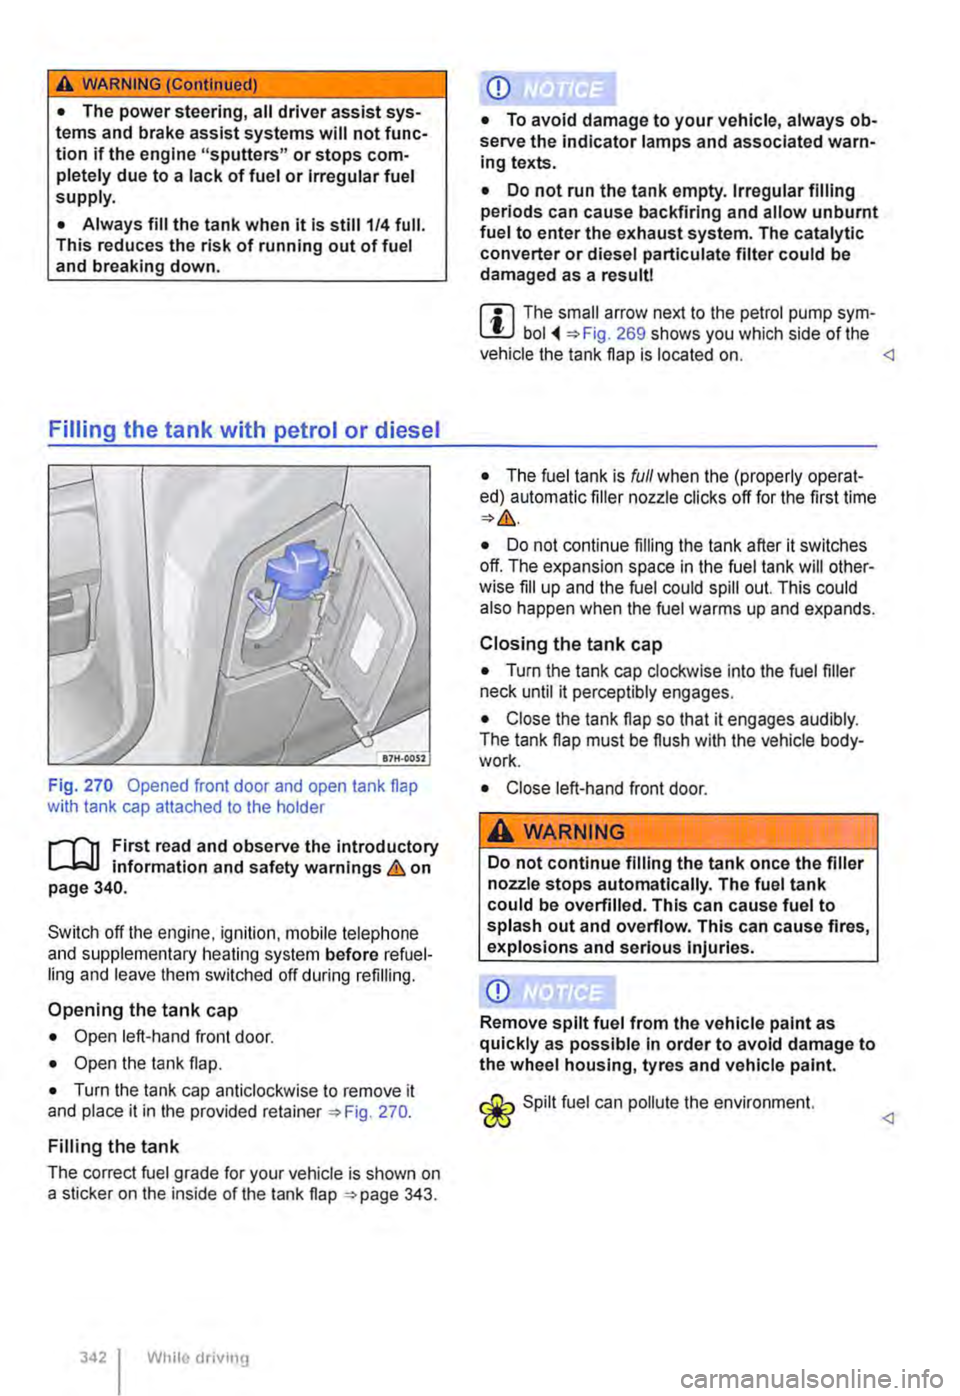
Fig. 270 Opened front door and open tank flap with tank cap attached to the holder
r--f"'n First read and observe the introductory L-.1=.1.1 information and safety warnings & on page 340.
Switch off the engine, ignilion. mobile lelephone and supplementary heating system before refuel-ling and leave them switched off during refilling.
Opening the tank cap
• Open left-hand front door.
• Open the lank flap.
• Turn the tank cap anticlockwise to remove it and place it in the provided retainer 270.
Filling the tank
The correct fuel grade for your vehicle is shown on a sticker on the inside of the tank flap 343.
While driv111g
Q)
• To avoid damage to your vehicle, always ob-serve the indicator lamps and associated warn-ing texts.
• Do not run the tank empty. Irregular filling periods can cause backfiring and allow unburnt fuel to enter the exhaust system. The catalytic converter or diesel partlculate filter could be damaged as a result!
m The small arrow next to the petrol pump sym-L!J bol 269 shows you which side of the vehicle the tank flap is located on.
• The fuel tank is full when the (properly operat-ed) automatic filler nozzle clicks off for the first time
• Do not continue filling the tank after it switches off. The expansion space in the fuel tank will other-wise fill up and the fuel could spill out. This could also happen when the fuel warms up and expands.
Closing the tank cap
• Turn the tank cap clockwise into the fuel filler neck until it perceptibly engages.
• Close the tank flap so that it engages audibly. The tank flap must be flush with the vehicle body-work.
• Close left-hand front door.
A WARNING
Do not continue filling the tank once the filler nozzle stops automatically. The fuel tank could be overfilled. This can cause fuel to splash out and overflow. This can cause fires, explosions and serious Injuries.
Q)
Remove spilt fuel from the vehicle paint as quickly as possible in order to avoid damage to the wheel housing, tyres and vehicle paint.
Spilt fuel can pollute lhe environment.
Page 346 of 486
CD
• Your vehicle is not suitable for use with bio-diesel and must not be filled up or driven with biodiesel. Failure to observe this point can re-sult in damage to the fuel system and engine.
• Some diesel manufacturers blend biodiesel with diesel fuel in compliance with European Standard 590 or an equivalent standard (in Ger-many). Use of this diesel is allowed and will not damage the engine or fuel system.
• The diesel engine has been developed for use with diesel only. For this reason, petrol, heating oil or other unsuitable fuels may not be used. These fuels can cause serious damage to the fuel system and engine.
CD
• The service life of the diesel particulate filter can be reduced considerably if diesels with a high sulphur content are used. A Voikswagen Commercial Vehicles dealership will be able to tell you which countries have diesel with a high sulphur content.
o:::n Introduction
This chapter contains information on the following subjects:
Warning and indicator lamps Refilling Ad Blue® ... 347
348
SCR catalysts can be used to reduce emissions from diesel engines (SCR = Selective Catalytic Re-duction). The SCR catalyst uses Ad Blue® urea sol-ution to convert nitrogen oxides into nitrogen and water.
If the vehicle is equipped with this kind of emission control system for diesel vehicles, the filler neck for the Ad Blue® tank is located below the filler cap for the fuel tank.
The Ad Blue® level should be checked within the scope of the service work Service schedule.
Information on AdBiue®
The Ad Blue® consumption figures depend on the individual driving style, the system's operating tem-perature and the ambient temperature that the ve-hicle is operated in.
The vehicle is fitted with a separate tank for Ad Bl-ue®. The Ad Blue® tank holds approximately 13 li-tres. For technical reasons, the capacity may be slightly larger when refilling using refill bottles.
The Ad Blue® tank must never run empty. As of a remaining distance of approximately 2,400 km. the instrument cluster display will indicate that the
346 While drivmg
Ad Blue® must be refilled 348. If the re-maining range is 0 km, the engine cannot be star-ted anymore 347.
The Ad Blue® trademark is held by the German As-sociation of the Automobile Industry (VDA) in the USA, Germany, the European Union and other countries.
Additional information and warnings:
• Fuel 343
• Accessories, modifications, repairs and renewal of parts 394
A WARNING
If the AdBiue® level is too low, the vehicle cannot be restarted after the Ignition has been switched off. Starting with jump leads is also not possible.
• Refill AdBiue® at the latest when the re-maining distance reaches approximately 1,000 km.
• Never allow the Ad Blue® tank to run emp-ty.
A WARNING
Ad Blue® is an Irritant and corrosive fluid that can damage the skin, eyes and breathing passages upon contact.
Page 348 of 486
![VOLKSWAGEN TRANSPORTER 2012 Owners Manual Refilling AdBiue®
Fig. 271 Behind the tank flap: filler cap of the Ad Blue tank unscrewed [A CD and attached in holder [[ ®. Fill the Ad Blue tank using a filler bottle [B@ or a filler nozzle C] @.](/manual-img/18/55785/w960_55785-347.png "VOLKSWAGEN TRANSPORTER 2012 Owners Manual Refilling AdBiue®
Fig. 271 Behind the tank flap: filler cap of the Ad Blue tank unscrewed [A CD and attached in holder [[ ®. Fill the Ad Blue tank using a filler bottle [B@ or a filler nozzle C] @.")
Refilling AdBiue®
Fig. 271 Behind the tank flap: filler cap of the Ad Blue tank unscrewed [A CD and attached in holder [[ ®. Fill the Ad Blue tank using a filler bottle [B@ or a filler nozzle C] @.
,....-.('n First read and observe the Introductory 1.-J=,U Information and safety warnings & on page 346.
To refill with Ad Blue®, park the vehicle on a level surface and not on any kind of incline. The tank level gauge may not detect the refill quantity cor-rectly if the vehicle is not parked on a level surface.
Do not fill fuel and AdBiue® at the same lime.
If a message about the Ad Blue® level appears on the instrument cluster display, refill with at least 7 litres of Ad Blue®. A smaller amount of refill is insufficient. if no message about the AdBiue® level appears on the instrument cluster display, use any quantity to refill the tank to the maximum level.
Opening the tank filler neck
• Opening the tank flap.
• Unscrew the cap of the tank filler neck =>Fig. 271 anticlockwise.
• Fit the cap of the filler neck into the holder]) @.
Use only Ad Blue® that complies with the stand-ard ISO 22241-1.
Refilling using a refill bottle
• Please read the manufacturer's notes and infor-mation on the refill bottle.
• Observe the expiry date.
• Remove the screw top of the refill bottle.
• Place the neck of the refill bottle =>Fig. 271 [ID @ vertically onto the tank filler neck and turn it clockwise hand-tight.
• Push the refill bottle towards the filler neck, press and hold down.
348 While driving
• Wait until the contents of the refill bottle have entered the Ad Blue® tank. Do not crumple up or damage the refill bottle!
• Unscrew the refill bottle anticlockwise and lift it carefully up and out =>CD.
• When the Ad Blue® tank is full, Ad Blue® will no longer flow out of the bottle and into the tank.
Refilling using a filler bottle
• Please read the manufacturer's notes and infor-mation on the container.
• Observe the expiry date.
• Use the integrated spout.
• Refill at least 7 litres of AdBiue®. A smaller amount of refill is insufficient.
• Do overfill the tank. The Ad Blue® tank is com-pletely filled when Ad Blue® reaches the top level of tank filler neck.
Refilling using a filler nozzle
• The procedure for refilling with an Ad Blue® filler nozzle =>Fig. 271 @]@) is the same as for refilling the fuel tank with fuel =>CD.
• The Ad Blue® tank is full as soon as the (proper-ly operated) filler nozzle clicks off for the first time =>CD.
Closing the tank filler neck
• Screw the cap onto the tank filler neck =>Fig. 271 clockwise until it clicks into place.
• Close the tank flap.
Page 357 of 486
A WARNING (Continued)
• If engine oil is spilt on cold engine parts it can heat up and Ignite when the engine Is running.
• Always ensure that the engine oil filler cap Is securely tightened after refilling, and that the dipstick Is properly Inserted back Into the guide tube. This will prevent the engine oil from draining out on to hot engine compo-nents when the engine Is running.
CD
• Do not start the engine if the engine oil level Is above area@. Seek expert assistance. The catalytic converter and the engine could other-wise be damaged.
• When refilling or changing service fluids, please ensure that the correct fluids are added through the correct openings. Incorrect service fluids can cause serious functional problems and engine damage.
Engine oil consumption
n"'n First read and observe the introductory l.-J,:.ll information and safety warnings & on page 353.
Engine oil consumption can vary from engine to engine and can change during the working life of an engine.
The vehicle may consume up to 1.0 litre of engine oil per 2,000 km, depending on how you drive and the conditions in which the car is used. In new ve-
Changing engine oil
n"'n First read and observe the Introductory l.-J,:.ll Information and safety warnings & on page 353.
The engine oil must be changed regularly in ac-cordance with the data given in the service sched-ule.
The engine oil and filter change should be carried out by a qualified workshop due to the special tools and knowledge required, this also applies to the disposal of used oil. Volkswagen Commercial Vehi-cles recommends using a Volkswagen Commercial Vehicles dealership for this purpose.
The engine oil level must never be above I!!S area @. Otherwise oil can be drawn in through the crankcase breather and escape into the atmosphere via the exhaust system. <1
hicles. consumption is likely to be higher for the first 5,000 km. The engine oil level must therefore be checked at regular intervals, preferably when refuelling and before long journeys.
When the engine is working hard the oil level must be kept within area =>Fig. 274 @,for instance dur-ing long motorway cruising in summer, trailer tow-ing or climbing mountain passes. <1
More details on the service intervals can be found in the service schedule.
Additives in the engine oil can cause new engine oil to discolour quickly. This is normal and does not mean that the engine oil should be changed more frequently.
A WARNING
If, In exceptional cases, you have to carry out an oil change yourself, please note the fol-lowing:
• Always wear eye protection. .,.
In the engine compartment 357
Page 469 of 486
Standards . . . . . . . . . . . . . . . . . . . . . . . . . . 98 Switching off the front passenger front air-bags............................. 93 Weight classes . . . . . . . . . . . . . . . . . . . . . . 98 Chrome ............•................ 385
Cigarette lighter . . . . . . . . . . . . . . . . . . . . . . 163
Circuit breaker . . . . . . . . . . . . . . . . . . . . . . . 247
City Emergency Brake function .......... 311
Cleaning see Vehicle care . . . . . . . . . . . . . . . . . . . . 380
Cleaning the drain . . . . . . . . . . . . . . . . . . . . 241
Cleaning the vehicle interior Cupboards . . . . . . . . . . . . . . . . . . . . . . . . 253 Display of the central control panel, Califor-nia . . . . . . . . . . . . . . . . . . . . . . . . . . . . . 254 Gas cooker . . . . . . . . . . . . . . . . . . . . . . . . 253 Refrigerator box, California . . . . . . . . . . . 242 Sink .....................•....... 253
Climatic see Air condilioning system . . . . . . . . . . . 322
Climatic, California . . . . . . . . . . . . . . . . . . . 250
Climatronic see Air condilioning system . . . . . . . . . . . 322
Cllmatronic, California . . . . . . . . . . . . . . . . 250 Clock ................................ 20
Closing Doors . . . . . . . . . . . . . . . . . . . . . . . . . . . . . 45 Electric sliding door . . . . . . . . . . . . . . . . . . 47 Sliding/tilting roof . . . . . . . . . . . . . . . . . . . . 59 Sliding door . . . . . . . . . . . . . . . . . . . . . . . . 46 Sliding windows . . . . . . . . . . . . . . . . . . . . . 58 Taiigate . . . . . . . . . . . . . . . . . . . . . . . . . . . . 50 Vehicle . . . . . . . . . . . . . • . . . . . . . . . . . 40, 42 Windows ...........•.............. 56 Wing doors . . . . . . . . . . . . . . . . . . . . . . . . . 54
Coasting function . . . . . . . . . . . . . . . . . . . . 266
Cockpit . . . . . . . . . . . . . . . . . . . . . . . . . . . . . . 10 Code number . . . . . . . . . . . . . . . . . . . . . . . . 417
Combined curtain and side alrbags see Airbag system . . . . . . . . . . . . . . . . . . . 94 Coming Home function ................. 112
Communication window ................ 116 Consumables . . . . . . . . . . . . . . . . . . . . . . . . 395
Consumer Information . . . . . . . . . . . . . . . . 404
Controls 2-seat arrangement . . . . . . . . . . . . . . . . . 183
Control units . . . . . . . . . . . . . . . . . . . . . . . . 398 Reprogramming . . . . . . . . . . . . . . . . . . . . 399
Convenience closing Electric windows . . . . . . . . . . . . . . . . . . . . 57 Sliding/tilting roof . . . . . . . . . . . . . . . . . . . . 59
Convenience functions Reprogramming . . . . . . . . . . . . . . . . . . . . 399
Convenience opening Electric windows . . . . . . . . . . . . . . . . . . . . 57
Coolant . . . . . . . . . . . . . . . . . . . . . . . . . . . . . 358 Checking the coolant level . . . . • . . . . . . . 361 Filler opening . . . . . . . . . . . . . . . . . . . . . . 361 G 12 plus-plus . . . . . . . . . . . . . . . . . . . . . 360 Indicator lamp . . . . • . . . . . • . . • . . . . . . . 359 Refilling . . . . . . . . . . . . . . . . . . . . . . . . . . 361 Specification . . . . . . . . . . . . . . . • . . • . . . . 360 Temperature display . . . . . . . . . . . . • . . . . 359 Warning lamp . . . . . . . . . . . . . . . . . . . . . . 359
Cool box . . . . . . . . . . . . . . . . . . . . . . . . . . . . 158 Battery monitor . . . . . . . . . . . . . . . . . . . . . 158 Cleaning . . . . . . . . . . . . . . . . . . . . . . . . . . 393
1W Fitting the adapter plate . . . . . . . . . . . . . . 159 Removing . . . . . . . . . . . . . . . . . . . . . . . . . 159 Removing the adapter plate . . . . . . . . . . . 159 Switching on and off.. . . . . . . . . . . . . . . . 161
Cooling and heating box . . . . . . . . . . . . . . . 158
Countdown timer Programming . . . . . . . . . . . . . . . . . . . . . . 207
Cruise control system . . . . . . . . . . . . . . . . . 295
Cruise control system (CCS) Indicator lamp . . . . . . . . . . . . . . . . . 296 Using . . . . . . . . . . . . . . • . . . . . . . . . 297
Cupboards Cleaning . . . . . . . . . . . . . . . . . . . . . . . . . . 253
Curtain airbags see Airbag system . . . . . . . . . . . . . . . . 94. 95
D
Darkening the interior of the vehicle California . . . . . . . . . . . . . . . . . . . . . . . . . 215 Multivan . . . . . . . . . . . . . . . . . . . . . . . . . . 175
Dash panel . . . . . . . . . . . . . . . . . . . . . . . . . . . 10 Airbag system . . . . . . . . . . . . . . . . . . 87, 392 Cleaning . . . . . . . . . . . . . . . . . . . . . . . . . . 392
Data Link Connector (DLC) . . . . . . . . . . . . . 399 Data recorders . . . . . . . . . . . . . . . . . . . . . . . 398 Daytime running lights . . . . . . . . . . . . . . . . 109
DCC see Adaptive chassis control . . . . . . . . . . 317
De-icing door lock cylinders . . . . . . . 387
Declaration of conformity . . . . . . . . . . 188, 406 Decorative film Caring for . . . . . . . . . . . . . . . . . . . . . . . . . 385 Cleaning . . . . . . . . . . . . . . . . . . . . . . . . . . 385
Default settings of the mobile telephone Rear-seat telephony . . . . . . . . . . . . . . . . . 190
Diagnostic connection . . . . . . . . . . . • . . . . 399 Diesel .............................. 345 Biodiesel . . . . . . . . . . . . . . . . . . . . . . . . . 346 Filling the tank . . . . . . . . . . • . . . . . . . . . . 342 Filter preheater . . . . . . . . . . . . . . . . . . . . . 345 Fuel gauge . . . . . . . . . . . . . . . . . . . . . . . . 341
Index 469