2012 VOLKSWAGEN TRANSPORTER ECU
[x] Cancel search: ECUPage 175 of 486
Equipment, Multivan
Darkening the interior of the vehicle, Multivan
n:n Introduction
This chapter contains information on the following subjects:
Components of the opaque shades kit . . . 175
Assembling opaque shades for the windscreen and the rear window . . . . . . . 176
Fitting opaque shades for the windscreen and the rear window . . . . . . . . . . . . . . . . . . . . . . . . . 177
Fitting the opaque shades to the side windows . . . . . . . . . . . . . . . . . . . . . . . . . . . . . 178
Removing and stowing the opaque shades . . 179
Darkening the interior of the vehicle
The opaque shades kit is supplied in a zippered storage bag, which can be securely stowed in a drawer underneath the 3-seat bench.
Additional information and warnings:
• Windows 36
• Seat functions, front 61
Components of the opaque shades kit
CD
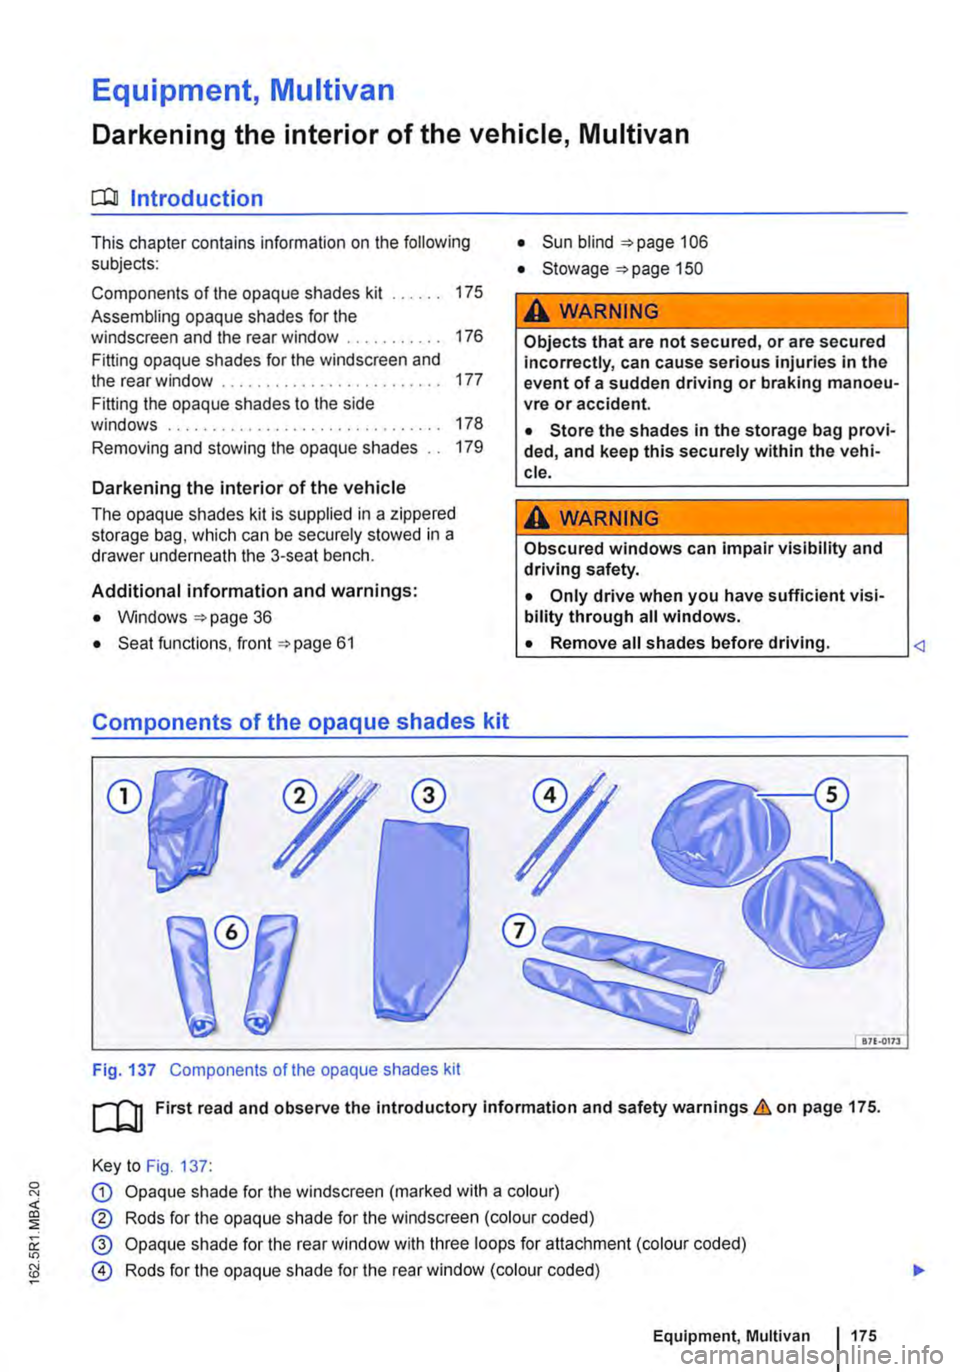
Fig. 137 Components of the opaque shades kit
• Sun blind 106
• Stowage "'page 150
A WARNING
Objects that are not secured, or are secured incorrectly, can cause serious injuries in the event of a sudden driving or braking manoeu-vre or accident.
• Store the shades in the storage bag provi-ded, and keep this securely within the vehi-cle.
A WARNING
Obscured windows can impair visibility and driving safety.
• Only drive when you have sufficient visi-bility through all windows.
L• ___
&71.0173
[QJ First read and observe the introductory information and safety warnings.&. on page 175.
Key to Fig. 137:
G) Opaque shade for the windscreen (marked with a colour)
® Rods for the opaque shade for the windscreen (colour coded)
@ Opaque shade for the rear window with three loops for attachment (colour coded)
@ Rods for the opaque shade for the rear window (colour coded)
Equipment, Multivan 1175
Page 177 of 486
Fitting opaque shades for the windscreen and the rear window
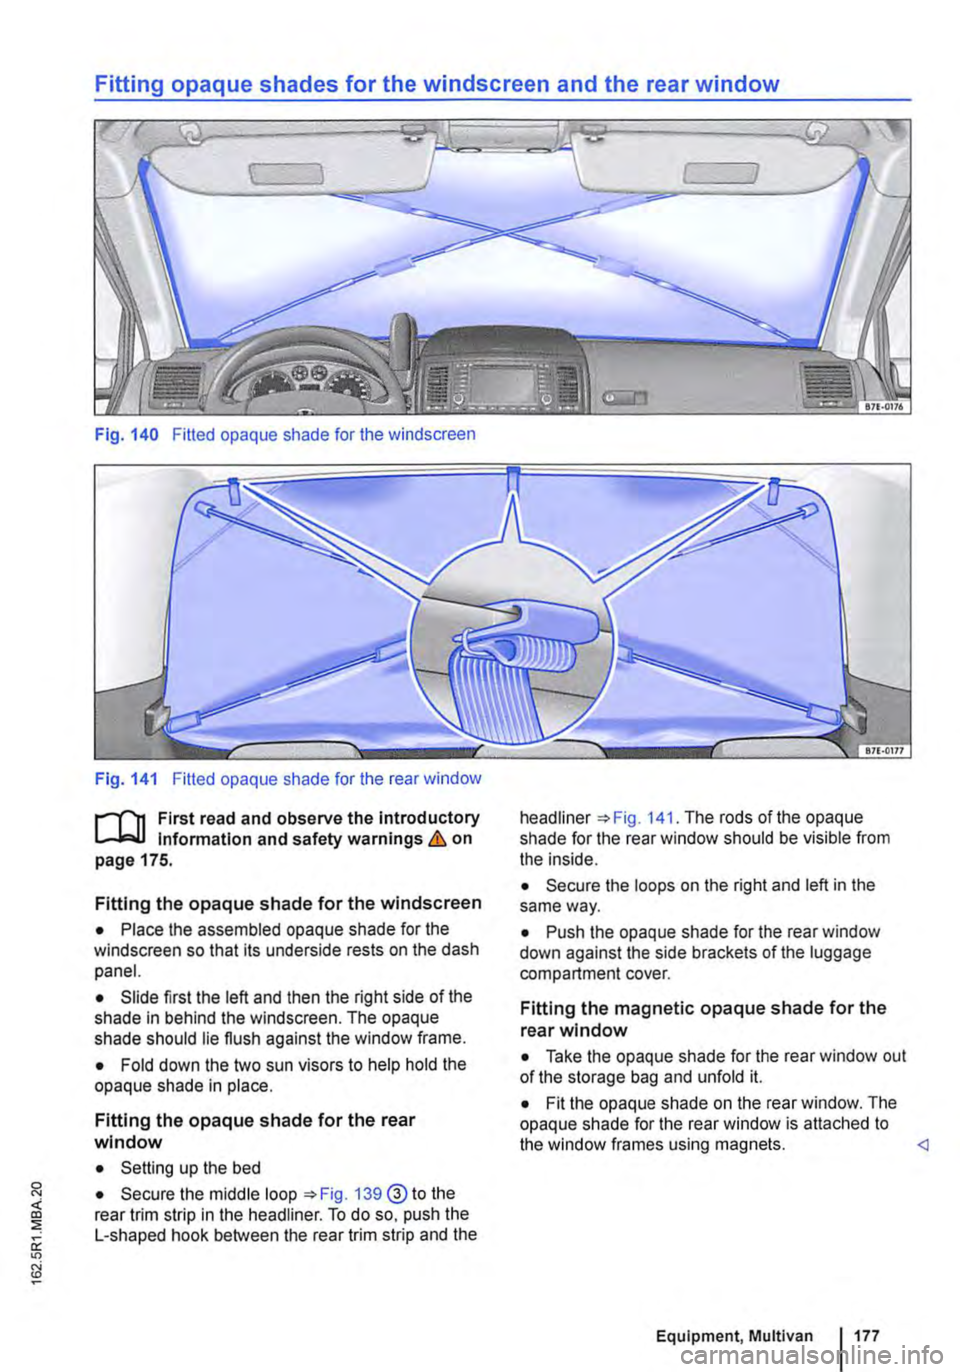
Fig. 140 Fitted opaque shade for the windscreen
Fig. 141 Fitted opaque shade for the rear window
f"""l'"'n First read and observe the introductory Information and safety warnings&. on page 175.
Fitting the opaque shade for the windscreen
• Place the assembled opaque shade for the windscreen so that its underside rests on the dash panel.
• Slide first the left and then the right side of the shade in behind the windscreen. The opaque shade should lie flush against the window frame.
• Fold down the two sun visors to help hold the opaque shade in place.
Fitting the opaque shade for the rear window
• Setting up the bed
• Secure the middle loop 139@ to the rear trim strip in the headliner. To do so, push the L-shaped hook between the rear trim strip and the
headliner The rods of the opaque shade for the rear window should be visible from the inside.
• Secure the loops on the right and left in the same way.
• Push the opaque shade for the rear window down against the side brackets of the luggage compartment cover.
Fitting the magnetic opaque shade for the rear window
• Take the opaque shade for the rear window out of the storage bag and unfold it.
• Fit the opaque shade on the rear window. The opaque shade for the rear window is attached to the window frames using magnets.
Page 178 of 486
Fitting the opaque shades to the side windows
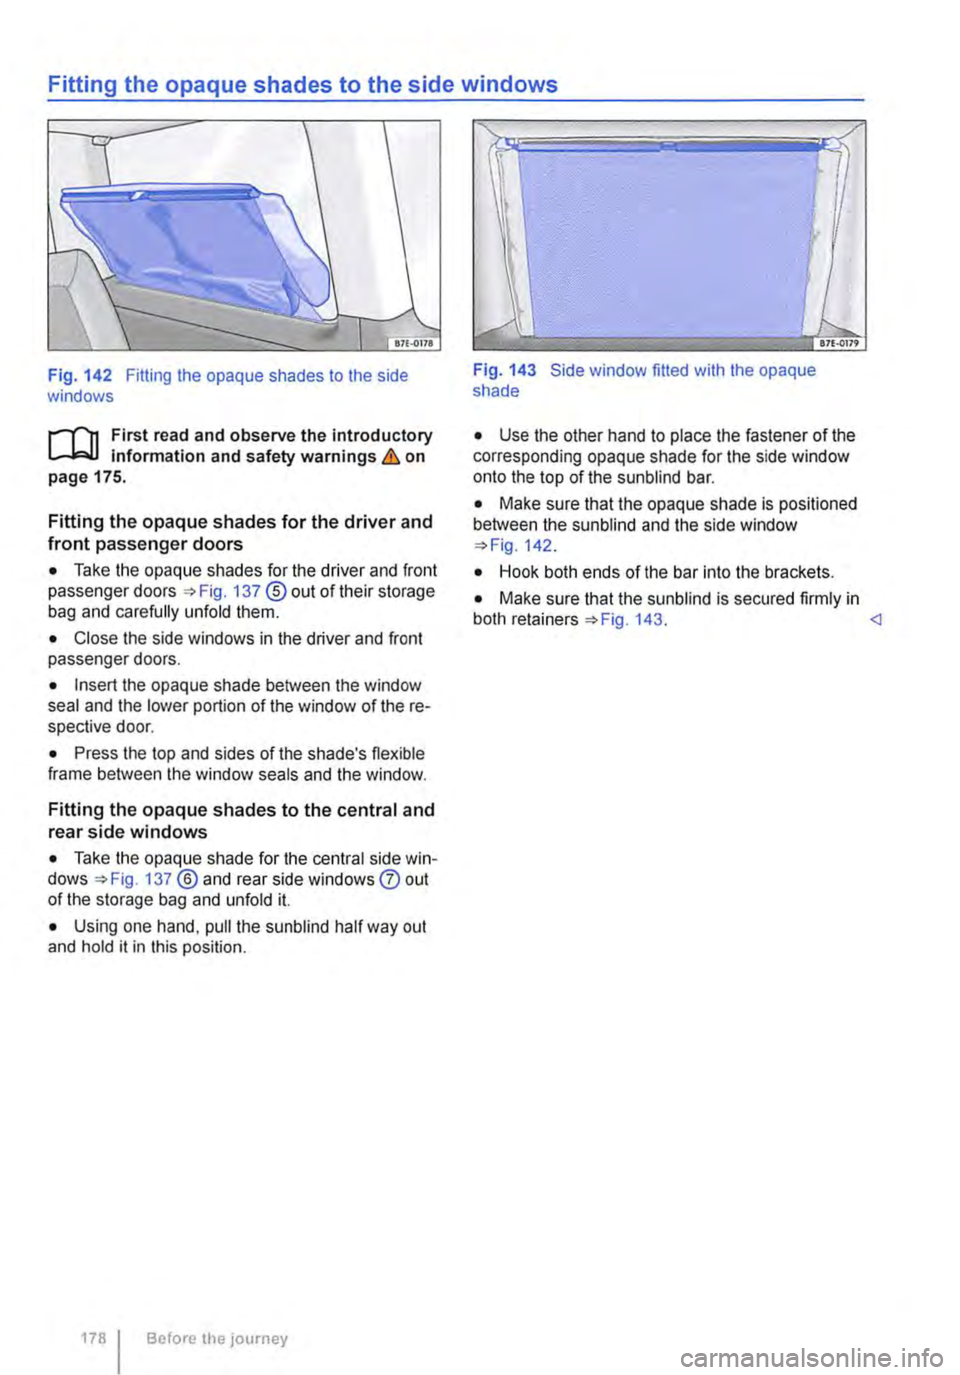
Fig. 142 Fitting the opaque shades to the side windows
rl'"'n First read and observe the introductory L-lc.l.l information and safety warnings & on page 175.
Fitting the opaque shades for the driver and front passenger doors
• Take the opaque shades for the driver and front passenger doors =>Fig. 137 ®out of their storage bag and carefully unfold them.
• Close the side windows in the driver and front passenger doors.
• Insert the opaque shade between the window seal and the lower portion of the window of the re-spective door.
• Press the top and sides of the shade's flexible frame between the window seals and the window.
Fitting the opaque shades to the central and rear side windows
• Take the opaque shade for the central side win-dows =>Fig. 137 ®and rear side windows 0 out of the storage bag and unfold it.
• Using one hand, pull the sunblind half way out and hold it in this position.
178 Before the journey
Fig. 143 Side window fitted with the opaque shade
• Use the other hand to place the fastener of the corresponding opaque shade for the side window onto the top of the sunblind bar.
• Make sure that the opaque shade is positioned between the sun blind and the side window =>Fig. 142.
• Hook both ends of the bar into the brackets.
• Make sure that the sunblind is secured firmly in both retainers=> Fig. 143. <1
Page 179 of 486
Removing and stowing the opaque shades
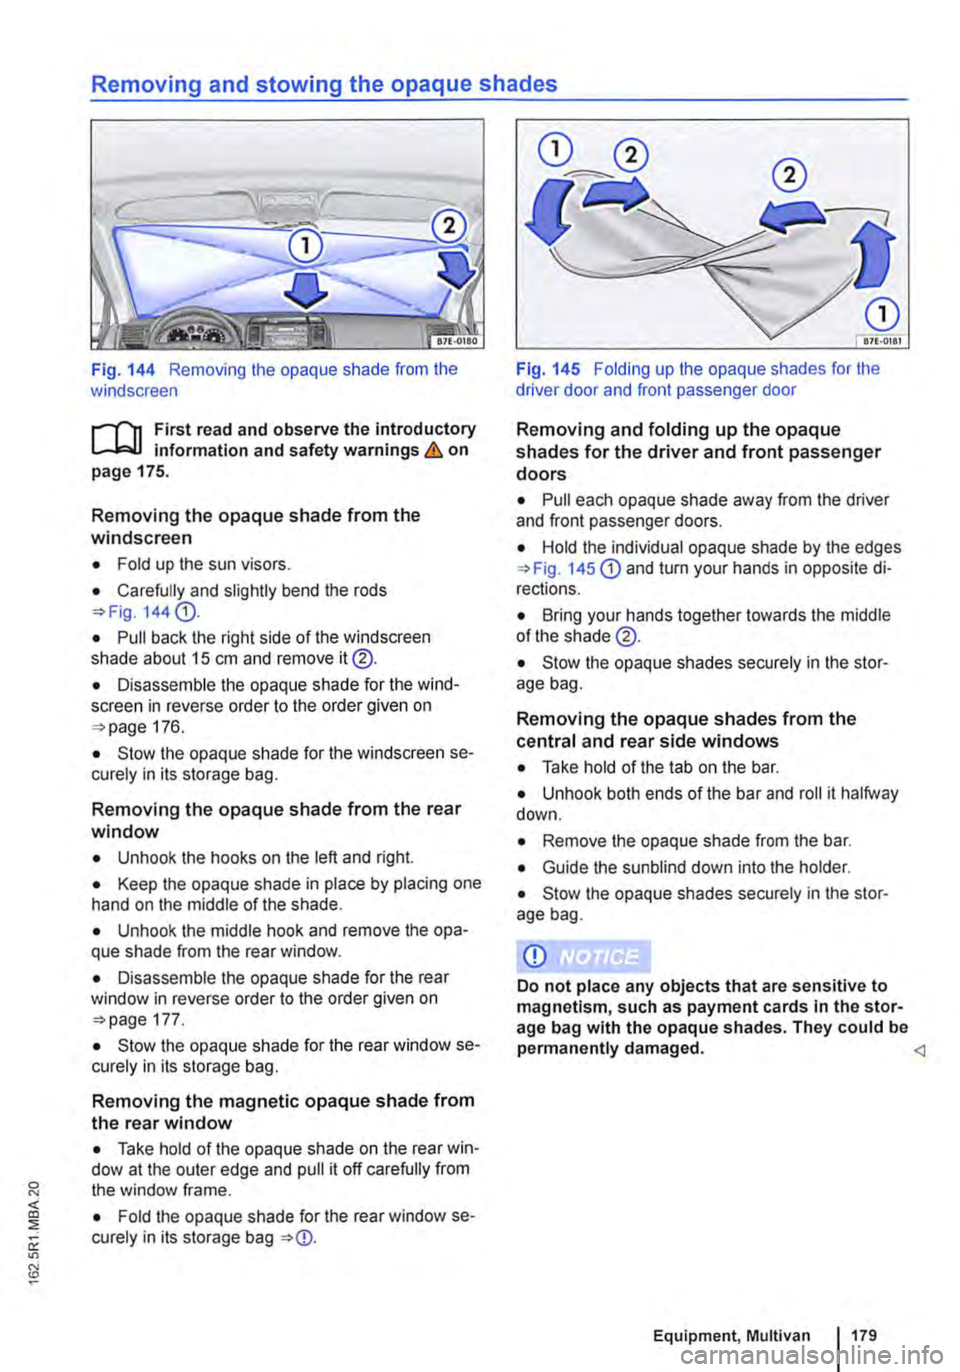
Fig. 144 Removing the opaque shade from the windscreen
,....-("n First read and observe the introductory L-.lc.l.l information and safety warnings & on page 175.
Removing the opaque shade from the windscreen
• Fold up the sun visors.
• Carefully and slightly bend the rods =>Fig. 144 G).
• Pull back the right side of the windscreen shade about 15 cm and remove it@.
• Disassemble the opaque shade for the wind-screen in reverse order to the order given on =>page 176.
• Stow the opaque shade for the windscreen se-curely in its storage bag.
Removing the opaque shade from the rear window
• Unhook the hooks on the left and right.
• Keep the opaque shade in place by placing one hand on the middle of the shade.
• Unhook the middle hook and remove the opa-que shade from the rear window.
• Disassemble the opaque shade for the rear window in reverse order to the order given on =>page 177.
• Stow the opaque shade for the rear window se-curely in its storage bag.
Removing the magnetic opaque shade from the rear window
• Take hold of the opaque shade on the rear win-dow at the outer edge and pull it off carefully from the window frame.
• Fold the opaque shade for the rear window se-curely in its storage bag =>CD.
Fig. 145 Folding up the opaque shades for the driver door and front passenger door
Removing and folding up the opaque shades for the driver and front passenger doors
• Pull each opaque shade away from the driver and front passenger doors.
• Hold the individual opaque shade by the edges =>Fig. 145 CD and turn your hands in opposite di-rections.
• Bring your hands together towards the middle of the shade @.
• Stow the opaque shades securely in the stor-age bag.
Removing the opaque shades from the central and rear side windows
• Take hold of the tab on the bar.
• Unhook both ends of the bar and roll it halfway down.
• Remove the opaque shade from the bar.
• Guide the sun blind down into the holder.
• Stow the opaque shades securely in the stor-age bag.
Equipment, Multivan 179
Page 181 of 486
anchor points should be fitted to the vehicle floor by a specialist workshop in accordance with Volks-
wagen AG guidelines.
These additional seats must also have seat belt anchor points and suitable seat belts.
The Volkswagen Commercial Vehicles dealership can provide you with more Information on retrofit-ting seats.
Additional Information and warnings:
• Sitting correctly and safely =>page 61
• Child seats (accessories) =>page 96
A WARNING
Assuming an Incorrect sitting position In the vehicle can Increase the risk of severe or fa-tal injuries during a sudden driving or brak-Ing manoeuvre, In the event of a collision or accident, or If the alrbags are triggered.
• The number of vehicle occupants must never exceed the number of seats with seat belts In the vehicle.
• All vehicle occupants must assume a cor-rect sitting position before setting off and maintain this position throughout the trip. This also applies to the fastening of seat belts.
• Always secure children In the vehicle in an authorised restraint system which is suita-ble for their height and weight=> page 61.
• Always keep your feet In the footwell while the vehicle is In motion. Never place your feet on the seat or dash panel, for example, and never ride with your feet out the window. When you are sat like this, the alrbag and seat belt cannot provide optimal protection and could actually Increase the risk of injury during an accident.
A WARNING
The seats of the 2-seat arrangement are not suitable for the attachment of child seats of any kind.
• Never use a child seat on the 2-seat ar-rangement.
A WARNING
Children who are not strapped In or who are not strapped In properly could sustain severe or fatal injuries while the vehicle Is In motion.
• Never use a rear-facing child seat on the front passenger seat.
• Children up to the age of 12 should always be transported on the single seats In the pas-senger compartment but not on the 2-seat ar-rangement.
• Always secure children In the vehicle In an authorised restraint system suitable for their height and weight.
• Always fasten children's seat belts cor-rectly and ensure that they assume a correct sitting position.
• Adjust the seat backrest to an upright po-sition If a child seat Is to be used on this seat.
• Do not allow children to sit with their heads or any other body parts In the side air-bag's deployment zone.
• Make sure that the seat belt Is correctly routed.
• Never allow children or babies to be trans-ported on someone's lap, or held In some-one's arms.
• Only ever fasten one child Into each child seat.
• Read and follow the Instructions by the manufacturer of the child seat.
Page 182 of 486
Seat functions, rear, Business
ct:lJ Introduction
This chapter contains information on the following subjects:
Controls of the 2-seat arrangement. . . . . . . . . 183
Seat heater in the 2-seat arrangement . . . . . . 183
Armrests . . . . . . . . . . . . .. . . . .. .. .. . .. .. .. 184
Moving the 2-seat arrangement . . . . . . . . . . . 185
Centre console of the 2-seat arrangement . . 185
Refrigerator box . . . . . . . . . . . . . . . . . . . . . . . 186
The seats of the 2-seat arrangement are not suita-ble for the attachment of child seats => &.
Features of the 2-seat arrangement
• Optimised seat belts for both seats.
• Head restraints and seat belts can be electrical-ly adjusted for height.
• The height, forwards/backwards position and angle of the seat cushion can be adjusted electri-cally.
• The backrest angle can be adjusted electrically.
• Electrically adjustable lumbar support.
• seat heating.
• Armrests with stowage compartment.
Additional information and warnings:
• Sitting correctly and safely =>page 61
• Seat functions. rear =>page 72
• Seat belts => page 79
• Airbag system =>page 87
• Child seats (accessories) =>page 96
• Luggage compartment =>page 130
• Stowage =>page 150
• Central table =>page 155
A WARNING
Incorrect use of the seat functions can cause serious Injuries.
• Always assume a correct sitting position before you drive and maintain this position throughout the trip. This also applies to all passengers.
• Keep hands, fingers, feet and other body parts away from the moving parts of the seats.
1821 Before the journey
A WARNING
The seats of the 2-seat arrangement are not suitable for the attachment of child seats of any kind.
• Never use a child seat on the 2-seat ar-rangement.
A WARNING
Incorrect adjustment or removal and Installa-tion of single seats and/or the 2-seat arrange-ment can cause accidents and severe Inju-ries.
• All adjustments as well as removing/In-stalling should be carried out only when the vehicle Is stationary; otherwise the single seats and/or the 2-seat arrangement could move unexpectedly when the vehicle Is in motion. Furthermore, an Incorrect seating po-sition Is adopted while adjusting the seat.
• All single seats and the 2-seat arrange-ment must always be fitted In the seat rails and must be securely engaged.
• Never use the table while the vehicle is in motion. All backrests must be In the upright position and securely engaged In this posi-tion while the vehicle Is In motion.
• While the vehicle Is In motion the feet of a fitted single seat must not be positioned close to the removable covers In the seat rails.
• Never move single seats and/or the 2-seat arrangement when the vehicle is on a steep slope. The single seats and/or the 2-seat ar-rangement could move unexpectedly and cause Injuries.
• The area for adjustment of the single seats and/or the 2-seat arrangement should not be restricted by any Items.
• While fitting and removing the single seats and/or the 2-seat arrangement, make sure that the seat feet are not soiled or dam-aged.
• The rotating single seats In the passenger compartment can be engaged securely only when facing either the front or rear of the ve-hicle. .,.
Page 184 of 486
Switching the seat heater in the 2-seat arrangement on and off J
• Press rotary switch 147 @.The rotary switch pops out.
• To switch on, turn the rotary switch as often as necessary until the desired heating level is reached &. The red LEDs indicate the heating level. The greater the number of LEDs that light up, the higher is the heating level.
• To switch off, turn the rotary switch as often as necessary until all the LEDs go out.
A wARNING
Anyone experiencing reduced sensitivity to pain or temperature due to medication, para-lysis or chronic Illness (e.g. diabetes) could sustain burns on the back, buttocks and legs when using the seat heating. These burns may take a long time to heal or may never heal fully. Please consult a doctor to deter-mine your own level of health.
• Anyone experiencing reduced sensitivity to pain or temperature should never use the seat heating.
A WARNING
Wet upholstery can cause a fault in the seat heating and Increase the risk of burns.
• Ensure that the seat cushion is dry before the seat heating Is used.
• Do not sit on the seat when wearing damp or wet clothing.
• Do not set any damp or wet objects or Items of clothing on the seat.
• Do not spill any liquids on the seat.
Armrests
r--f"'n First read and observe the introductory L-J.:.l.l information and safety warnings & on page 182.
Adjusting the height of the armrest
• To raise, lift the armrest until it reaches the de-sired position.
• To lower. pull the armrest all the way up and then lower it downwards.
184 I Before tho journey
CD
• To avoid damaging the heating elements, do not kneel on the seat or apply sharp pressure at a single point on the seat cushion and back-rest.
• Liquids, sharp objects and Insulating mate-rials (such as a protective cover or child seat) on the seat could damage the seat heating.
• If the system starts to emit a smell, switch the seat heating off Immediately and have it checked by a qualified workshop.
r:Q:.. The seat heating should be switched off as 'r!1S soon as lt is no longer needed. Fuel is other-wise wasted. <1
There is a storage compartment in each armrest.
Opening and closing the stowage compartment in the armrest
• To open the storage compartment, push the button and fold the lid upwards.
• To close, fold the lid down, making sure that it clicks securely into place. <1
Page 187 of 486
Switching on the refrigerator box
• Slide the cover open =>Fig. 149 (D.
• Move switch =>Fig. 150 CD to I position. When the refrigerator box is switched on, the lamp in the box lights up.
• Fill the refrigerator box and then close the lid =>&.
Switching off the refrigerator box
• Slide the cover open =>Fig. 149 (D.
• Move switch =>Fig. 150 CD to 0 position. The in-dicator lamp in the refrigerator box goes out.
• Close the cover.
Notes on cleaning and care
Clean the refrigerator box thoroughly before using it for the first time, if it is dirty or if it has not been used for a long time.
To avoid stains and mildew in the refrigerator box if it remains unused for a long time, leave the cover slightly open.
• Use water and normal household cleaning fluid to clean the refrigerator box.
• The refrigerator box should be defrosted regu-larly to prevent layers of ice forming. To do this, switch the refrigerator box off and leave the cover open. Do not use an additional heat source to de-frost the refrigerator more quickly. This could dam-age the refrigerator =>
If the refrigerator box is left on when the engine is not running, the additional battery runs down. The refrigerator box is therefore fitted with a battery monitor. The battery monitor will switch the refriger-ated box off if the charge of the additional battery becomes too low. The battery monitor will switch the refrigerator box on again as soon as the addi-tional battery has reached a suitable charge level, for example, after a long journey.
Rear-seat telephony, Business
a:n Introduction
This chapter contains information on the following subjects:
Components . . . . . . . . . . . . . . . . . . . . . . . . . . . . 189
Pairing a mobile telephone before using it for the first time . . . . . . . . . 190
Functional description ........... . 190
A WARNING
Objects that are not secured, or are secured incorrectly, can cause serious injuries in the event of a sudden driving or braking manoeu-vre or accident.
• The refrigerator box lid must always be kept closed and locked when the vehicle is in motion.
• Never use the refrigerator box as a table or stowage compartment when the vehicle is In motion.
A WARNING
If the ambient temperature In the vehicle Is too low, the temperature in the refrigerator box could fall below +2 •c {+35 °F) degrees. ThIs could cause the contents of the refriger-ator box to freeze and bottles and other con-tainers to burst, potentially causing Injuries.
• Do not use the refrigerator box when the ambient temperature Is too low.
CD
Handling the refrigerator box incorrectly could damage it.
• Do not place containers, food or other ob-jects which are warmer than +50 •c (+122 •F) In the refrigerator box.
• Do not place corrosive substances or sol-vents in the refrigerator box.
• Do not use an additional heat source to de-frost the refrigerator box.
m The refrigerator box is not suitable for cooling W the vehicle interior. The refrigerator box should only be used to keep food cool and for transporting heat-sensitive items on short journeys.
The rear-seat telephony system (hands-free sys-tem in the passenger compartment with Private Mode) works independently of other provision for mobile telephones fitted in the vehicle. Neither the
Equipment, Business 1187