2012 VOLKSWAGEN TRANSPORTER fuses
[x] Cancel search: fusesPage 242 of 486

Using the refrigerator box
r--('n First read and observe the introductory information and safety warnings & on page 241.
The suspended basket in the refrigerator box is for cooling food. The temperature is lower under the basket than inside it. Closed containers or glass bottles are less likely to burst if they are stored in the basket rather than on the bottom of the refrig-erator box .& in Introduction on page 241.
The additional battery will discharge if the refriger-ator box is used for a long period while the engine is switched off and the 230-volt connection is not used.
Before the refrigerator box is used for the first time, it should be cleaned thoroughly using lukewarm water and a mild detergent.
Cleaning the refrigerator box
r--f'n First read and observe the introductory information and safety warnings & on page 241.
The refrigerator box works independently of the engine and the ignition. lt is fed exclusively by the additional battery. The refrigerator box is switched on and off and regulated using the central control panel.
As far as possible, keep food and drinks in the re-frigerator box in leak-proof containers. Do not over-fill the refrigerator box such that air circulation is impaired.
Cool the refrigerator box before placing food items and drinks in it. Items you wish to keep in the re-frigerator box should be removed from your house-hold fridge/freezer just before you start your jour-ney. When shopping during a journey, we recom-mend items from shop fridges/freezers be placed in the refrigerator box as quickly as possible.
• To prevent mould and mildew from forming in the refrigerator box when it is not being used for long periods, place a folded dry towel between the box and its lid.
o::JJ Introduction
This chapter contains information on the following subjects:
12-volt socket ........................... 244
230-volt power supply . . . . . . . . . . . . . . • . . . . . 245
230-volt Euro socket, California . . . . . . . . . . . . 245
230-volt grounded safety socket . . . . . . . . . . . 246
Residual current circuit breaker . . . . . . . . . . . . 24 7
Battery charger . . . . . . . . . . . . . . . . . . . . . . . . . 24 7
Additional batteries . . . . . . . . . . . . . . . . . . . . . . 248
Fuses for the camping equipment .. 249
Electrical equipment can be connected to the sock-ets in the vehicle.
The connected devices must be in good condition. Do not use faulty devices.
2421 Before the journey
There are two separate power circuits in the vehi-cle:
• 12-volt DC circuit
• 230-volt AC circuit
12-volt DC circuit
Power is supplied as standard from the additional batteries under the left front seat and in the ward-robe to the following 12-volt consumers:
• Interior lights in the living area
• 12-volt sockets in the living area
• 230-volt Euro socket in the side trim panel be-hind the left front seat
• Central control panel
• Refrigerator box
Page 243 of 486

• Pump for fresh water
• Auxiliary heater
230-volt grounded safety socket
The 230-volt grounded safety socket is supplied with 230 V alternating current via electrical feed from the external socket 242.
The following electrical consumers are supplied from the 230-volt power supply via the external socket:
• Battery charger
• Depending on the vehicle equipment, the 230-volt grounded safety socket is located in the side trim panel behind the left front seat or on the side of the kitchen unit 246.
230-volt Euro socket
The 230-volt Euro socket is supplied via additional batteries or via an inverter and is located in the side trim panel behind the left front seat 245.
Additional information:
• Electrical sockets page 163
• Battery 362
• Cigarette lighter 161
• Accessories, modifications, repairs and renewal of parts 394
• Fuses 429
• Consumer information 404
• Rectifying faults on the camping equipment 254
High voltage in the electrical system!
• Never pour any liquid over the socket.
• Do not plug any adapters or extension ca-bles into the 230-volt Euro socket. Otherwise the built-in child lock will disengage and pow-er will be supplied to the socket.
• Do not insert any items which will conduct electricity, such as knitting needles, into the contacts of the 230-volt Euro socket.
A WARNING
Improper use of the sockets and electrical ac-cessories can cause fires and severe Injuries.
• Never leave children in the vehicle unat-tended. Sockets and the devices connected to them can be used when the ignition is switched on.
A WARNING (Continued)
• If the electrical device gets too hot, switch off the device Immediately and disconnect it from the socket.
CD
• Observe the operating instructions for any device that you plug into the socket.
• Never exceed the maximum power rating as this could damage the whole vehicle electrical system.
• Only use accessories that have been ap-proved in accordance with valid guidelines concerning electromagnetic compatibility.
• Never feed electricity into the socket.
• Do not plug any heavy devices or connec-tions, such as mains adapters, directly Into the socket.
• Only connect devices to the socket with a voltage that matches the voltage of the socket.
CD
• In order to prevent damage to the electrical system, never connect equipment that gener-ates electricity, such as solar panels or battery chargers for charging the vehicle battery, to the 12-volt socket.
• Only use accessories that have been ap-proved in accordance with current guidelines concerning electromagnetic compatibility.
• In order to avoid damage due to voltage fluctuation, always switch any electrical con-sumers connected to the 12-volt sockets off be-fore switching the ignition or the engine on or off. When the start/stop system automatically switches off and restarts the engine, it is not necessary to switch off any connected electri-cal consumers.
• Never connect electrical devices requiring more electrical power to a 12-volt socket. The vehicle's electrical system can be damaged if the maximum power output is exceeded.
CD
• Observe the operating instructions for any device that you plug Into the socket.
• 230-volt Euro socket:
-Do not plug any heavy devices or connec-tions, such as mains adapters, directly into the socket. .,..
Equipment, California I 243
Page 248 of 486

The batteries will become depleted if electrical consumers such as the auxiliary heater, refrigera-tor box or interior lights are used while the vehicle is stationary for long periods of time without re-charging the batteries. If the battery voltage falls below 11.5 volts, the auxiliary heater cannot be switched on.
The battery compartment and the battery charger are designed specifically for the factory-fitted AGM (absorbed glass mat) batteries &.
Additional batteries
r--f'n First read and observe the introductory information and safety warnings & on page 242.
The factory-fitted AGM batteries are located under the left front seat and in the wardrobe. They have deep discharge protection.
Should the additional batteries be subjected to deep discharge over a long period of time, they could be destroyed.
You can prevent deep discharge by:
• switching off the central control panel after charging,
• removing the fuses for the fresh water pump and the pop-up roof as necessary 249.
AGM batteries are maintenance free. do not leak their electrolyte, are robust and have extremely low gas emissions.
When should the additional battery be charged?
• If the additional battery is not charged by the al-ternator while the engine is running, the additional battery must be charged on the battery charger at regular intervals -every 4 weeks at the latest-for at least 12 hours.
• The additional battery must be recharged for at least 12 hours before the start of a journey if the battery has not been used for an extended period (e.g. seasonal use).
248 I Before the JOurney
A WARNING
If a conventional battery Is charged it will give off a highly explosive mixture of gases.
• Use only AGM batteries of the same type (batteries with the electrolyte absorbed Into a special fibreglass matting) and with the same specifications as the factory-fitted batteries.
• Never use conventional batteries (wet cells with liquid electrolyte).
If a conventional battery Is charged it will give off a highly explosive mixture of gases.
• Use only AGM batteries of the same type (batteries with the electrolyte absorbed into a special fibreglass matting) and with the same specifications as the factory-fitted batteries.
• Never use conventional batteries (wet cells with liquid electrolyte).
Page 249 of 486

Fuses for the camping equipment
87E-0221
Fig. 214 Under the left front seat: fuse box.
l"""'('n First read and observe the introductory L-Jr:,.U information and safety warnings & on page 242.
Colour
Purple
beige
Brown
Red
Blue
Yellow
White or clear
Green
Orange
beige
Colour coding of fuses
Electrical consumers
Battery charger
Pop-up roof
Reading lights
Refrigerator box
Water pump
Central control panel
Fuse table
In some vehicles, the locations of fuse blocks could vary from the those shown In the table. How-ever, since the order of the amp ratings is identical within any individual fuse block, you will still be able to identify the electrical consumers if this is the case.
The fuses for the camping equipment electrical consumers are located under the left front seat 214. Other vehicle parts will have to be re-moved in order to gain access to the fuse box. If you are unsure, have the fuses changed by a qualified workshop.
Several electrical consumers could share a single fuse. Conversely, a single consumer could have more than one fuse.
Therefore fuses should only be replaced when the cause of the fault has been rectified. If a new fuse blows shortly after insertion, have the electrical system checked by a qualified workshop as soon as possible.
Amp rating
3
5
7.5
10
15
20
25
30
40
80
Fuse number (amp rating in Fig. 214
16 (30)
17 (30)
18 (10)
19 (10)
20 (5)
21 (5)
A WARNING
Using unsuitable or repaired fuses and bridg-Ing an electrical circuit without fuses can cause a fire and serious injuries.
Equipment, California 249
Page 250 of 486

A WARNING (Continued)
• Never fit fuses that have a higher fuse pro-tection limit. Fuses must always be replaced by a new fuse with the same amp rating (same colour and markings) and size.
• Never repair a fuse.
• Never use a metal strip, paper clip or simi-lar objects to replace a fuse.
CD
• To avoid damage to the electrical system in the vehicle, switch the ignition, the lights and all electrical consumers off and remove the ve-hicle key from the ignition before changing a fuse.
• You can damage another position in the electrical system by using a fuse with a higher amp rating.
• Fuse boxes must be protected from dirt and moisture when opened. Dirt and moisture in the fuse boxes can damage the electrical system.
o::n Introduction
This chapter contains information on the following subjects:
Controls for the living area 250
Controls for the living area
Fig. 215 Controls for the Climatic
ifl1 First read and observe the introductory L-.J.=.IJ information given on page 250.
Depending on equipment options, your vehicle is fitted with one of the control units shown here for the living area.
250 I Before the journey
Additional information:
• Air conditioning system 322.
Fig. 216 Controls for the Climatronic
Climatic: heating the living area
• Turn the temperature control clockwise to set the required heating temperature 215 G).
• Turn the blower control @ to one of the set-tings 1-4.
Page 429 of 486

Test after driving for 10 minutes
r-'('n First read and observe the Introductory L-J,:.LI Information and safety warnings & on page 425.
Reconnect the tyre filler hose =>Fig. 302 ®and check the tyre pressure on the Tyre Pressure Loss Indicator®.
1.3 bar (19 psi /130 kPa) and lower:
• Do not drive on I The tyre cannot be sealed adequately with the breakdown set.
• Seek expert assistance => &.
1.4 bar (20 psi /140 kPa) and higher:
• Set the tyre pressure back to the correct value =>page 367.
• Resume your journey to the nearest qualified workshop. Do not exceed a maximum speed of 80 km/h (50 mph).
• The damaged tyre should be replaced at the qualified workshop.
Fuses
i:llJ Introduction
This chapter contains information on the following subjects:
Fuse box in the dash panel . . . . . . . . . . . . . . . 430
Fuses in the engine compartment . . . . . . . . . . 431 Changing a blown fuse ................... 431
At the time of print we are unable to provide an up-to-date overview of the locations of the fuses for the electrical consumers. This is because the vehi-cle is under constant development, because fuses are assigned differently depending on the vehicle equipment level and because several consumers may use a single fuse. You can get more informa-tion about the fuse layout from a Volkswagen Com-mercial Vehicles dealership.
Several electrical consumers could share a single fuse. Conversely, a single consumer could have more than one fuse.
Therefore fuses should only be replaced when the cause of the fault has been rectified. If a new fuse blows shortly after insertion, have the electrical system checked by a qualified workshop as soon as possible.
A WARNING
Driving with an unsealed tyre is dangerous as it can cause accidents and serious Injuries.
• Do not carry on driving if the tyre pressure Is 1.3 bar (19 psi /130 kPa) or lower.
• Seek expert assistance.
• Drink holder =>page 153
• Preparation for working in the engine compart-ment =>page 350
• Battery =>page 362
A WARNING
High voltages in the electrical system can cause electric shocks, serious burns and death.
• Never touch the electrical wiring of the ig-nition system.
• Avoid causing short circuits in the electri-cal system.
A WARNING
Using unsuitable or repaired fuses and bridg-ing an electrical circuit without fuses can cause a fire and serious injuries.
Practical tips I 429
Page 430 of 486

A WARNING (Continued)
• Never fit fuses that have a higher fuse pro-tection limit. Fuses must always be replaced by a new fuse with the same amp rating (same colour and markings) and size.
• Never repair a fuse.
• Never use a metal strip, paper clip or simi-lar objects to replace a fuse.
Fuse box in the dash panel
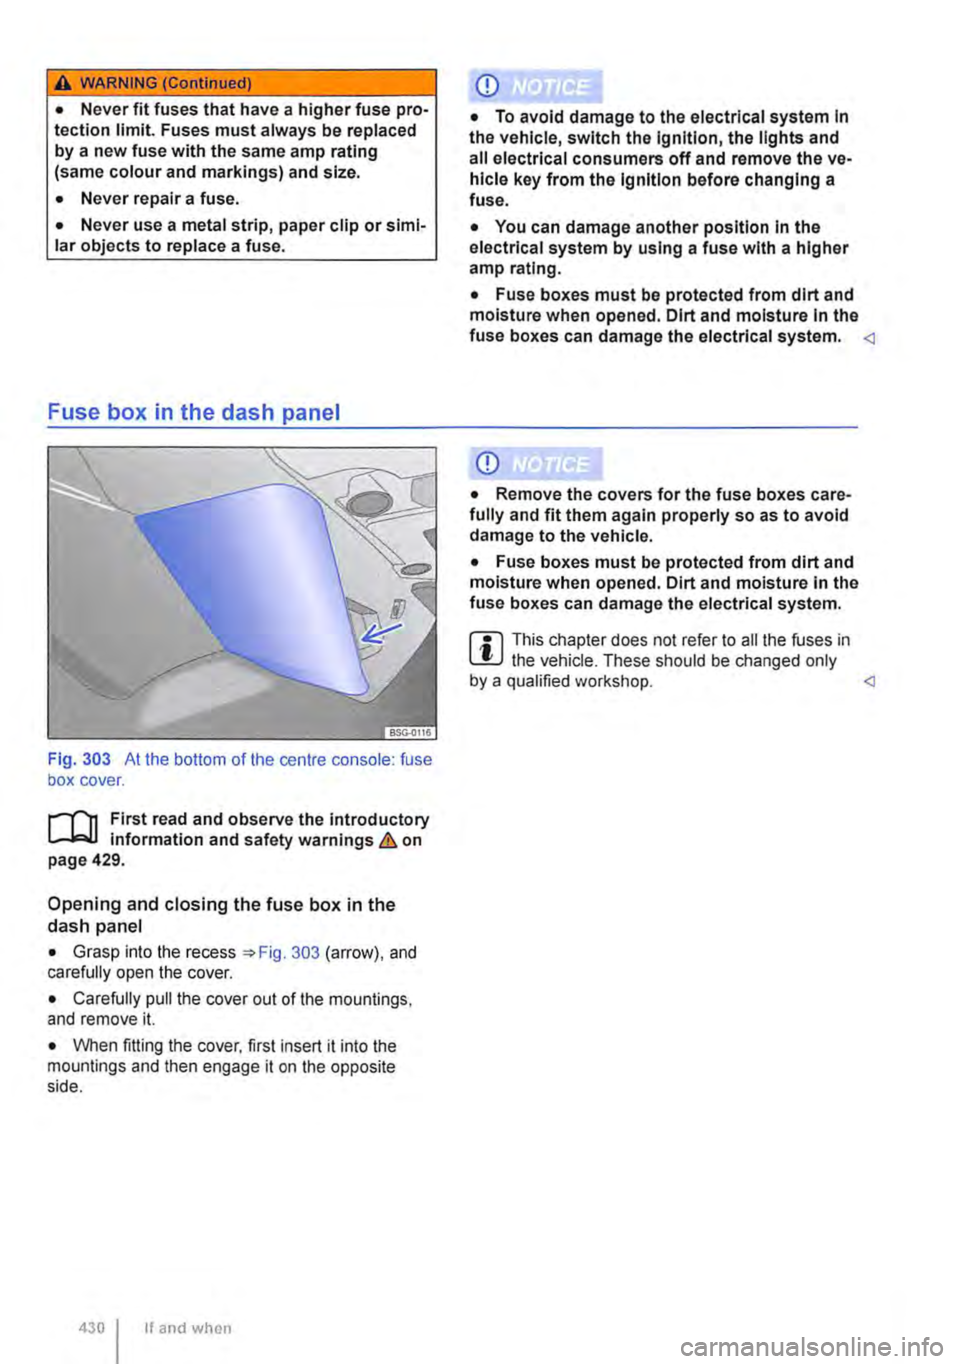
Fig. 303 At the bottom of the centre console: fuse box cover.
r-f"'n First read and observe the introductory information and safety warnings & on page 429.
Opening and closing the fuse box in the dash panel
• Grasp into the recess =>Fig. 303 (arrow), and carefully open the cover.
• Carefully pull the cover out of the mountings, and remove it.
• When fitting the cover. first insert it into the mountings and then engage it on the opposite side.
430 If and when
CD
• To avoid damage to the electrical system in the vehicle, switch the Ignition, the lights and all electrical consumers off and remove the ve-hicle key from the ignition before changing a fuse.
• You can damage another position In the electrical system by using a fuse with a higher amp rating.
• Fuse boxes must be protected from dirt and moisture when opened. Dirt and moisture In the fuse boxes can damage the electrical system. <1
CD
• Remove the covers for the fuse boxes care-fully and fit them again properly so as to avoid damage to the vehicle.
• Fuse boxes must be protected from dirt and moisture when opened. Dirt and moisture in the fuse boxes can damage the electrical system.
m This chapter does not refer to all the fuses in W the vehicle. These should be changed only by a qualified workshop. <1
Page 431 of 486

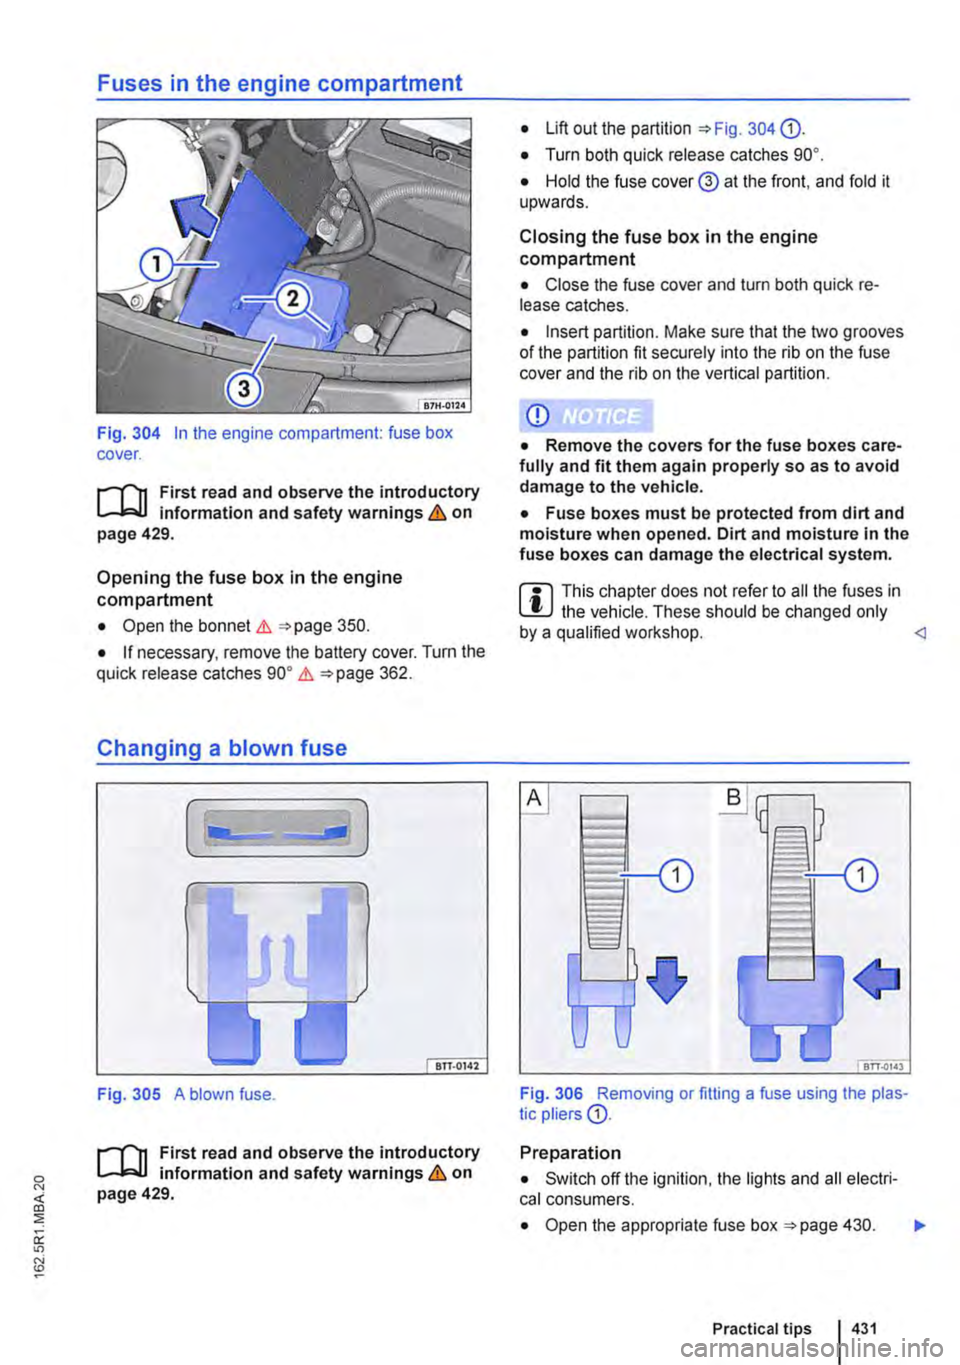
Fig. 304 In the engine compartment: fuse box cover.
;-('n First read and observe the introductory L-Jc.IJ information and safety warnings & on page 429.
Opening the fuse box in the engine compartment
• Open the bonnet .1. =<>page 350.
• If necessary, remove the battery cover. Turn the quick release catches go• .1. =<>page 362.
Changing a blown fuse
Fig. 305 A blown fuse.
;-('n First read and observe the introductory L-Jc.IJ information and safety warnings & on page 429.
• Lift out the partition =<>Fig. 304 0).
• Turn both quick release catches go•.
• Hold the fuse cover@ at the front. and fold it upwards.
Closing the fuse box in the engine compartment
• Close the fuse cover and turn both quick re-lease catches.
• Insert partition. Make sure that the two grooves of the partition fit securely into the rib on the fuse cover and the rib on the vertical partition.
CD
• Remove the covers for the fuse boxes care-fully and fit them again properly so as to avoid damage to the vehicle.
• Fuse boxes must be protected from dirt and moisture when opened. Dirt and moisture in the fuse boxes can damage the electrical system.
m This chapter does not refer to all the fuses in L!J the vehicle. These should be changed only by a qualified workshop.
Preparation
• Switch off the ignition, the lights and all electri-cal consumers.
• Open the appropriate fuse box =<>page 430. .,..
Practical tips I 431