2012 VOLKSWAGEN TRANSPORTER cooling
[x] Cancel search: coolingPage 242 of 486

Using the refrigerator box
r--('n First read and observe the introductory information and safety warnings & on page 241.
The suspended basket in the refrigerator box is for cooling food. The temperature is lower under the basket than inside it. Closed containers or glass bottles are less likely to burst if they are stored in the basket rather than on the bottom of the refrig-erator box .& in Introduction on page 241.
The additional battery will discharge if the refriger-ator box is used for a long period while the engine is switched off and the 230-volt connection is not used.
Before the refrigerator box is used for the first time, it should be cleaned thoroughly using lukewarm water and a mild detergent.
Cleaning the refrigerator box
r--f'n First read and observe the introductory information and safety warnings & on page 241.
The refrigerator box works independently of the engine and the ignition. lt is fed exclusively by the additional battery. The refrigerator box is switched on and off and regulated using the central control panel.
As far as possible, keep food and drinks in the re-frigerator box in leak-proof containers. Do not over-fill the refrigerator box such that air circulation is impaired.
Cool the refrigerator box before placing food items and drinks in it. Items you wish to keep in the re-frigerator box should be removed from your house-hold fridge/freezer just before you start your jour-ney. When shopping during a journey, we recom-mend items from shop fridges/freezers be placed in the refrigerator box as quickly as possible.
• To prevent mould and mildew from forming in the refrigerator box when it is not being used for long periods, place a folded dry towel between the box and its lid.
o::JJ Introduction
This chapter contains information on the following subjects:
12-volt socket ........................... 244
230-volt power supply . . . . . . . . . . . . . . • . . . . . 245
230-volt Euro socket, California . . . . . . . . . . . . 245
230-volt grounded safety socket . . . . . . . . . . . 246
Residual current circuit breaker . . . . . . . . . . . . 24 7
Battery charger . . . . . . . . . . . . . . . . . . . . . . . . . 24 7
Additional batteries . . . . . . . . . . . . . . . . . . . . . . 248
Fuses for the camping equipment .. 249
Electrical equipment can be connected to the sock-ets in the vehicle.
The connected devices must be in good condition. Do not use faulty devices.
2421 Before the journey
There are two separate power circuits in the vehi-cle:
• 12-volt DC circuit
• 230-volt AC circuit
12-volt DC circuit
Power is supplied as standard from the additional batteries under the left front seat and in the ward-robe to the following 12-volt consumers:
• Interior lights in the living area
• 12-volt sockets in the living area
• 230-volt Euro socket in the side trim panel be-hind the left front seat
• Central control panel
• Refrigerator box
Page 246 of 486
Inserting the Euro plug
• Plug the Euro plug into the Euro socket. The child safety function will disengage at the same time. Electricity will not flow until the child lock has been unlocked.
• Push the Euro plug all the way into the Euro socket so that it is firmly in place and will not fall out as a result of vibration or other vehicle motion.
LEDs above the socket
Constant green light The child lock is disen-gaged. The Euro socket is ready for use.
Flashing red light A fault has occurred. for example cut-off due to excess current or tem-perature.
Compatible devices
Electrical devices with a Euro plug can be connec-ted to the 230-volt Euro socket in the side trim pan-el behind the left front seat.
230-volt grounded safety socket
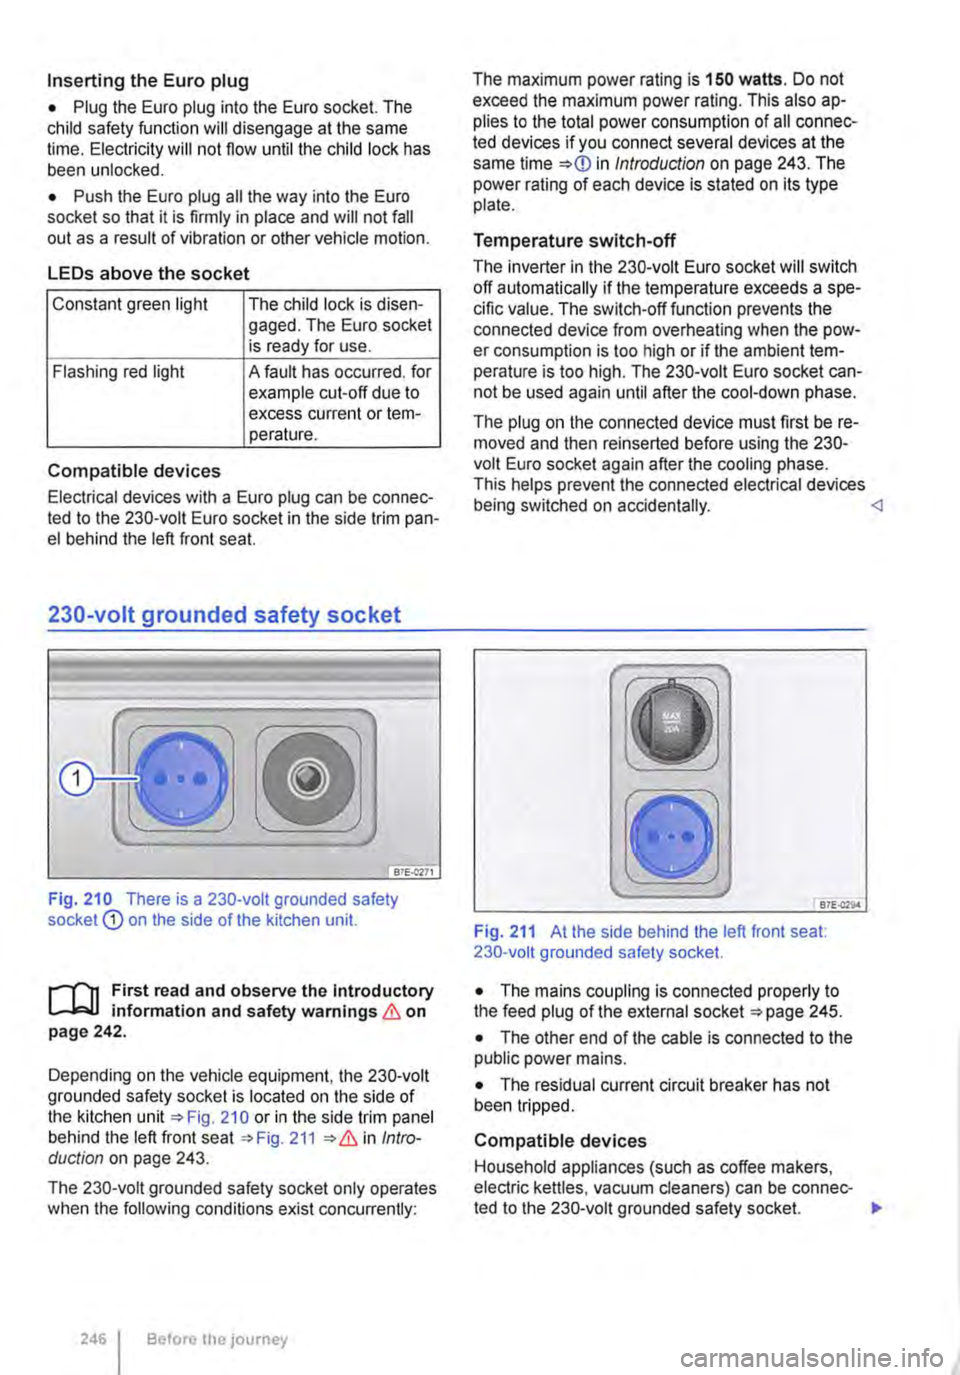
Fig. 210 There is a 230-volt grounded safety socket Q) on the side of the kitchen unit.
r--T'n First read and observe the Introductory L-k.U information and safety warnings & on page 242.
Depending on the vehicle equipment, the 230-volt grounded safety socket is located on the side of the kitchen unit 210 or in the side trim panel behind the left front seat 211 Intro-duction on page 243.
The 230-volt grounded safety socket only operates when the following conditions exist concurrently:
246 I Before the journey
The maximum power rating is 150 watts. Do not exceed the maximum power rating. This also ap-plies to the total power consumption of all connec-ted devices if you connect several devices at the same time in Introduction on page 243. The power rating of each device is stated on its type plate.
Temperature switch-off
The inverter in the 230-volt Euro socket will switch off automatically if the temperature exceeds a spe-cific value. The switch-off function prevents the connected device from overheating when the pow-er consumption is too high or if the ambient tem-perature is too high. The 230-volt Euro socket can-not be used again until after the cool-down phase.
The plug on the connected device must first be re-moved and then reinserted before using the 230-volt Euro socket again after the cooling phase. This helps prevent the connected electrical devices being switched on accidentally. <1
B7E.Q29.4
Fig. 211 At the side behind the left front seat: 230-volt grounded safety socket.
• The mains coupling is connected properly to the feed plug of the external socket 245.
• The other end of the cable is connected to the public power mains.
• The residual current circuit breaker has not been tripped.
Compatible devices
Household appliances (such as coffee makers, electric kettles, vacuum cleaners) can be connec-ted to the 230-volt grounded safety socket. .,.
Page 279 of 486
Changing gear earlier
In principle, the highest gear is always the most economical gear. A rule of thumb for most vehicles: at a speed of 30 kmlh (19 m ph} drive in third gear, at 40 km/h (25 mph) in 4th gear and at 50 km/h (31 mph) In 5th gear.
If the traffic and driving situation allows it, skipping gears when changing up a gear will also save fuel.
Do not drive gears to their upper limit. Use first gear only for pulling away then quickly change up to second gear. Avoid using the kickdown func-tion in vehicles with a DSG® dual clutch gearbox.
Vehicles with a gear display help to improve fuel economy by indicating the optimum time to change gear.
Rolling to a stop
Taking your foot off the accelerator will interrupt the supply of fuel to the engine and decrease fuel con-sumption.
Therefore, in situations such as approaching a red traffic light, let the vehicle roll without applying the accelerator.
Only press on the dutch pedal to disengage if the vehicle becomes too slow or if the stopping dis-tance is longer. The engine will then run at idling speed 263.
Switch off the engine in situations when the vehicle might be stationary for a long time, e.g. at a level crossing. In vehicles with an active start/stop sys-tem, the engine will switch off automatically when the vehicle Is stationary.
Thinking ahead when driving, and driving with the flow of traffic
Applying the brake and accelerator too often will significantly increase fuel consumption. If you think ahead when driving and maintain a sufficient dis-tance from the vehicle in front, simply keeping your foot off the accelerator should stop the speed from fluctuating. This means that active braking and ac-celerating is not always necessary.
Driving smoothly and evenly
Smoothness is even more important than speed. The more evenly you drive, the lower your fuel consumption will be.
When driving on a motorway, it is much more ef-fective to drive at a constant moderate speed than to drive with constant acceleration and braking. As a rule, driving with a constant style will get you to your destination just as quickly.
The cruise control system will help you to maintain a constant driving style.
Using additional equipment in moderation
lt is always important to be comfortable in your ve-hicle, but it is also important to consider the envi-ronment.
Some equipment will increase fuel consumption when switched on:
• The cooling function of the air conditioning sys-tem: if the air conditioning system is set to a very high or low temperature it will require a lot of ener-gy, which is generated by the engine. Therefore the temperature setting in the vehicle should not vary too much from the outside temperature. lt may be a good idea to air the vehicle before setting off and then to travel a short distance with the win-dows open. The air conditioning system should then be switched on once the windows have been closed. Keep the windows closed when driving at high speeds. Having the windows open increases fuel consumption.
• Switch the seat heating off as soon as it has served its purpose.
• Switch the windscreen and rear window heating off as soon as the windows have defogged and are clear of ice.
• Do not leave the supplementary heating system on when the vehicle is moving 332.
Other factors that Increase fuel consumption (examples):
• Fault in engine management.
• Driving in hilly regions.
• Driving with a trailer.
Page 322 of 486

Air conditioning system
Heating, ventilating, cooling
o:n Introduction
This chapter contains information on the following subjects:
Controls for Climatic . . . . . . . . . . . . . . . . . . . . 323
Controls for Climatronic . . . . . . . . . . . . . . . . . 325
Controls for the heating and fresh air system . 327
Information on the air conditioning system . . . 328
..................... m
Air recirculation mode . . . . . . . • . . . . . . . . . . . . 330
Windscreen heating . . . . . . . . . . . . . . . . . . . . . 331
Roof ventilator . . . . . . . . . . . . . . . . . . . . . . . . . . 331
Displays for the Climatronic information
Depending on the vehicle equipment level, infor-mation on the Climatronic is displayed briefly on the screen of the factory-fitted radio or navigation system.
The dust and pollen filter
The dust and pollen filter with activated charcoal reduces the level of impurities in the outside air en-tering the vehicle.
The dust and pollen filler must be changed regular-ly to avoid impairing the performance of the air conditioning system.
The dust and pollen filter must be changed more frequently than stated in the service schedule if the efficiency of the filter declines prematurely due to the vehicle being used in areas with high levels of air pollution.
Additional information and warnings:
• Exterior views 5
• Wipers/washer 116
• Supplementary heaters (auxiliary air heater or auxiliary coolant heater) 332
• Cleaning and caring for the vehicle exterior 380
A WARNING
Poor visibility through all windows increases the risk of collisions and accidents, which can cause serious injuries.
• Always ensure that all windows are free of ice, snow and mist to ensure good visibility.
3221 While driving
A WARNING (Continued)
• Maximum heat output, which Is needed to defrost the windows as quickly as possible, is only available when the engine has reached Its operating temperature. Do not start your journey until you have good visibil-Ity.
• Always ensure that the heating and fresh air system or the air conditioning system and the rear window heating are used correctly so that you have good visibility.
• Never use the air reclrculatlon mode for an extended period. If the cooling system Is switched off, the windows can mist up very quickly In air reclrculatlon mode and reduce visibility considerably.
• Always switch off the air reclrculatlon mode when it Is not required.
A WARNING
Stale air can quickly make the driver tired and affect their concentration, which In turn can cause collisions, accidents and serious Inju-ries.
• Never switch off the blowers or switch on the air recirculatlon mode for an extended pe· riod as this prevents fresh air from entering the vehicle interior.
• Repairs to the air conditioning system re-quire specialist knowledge and special tools. Volkswagen Commercial Vehicles recommends using a Volkswagen Commercial Vehicles deal-ership for this purpose.
Page 323 of 486
m If the cooling system is switched off. the out-W side air that is drawn into the vehicle is not dehumidified. To prevent the windows misting over, Volkswagen Commercial Vehicles recommends that you leave the air conditioning (air conditioning co'!!E.'"essor) switched on. To do this, press the @ button. The indicator lamp in the button must light up.
m Maximum heat output, which is needed to de-W frost the windows as quickly as possible, is only available when the engine has reached its op-erating temperature.
Controls for Climatic
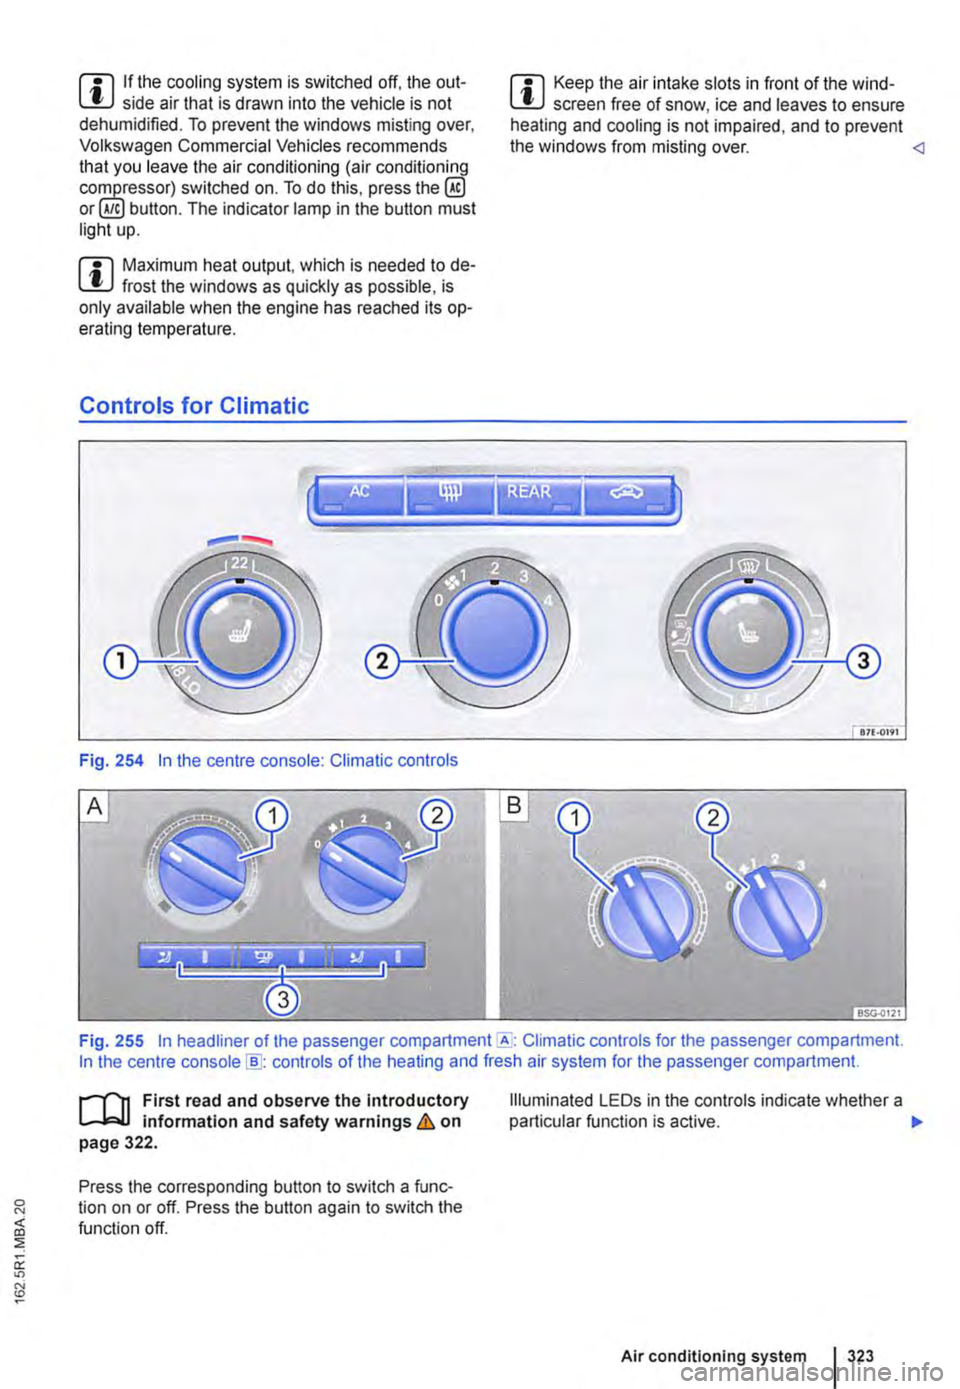
Fig. 254 In the centre console: Climatic controls
m Keep the air intake slots in front of the wind-W screen free of snow, ice and leaves to ensure heating and cooling is not impaired, and to prevent the windows from misting over.
Fig. 255 In headliner of the passenger Climatic controls for the passenger compartment. In the centre console [ID: controls of the heating and fresh air system for the passenger compartment.
ill1 First read and observe the Introductory l..-Wl information and safety warnings & on page 322.
Press the corresponding button to switch a func-tion on or off. Press the button again to switch the function off.
Illuminated LE Os in the controls indicate whether a particular function is active. .,.
Air conditioning system I 323
Page 324 of 486
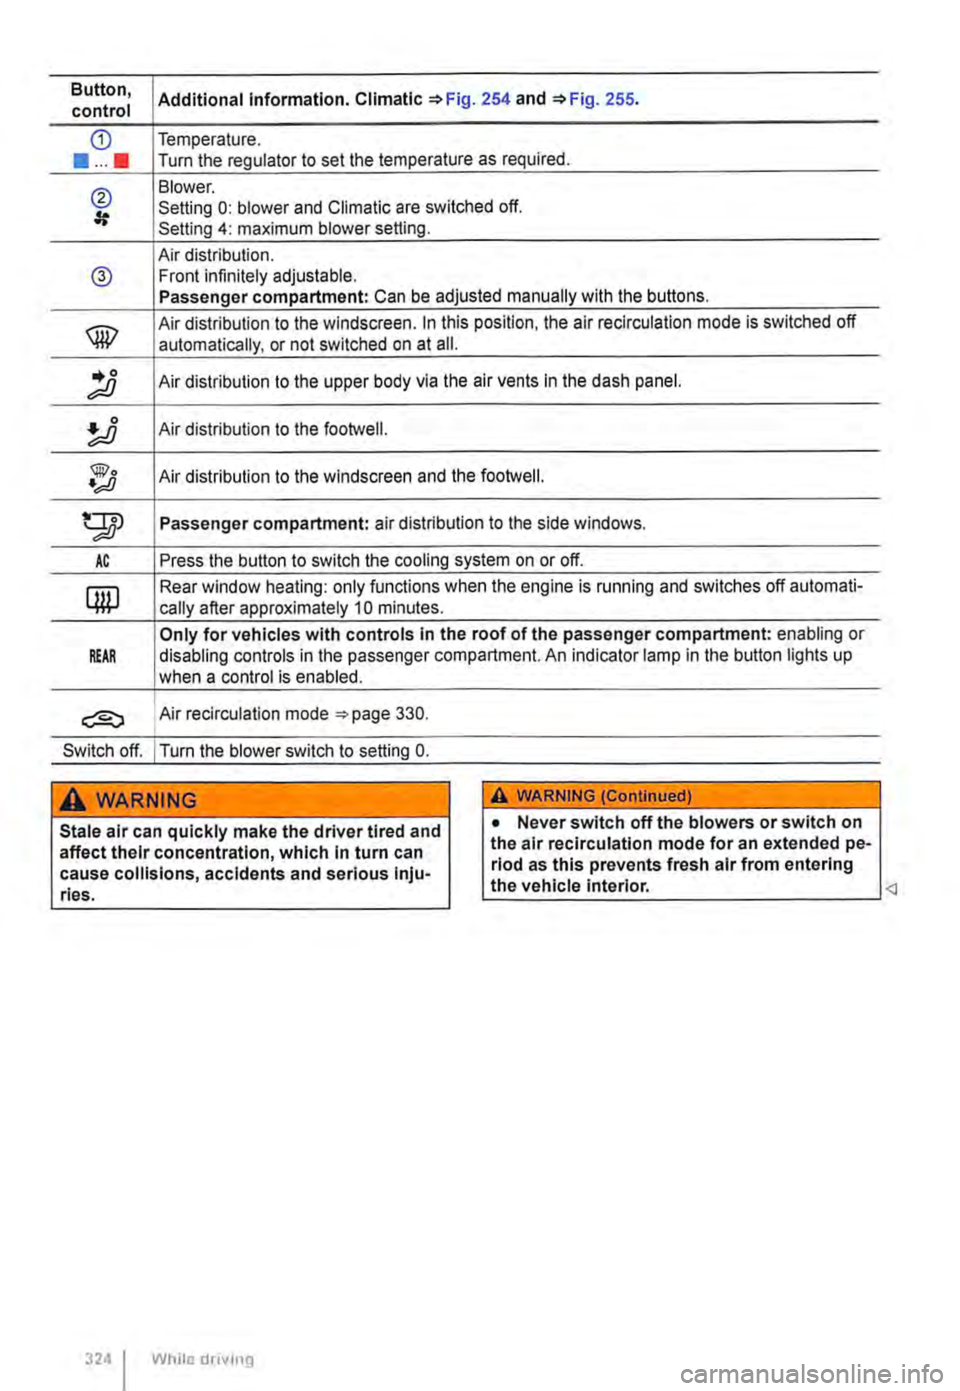
Button, Additional information. Climatic '*Fig. 254 and '*Fig. 255. control
CD Temperature .
••••• Turn the regulator to set the temperature as required.
@ Blower. Setting 0: blower and Climatic are switched off. Setting 4: maximum blower setting.
Air distribution. @ Front infinitely adjustable. Passenger compartment: Can be adjusted manually with the buttons.
® Air distribution to the windscreen. In this position, the air re circulation mode is switched off
automatically, or not switched on at ail .
.. 0 ;;;o Air distribution to the upper body via the air vents In the dash panel.
Air distribution to the footwell.
@o •;;JJ Air distribution to the windscreen and the footweii.
gp Passenger compartment: air distribution to the side windows.
AC Press the button to switch the cooling system on or off.
QW Rear window heating: only functions when the engine is running and switches off automati-
cally after approximately 10 minutes.
Only for vehicles with controls in the roof of the passenger compartment: enabling or REAR disabling controls in the passenger compartment. An indicator lamp in the button lights up
when a control is enabled.
Air recirculation mode =-page 330.
Switch off. I Turn the blower switch to setting 0.
A WARNING
Stale air can quickly make the driver tired and affect their concentration, which in turn can cause collisions, accidents and serious Inju-ries.
324 I While drivmg
A WARNING (ConUnued)
• Never switch off the blowers or switch on the air recirculation mode for an extended pe-riod as this prevents fresh air from entering the vehicle interior.
Page 326 of 486
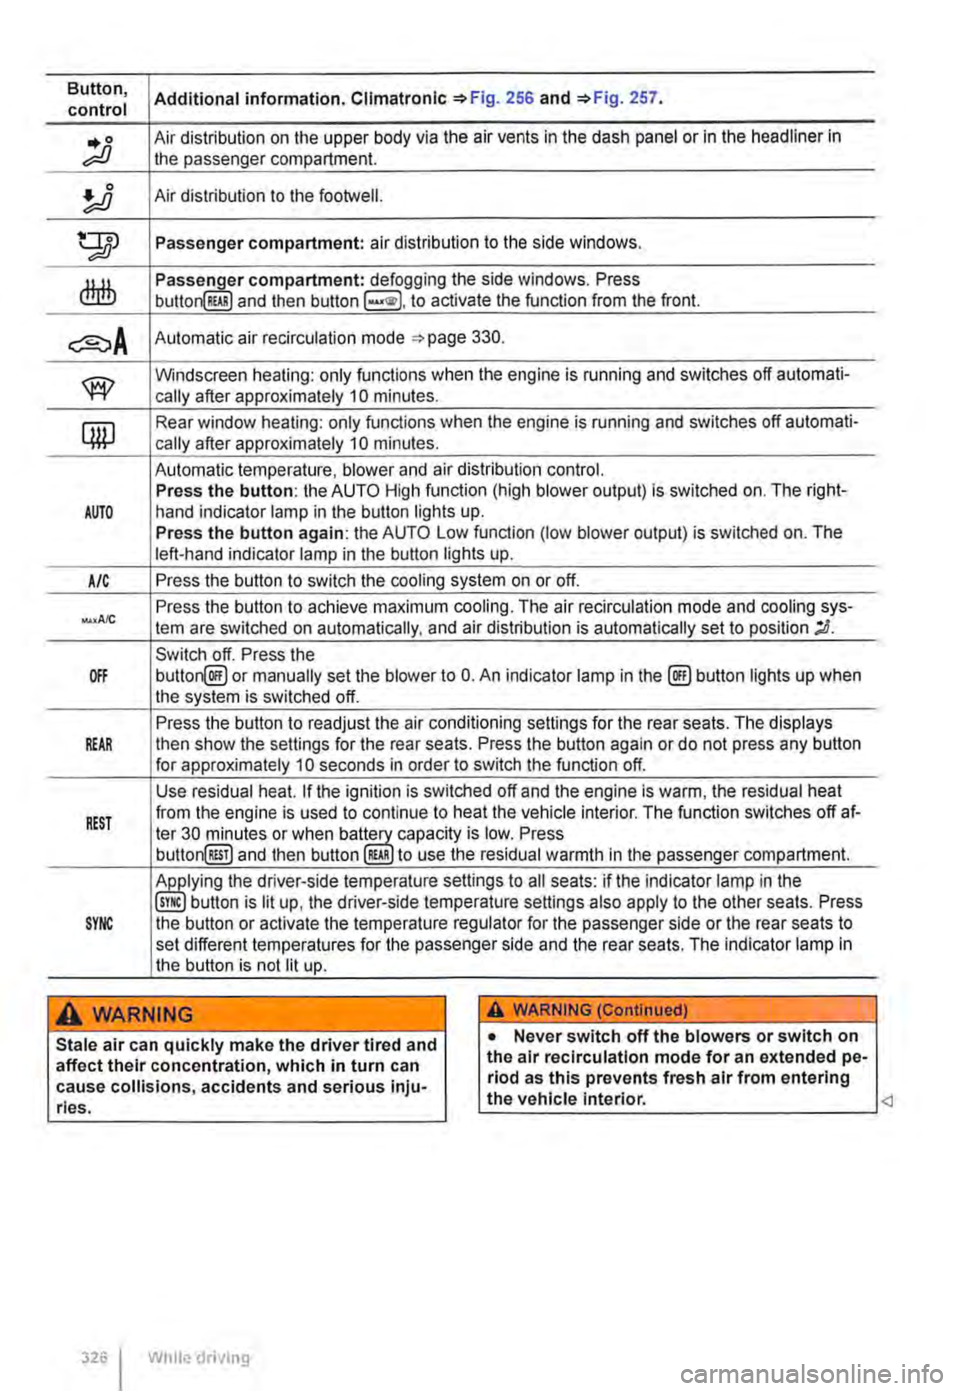
Button, Additional information. Climatronlc 256 and 257. control
.. 0 Air distribution on the upper body via the air vents in the dash panel or in the headliner in ;;;o the passenger compartment.
!J Air distribution to the footwetl.
tTIJ Passenger compartment: air distribution to the side windows.
dlrlb compartment: defogging the side windows. Press button RWI and then button to activate the function from the front.
Automatic air recirculation mode 330.
w Windscreen heating: only functions when the engine is running and switches off automati-cally after approximately 10 minutes.
qw Rear window heating: only functions when the engine is running and switches off automati-cally after approximately 10 minutes.
Automatic temperature, blower and air distribution control. Press the button: the AUTO High function (high blower output) is switched on. The right-AUTO hand indicator lamp in the button lights up. Press the button again: the AUTO Low function (low blower output) is switched on. The left-hand indicator lamp in the button lights up.
A/C Press the button to switch the cooling system on or off.
Press the button to achieve maximum cooling. The air recirculation mode and cooling sys-tern are switched on automatically, and air distribution is automatically set to position ;D.
Switch off. Press the OFF button@ or manually set the blower to 0. An indicator lamp in the@) button lights up when the system is switched off.
Press the button to readjust the air conditioning settings for the rear seats. The displays REAR then show the settings for the rear seats. Press the button again or do not press any button for approximately 10 seconds in order to switch the function off.
Use residual heat. If the ignition is switched off and the engine is warm, the residual heat
REST from the engine is used to continue to heat the vehicle interior. The function switches off at-ter 30 minutes or when capacity is low. Press button@!] and then button RWI to use the residual warmth in the passenger compartment.
the driver-side temperature settings to all seats: if the indicator lamp in the button is lit up, the driver-side temperature settings also apply to the other seats. Press SYNC the button or activate the temperature regulator for the passenger side or the rear seats to set different temperatures for the passenger side and the rear seats. The indicator lamp in the button is not lit up.
A wARNING A WARNING (Continued)
Stale air can quickly make the driver tired and affect their concentration, which in turn can cause collisions, accidents and serious inju-ries.
326 I While driving
• Never switch off the blowers or switch on the air recirculatlon mode for an extended pe-riod as this prevents fresh air from entering the vehicle interior.
Page 328 of 486
Settings for optimal road visibility
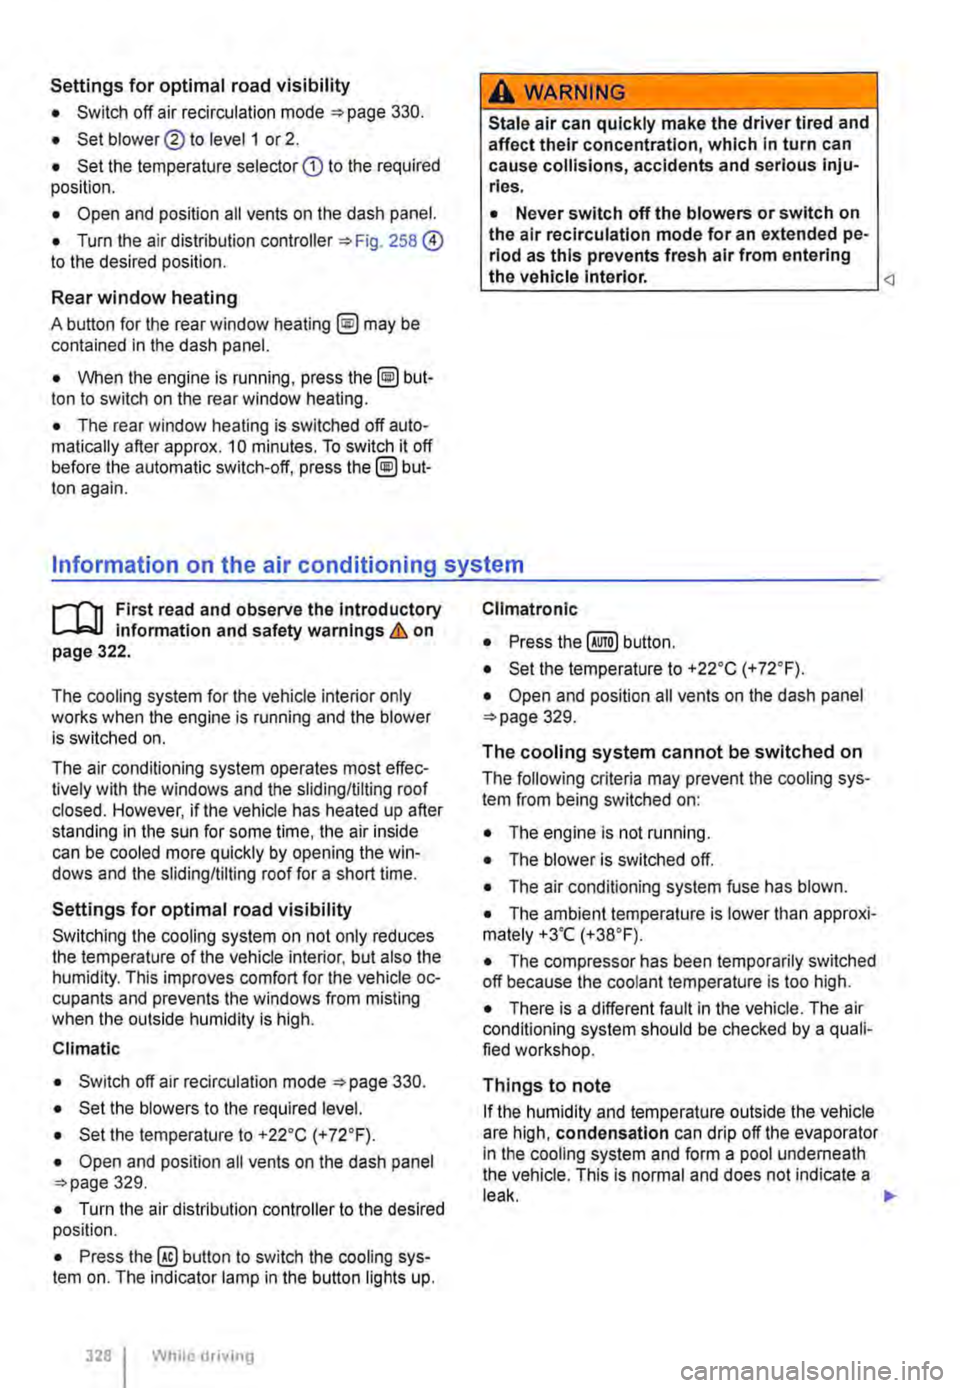
• Switch off air recirculation mode 330.
• Set blower® to level 1 or 2.
• Set the temperature selector G) to the required position.
• Open and position all vents on the dash panel.
• Turn the air distribution Fig. 258 0 to the desired position.
Rear window heating
A button for the rear window heating @ may be contained in the dash panel.
• When the engine is running, press the @ but-ton to switch on the rear window heating.
• The rear window heating is switched off auto-matically after approx. 10 minutes. To switch it off before the automatic switch-off, press the(!) but-ton again.
A WARNING
Stale air can quickly make the driver tired and affect their concentration, which in turn can cause collisions, accidents and serious inju-ries.
• Never switch off the blowers or switch on the air recirculatlon mode for an extended pe-riod as this prevents fresh air from entering the vehicle Interior.
.........r'n First read and observe the Introductory L-.lr:.ll Information and safety warnings & on page 322.
The cooling system for the vehicle interior only works when the engine is running and the blower is switched on.
The air conditioning system operates most effec-tively with the windows and the sliding/tilting roof closed. However, if the vehicle has heated up after standing in the sun for some time, the air inside can be cooled more quickly by opening the win-dows and the sliding/tilting roof for a short time.
Settings for optimal road visibility
Switching the cooling system on not only reduces the temperature of the vehicle interior, but also the humidity. This improves comfort for the vehicle oc-cupants and prevents the windows from misting when the outside humidity is high.
Climatic
• Switch off air recirculation mode 330.
• Set the blowers to the required level.
• Set the temperature to +22•c (+72.F).
• Open and position all vents on the dash panel 329.
• Turn the air distribution controller to the desired position.
• Press the@) button to switch the cooling sys-tem on. The indicator lamp in the button lights up.
328 I While driving
Cllmatronlc
• Press button.
• Set the temperature to +22•c (+72.F).
• Open and position all vents on the dash panel 329.
The cooling system cannot be switched on
The following criteria may prevent the cooling sys-tem from being switched on:
• The engine is not running.
• The blower is switched off.
• The air conditioning system fuse has blown.
• The ambient temperature is lower than approxi-mately +3"C (+38°F).
• The compressor has been temporarily switched off because the coolant temperature is too high.
• There is a different fault in the vehicle. The air conditioning system should be checked by a quali-fied workshop.
Things to note
If the humidity and temperature outside the vehicle are high, condensation can drip off the evaporator in the cooling system and form a pool underneath the vehicle. This is normal and does not indicate a