2012 VOLKSWAGEN GOLF PLUS lights
[x] Cancel search: lightsPage 128 of 541
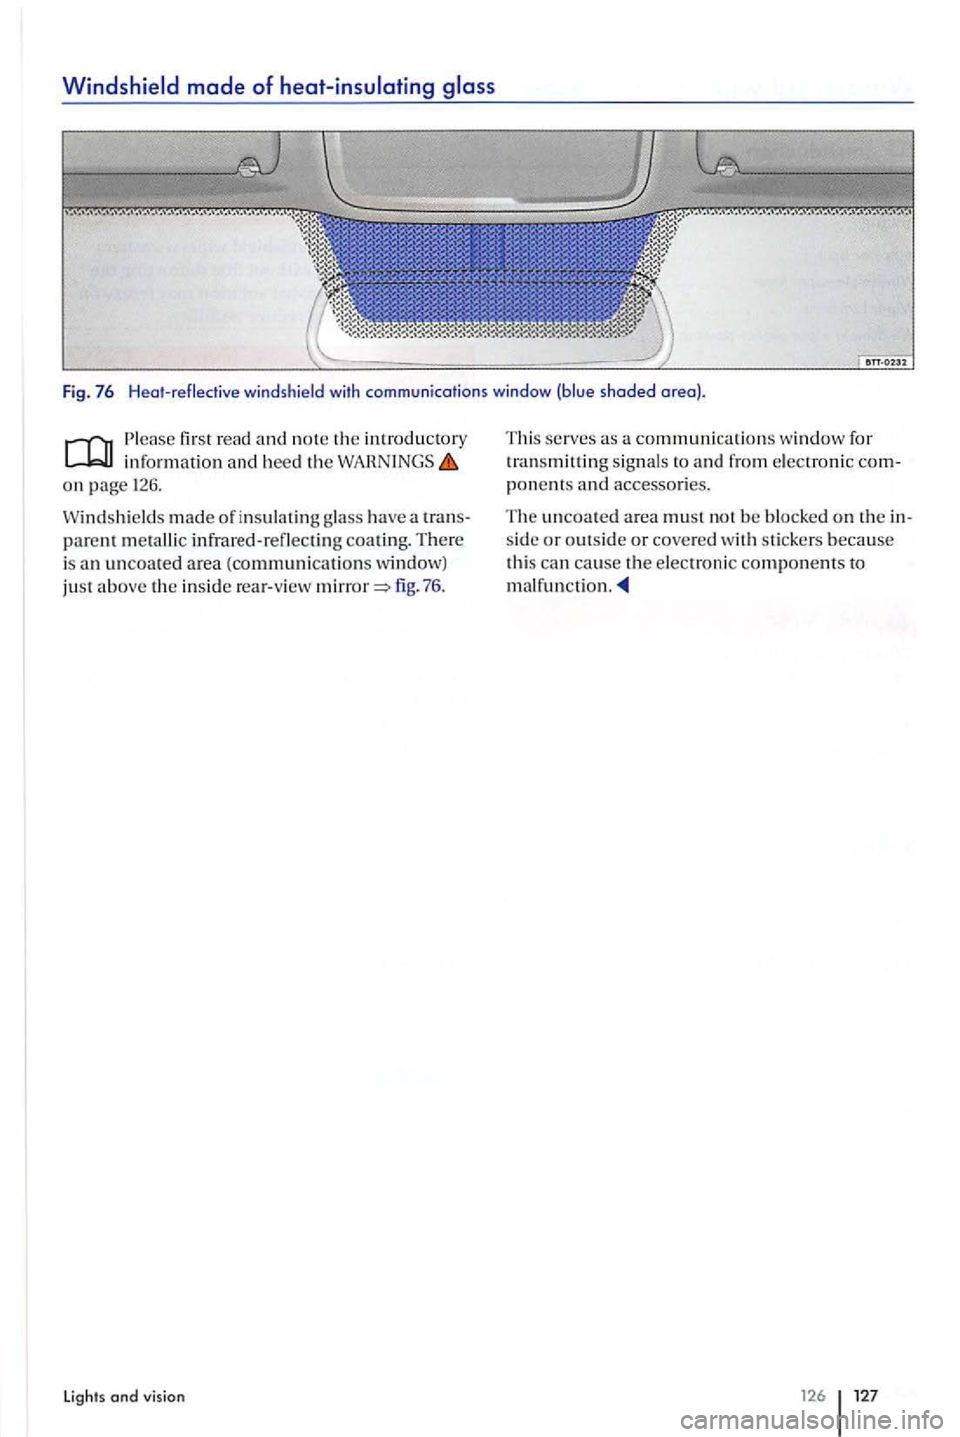
first read and no te th e introductory information and heed the WAHNINGS on page 126.
Windshi eld s made of in sulatin g glass have a transparent m etallic infrared-r eflecting coating. There is an uncoated area (communications window)
ju st above the insid e rear-v iew fig. 7 6 .
lights and vision
This serves as a communi cations window for
t ran smilling signal s to and from electronic components and accessories.
The uncoated area m ust not be blocked on th e in
s ide or outs ide or cove red with sticke rs because
thi s can cause the electronic components to
malfunction.
126 127
Page 130 of 541
Windshield wiper lever
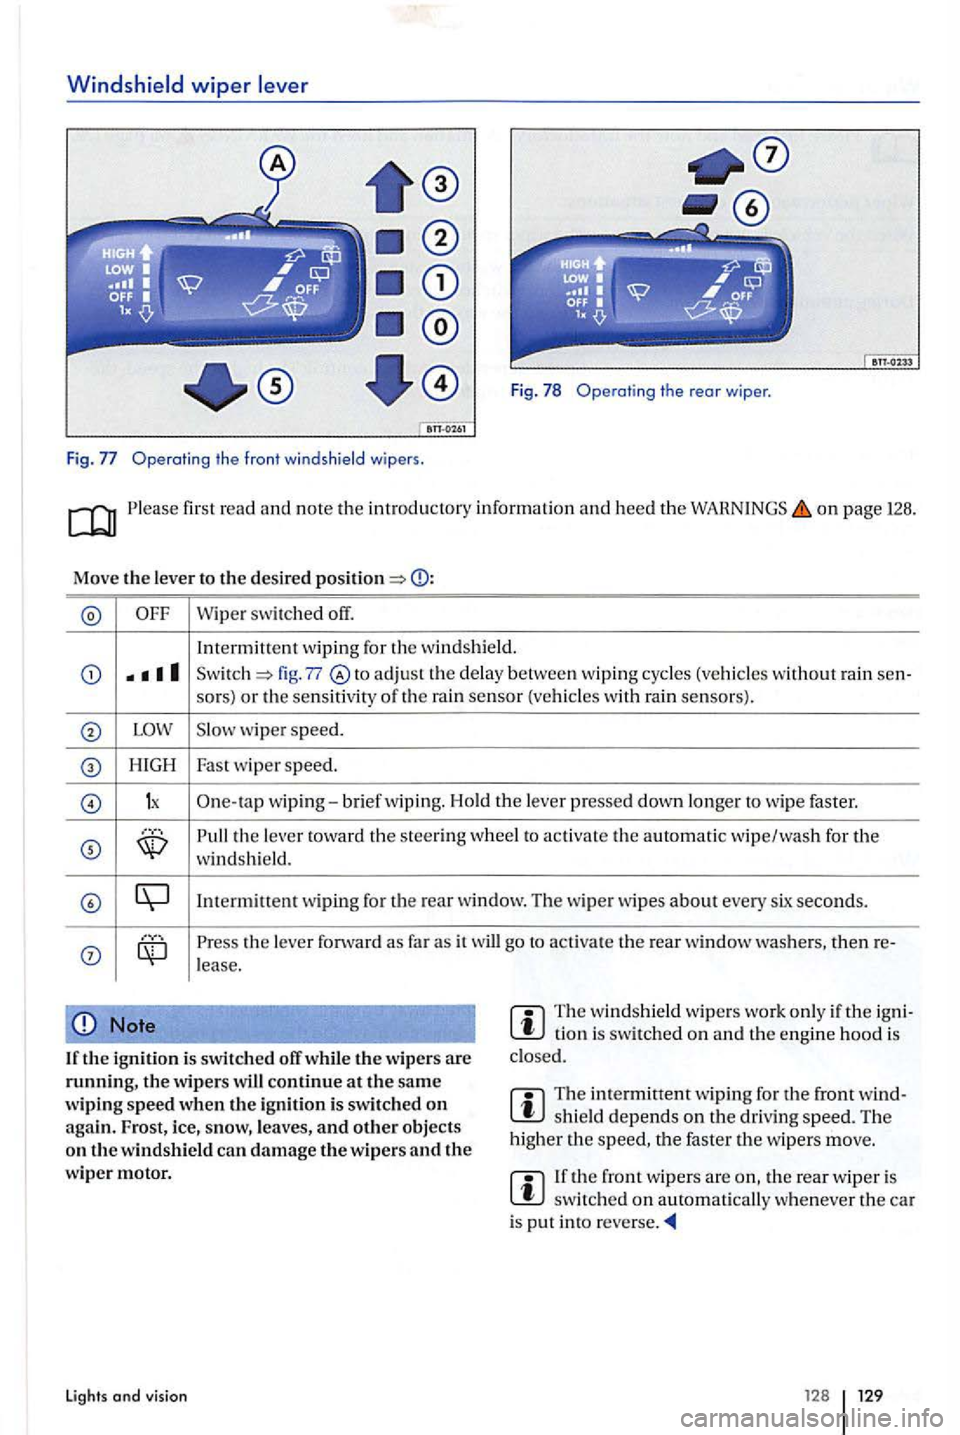
Fig . 78 Operating the rear wiper .
Fig. Operatin g t he front windsh ie ld wipers .
on page 128.
Move the leve r to t he des ired
Wipe r switched off.
In term itt
ent wiping for the w ind shield.
fig. 77 to adj ust the delay between wip ing cycles (vehicles wit hout rain sen-
so rs) or the sensit iv ity of th e rain sensor (vehicle s w ith rain senso rs).
w iper speed.
H IGH Fast wipe r speed.
1x One-ta p wip ing-brief wiping. Hold th e lever presse d down longer to wipe faster.
the le ve r towa rd t he stee ring whee l to activat e the au toma tic wipe/wa sh for the windsh ie ld.
the leve r forward as far as it will go to ac tiva te the rear window then re-lease.
Note
If the ig n it io n i s swi tc h ed off whil e the w ipers are th e w ipers continue a t the sa me
w ip ing sp eed when the ign ition i s swi tched on agai n.
The w in ds hield wipe rs work only if th e tio n i s sw itched on and th e engine hood is
clo sed.
Th e intermittent wip ing for the front shield depends on the driving speed. The
h igh er the the faster th e wipers move.
th e rear w ip e r is s witc hed on automatically w henever the car is pu t in to
Lights and visi o n 12 8
Page 132 of 541
lifting and folding the wiper blades away from
th e
windshield
Move the wiper arm s th e serv ice position
Do not handle the wiper b lades; h andle the
wipe r arms o nl y at the a uachment above the w iper blades.
Rai n sens or
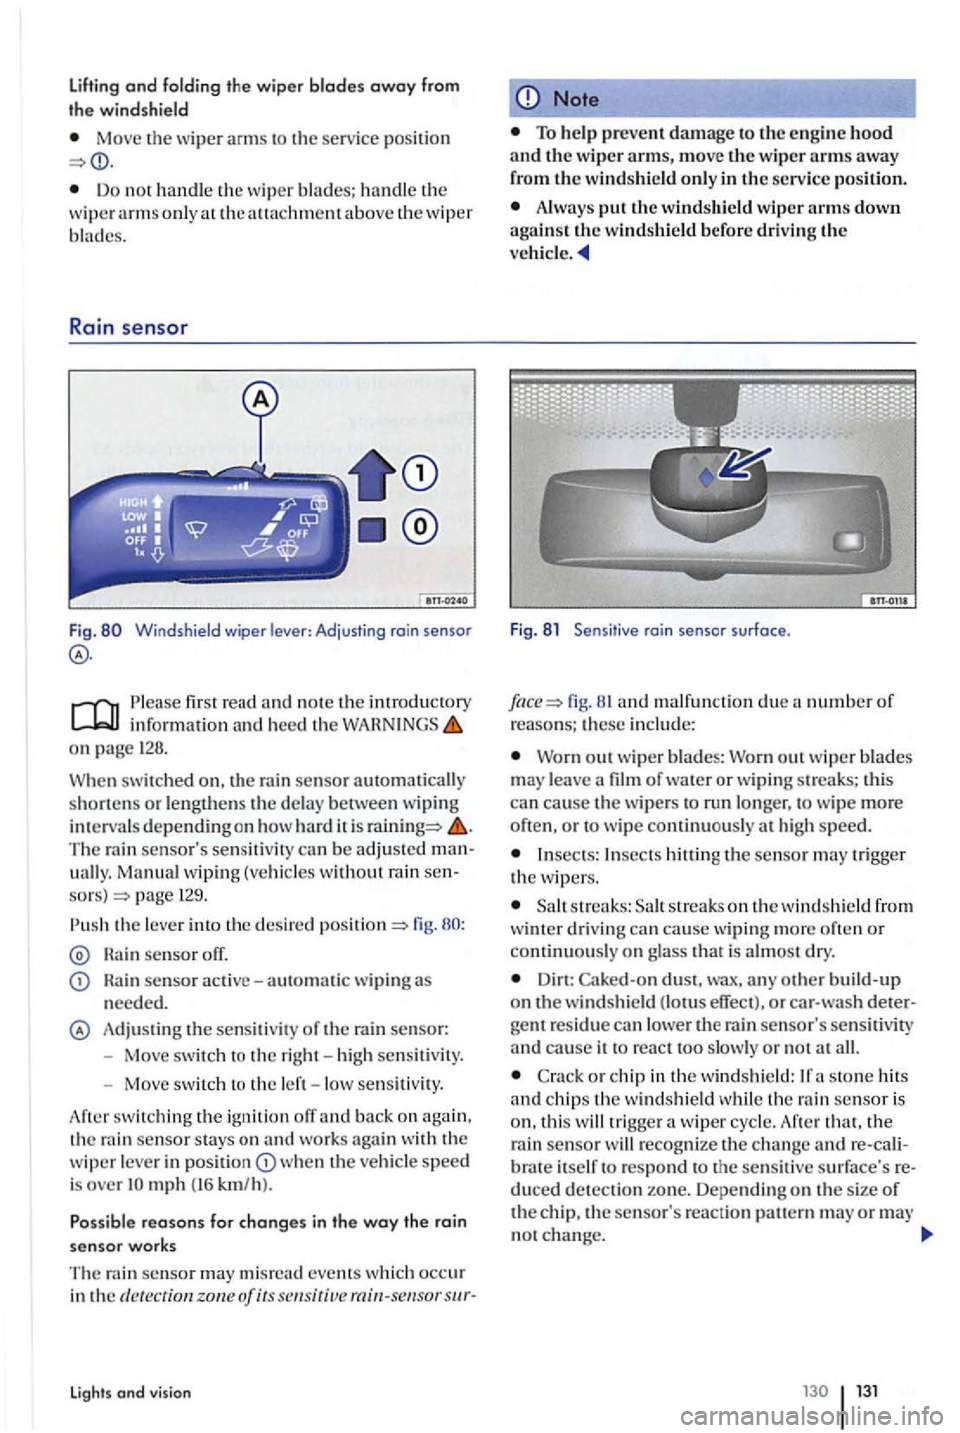
Fig. Windshield wiper lever : Adjusting rain senso r
first read and note the introductory information and heed th e WARNINGS on page 128.
When
swit ched on. the rain sensor automatically
shorte n s or le ngthens the de lay betwee n wiping in tervals depend in g on how hard it is The rain sensor's sensiti vity can be adjusted manuall y. Manual wiping (vehicle s w ith out rain sensors) page 129.
Rain sensor off.
sensor active-automatic wiping needed.
Adju stin g the sensit iv it y of the rain sensor:
- Move switc h t o the right -hi gh sen siti vity.
- Move sw itch to the left - low se nsitivity.
swit ch in g th e ignition off an d back on again ,
t h e ra in sensor stays o n and works agai n with the wiper leve r in w he n the vehicle speed is over
events which occur in the dete ction zone of its
Lights and vision
Note
Always the windshield wiper arms down against the windshield before driving the ve hicle.
Fig . 8 1 Sensit ive rai n sensor surface .
fig. 81 an d malfu nction due number of reasons; these in clu de:
Worn out w ip er blades: Wo rn out w iper blades m ay lea ve a film of water or w ipi ng streaks; thi s can cause the wipers run longe r, to wip e more often , o r to w ipe continu ously at h ig h speed.
Insects: Insects the sensor may tri gger the w ipers .
s tr eaks: streaks o n th e w indsh ie ld from
w inter drivin g can cause wiping more often or continu ously on g lass that is almos t dry.
Dirt: Caked-on dust, wax, any build- up on the windshield (lotus effect), or car -w ash detergent residue can lower the rain sensor's sen siti vity and cause it to react too slowly or n o t all.
C ra ck or chip in the wind shi eld :
th at, th e
rai n sensor will recog nize the c ha nge re -cal iitself to respond to the sensit ive su rface's reduced detection zone. Depending on th e s ize of the chip, the sensor's reaction ern may or may no t change.
Page 135 of 541
mirror
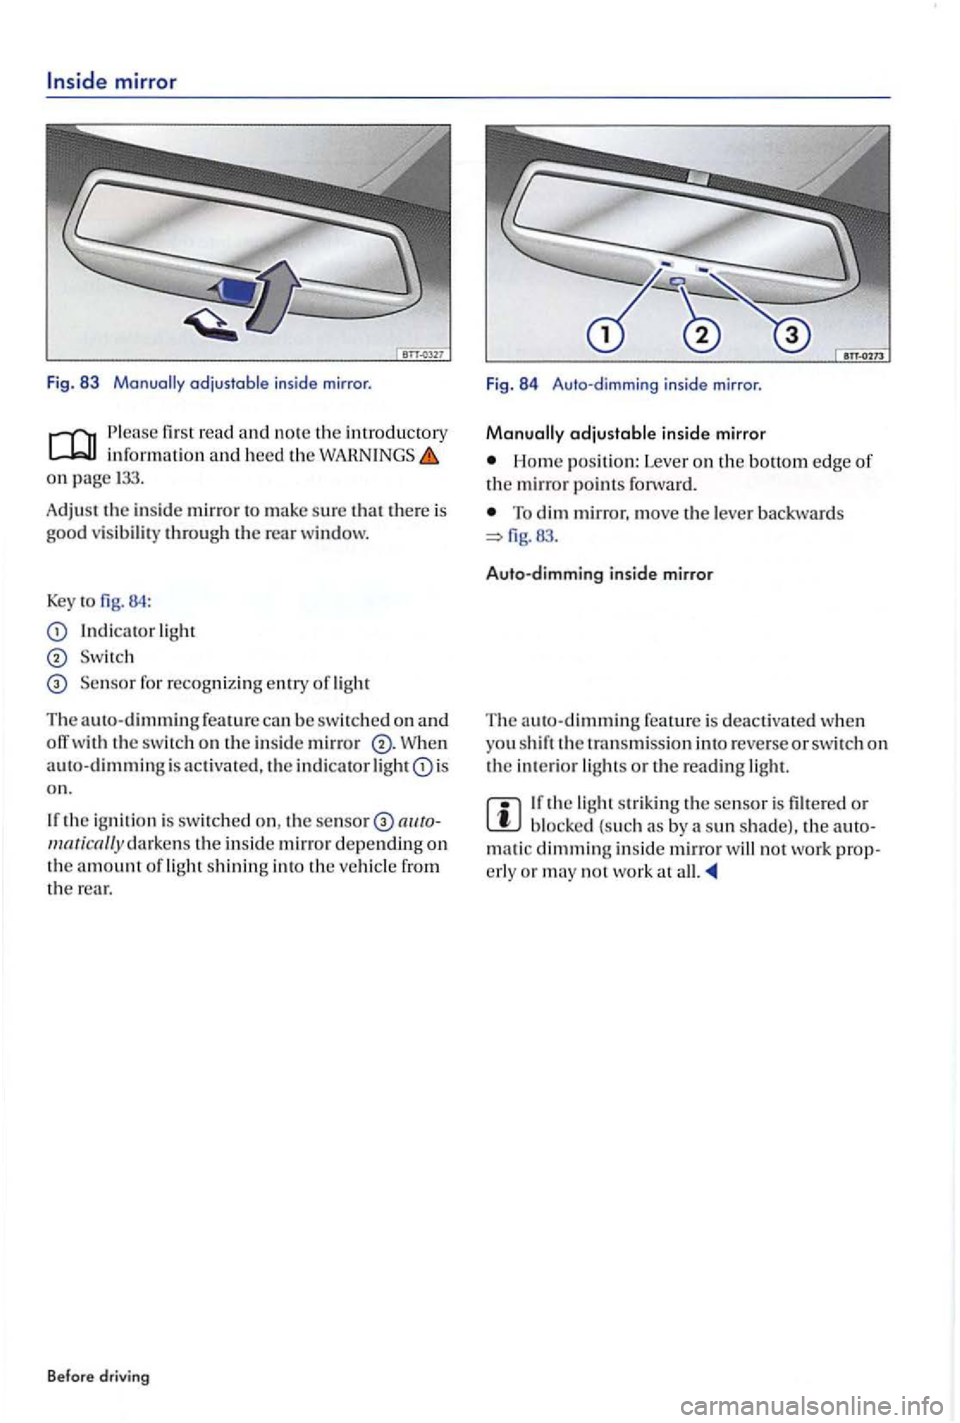
Fig. 83
read informatio n and heed the on page
Adjust the in sid e mirror to make su re that there is good v is ibilit y throug h the rear window.
Key to 84 :
light
Se nsor for recognizin g e ntry of ligh t
The auto-dimming feature b e swit ched o n and th e switch on th e in side mirror W hen
a u to-dimm in g is activate d , th e indicator light is
o n.
the ig nition is switched on , the se nsor the insid e mirror depending on th e amount of light shining into the vehicle from the
Before driv ing F
ig.
84 Auto -dimmi ng inside mirror .
adjustable insid e mirror
Home position: Lever on the bottom edge of the mirror point s forward.
To dim mirror, move lever b ac kwards
Auto -d imm ing inside mirro r
T he a uto-
dimming feature is deactiva ted when
you shift th e tra nsm issio n int o reverse or switch o n the in terior lights or the reading light.
the light striking the sensor is filt ere d or bl ocke d (suc h as by sun shade). the matic dimming insid e mirror no t work o r may not work at
Page 136 of 541
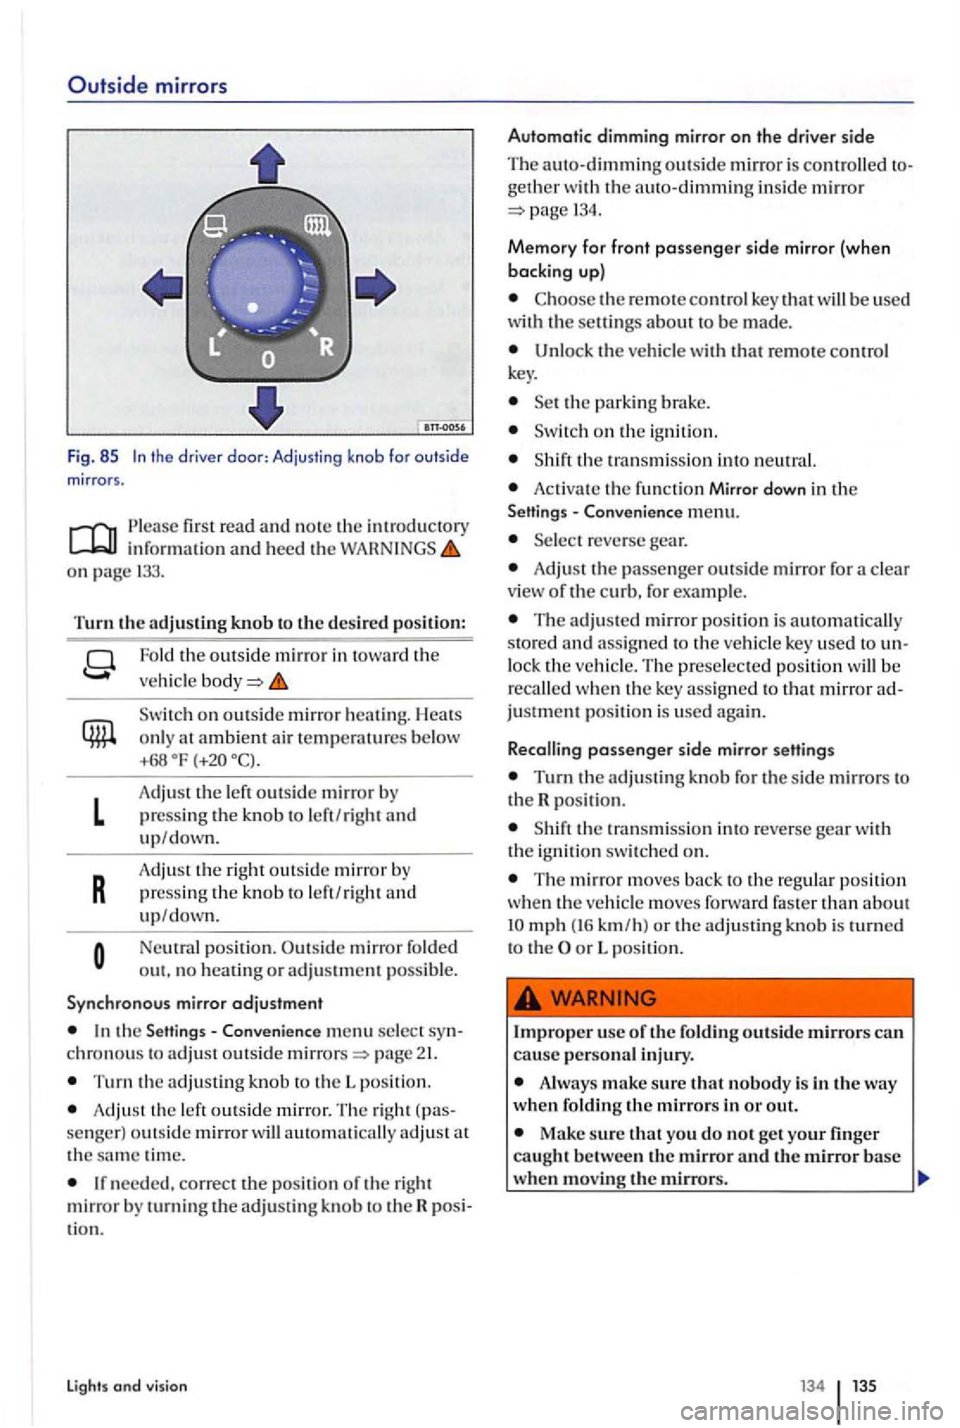
Outside mirrors
Fig. 85 the driver doo r: Adjusting knob for outside mirror s.
o n page 133.
Turn the adjusting knob to the desired po siti on :
L
R
Fold the outsi de mirror in toward the
veh i
cle
on outsid e mirror heating. Heats
o nl y at ambient air tempe ratures b e low +68
A dju st the left outside mirro r press ing the knob to le ft/righ t
pressing the knob to le ft/rig h t and up/down.
Neutral position . mirror fo ld ed out. no heatin g or adjustment possib le .
Syn ch rono us mirror adjustment
the Sett ing s- Conveni ence men u select chronous to adju st outside page
T urn the adj ustin g knob to th e L positi on.
Adjust th e left outs ide m irror. Th e righ t
th e sa m e tim e.
needed, correct the positi on of the right mirror turning the adjust in g kn ob to th e tio n.
Lights and vision
Automatic dimming mirror on the drive r side
Th e auto-dimming outs ide mirror is contr olled geth e r w ith the auto-dimming inside mirror 13 4.
Memory for front passenger sid e mirror (when
backing up)
the re m ote contr ol key that will be use d
with th e settin gs about be made.
Unloc k the veh icle with tha t re mote control
k ey.
o n the ign ition.
the transmiss ion into ne ut ral.
Acti vate the fun ctio n Mirror down in the - C onvenience menu.
reverse gear.
Adjus t the passenge r outsid e mirror for a clear view of the curb, for example.
The adjusted mirror positio n is automatically
s to red and ass igned to the ve hicl e key used to lock the vehicle. The preselecte d po sit ion w ill recalled w hen the ke y ass igned to that mirror justment pos it io n is used again .
Recalling
passenger s id e mirror setting s
Turn the adjusting for the sid e mirrors to the R posit ion.
T he mirror m ove s back to the re g ul ar position wh en the ve hicl e m oves forward faster than about mph (16 km /h) or the adjusting knob is to th e or L po sition.
use of the foldin g outside mirrors can cause persona l injury.
Alway s make sure that nobody is in the way w hen f oldin g the mirrors in or out.
Make sure that you do not get yo ur finger caught between the mirror and the mirror base when moving the mirrors.
Page 154 of 541
Never drive fa ster than mph mph -
Never try to stop the swaying by accelerating.
fir st read a nd note the imroductory informatio n and heed the on page
If the ve hicle was fac tory-equipped with a trail er
hi tch, all technical and lega l require m em s fo r
trailer towi ng have already been m et.
use a trai le r hitc h w hich is approve d for the
g ro ss wei ght rating of the trailer yo u want to tow. The hit ch mus t be s uitabl e fo r your vehicle and
tr ailer and be securely bolt ed to the ve hicle's chassis. use a trail er hitc h with a re movable ball mount. Alway s check and follow the trail er
hi tch manufacturer's information. Neve r in stall a o r tra ile r hitch on yo u r vehicle.
D o n
ot use a bumper-mounted trai le r h itch
Never insta
ll a trailer hitch on the bumper o r or on th e bumper mountings. The traile r hit ch mus t not in terfe re wit h the impact-absorbing bumper syste m . D o not make any changes to the ve hicl e exhaust and brake sys te m s. From time to time, check that all hitch m oumin g bolts are securely fas ten ed . W hen not towing. re m ove the trailer hi tch. Thi s help s ke ep the hitch from causin g damage if your ve hicl e is hit from behind.
Eng ine cooling syste m
Tow ing a tra
iler makes the e ngin e
If you arc dri ving a new ve hicle or ave-do not tow
a t railer
mil es
need
load it h as to pull.
When you are not towin g, remove the trailer
models need trail er hit ch to tow or tow -s tart other ve hicl es. may
Trailer brakes
If your trail er has its own brake s, make sure it
meet s all regulati ons. Th e trailer bmke sys te m
mu st never be directly connecte d to the ve hicle's brake system .
Safety c
hain s
A lways u
se safety chains be tween yo ur vehicle and
th e trailer.
Trail er rear lights
Tra
ile r lights must meet all regulation s.
Neve r
connect the tmil er l ights directly to the e lec
trica l s ys tem of your ve hicl e. Be su re to check wit h
your authorized Volkswagen dealer or authorized Volk swagen Faci lit y about correct w iring, sw itches and re lay s.
Outside mirrors
I f
the s ta ndard ou ts id e mirror, addition al outs ide m irrors are needed and required b y law in so me coumrie s I states I provin ces. The o uts id e
mirr o rs mus t b e adjuste d b efore driv in g and g ive good v iew to the rear.
Max im um power consump tio n f or th e trailer
D o no t excee d the power ratin gs liste d in the chart below.
E l
ectrical consumers power con-sumptio n
Taillight s
Turn signals pe r sid e 54 wat ts
Page 155 of 541
Electrical consumers Max. power sumption
Brake lights total
An improp erl y in sta ll ed or incorrect t railer hit ch can
trail er any
m ore , remove the entire trailer hitch. Always
sea l all bolt ho les to prevent water and deadly
exhaust fumes from getting int o the ve hicle.
Hitching up and connecting a
Ple a se firs t r ea d and no te the introdu cto ry informati on and heed th e on pag e 152.
n ers witho ut str etc hi ng the c hain s. T he safety
c hain s mu st n ot drag o n th e g ro und, ho wev er.
Trailer electrical socket
The vehicl e m ay be opti onally equipped with a
setup for con nec ting a trailer so cket. Th e ele ctrical connec tio n betwee n th e towing ve hicle and the
trailer is a convent io nal7-pin trailer socke t.
T raile r rear lights
Mak e sure that th e trailer light s work prop erly and
m ee t le gal re quir em ent s. D o no t excee d th e
im um po w er co nsumpti on f or th e trail er 153 .
Before drivin g
Note
If you tow a trailerfrequenll y,
ween th e re gular maintenance and inspecti on
int erva ls because of the extra load it has to pull.
Do not use a trailer with LED (lig ht emitting
di ode) rear lights, as they ca n d amage your ve hicle's ele ctroni cs.
If the uses too much elec tricity, the
ve hicle' s e lectroni cs may be damaged.
Never connect the electric.1.l system for th e
trailer directly to the electrical connection s for
th e rear light s or to any other unsuitabl e powe r
sources. Use onl y a suit abl e connector to provide
po we r to trailer.
In some co untries an additio na l fire extingui sh er must be carried if th e tota l w eight of th e trailer exce e d s 5,512lb s.
Improp er connections to the ve hicl e elec trical
sys te m can cause malfunction s that affect the
entire vehicle electrical system, which lead to acciden ts and seriou s pe rso nal injury.
Have any work on the electrical syste m d on e
b y an authorized Volkswage n dealer or autho
rized Volk sw age n Facility.
Never connect th e e lectrical syste m for the trailer to Ll1e e lectrical connections for
th e rear lights or to any other unsuit abl e power
sources . Usc only a suitabl e con nec tor to vide power to the trail er .
Note
------------------------~ Never attach trailer to the vehicle or leave it taclled to the vehicle when the trail er i s supported
b y a trailer jack or blocks. Various thin gs (sucl1 as c h a ng e in traile r or vehicl e load or a fla t tir e) can lower or raise the ve hicle. Thi s subj ects th e trailer
hit ch and th e trailer to strong fo rces that can d a mag e th e ve hicl e or the trailer.
Page 181 of 541
Warning and indicator
Please fir st r ead and not e th e int rod uc tory informatio n and heed th e on pag e 179.
Light s
Possibl e cause up
Brak e pedal not d ep ressed!
Brake pedal w as not depressed before a new drive position wa s selected with the
se lec to r l eve r. o r be fo re pe rformin g
Possibl e caus e
The re lease bul!on in th e s elec tor leve l did
n o t en gage in po siti on. V ehicle is preve nted.
th e ig niti on i s s witch ed on, seve ral warnin g
and indica to r lig hts c om e on briefly fo r a function
c heck . T hey go out aft er few sec o nd s.
to hee d warning light s and in strument
clu ste r te xt m essages cause the v ehicl e to
b reak d own in and result in colli sion and seri ou s persona l injury.
Neve r ignore warning lig ht .s or t ext
drivin g
Prop er re sponse
Dep ress the brake pedal.
Appl y th e brake pedal to sele ct a dri ve position
Prop er re sp o nse
E ngage se lecto r lev er
page 183.
Alwa ys stop the ve hicl e as s oo n it is safe to
d o s o.
stalled or stopped f or r epa ir , move the ve hicl e a safe di sta n ce
Note
Fa ilur e to heed warning lights o r tex t