2012 VOLKSWAGEN GOLF PLUS stop start
[x] Cancel search: stop startPage 189 of 541
Braking, stopping, and parking
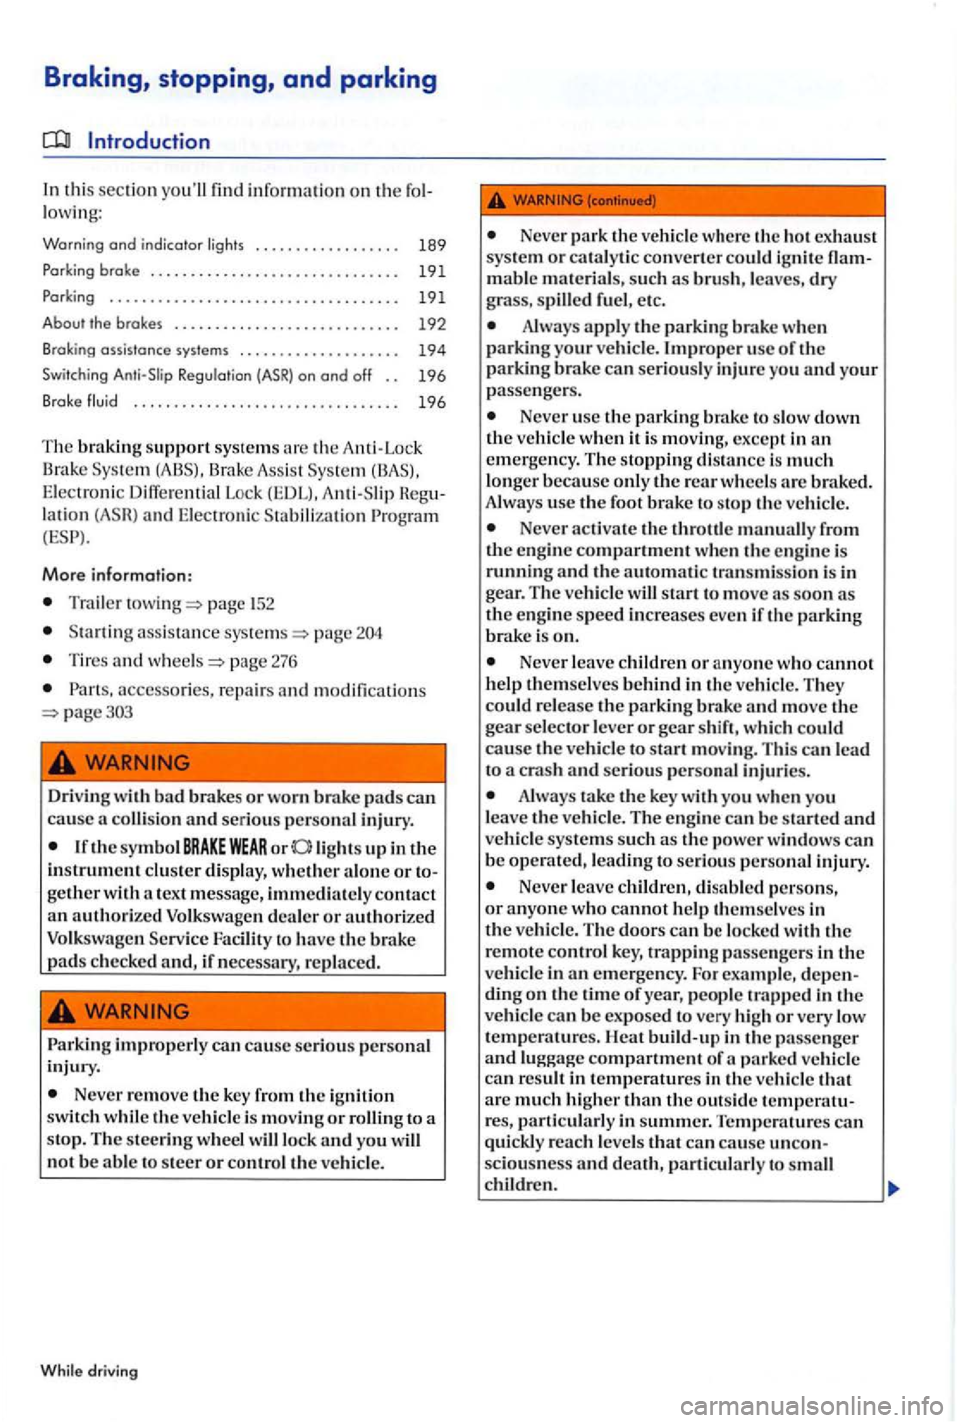
Introduction
In this section yo u'll find inform ation on fo l
lowi ng:
Warning and indicator lights . . . . . . . . . . . . . . . . . 189
Park in g brake . . . . . . . . . . . . . . . . . . . . . . . . . . . .
.. . . . . . . . . . . . . . . 19 1
About t
he brakes . . . . . . . . .. . . . . . . . . . . . .. . . . 192
Bra king assistance sys tem s . . . . . . . . . . . . . . . . . . . . 194
Switching Anti-Slip Regulation (ASR) on ond off . . 196
Brake fluid . . . . . . . . . . . . . . . . . . . . . . . . . . . . . . . . . 196
T he brakin g support syste ms are Brake A ss is t E lec tro nic Differ e n tial Loc k (EDL). Anti-Slip
M ore information:
Trail er page
pag e
Tires and page 276
acce ssories, r epa ir s and modifi catio ns
brakes or worn brake pads can
ca use colli sio n and serious personal inju ry.
light s up in the
in strument cluste r di splay, w heth er a lo n e or to
ge ther with tex t message, immediat ely conta ct an authorized Volk swage n dea ler or authorized
Volkswag en Se rvi ce Faci lity to have th e brake pad s ch ecke d and , if necessary, re pl aced.
WARNING
improperly can cause se riou s pe rso nal
injury .
Never re m ove key from the ignition switch while vehicl e is m ov ing or ro llin g to a
s top. The steering w heel w ill lock and you not be
Never park the vehicle w here the ho t ex ha ust
syste m or catalyti c convert er could ignit e flam
mabl e mater ia ls, su ch as brus h , leaves , dry grass, spilled fue l, e tc .
Always apply th e parki ng brake whe n
p a rki ng your veh icle. Imprope r u sc of th e
p a rking bra ke can se rio usly injur e you and your passe nge rs.
Never use the
e m ergency . The stopping dista n ce is muc h
longer b ec au se onl y the wheels arc braked . use the foot brake to sto p the vehicle .
Never the throttl e from
th e e ng in e
th e automati c transmission is in gear. The ve hicle will start t o move as soon the e ngine speed ev en i f th e brake is on.
Never leave childr en or anyo ne w ho canno t
h elp them se lve s beh in d in the vehicl e. They could re leas e the brak e move the gear selector leve r or shift , wh ic h could cause th e vehicle to start m ov ing. Thi s ca n lea d
to a cras h and seri ous personal injuri es.
Always take the key with you when yo u
leave th e ve hicle . The engine ca n be started and ve hicl e sys te m s s uch as the power wind ows can
b e operate d , le ad ing to seri ous perso nal injury.
Neve r leave childr en , di sabled perso ns, or a nyon e who cannot h elp them se lves in the vehicl e. T he doors can b e lo cke d wit h the re mote contro l ke y, trapping passe nge rs in the
ve hicle in an emerge ncy. For exa mpl e, dep ending on th e tim e of year, people trappe d in the
ve hicle can be ex pose d to very high or very temperatures. Heat build -up in the passenger and parked vehicl e result in temperatu res in the ve hicl e th at arc much hi gher than the outsid e tempe mtu
res, partic ul arl y in summer. T emperatures ca n
qui ckly reac h le v e ls that can cause uncon
scio usn ess ch ildr en.
Page 190 of 541
Note
Always be careful when you park in areas with parking barriers or high cmbs. These vary in h eigh t and could damage your bumper andrelated parts ifLhe front of your ve hicl e hit s a barrier or curb that is too high while you are getting into or out of a parking spot . To help prevent damage, stop before the tires of your vehicle touch a parking barrier or curb.
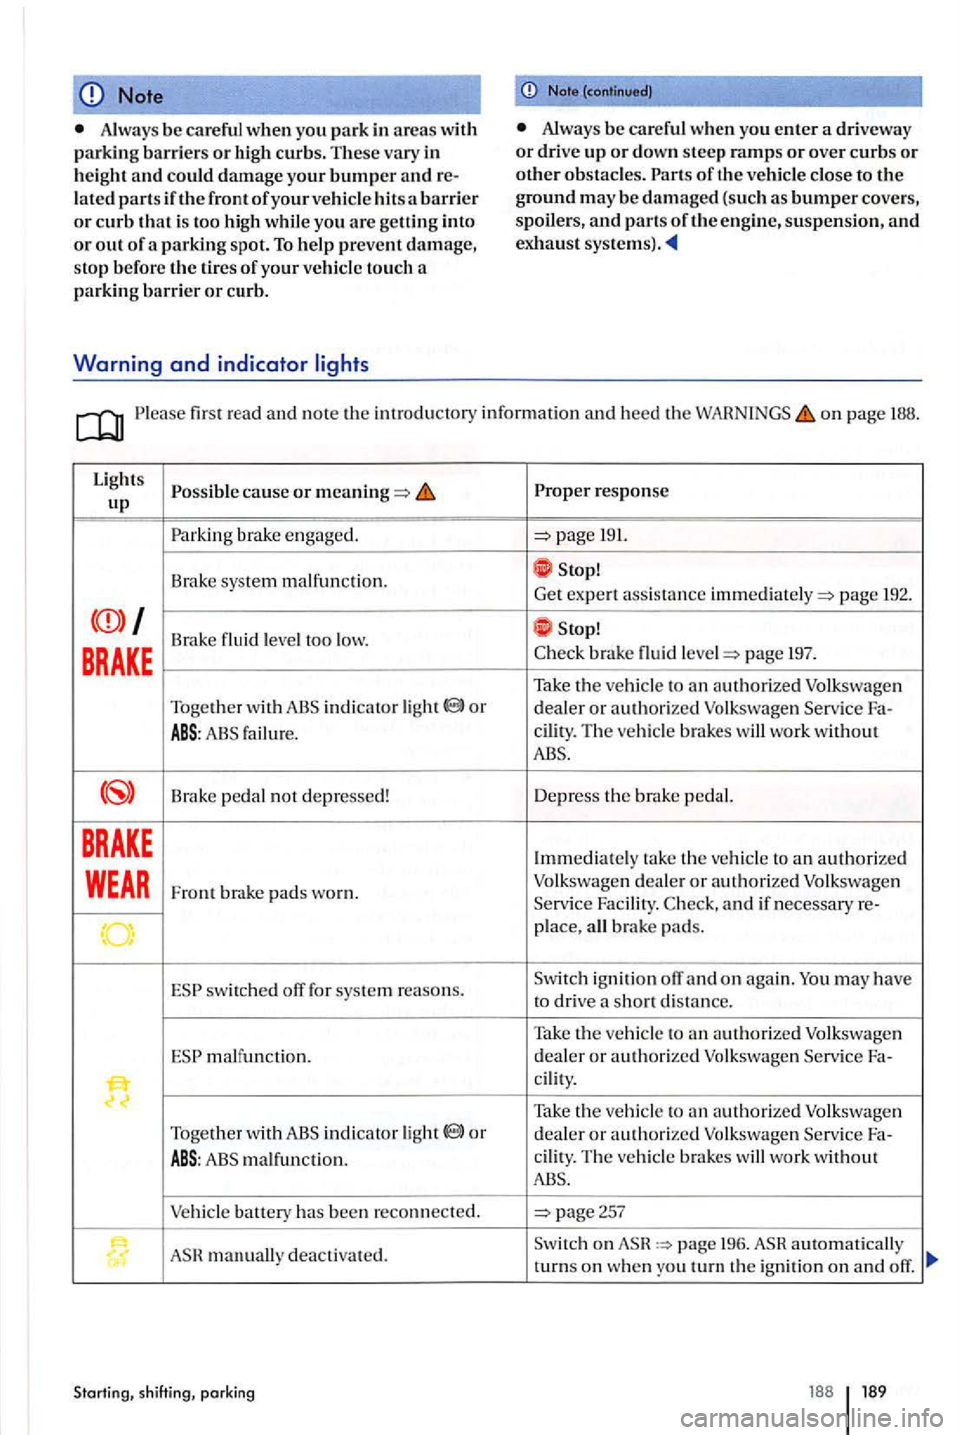
Warning and indicator
Note (continu ed)
Always be careful when you enter a driveway or drive up or down steep ramps or over curbs or obstacles. of the vehicle close to Lhe ground may be damaged (s u ch as bumper covers,
spoilers, and parts of the engine, suspen sion, and exhaust
firs t read and note Lhe introdu ctory informat io n and hee d the WAHNINGS page 188.
Lig ht s
191.
Brak e syste m malfun ction. Stop!
Get
expert assi stance pag e 192.
Brake fluid leve l too low. Stop!
BRAKE brake fluid page 197.
Take the vehicle to an au thorized indicator light or dea ler or authorize d Volksw agen Service Fa-
ABS: failure. ci
lity. Th e ve hicl e brakes will work without ABS.
Brake pedal not depressed! Depress the brake
pedal.
BRAKE Immediate ly take the vehicle to an auth orized
WEAR Front brake pads wo rn. Volkswagen dealer or authorized Volk swage n
Serv ice Facility. and if necessary re-place, all brake pads.
switc h ed off for syste m r easo ns. Switch ignit ion off an d on again . You may have
to dri ve a short dis tan ce.
Take th e ve hicle to an authori zed Volksw age n malfunc ti on. dealer or a
uthorize d Volk sw agen Service Fa-cilit y .
Tak e the vehicl e to or d ea le r or a uthori zed Volksw agen Service Fa-
ABS:
page257
manually deacti va te d. S
witch on p age 196. a ut om atically
turns on w he n you turn the ig nition on and off.
Startin g, shift ing, parking 188 189
Page 192 of 541
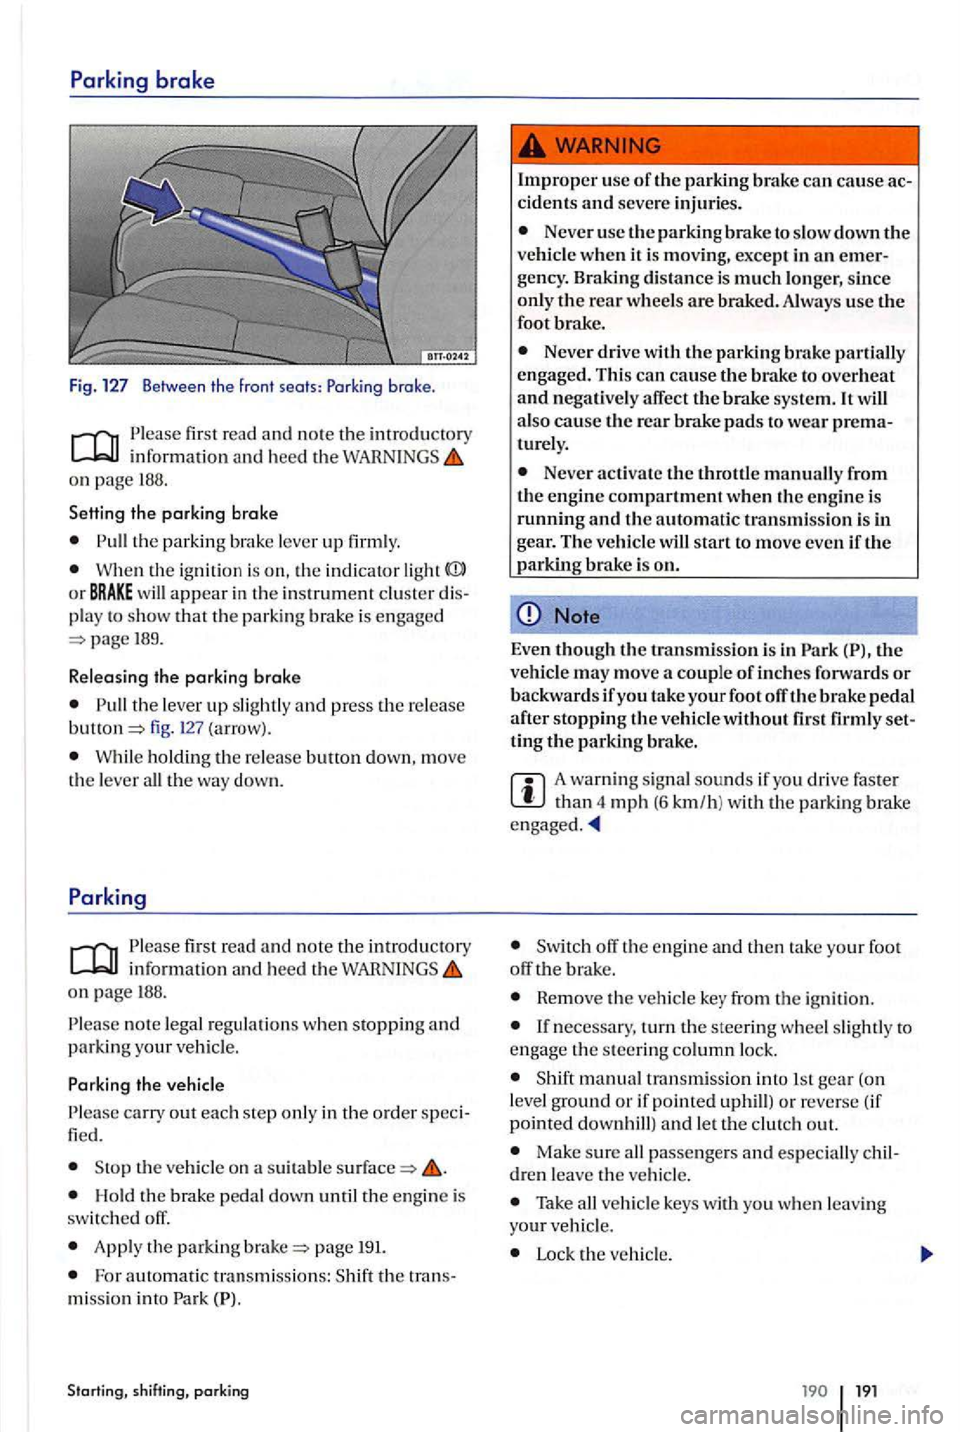
first read and note the imrod uctory
on pag e 188.
Setting the parking brake
the parkin g br ake lever up firml y.
Wh en th e ignitio n is on, the in dicator light
189.
R e leasing the parking
brake
the lever up slightl y and press the release fig. (arrow).
W hil e ho ldin g th e re lease butt on down, move
t h e leve r all th e way down.
info rmatio n and hee d th e on page 188.
n o te lega l regulations when stopping and parking your veh icle.
th e vehicle on a suitabl e
Hold th e brak e pedal dow n until the engin e is
switc h ed off.
App ly the parking page 191.
Fo r a utomatic tra nsmiss ions: th e tra ns
mi ssio n in to Park
Starting, shift ing, parking
Improper use of the parking brake ca n cause ac cidents and seve re injurie s.
Never use the pa rkin g brake to slow down the ve hicl e when it is moving , except in an emer
gency . Braking distance is much longe r, since only the rear wheels are brak ed. Always use the
foot brake.
Never drive with the parking brake partiall y
engage d. Thi s can cause the brake to overheat and negatively affect the brake syste m. It also cause the rea r brake pads to wea r prematurely.
Never acti va te t he throttl e manually from
th e e ngin e compartment when th e engine is running and the automatic tra n smissio n is in gear. The ve h icl e w ill start to move eve n iftl1 e parking brake is on.
Note
Even t11ough the transmi ssio n is in th e
ve hicl e may move a couple of inches forward s or backwar ds if you take your foot off the brake pedal after s toppin g the vehicle without set
ting tl1e parking brake.
A wa rning sig nal sounds if yo u driv e faste r th an 4 mph (6 km/h ) w ith th e parking brake
off the engin e and th en tak e yo ur foot
off brak e.
Rem ove the veh icle ke y from th e ign ition .
manual transm iss ion in to 1 st gea r (on
l evel ground or if pointed uphill) o r re ve rse (if
point ed
Make sure all passengers and esp ecially children leave th e ve hicle.
Take all ve h icle keys with you w he n le a vin g your ve hicl e.
Lock the ve hicl e.
19 1
Page 194 of 541
Brake booster
Th e brak e boo ste r w ork s o
nly wh en the engi ne is
running . It increa se s th e forc e on the brake s above and beyond the pre ssure put on th e brake pedal by
the driver.
If the brake booster is not working, or if th e ve hicl e
ha s to be towed, you have to push th e brak e
p ed a l hard er to make up for the lack of booster
New brake pads do not provide maximum braking performance.
New brake pads do not have the best ping power for the first km) and must be You can compensate for the slightl y reduced braking force by putting more pressure on the brake pedal.
Drive with
Never follow otl1er vehicles too closely or put yourself into other sit uation s that might require sudden, hard braking ,especially when the brake pads have not been broken
Overheated brakes
When driving downhill , the brakes have to
work es pecially hard and heat up quickly.
Before driving downhill, es peciall y on th at are long or steep, alwa ys reduce s peed and shift into lower gear (manual or automatic
transmission) so that the engine he lp s to brake
the vehicl e. Othenvise, the brake system cou ld
ov erheat and pos sibly u se the brakes
w hen yo u need them to slow the v ehicl e down
m ore or to stop.
A damaged front spoiler or a non- standard spoiler can reduce airflow to the brakes and
Starting, shifting, parking
Wet brakes or brakes witl1 icc or road salt
react slow er and n eed lo n ger stoppin g tances.
Ca refully apply the brakes to test th em.
Always dry brak es and clean off ice and salt
coat ings with a few cautious
tions permit.
Driving when the booster is no t working
in creases stopping distances and can cause dent s and seriou s personal injuries.
Never le t the vehicl e coast when the en gine is
switc hed off.
If the brake booster is not working (such as
w he n the vehicle is bein g towed), a lot more pedal force is needed to slow down and stop.
Note
Neve r the by keeping your foot on the to brak e.
Constant pressure on the brake pedal can make th e brakes overheat. This sub stantially reduce
braking performance, increase stopping di stan ce, and can cause co mpl ete failure of th e brake
s y stem.
Before driving downhill, especially on that are long or steep, always reduce speed and shift into lower gear (manua l or automati c
When th e front brake s are serviced , you should have the rea r brake pads inspected
rized Volksw agen deal er or au th orize d Volkswa gen
Service Facility vis uall y insp ec t th e pads through
th e o pe nin gs in the wh eel rim s or from nea th tl1e ve hicle. If n ecess ary, the wheels ca n be
t ake n off for a mor e thorou gh
192 193
Page 204 of 541
first r ead and n ote th e introducto ry in forma ti o n o n page
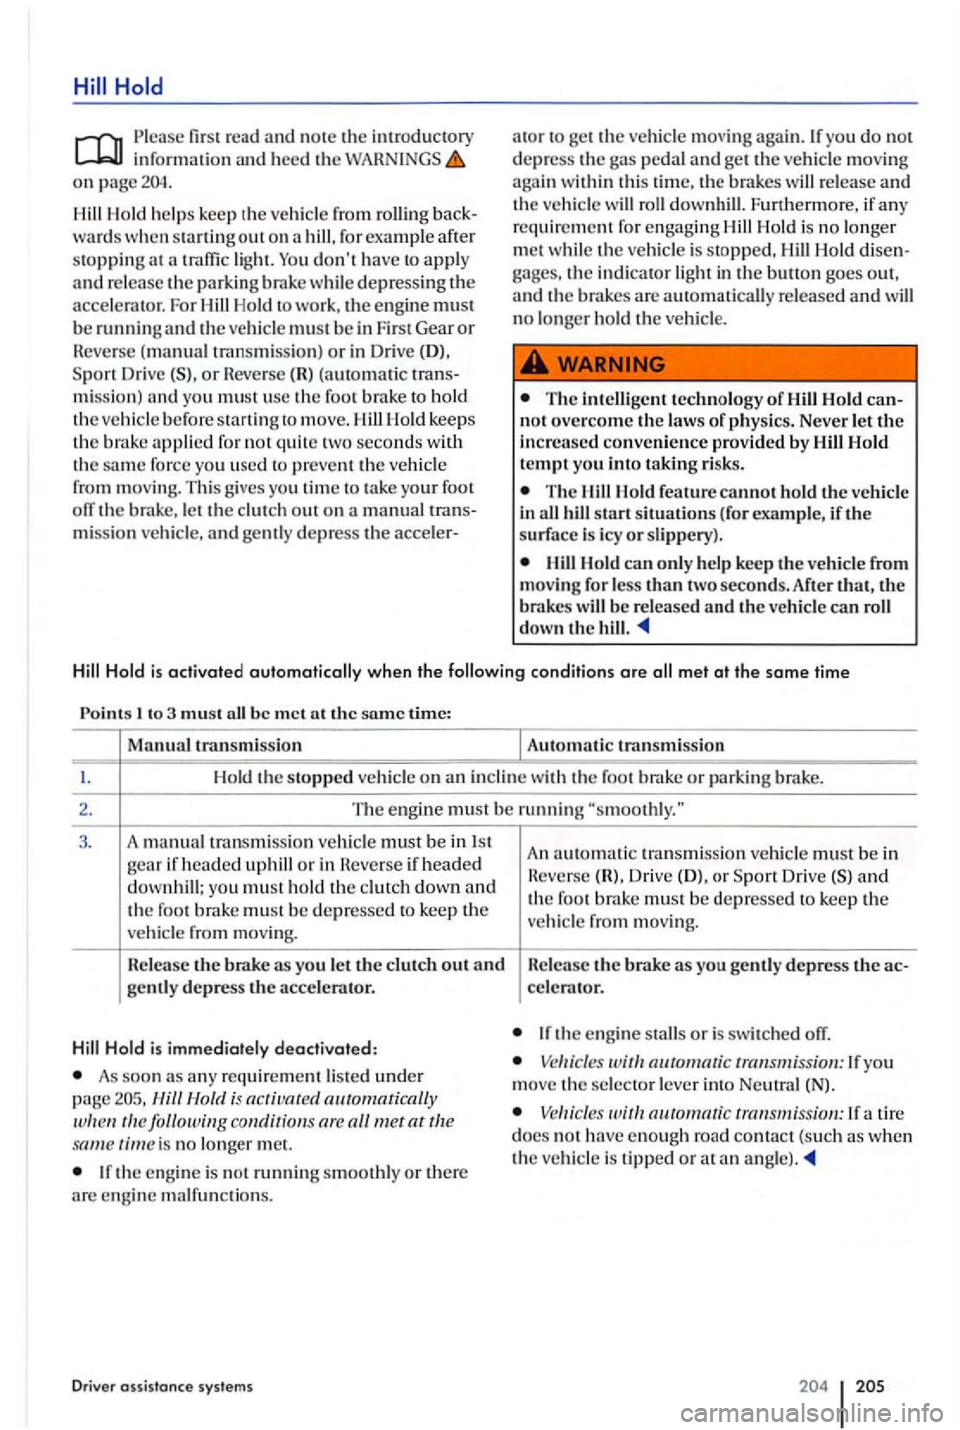
Hill Hold help s keep th e vehicl e from rollin g back
w ard s w hen sta rtin g out on a hill , for example aft er
s topping at a lig h l. don 't h ave to appl y
and r e le ase the parkin g brak e whi le dep re ss in g the For Hill Hold to work . th e e ng in e m ust
b e runni ng and the veh icle mus t b e in First Gea r or R eve rse (m anual tran smissio n) o r in Driv e (DJ. Dri ve (S), o r Reve rse (R) (a utomatic trans
mi ssion) and yo u must usc the foo t b ra ke to ho ld
th e ve hi cle befo re
force yo u u sed to pre ve nt the ve hicl e
from moving. This g ives you tim e to take your foo t
off the brake, le t t h e clu tc h out on a m anual t ran s
m ission ve hicle . and gently depress the acc ele r- a
to r to
p edal and ge t the ve hicl e moving
a ga in w ithin this time, the brake s will and the ve hicle will roll downhill. Furtherm ore , if re qu ire m en t f or e nga gin g Hill Hold is no lo nge r
m et while the vehicle is s toppe d, Hill Hold di sengages, the in dicator light in the butto n goes out,
a nd the brakes are automatically re leased and will no lo nge r h old the ve hicl e.
The intelligent technolo gy of
The llillllold feature cannot h old the ve hicl e
in all start situ ations ( for example, if the
surface is icy or s lip pery ).
Ho ld can only help keep the ve hicl e from mov ing fo r l ess than two seconds. Af te r tha t, the
b rakes be re lease d and the ve hicl e can roll
d ow n the hill .
Hill Hold is activated outomoli colly when the following conditions ore all met at the some tim e
I to 3 mus t b e m et a t the sa m e time:
M
anua l tran smissio n Automatic transmission
H old the stoppe d ve hicle on a n in cline w ith th e foot brake o r park in g brak e.
2.
3.
The e ngine must be run ning
if uphill o r in Revers e if headed
d o w nhill; you must hold th e clutch down and the foo t brak e must b e d ep ressed to keep th e
ve hicle from mo ving.
R elease the brake as yo u let the clutch out an d
g e ntl y de press the accelerator.
Hill Hold is imm ediat ely deactivated :
As soon an y re qu ire m en t liste d unde r page is a cti ua te d auto matically follo win g con d itio ns ar e time is no longe r m el.
If the engin e is not runnin g smoothl y or there
a rc e ng in e malfun ctions.
D river assista nce systems
A n autom atic transmissio n ve hicle must b e in
H e vc rse (R). Dr iv e (D ), or S po rt Drive ( S) and th e foot brak e m ust be d epresse d to keep the
ve hicle from movin g.
R el
ease the brake as yo u gentl y depress t11e celc rnt or.
If th e e ng in e s tall s or is swi t c he d off.
Vehicles ruitl1 automatic If you m ove the selector lever i nt o N eutral (N).
Vehicl es autom ati c tran smission: If a tir e docs no t h ave eno ug h ro ad contac t (s uch as w hen the ve hicle is tippe d or at an
Page 352 of 541
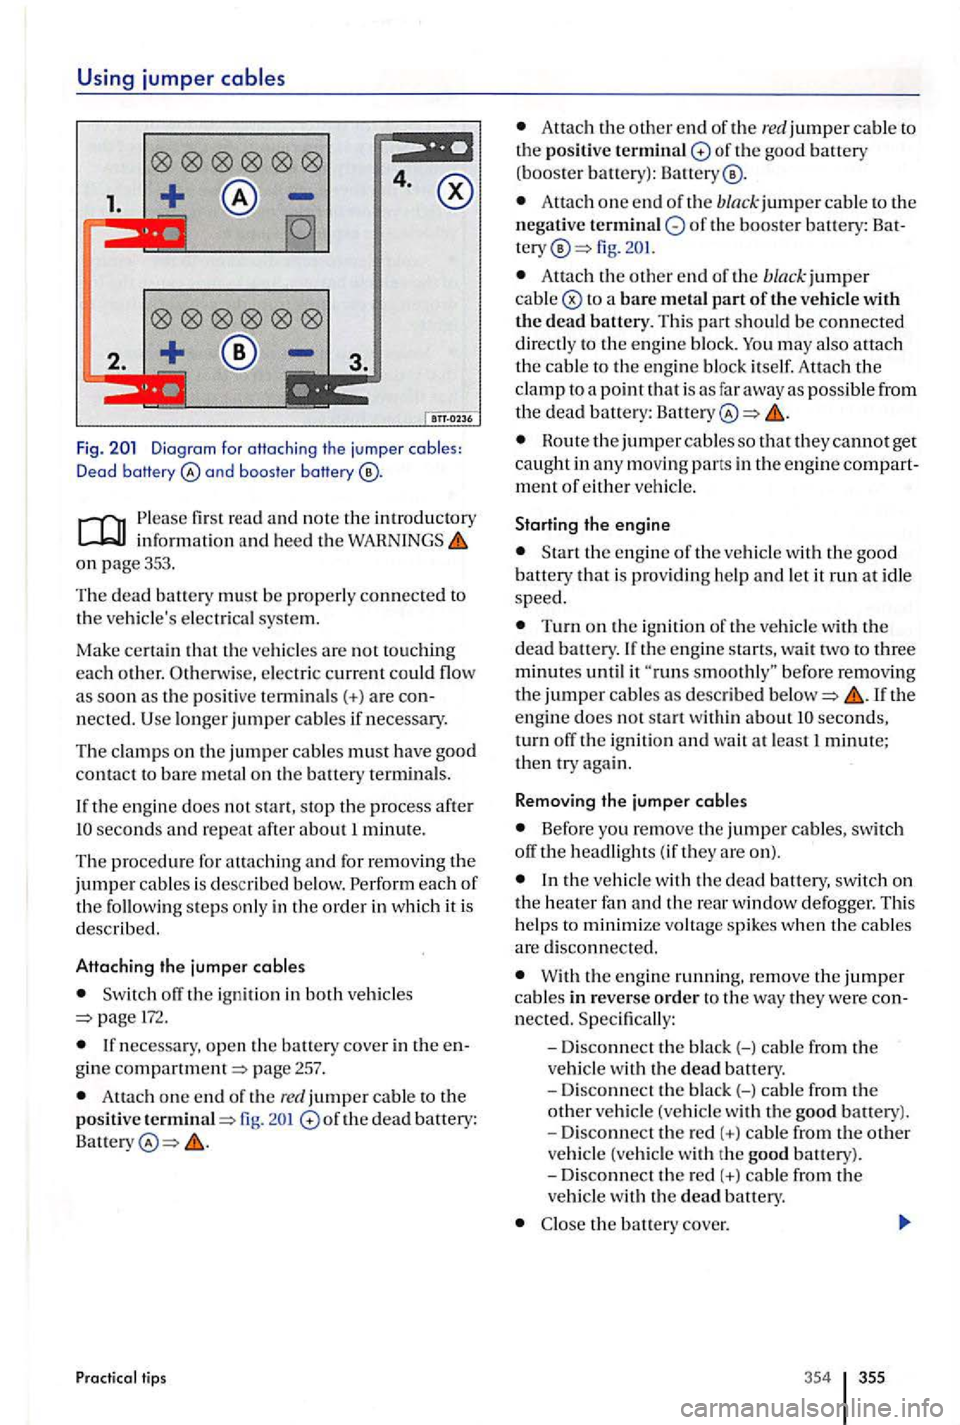
Using jumper
4.
1.
2.
Fig. and boos te r baHery
informat ion and heed the on page 353.
Th e
dead battery must be properly connected to
th e ve hicle's electri cal sys tem.
Ma
ke certain
pos iti ve termin als(+) a re
the engine does not start, stop the process after seconds and repeat after about 1 minute.
Th e procedu re for attach ing
and for removing the jumper cables is desc ribed below.
off the ign ition in both vehicle s 172.
gine compartment=> page 257.
Attach one end o f th e red jumper cable to the positive termina l=> fig. of th e dead battery:
Pr actical tips
Atta ch the o ther end of the re d jumper cable to th e positive terminal of the good battery (booster battery):
Attach one e nd of the black jumper cable to th e
n egative of the booste r battery : fig.
Attac h the oth er e nd of the bla ck jumper cable
may also attach the cable to the e ng in e bl oc k itself. Attach the clamp to a poi nt that is as far away as possible from the dead battery: Battery
Route the jumper cable s so that they cannot get caught in a ny moving pans in th e engine ment of either vehicle.
Starting the engine
is prov idi ng h elp and let it run at i dle speed.
Turn on the ign ition of the ve hicle with the dead battery.
seconds, turn off th e ignition and wa it at least 1 minute; then try again.
Remo ving the jumper cables
Before yo u remove the jumper cables , switch
off the headligh ts ( if they are on).
the ve hicl e w ith the dead battery, switch on the heater fan and the rear window defogger. This
h elp s to minimize voltag e spikes when the cables are disconne cted.
With the engin e running. remove the jumper cable s in reverse order to the way they we re
the bauery cove r.
354 355
Page 354 of 541
Tow-starting and towing
Introduction
In thi s sec tion you'll find informati on on the low ing:
ti ps on towin g your vehicle . . . . . . . . . . . . . . . . . . . 357
Installing the towing eye in the fron t . . . . . . . . . . . . . 358
In stalling the towing eye in the rear . . . . . . . . . . . . . 359
Driving tips while towing . . . . . . . . . . . . . . . . . . . . . .
Ob serve lega l regulations tow -startin g and
t ow ing.
For technical rea sons: A vehicle with dead battery must never be towed;
Engin e control and emissio n control system page315
Never tow a vehicle without any electrica l
power.
Neve r remove the vehicle key from the
first r ea d and no te th e introductory inf ormation and heed the WARNINGS on page357.
Towing eye; bar
A to w ing eye is includ ed in your vehicl e's tool kit.
Thi s ca n b e inserted in a th rea ded h ole in the front bumper a nd use d whe n your ve hicl e is bei ng
t owed by an o th er ve hicle.
Towing a veh icle change s th e way it handles and brake s. To help reduce the risk of an accident and serious personal injury, note the following:
The driver of the ve hicl e that is being towed:
-
need to
press harder on the brak e pedal to slow down or stop. Always be alert so as not to rear-end the towing vehicle.
-
You will have to use conside rably more
force to turn the steerin g whee l because the power steering is not working.
The driver of the ve hicl e that is doing the towing:
- Accelerate gradually
and gently and avoid
jerking movements.
- Do
not brake hard or stee r sharply.
- Brake earlier
and more gently than in normal driving.
Note
Be careful not to damage the paint when stalling and removing the eye and the cove r for the threaded hole behind the bumper.
Unburned fuel can get into the catalytic verter during towing and damage it.
The tow rope s ho uld be nexib le e no ug h to help
protect both v ehicle s from damage . thetic fiber rope or simil ar rope.
A tta ch th e
tow rope or tow bar onl y to the towing
eye included in the vehicl e tool kit for thi s
the transmission in Ne utra l (N).
Do not tow faster than mph km /h ).
D o not tow more than miles
Page 372 of 541
Trailer towing. . . . . . . . . . . . . . . . . . . . . . . . . . 152
Fire extingu is her . . . . . . . . . . . . . . . . . . . . 154
Technica l require ments.............. 153
Transporting . . . . . . . . . . . . . . . . . . . . . . . . . . 137
Dr iv ing tips . . . . . . . . . . . . . . . . . . . . . . . . .
Tread depth . . . . . . . . . . . . . . . . . . . . . . . . . . . 286
Tread wear . . . . . . . . . . . . . . . . . . . . . . . . . . . . 292
Trip
odomet e r . . . . . . . . . . . . . . . . . . . . . . . . . . 16
Tro ubleshooting . . . . . . . . . . . . . . . . . . . . . . . 318
Turn signa l leve r . . . . . . . . . . . . . . . . . . . . . . . 122
u
Undercoating .......................... 268
Unidirec t
ional tires .................... 293
Unlocking
Rear hatch . . . . . . . . . . . . . . . . . . . . . . . . . . . 46 Vehicle .............................. 39
Upholstery . . . . . . . . . . . . . . . . . . . . . . . . . . . .
Cleanin g fabr ic tr im . . . . . . . . . . . . . . . . . 271
C leaning uphols tery . . . . . . . . . . . . . . . . . 271
Leatherett e . . . . . . . . . . . . . . . . . . . . . . . . . 273
Lockin g from th e outsid e .............. 39
action in case of breakdown
Stopping on an up hill grade . . . . . . . . . . 192
Un locking and l ock ing from the inside .
Battery acid ......................... 259
Battery runs dow n . . . . . . . . . . . . . . . . . . .
Disch arges...................... 174,321
Disconnecting . . . . . . . . . . . . . . . . . . . . . .
In stallation location ................. 257
Jump-start . . . . . . . . . . . . . . . . . . . . . . . . . . 355
. . . . . . . . . . . . . . . . . . . . . . . . 259
R ep l
acement. . . . . . . . . . . . . . . . . . . . . . . .
Leather. . . . . . . . . . . . . . . . . . . . . . . . . . . . . 272
Leatherette . . . . . . . . . . . . . . . . . . . . . . . . . 273
mirror s . . . . . . . . . . . . . . . . . . . . . 265 components .................. 274 was her . . . . . . . . . . . . . . . . . . . . . . . 264
R
eplacing wip er b lades . . . . . . . . . . . . . . 266
Serv ice posit ion . . . . . . . . . . . . . . . . . . . . .
S pecial considerations . . . . . . . . . . . 263, 264
U ndercoatin g ....................... 268
Uph ols tery . . . . . . . . . . . . . . . . . . . . . . . . . .
271
Vehicle pain t.. . . . . . . . . . . . . . . . . . . . . . . 267 Washing by hand. . . . . . . . . . . . . . . . . . . . 263
Wash ing the ve hicle . . . . . . . . . . . . . . . . . 263
W i
ndows . . . . . . . . . . . . . . . . . . . . . . . . . . . 265
W i
ndshi eld -int egrated antenna ....... 312
Woo d trim . . . . . . . . . . . . . . . . . . . . . . . . . . 274
374 375