Page 475 of 704
475 4-3. Do-it-yourself maintenance
4
Maintenance and care
YARIS_F (including HV)_WE_52C79E1ND-TV engine
1NZ-FXE engine
Make sure to check the oil type and prepare the items needed before
adding oil.
Remove the oil filler cap by turning it counterclockwise.
Add engine oil slowly, checking the dipstick.
Install the oil filler cap by turning it clockwise.
Engine oil selectionP. 662
Oil quantity
(Low Full)1.5 L (1.6 qt., 1.3 Imp. qt.)
Item Clean funnel
Page 486 of 704

486 4-3. Do-it-yourself maintenance
YARIS_F (including HV)_WE_52C79E
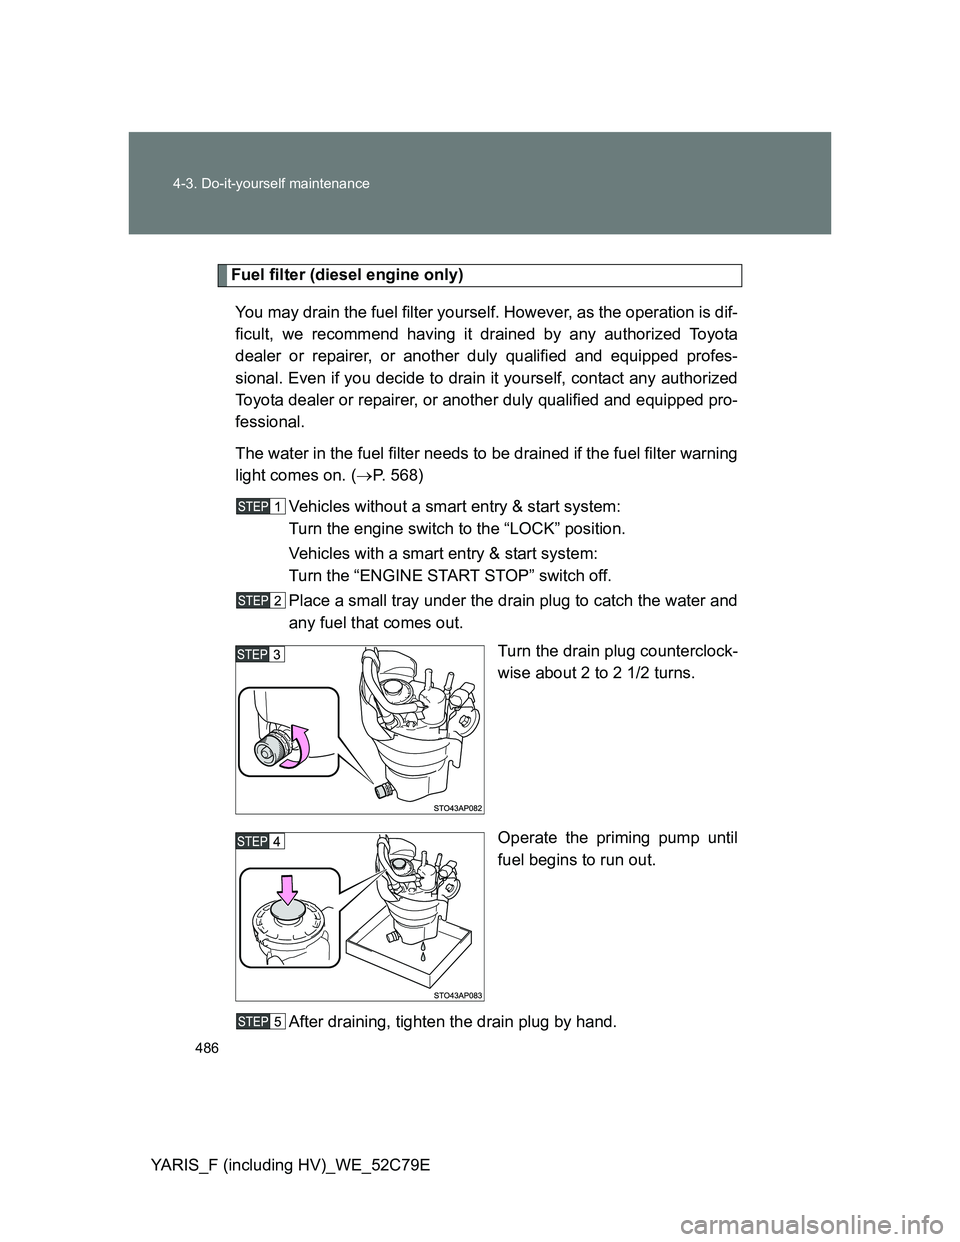
Fuel filter (diesel engine only)
You may drain the fuel filter yourself. However, as the operation is dif-
ficult, we recommend having it drained by any authorized Toyota
dealer or repairer, or another duly qualified and equipped profes-
sional. Even if you decide to drain it yourself, contact any authorized
Toyota dealer or repairer, or another duly qualified and equipped pro-
fessional.
The water in the fuel filter needs to be drained if the fuel filter warning
light comes on. (P. 568)
Vehicles without a smart entry & start system:
Turn the engine switch to the “LOCK” position.
Vehicles with a smart entry & start system:
Turn the “ENGINE START STOP” switch off.
Place a small tray under the drain plug to catch the water and
any fuel that comes out.
Turn the drain plug counterclock-
wise about 2 to 2 1/2 turns.
Operate the priming pump until
fuel begins to run out.
After draining, tighten the drain plug by hand.
Page 539 of 704
539 4-3. Do-it-yourself maintenance
4
Maintenance and care
YARIS_F (including HV)_WE_52C79EHeadlights (hybrid vehicle)
Turn the cover to the open posi-
tion and remove it.
Open position
Turn the bulb base counterclock-
wise.
Unplug the connector while pull-
ing the lock release.
Replace the light bulb, and install
the bulb base.
Align the 3 tabs on the light bulb
with the mounting, and insert.
Page 541 of 704
541 4-3. Do-it-yourself maintenance
4
Maintenance and care
YARIS_F (including HV)_WE_52C79ERemove the grommet.
Partly remove the fender liner.
Unplug the connector while
depressing the lock release.
Turn the bulb base counterclock-
wise.
Page 542 of 704
542 4-3. Do-it-yourself maintenance
YARIS_F (including HV)_WE_52C79EInstall a new bulb.
Align the 3 tabs on the light bulb
with the mounting, and insert.
Turn and secure the bulb. Install
the connector.
Shake the bulb base gently to
check that it is not loose, turn the
front fog light, on once and visu-
ally confirm that no light is leaking
through the mounting.
When installing the fender liner, install by conducting
with the directions reversed.
Front position lights (except hybrid vehicle)
Turn the bulb base counterclock-
wise.
Page 543 of 704
543 4-3. Do-it-yourself maintenance
4
Maintenance and care
YARIS_F (including HV)_WE_52C79ERemove the light bulb.
When installing, reverse the steps listed.
Front turn signal lights
Turn the bulb base counterclock-
wise.
Remove the light bulb.
When installing, reverse the steps listed.
Page 545 of 704
545 4-3. Do-it-yourself maintenance
4
Maintenance and care
YARIS_F (including HV)_WE_52C79EWhen installing, reverse the steps listed.
Back-up lights, stop/tail lights and rear turn signal lights
Open the back door and remove
the cover.
To prevent damaging the vehicle,
wrap the screwdriver with a tape.
Turn the bulb base counterclockwise.
Ty p e A
Stop/tail light
Rear turn signal light
Back-up light
Ty p e B
Rear turn signal light
Back-up light
Page 547 of 704
547 4-3. Do-it-yourself maintenance
4
Maintenance and care
YARIS_F (including HV)_WE_52C79ETurn the bulb base counterclock-
wise.
Remove the light bulb.
When installing, reverse the steps listed.
License plate lights
Remove the cover.
Insert a properly sized screw-
driver into the hole of the cover,
and ply off the cover as shown in
the illustration.
To prevent damaging the vehicle,
wrap the screwdriver with a tape.