Page 177 of 744
177
2-1. Driving procedures
2
When driving
NOTICE
■
When encountering flooded roads
Do not drive on a road that has flooded after heavy rain etc. Doing so may
cause the following serious damage to the vehicle.
●Engine stalling
● Short in electrical components
● Engine damage caused by water immersion
In the event that you drive on a flooded road and the vehicle is flooded, be
sure to have your Toyota dealer check the following.
● Brake function
● Changes in quantity and quality of oil and fluid used for the engine, trans-
mission, transfer (4WD models), differentials, etc.
● Lubricant condition for the propeller shaft, bearings and suspension joints
(where possible) and the function of all joints, bearings, etc.
Page 194 of 744

194 2-2. Instrument cluster
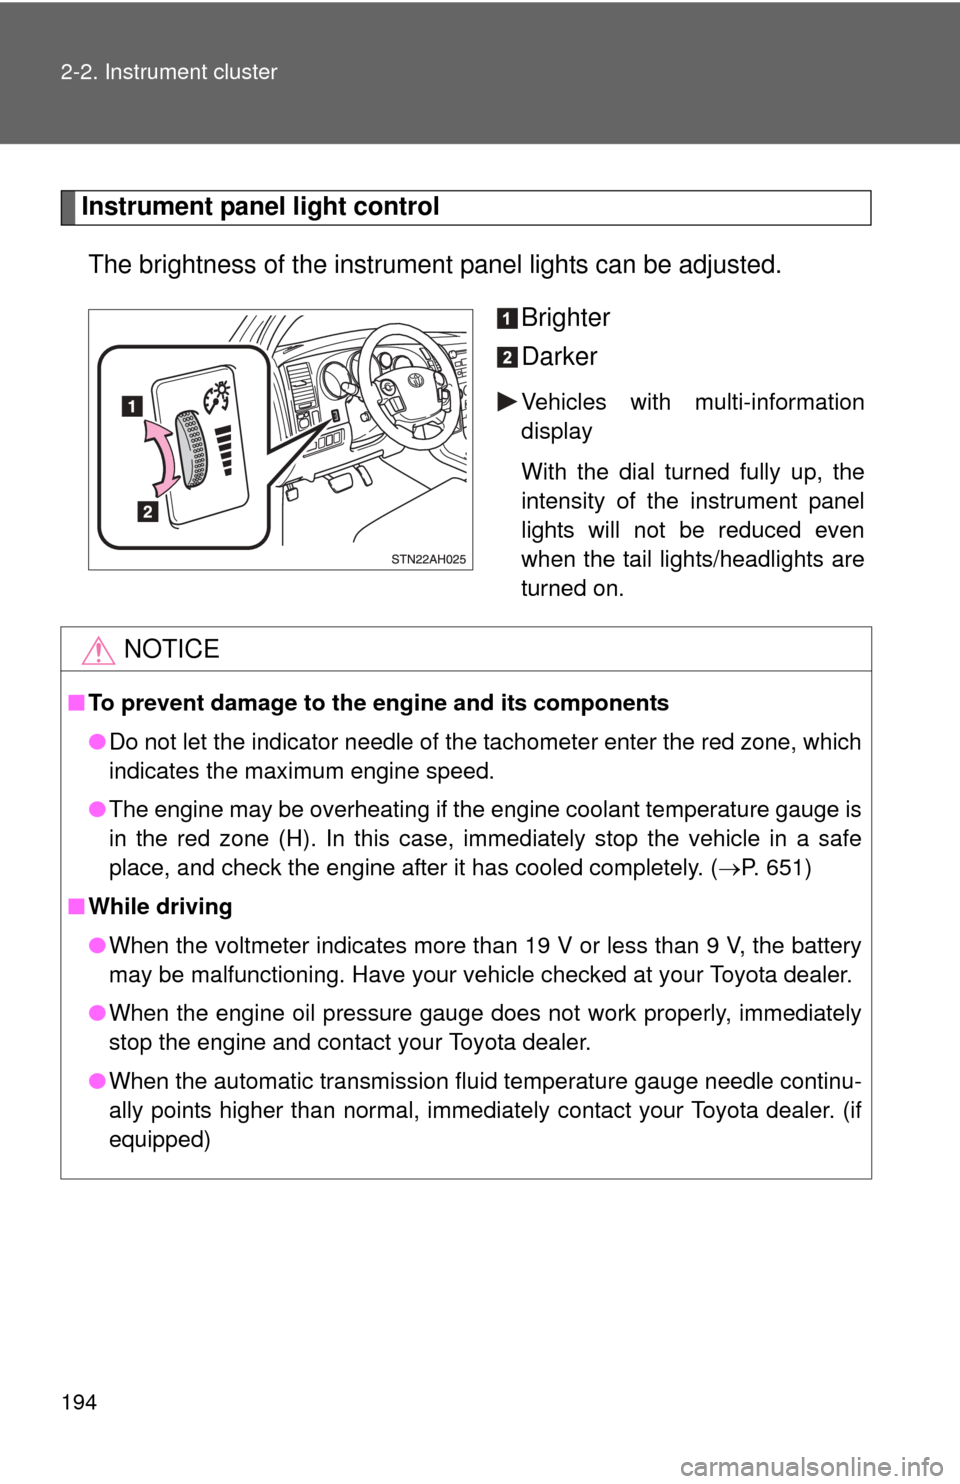
Instrument panel light controlThe brightness of the instrument panel lights can be adjusted.
Brighter
Darker
Vehicles with multi-information
display
With the dial turned fully up, the
intensity of the instrument panel
lights will not be reduced even
when the tail lights/headlights are
turned on.
NOTICE
■To prevent damage to the engine and its components
●Do not let the indicator needle of the tachometer enter the red zone, which
indicates the maximum engine speed.
● The engine may be overheating if the engine coolant temperature gauge is
in the red zone (H). In this case, immediately stop the vehicle in a safe
place, and check the engine after it has cooled completely. ( P. 651)
■ While driving
●When the voltmeter indicates more than 19 V or less than 9 V, the battery
may be malfunctioning. Have your vehicle checked at your Toyota dealer.
● When the engine oil pressure gauge does not work properly, immediately
stop the engine and contact your Toyota dealer.
● When the automatic transmission fluid temperature gauge needle continu-
ally points higher than normal, immediately contact your Toyota dealer. (if
equipped)
Page 261 of 744

261
2-5. Driving information
2
When driving
NOTICE
■
To prevent the water damage
●Take all necessary safety measures to ensure that water damage to the
engine or other components does not occur.
● Water entering the engine air intake will cause severe engine damage.
● Water entering the automatic transmission will cause deterioration in shift
quality, locking up of your transmission accompanied by vibration, and ulti-
mately damage.
● Water can wash the grease from wheel bearings, causing rusting and pre-
mature failure, and may also enter the differentials, transmission and
transfer case, reducing the gear oil’s lubricating qualities.
■ When you drive through water
If driving through water, such as when crossing shallow streams, first check
the depth of the water and the bottom of the river bed for firmness. Drive
slowly and avoid deep water.
■ Inspection after off-road driving
●Sand and mud that has accumulat ed in brake drums and around brake
discs may affect braking efficiency and may damage brake system compo-
nents.
● Always perform a maintenance inspection after each day of off-road driv-
ing that has taken you through rough terrain, sand, mud, or water. For
scheduled maintenance information, refer to the “Scheduled Maintenance
Guide” or “Owner’s Manual Supplement”.
Page 267 of 744

267
2-5. Driving information
2
When driving
Winter driving tips
Carry out the necessary preparations and inspections before driving
the vehicle in winter. Always drive the vehicle in a manner appropri-
ate to the prevailing weather conditions.
■ Pre-winter preparations
●Use fluids that are appropriate to the prevailing outside tem-
peratures.
• Engine oil
• Engine coolant
• Washer fluid
● Have a service technician inspect the level and specific grav-
ity of battery electrolyte.
● Have the vehicle fitted with four snow tires or purchase a set
of tire chains for the rear tires.
Ensure that all tires are the same size and brand, and that chains
match the size of the tires.
■Before driving the vehicle
Perform the following according to the driving conditions.
●Do not try to forcibly open a window, scrape an outside rear
view mirror surface or move a wiper or outside rear view mir-
ror that is frozen. Pour warm water over the frozen area to
melt the ice. Wipe away the water immediately to prevent it
from freezing.
● To ensure proper operation of th e climate control system fan,
remove any snow that has accumulated on the air inlet vents
in front of the windshield.
● Remove any ice that has accumu lated on the vehicle chassis.
● Periodically check for and remove any excess ice or snow
that may have accumulated in the wheel well or on the
brakes.
Page 534 of 744
534
4-2. Maintenance
General maintenance
Engine compartment
ItemsCheck points
Battery Maintenance-free. ( P. 553)
Brake fluid At the correct level? ( P. 550)
Engine coolant At the correct level? ( P. 549)
Engine oil At the correct level? ( P. 545)
Exhaust system No fumes or strange sounds?
Power steering fluid At the correct level? ( P. 552)
Radiator/condenser/hoses Not blocked with foreign matter?
(P. 550)
Washer fluid At the correct level? (P. 555)
Listed below are the general maintenance items that should be per-
formed at the intervals specified in the “Scheduled Maintenance
Guide” or “Owner’s Manual Supp lement”. It is recommended that
any problem you notice should be brought to the attention of your
Toyota dealer or qualified service shop for advice.
Page 545 of 744
545
4-3. Do-it-yourself maintenance
4
Maintenance and care
Engine oil
With the engine at operating temperature and turned off, check the oil
level on the dipstick.
■ Checking the engine oil
Park the vehicle on level ground. After warming up the engine
and turning it off, wait more than 5 minutes for the oil to drain
back into the bottom of the engine.
Hold a rag under the end and pull the dipstick out.
4.0L V6 (1GR-FE) engine
4.6L V8 (1UR-FE) and 5.7L V8 (3UR-FE, 3UR-FBE) engines
Wipe the dipstick clean.
Reinsert the dipstick fully.
Holding a rag under the end, pull the dipstick out and check
the oil level.
Page 546 of 744
546 4-3. Do-it-yourself maintenance
Wipe the dipstick and reinsert it fully.Low
Full
■ Adding engine oil
4.0L V6 (1GR-FE) engine
If the oil level is below or near
the low level mark, add engine
oil of the same type as already in
the engine.
4.6L V8 (1UR-FE) and 5.7L V8 (3UR-FE, 3UR-FBE) engines If the oil level is below or near
the low level mark, add engine
oil of the same type as already in
the engine.
Make sure to check the oil type and prepare the items needed before
adding oil.
Engine oil selection P. 671
ItemsClean funnel
Page 547 of 744
547
4-3. Do-it-yourself maintenance
4
Maintenance and care
Remove the oil filler cap, turning it counterclockwise.
Add engine oil slowly.
Checking the dipstick.
Reinstall the filler cap, turning it clockwise.
The approximate quantity of oil needed to raise the level between low and
full on the dipstick is indicated as follows:
1.6 qt. (1.5 L,
1.3 lmp. qt.)
■Engine oil consumption
●The amount of engine oil consumed depends on the oil viscosity, the
quality of the oil and the way the vehicle is driven.
● More oil is consumed under driving conditions such as high speeds and
frequent acceleration and deceleration.
● A new engine consumes more oil.
● When judging the amount of oil consumption, keep in mind that the oil
may have become diluted, making it difficult to judge the true level accu-
rately.