Page 1 of 330

1
Introduction
This manual explains the operation of the Navigation System.
Please read this manual carefully to ensure proper use. Keep this
manual in your vehicle at all times.
The Navigation System is one of the most technologically advanced
vehicle accessories ever developed. The system receives satellite sig-
nals from the Global Positioning System (GPS) operated by the U.S.
Department of Defense. Using these signals and other vehicle sen-
sors, the system indicates your present position and assists in locating
a desired destination.
The navigation system is designed to select efficient routes from your
present starting location to your destination. The system is also designed
to direct you to a destination that is unfamiliar to you in an ef ficient manner.
The system uses DENSO maps. The calculated routes may not be the
shortest nor the least traffic congested. Your own personal local knowl-
edge or “short cut” may at times be faster than the calculated rou\
tes.
The navigation system’s database includes Point of Interest categories to
allow you to easily select destinations such as restaurants and hotels. If
a destination is not in the database, you can enter the street address o\
r
a major intersection close to it and the system will guide you there.
The system will provide both a visual map and audio instructions. The au-
dio instructions will announce the distance remaining and the direction to
turn in approaching an intersection. These voice instructions will help you
keep your eyes on the road and are timed to provide enough time to allow
you to maneuver, change lanes or slow down.
Page 11 of 330

11
No.NameFunctionPage
7“Route”Touch this button to change the route.84, 86
8“Show on Map”
Touch this button to browse information
about guidance route, to set the Points
of Interest to be displayed on the
screen, or to record the route.
92, 96, 97, 99
9Zoom in buttonTouch this button to magnify the map
scale.42
10Foot print map
buttonTouch this button to display the foot print
map and the building information.42
11“INFO/PHONE”
buttonPush this button to display the “Informa-
tion” screen.23, 127, 142, 319, 320
12
Screen
configuration
buttonTouch this button to change the screen
mode.39
13“SETUP” buttonPush this button to display the “Setup”
screen.22, 102, 236,
241, 243, 245, 254, 293, 300
14“DEST” buttonPush this button to display the “Destina-
tion” screen.12, 14, 16, 17, 20, 52
15“MAP/VOICE”
buttonPush this button to repeat a voice guid-
ance, cancel one touch scroll, start
guidance, and display the current posi-
tion.
33, 82
16Distance and time
to destinationDisplays the distance, the estimated
travel time to the destination, and the
estimated arrival time at the destination.
83
17XM� NavTraffic
markThis mark is displayed when XM � Nav-
Traffic information is received.98
18
“GPS” mark
(Global
Positioning
System)Whenever the vehicle is receiving sig-
nals from the GPS, this mark is dis-
played.
308
Page 22 of 330

22
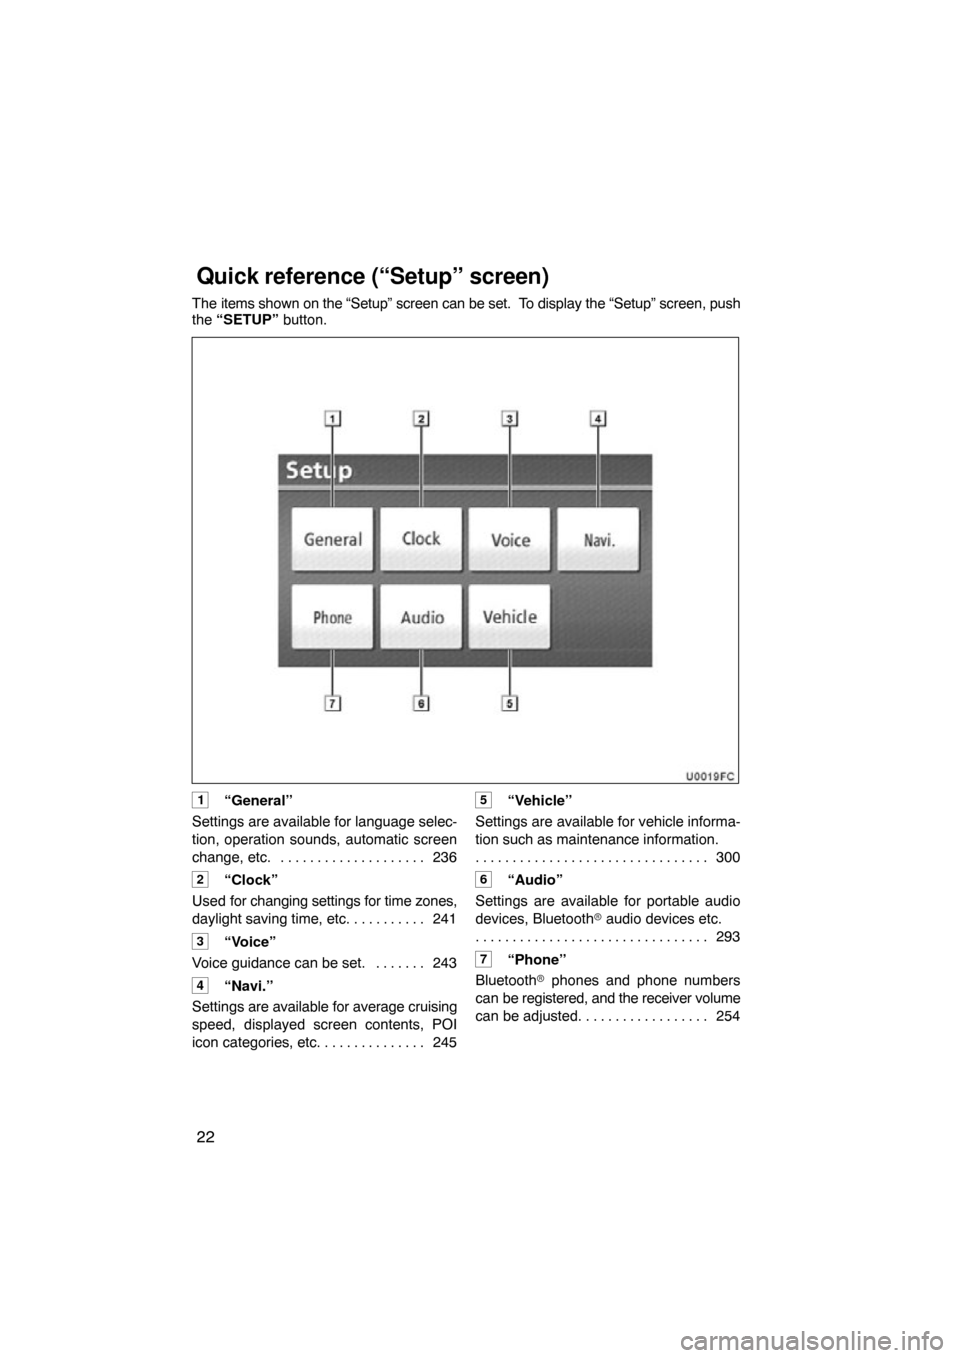
The items shown on the “Setup” screen can be set. To display the “Setup” screen, push
the “SETUP” button.
1“General”
Settings are available for language selec-
tion, operation sounds, automatic screen
change, etc. 236
. . . . . . . . . . . . . . . . . . . .
2“Clock”
Used for changing settings for time zones,
daylight saving time, etc. 241
. . . . . . . . . .
3“Voice”
Voice guidance can be set. 243 . . . . . . .
4“Navi.”
Settings are available for average cruising
speed, displayed screen contents, POI
icon categories, etc. 245
. . . . . . . . . . . . . .
5“Vehicle”
Settings are available for vehicle informa-
tion such as maintenance information. 300
. . . . . . . . . . . . . . . . . . . . . . . . . . . . . . . .
6“Audio”
Settings are available for portable audio
devices, Bluetooth � audio devices etc.
293
. . . . . . . . . . . . . . . . . . . . . . . . . . . . . . . .
7“Phone”
Bluetooth � phones and phone numbers
can be registered, and the receiver volume
can be adjusted. 254
. . . . . . . . . . . . . . . . .
Quick reference (“Setup” screen)
Page 95 of 330
ROUTE GUIDANCE
95
“Near Here” : When “Near Here” is
touched, the list of Points of Interest near
the current position will be displayed.
“Along My Route” : When “Along My
Route” is touched, the list of Points of In-
terest along the route will be displayed.
�To set a POI as a destination
You can select one of the Points of Interest
icons on the map screen as a destination
and use it for route guidance.
1. Directly touch the Point of Interest
icon that you want to set as a destina-
tion.
The map will shift so that the icon is cen-
tered on the screen and overlaps with the
cursor
. At this time, the distance from
the current position is displayed on the
screen. The distance shown is measured
as a straight line from the current vehicle
position to the POI.
2. When the desired Point of Interest
overlaps with the cursor, touch “Enter
”.
The screen changes and displays the map
location of the selected destination and
route preference. (See
“Starting route
guidance” on page 72.)
Page 142 of 330
TELEPHONE AND INFORMATION
142
Everytime you touch or push of
the steering wheel while interrupt call, the
other party will be switched.
If your cellular phone is not accepted for
HFP Ver. 1.5, this function can not be used.
INFORMATION
Interrupt call operation may differ
depending on your phone company
and cellular phone.
To view calendar.
U009ADNS
1. Push the “INFO/PHONE” button.
2. Touch “Calendar”.
On this screen, the current date is high-
lighted in yellow.
or : To change month.
or : To change year.
“Today”: To display the current month cal-
endar (if another month will be displayed).
Calendar
Page 144 of 330

AUDIO/VIDEO SYSTEM
144
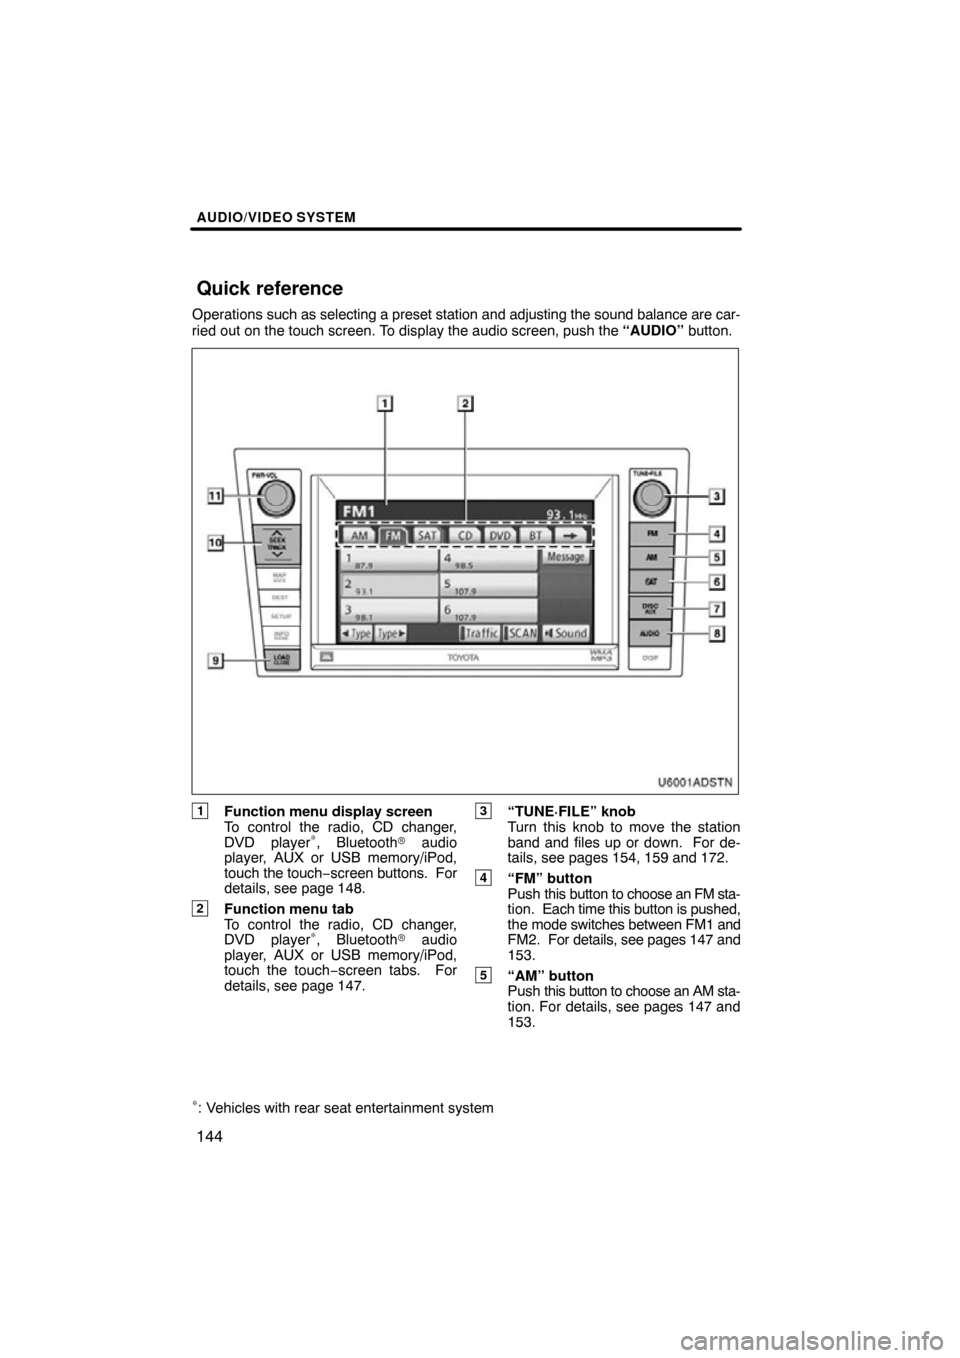
Operations such as selecting a preset station and adjusting the sound balance are c\
ar-
ried out on the touch screen. To display the audio screen, push the “AUDIO” button.
U6001AD
STN
1Function menu display screen
To control the radio, CD changer,
DVD player
∗, Bluetooth� audio
player, AUX or USB memory/iPod,
touch the touch− screen buttons. For
details, see page 148.
2Function menu tab
To control the radio, CD changer,
DVD player
∗, Bluetooth� audio
player, AUX or USB memory/iPod,
touch the touch −screen tabs. For
details, see page 147.
3“TUNE·FILE” knob
Turn this knob to move the station
band and files up or down. For de-
tails, see pages 154, 159 and 172.
4“FM” button
Push this button to choose an FM sta-
tion. Each time this button is pushed,
the mode switches between FM1 and
FM2. For details, see pages 147 and
153.
5“AM” button
Push this button to choose an AM sta-
tion. For details, see pages 147 and
153.
∗: Vehicles with rear seat entertainment system
Quick reference
Page 145 of 330

AUDIO/VIDEO SYSTEM
145
6“SAT” button
Push this button to choose an SAT
station. For details, see pages 147
and 159.
7“DISC/AUX” button
Push this button to turn the CD
changer, DVD player
∗, Bluetooth�
audio player, AUX or USB
memory/iPod on. For details, see
pages 147, 153, 167, 182 and 187.
8“AUDIO” button
Push this button to display the audio
control screen. For details, see page
147.
9“LOAD/CLOSE” button
Push this button to display the
“Load·Eject” screen or close the dis-
play. For details, see page 164.
10“SEEK/TRACK” button
Push either side of this button to seek
up or down for a station, or to access
a desired track, file or chapter. For
details, see pages 155, 168, 172,
183, 188 and 191.
11“PWR·VOL” knob
Push this knob to turn the audio sys-
tem on and off, and turn it to adjust the
volume. For details, see page 147. This section describes some of the basic
features of your audio system. Some in-
formation may not
pertain to your system.
Your audio system works when the engine
switch is turned to the “ACC” or “ON” posi-
tion.
CAUTION
For vehicles sold in U.S.A. and Cana-
da:
�Part 15 of the FCC Rules
FCC Warning:
Changes or modifications in
construction not expressly approved
by the party responsible for com-
pliance could void the user’s author-
ity to operate the equipment. Radio
frequency exposure. This device is
approved for Mobile Application only
and, to comply with applicable FCC
radio frequency exposure regula-
tions, must be used with a distance of
at least 7.9 in. (20 cm) between the an-
tenna and the body of any person at
all time during use.
∗: Vehicles with rear seat entertainment system
Using your audio/video
system —
— Some basics
Page 152 of 330
AUDIO/VIDEO SYSTEM
152
U6009GS
4. Touch the desired button.
“Normal”:Displays a 3 : 4 screen, with
either side in black.
“Wide 1”: Widens the 3 : 4 screen hori-
zontally to fill the screen.
“Wide 2”: Widens the 3 : 4 screen ver-
tically and horizontally, in
the same ratio, to fill the screen.
When you touch
, the previous
screen returns.
5. Touch “Save”. (g) Your CD changer
When you insert a disc, touch “Load” and
gently push the disc in with the label side
up. This CD changer can store up to four
discs. The changer will play from track 1
through to
the end of the disc. Then it will
play from track 1 of the next disc.
The changer is intended for use with 4.7 in.
(12 cm) discs only.
U031ADNS
NOTICE
�Do not stack up two discs for inser-
tion, or it will cause damage to the
changer. Insert only one disc into
the slot at a time.
�Never try to disassemble or oil any
part of the changer. Do not insert
anything other than a disc into the
slot.