Page 92 of 240
 86AUDIO SYSTEM
AF (Alternative Frequencies)
This button is used for seeking RDS (Ra-
dio Data System) stations all over the
band (see “RDS display”).
Push “AF” for less than 2 seconds to
recei")
86AUDIO SYSTEM
AF (Alternative Frequencies)
This button is used for seeking RDS (Ra-
dio Data System) stations all over the
band (see “RDS display”).
Push “AF” for less than 2 seconds to
receive the same program while tuning in
an RDS station. “AF” will appear on the
display. When reception conditions worsen,
a network which broadcasts the same pro-
gram will be selected using the AF (Alter-
native Frequencies) list from the RDS sta-
tion.
To change the AF mode, push “AF” for at
least 2 seconds. When “REG ON” appears
on the display, the radio will select the
RDS station which has the same PI (Pro-
gram Identification) code. When “REG
OFF” appears on the display, the radio
will select the RDS station which has the
same three−digit number PI (Program
Identification) code.
If the radio cannot find an RDS station for
60 seconds, the radio will mute all the
programs and begin seeking an RDS sta-
tion of the same PI code by using the AF
list. If the radio cannot seek out any sta-
tion in one pass because the signals are
too weak, the radio will begin seeking
again with sensitivity boosted to search
out weak stations. At this time, “DX” will
appear on the display. A beep will sound
and “PI SEEK” will appear on the display
to tell you when this feature starts opera-
tion.
If the signal gets extremely weak, the
radio will stop seeking a station and
“NOTHING” will appear on the display for
2 seconds. After this, if the radio cannot
receive a TA station for 20 seconds, the
radio will begin seeking again.
To cancel the AF mode, push “AF” once
again.BAL (Balance)
This knob lets you adjust the balance be-
tween the right and left speakers.
Pull out “PWR·VOL/BAL” and turn it.
BAND
Push “BAND” to switch between the LW/
MW and UKW bands.
“LW”, “MW” or “U1”, “U2” or “U3” will
appear on the display. Thesesystems al-
low you to set eighteen UKW stations,
three for each buttons.
If the audiosystem is off, you can turn
on the radio by pushing “BAND”.
PRESET (Preset buttons)
These buttons are used to preset and
tune in radio stations.
To preset a station to a button: Tune in
the desired station (see “TUNE” buttons).
Push and hold down the button until you
hear a beep—this will set the station to
the button. The button location will appear
on the display.
To tune in to a preset station: Push the
button for the station you want. The but-
ton location and station frequency will ap-
pear on the display.
These systems can store one LW/MW and
three UKW stations for each button. (The
display will show “LW/MW”, “U1”, “U2” or
“U3” when you push “BAND”.) The preset
station memory will be canceled out if the
power source is interrupted (battery dis-
connected or fuse blown).
Dyna100/150_EE
Page 141 of 240
 STARTING AND DRIVING135
Instruments and controls.Especially
make sure the service reminder indicators,
instrument lights, and defroster are work-
ing.
Brakes.Make sure the pedal has enough
clearance.")
STARTING AND DRIVING135
Instruments and controls.Especially
make sure the service reminder indicators,
instrument lights, and defroster are work-
ing.
Brakes.Make sure the pedal has enough
clearance.
Spare fuses.Make sure you have spare
fuses. They should cover all the amperage
ratings designated on the fuse box lid.
In the engine compartment
Coolant level.Make sure the coolant lev-
el is correct. (See page 198 in Section
7−2 for instructions.)
Wiring.Look for damaged, loose, or dis-
connected wires.
Fuel lines.Check the lines for leaks or
loose connections.
AFTER STARTING THE ENGINE
Exhaust system.If you notice any
change in the sound of the exhaust or
smell exhaust fumes, have the cause lo-
cated and corrected immediately. (See
“Engine exhaust cautions” on page 122 in
Section 2.)
Engine oil level.Stop the engine and
check the dipstick with the vehicle parked
on a level spot. (See page 196 in Section
7−2 for instructions.)
WHILE DRIVING
Instruments.Make sure the speedometer
and gauges are working.
Brakes.In a safe place, check that the
brakes do not pull to one side when ap-
plied.
Anything unusual?Look for loose parts
and leaks. Listen for abnormal noises.
If everything looks O.K., set your mind at
ease and enjoy your trip!DAlways slow down in gusty crosswinds.
This will allow you much better control.
DDrive slowly onto curbs and, if pos-
sible, at a right angle. Avoid driving
onto high, sharp−edged objects and
other road hazards. Failure to do so
can lead to severe tire damage such
as a tire burst.
Drive slowly when passing over bumps
or travelling on abumpy road. Other-
wise, the impact could cause severe
damage to the tires and/or wheels.
DWhen parking on a hill, turn the front
wheels until they touch the curb so
that the vehicle will not roll. Apply the
parking brake, and place the transmis-
sion in first or reverse. If necessary,
block the wheels.
DWashing your vehicle or driving through
deep water may get the brakes wet. To
see whether they are wet, check that
there is no traffic near you, and then
press the pedal lightly. If you do not
feel a normal braking force, the brakes
are probably wet. To dry them, drive
the vehicle cautiously while lightly
pressing the brake pedal with the park-
ing brake applied. If they still do not
work safely, pull to the side of the road
and call any authorized Toyota dealer
or repairer, or another duly qualified
and equipped professional, for assis-
tance.
CAUTION
DBefore driving off, make sure the
parking brake is fully released and
the parking brake reminder light is
off.
DDo not leave your vehicle unat-
tended while the engine is running.
DDo not rest your foot on the brake
pedal while driving. It can cause
dangerous overheating, needless
wear, and poor fuel economy.
Dyna100/150_EE
Tips for driving in various
conditions
Page 193 of 240
DO−IT−YOURSELF MAINTENANCE: Introduction187
Section 7−1
DO−IT−YOURSELF MAINTENANCE
Introduction
DEngine compartment overview 188......................
DBattery locations 190..................................
DFuse locations 190.....................................
DDo−it−yourself service precautions 193..................
Dyna100/150_EE
Page 196 of 240
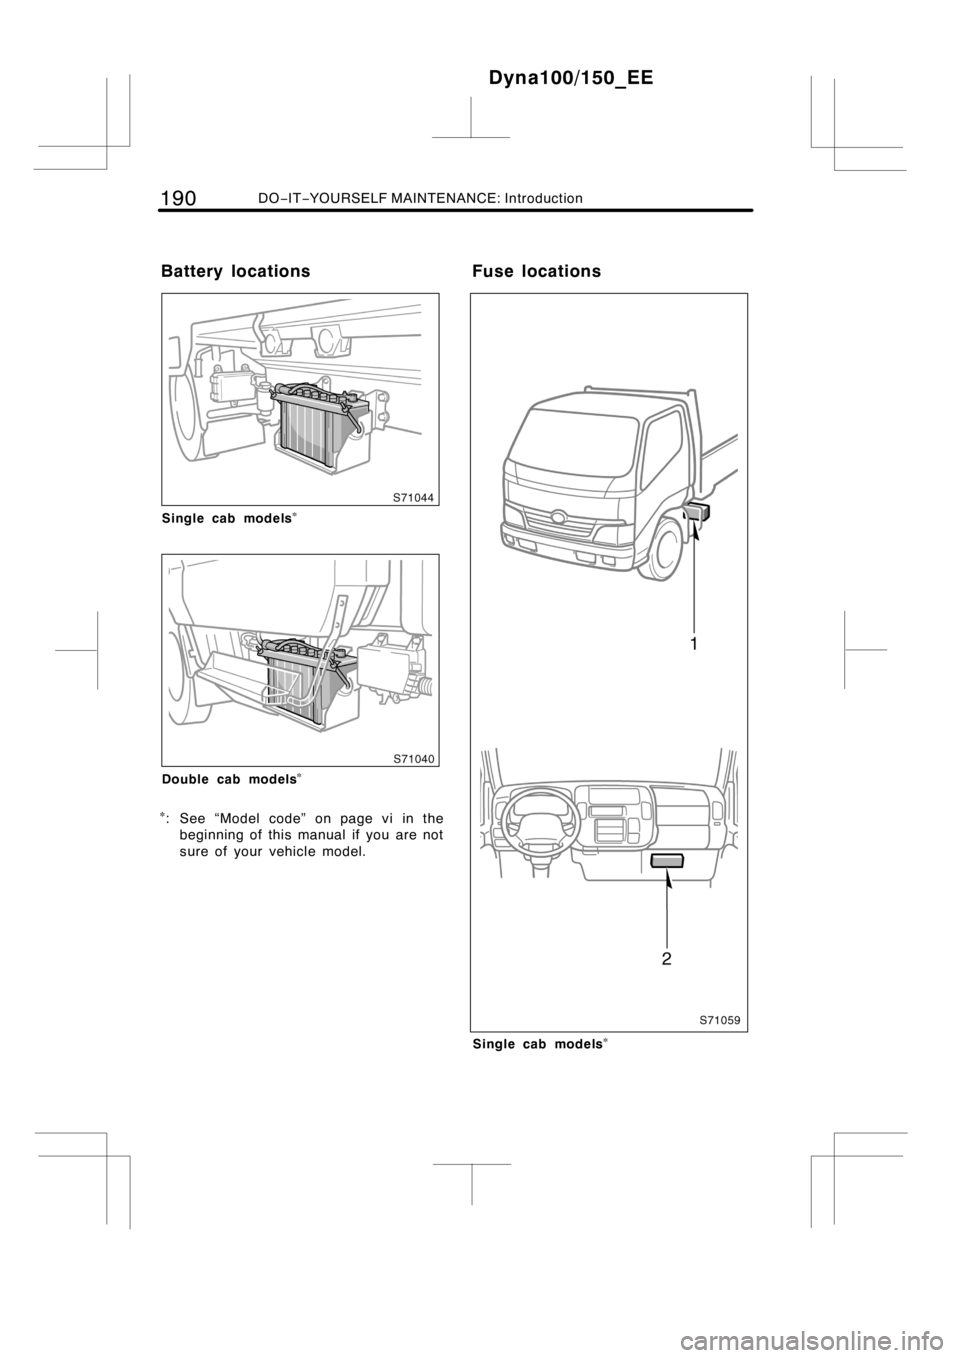
190DO−IT−YOURSELF MAINTENANCE: Introduction
Single cab models�
Double cab models�
�: See “Model code” on page vi in the
beginning of this manual if you are not
sure of your vehicle model.
Single cab models�
Dyna100/150_EE
Battery locations Fuse locations
Page 198 of 240
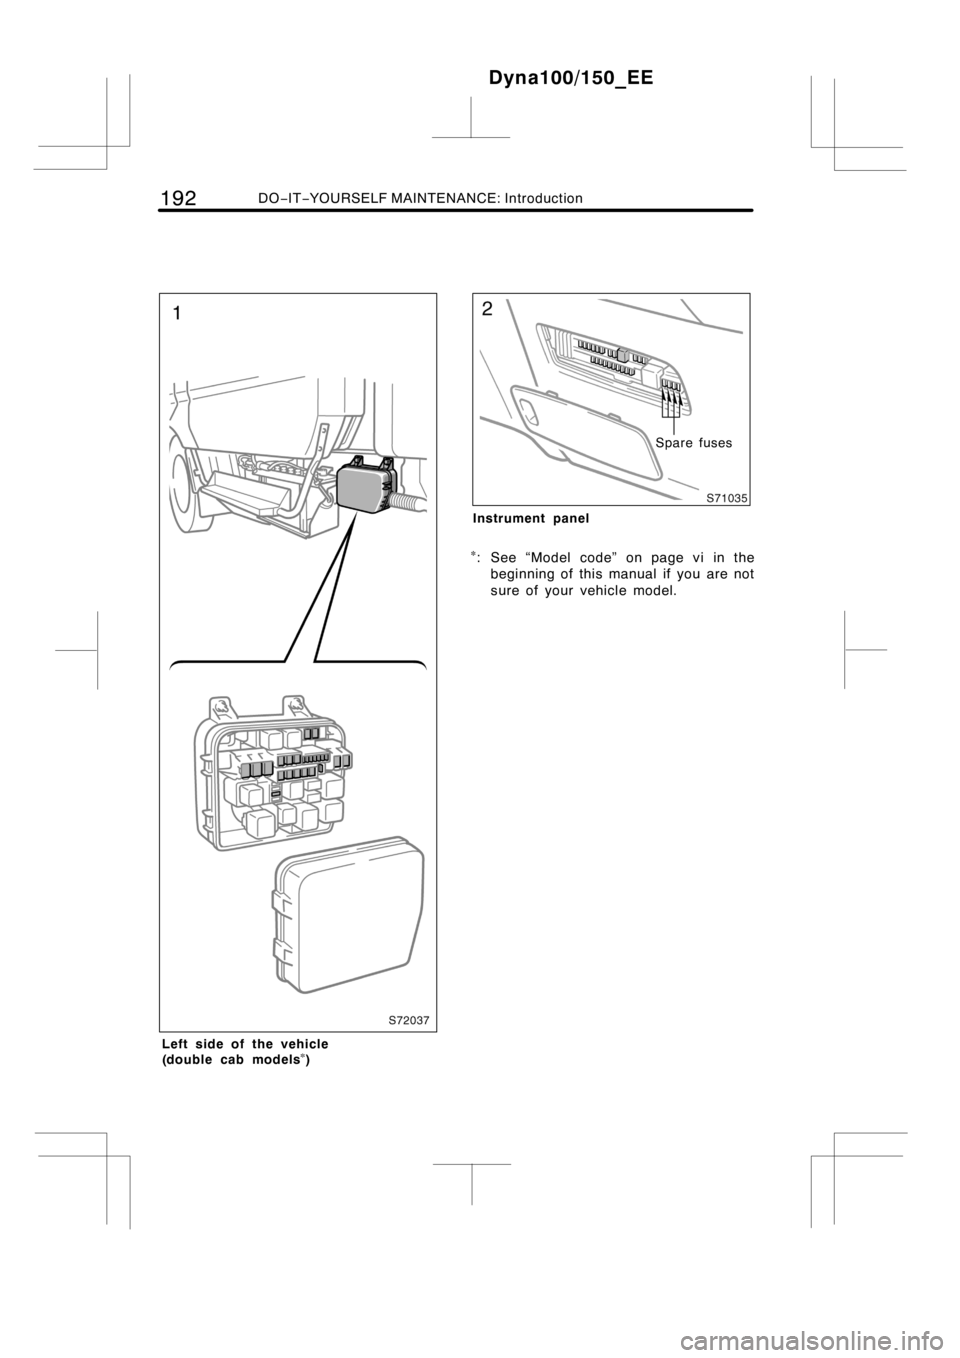
192DO−IT−YOURSELF MAINTENANCE: Introduction
Left side of the vehicle
(double cab models�)
Spare fuses
Instrument panel
�: See “Model code” on page vi in the
beginning of this manual if you are not
sure of your vehicle model.
Dyna100/150_EE
Page 213 of 240
DO−IT−YOURSELF MAINTENANCE: Electrical components207
Section 7−3
DO−IT−YOURSELF MAINTENANCE
Electrical components
DChecking battery condition 208.........................
DBattery recharging precautions 210.....................
DChecking and replacing fuses 211.......................
DAdding washer fluid 212................................
DReplacing light bulbs 213...............................
Dyna100/150_EE
Page 217 of 240
 DO−IT−YOURSELF MAINTENANCE: Electrical components211
Ty p e A
Good Blown
Ty p e B
Good Blown
Ty p e C
Good Blown
Instrument panel
If the headlights or other electrical
components do not work, chec")
DO−IT−YOURSELF MAINTENANCE: Electrical components211
Ty p e A
Good Blown
Ty p e B
Good Blown
Ty p e C
Good Blown
Instrument panel
If the headlights or other electrical
components do not work, check the
fuses. If any of the fuses are blown,
they must be replaced.
See “Fuse locations” on page 190 in Sec-
tion 7−1 for locations of the fuses.
Turn the engine switch and inoperative
component off. Pull the suspected fuse
straight out and check it.
Determine which fuse may be causing the
problem. The lid of the fuse box shows
the name of the circuit for each fuse. See
page 227 in Section 8 for the functions
controlled by each circuit.
Type A fuses can be pulled out by the
pull−out tool. The location of the pull−out
tool is shown in the illustration.
If you are not sure whether the fuse has
blown, try replacing the suspected fuse
with one that you know is good.
If the fuse has blown, push a new fuse
into the clip.
Only install a fuse with the amperage rat-
ing designated on the fuse box lid.
If you do not have a spare fuse, in an
emergency you can pull out the “CIG”,
“DOME” or “A/C” fuse, which may be dis-
pensable for normal driving, and use it if
its amperage rating is the same.
Dyna100/150_EE
Checking and replacing fuses
Page 218 of 240
 212DO−IT−YOURSELF MAINTENANCE: Electrical components
If you cannot use one of the same amper-
age, use one that is lower, but as close
to the rating as possible. If the amperage
is lower than that")
212DO−IT−YOURSELF MAINTENANCE: Electrical components
If you cannot use one of the same amper-
age, use one that is lower, but as close
to the rating as possible. If the amperage
is lower than that specified, the fuse
might blow out again but this does not
indicate anything wrong. Be sure to get
the correct fuse as soon as possible and
return the substitute to its original clip.
It is a good idea to purchase a set of
spare fuses and keep them in your ve-
hicle for emergencies.
If a new fuse immediately blows out, there
is a problem with the electrical system.
Have any authorized Toyota dealer or re-
pairer, or another duly qualified and
equipped professional, correct it as soon
as possible.
CAUTION
Never use a fuse with a higher am-
perage rating, or any other object, in
place of a fuse. This may cause ex-
tensive damage and possibly a fire.
If washer fluid does not come out, the
washer fluid tank may be empty. To
check the washer fluid level, simply
look at the transparent tank. If the level
is low, add washer fluid.
You may use plain water as washer fluid.
However, in cold areas where tempera-
tures range below the freezing point, use
washer fluid containing antifreeze. This
product is available at your Toyota dealer
or repairer and most auto parts stores or
another duly qualified professional. Follow
the manufacturer ’s directions for how
much to mix with water.
NOTICE
Do not use engine antifreeze or any
other substitute because it may dam-
age your vehicle’s paint.
Dyna100/150_EE
Adding washer fluid
 DO−IT−YOURSELF MAINTENANCE: Introduction187
Section 7−1
DO−IT−YOURSELF MAINTENANCE
Introduction
DEngine compartment overview 188......................
DBattery locations 190.................")
 DO−IT−YOURSELF MAINTENANCE: Electrical components207
Section 7−3
DO−IT−YOURSELF MAINTENANCE
Electrical components
DChecking battery condition 208.........................
DBattery recharging")