Page 165 of 240
IN CASE OF AN EMERGENCY159
1. Get the required tools
Single cab models:
With single back bench seat—Pull
the seatback lock release strap and
fold down the seatback.
With split back bench seat—Pull
the seatback lock release lever and
strap, then fold down both seat-
backs.
Double cab models:
Fold up the rear seat. (For instruc-
tions, see “Folding up rear seat”
on page 26 in Section 1−3.)
1. Jack
2. Tool bag
3. Jack handle end
4. Wheel nut wrench handle
To prepare yourself for an emergency, you
should familiarize yourselfwith the use of
the jack, each of the tools and their stor-
age locations.
To remove the jack, turn the jack joint by
hand.
To remove: Turn the joint in direction 1
until the jack is free.
To store: Turn the joint in direction 2 until
the jack is firmly secured to prevent it
flying forward during a collision or sudden
braking.
Dyna100/150_EE
Page 167 of 240
IN CASE OF AN EMERGENCY161
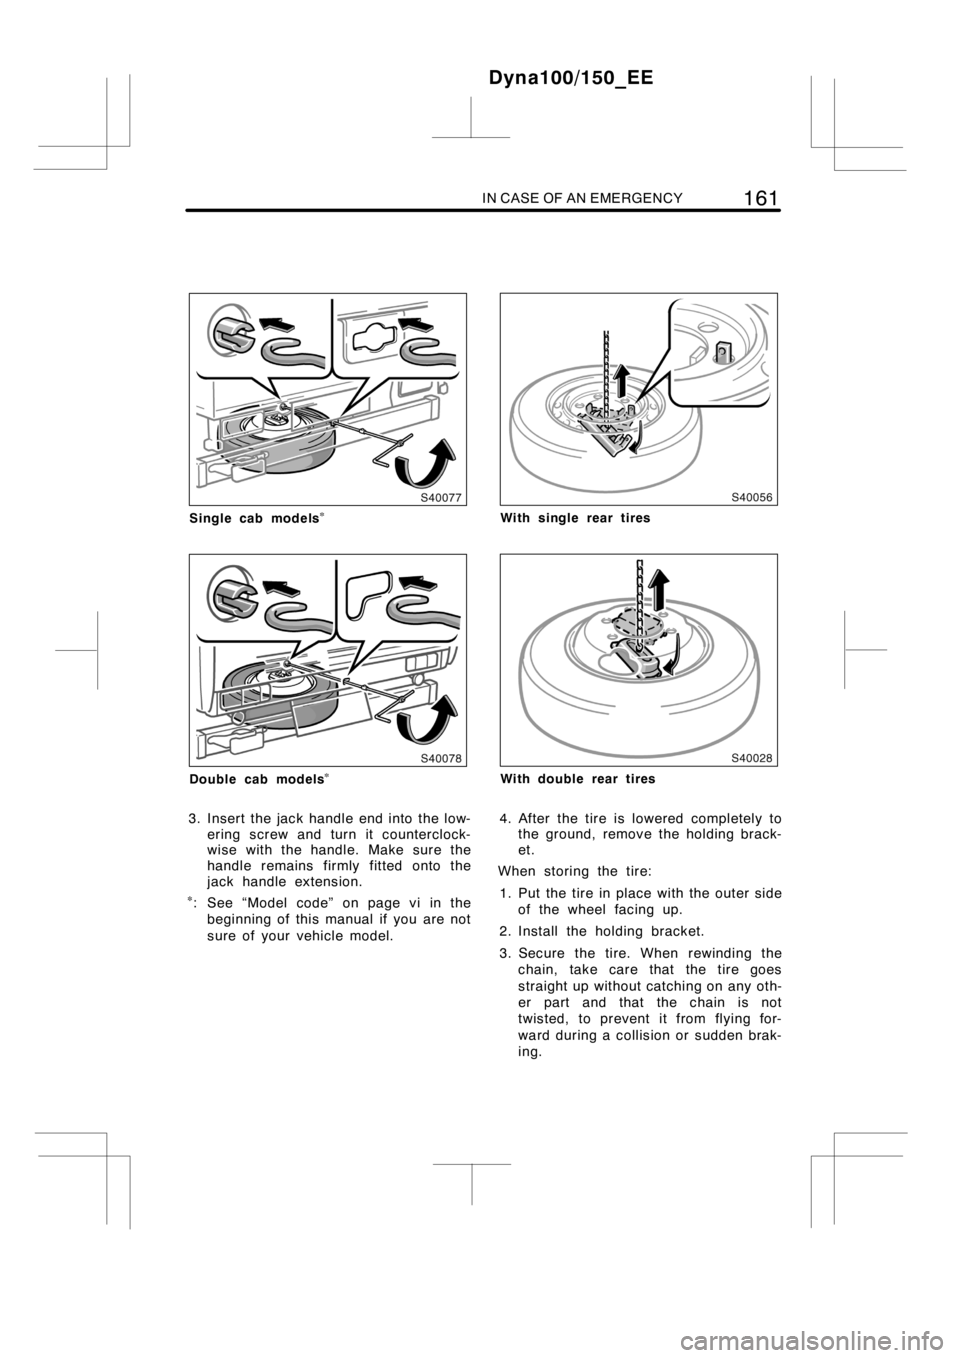
Single cab models�
Double cab models�
3. Insert the jack handle end into the low-
ering screw and turn it counterclock-
wise with the handle. Make sure the
handle remains firmly fitted onto the
jack handle extension.
�: See “Model code” on page vi in the
beginning of this manual if you are not
sure of your vehicle model.
With single rear tires
With double rear tires
4. After the tire is lowered completely to
the ground, remove the holding brack-
et.
When storing the tire:
1. Put the tire in place with the outer side
of the wheel facing up.
2. Install the holding bracket.
3. Secure the tire. When rewinding the
chain, take care that the tire goes
straight up without catching on any oth-
er part and that the chain is not
twisted, to prevent it from flying for-
ward during acollision or sudden brak-
ing.
Dyna100/150_EE
Page 168 of 240
162IN CASE OF AN EMERGENCY
CAUTION
After fixing the tire in place, make
sure that the tire is fixed securely by
pushing it. If the handle is not fas-
tened tightly enough, or if the chain
is twisted, the vibration caused by
driving can cause the tire to become
loose and fall off.
2. Block the wheel diagonally opposite
the flat tire to keep the vehicle from
rolling when it is jacked up.
When blocking the wheel, place a wheel
block from the front for the front wheels
or from the rear for the rear wheels.
Dyna100/150_EE
—Blocking the wheel
Page 169 of 240
IN CASE OF AN EMERGENCY163
3. Remove the bolts by turning them
counterclockwise with an open−end
wrench. Remove the wheel ornament.
CAUTION
Take due care in handling the orna-
ment to avoid unexpected serious in-
jury.
Your vehicle may have any of the above
wheel nuts.
1. Right−hand thread nut (no marks)
2. Left−hand thread nut (identified by
punch marks on each nut)
Dyna100/150_EE
—Removing wheel ornament —Loosening wheel nuts
Page 170 of 240
 164IN CASE OF AN EMERGENCY
Front tires and single rear tires
Double rear tire (right)
Double rear tire (left)
4. Loosen all the wheel nuts.
Always loosen the wheel nuts before rais-
ing the vehicle.
M")
164IN CASE OF AN EMERGENCY
Front tires and single rear tires
Double rear tire (right)
Double rear tire (left)
4. Loosen all the wheel nuts.
Always loosen the wheel nuts before rais-
ing the vehicle.
Models with double rear tires—Use the
large end of the wheel nut wrench to loos-
en the wheel nuts.
Front tires, single rear tires and double
rear tire (right):
Turn the wheel nuts counterclockwise to
loosen. To get maximum leverage, fit the
wrench to the nut so that the handle is
on the right side, as shown above. Grab
the wrench near the end of the handle
and pull up on the handle. Be careful that
the wrench does not slip off the nut.
Double rear tire (left):
Turn the wheel nuts clockwise to loosen.
To get maximum leverage, fit the wrench
to the nut so that the handle points to the
front of the vehicle. Grab the wrench near
the end of the handle and pull up on the
handle. Be careful that the wrench does
not slip off the nut.
Do not remove the nuts yet—just unscrew
them about one−half turn.
CAUTION
Never use oil or grease on the bolts
or nuts. The nuts may loose and the
wheels may fall off, which could cau-
se a serious accident.
Dyna100/150_EE
Page 171 of 240
IN CASE OF AN EMERGENCY165
5. Position the jack at the correct jack
point as shown.
Make sure the jack is positioned on a
level and solid place.6. After making sure that no one is in
the vehicle, raise it high enough so
that the spare tire can be installed.
Remove the wheel nuts and the tire.
Remember you will need more ground
clearance when putting on the spare tire
than when removing the flat tire.
To raise the vehicle, insert the jack handle
end into the jack (it is a loose fit) and
turn it clockwise with the handle, making
sure that the handle remains firmly fitted
onto the jack handle extension. As the
jack touches the vehicle and begins to lift,
double−check that it is properly positioned.
CAUTION
Never get under the vehicle when the
vehicle is supported by the jack
alone.
Dyna100/150_EE
—Positioning the jack —Raising your vehicle
Page 174 of 240
168IN CASE OF AN EMERGENCY
Tapered
portion
CAUTION
Be sure to install the wheel nuts with
the tapered end facing inward. Instal-
ling the nuts with the tapered end
facing outward can cause wheel to
break and eventually cause a wheel to
come off while driving, which could
lead to an accident resulting in death
or serious injury.
9. Lower the vehicle completely and
tighten the wheel nuts.
To lower the vehicle, turn the jack handle
extension counterclockwise with the han-
dle, making sure the handle remains firmly
fitted onto the jack handle extension.
Tighten each nut a little at a time in the
order shown. Repeat the process until all
the nuts are tight.
Use only the wheel nut wrench to tighten
the nuts. Do not use other tools or any
additional leverage other than your hands,
such as a hammer, pipe or your foot.
Make sure the wrench is securely en-
gaged over the nut.
Dyna100/150_EE
—Lowering your vehicle
Page 175 of 240
IN CASE OF AN EMERGENCY169
CAUTION
DWhen lowering the vehicle, make
sure all portions of your body and
all other persons around will not be
injured as the vehicle is lowered to
the ground.
DHave the wheel nuts tightened with
torque wrench to the following
torques, as soon as possible after
changing wheels. Otherwise, the
nuts may loosen and the wheels
may fall off, which could cause a
serious accident.
DYNA 100
�
135 N·m (13.8 kgf·m, 100 ft·lbf)
DYNA 150�
365 N·m (37.2 kgf·m, 269 ft·lbf)
�: See “Model code” on page vi in the
beginning of this manual if you are not
sure of your vehicle model.
10. Reinstall the wheel ornament.
To reinstall the wheel ornament, tighten
the bolts by turning them clockwise with
the open−end wrench.
CAUTION
Take due care in handling the orna-
ment to avoid unexpected serious in-
jury.
Dyna100/150_EE
—Reinstalling wheel
ornament
 IN CASE OF AN EMERGENCY159
1. Get the required tools
Single cab models:
With single back bench seat—Pull
the seatback lock release strap and
fold down the seatback.
With split back bench seat—Pull")
 162IN CASE OF AN EMERGENCY
CAUTION
After fixing the tire in place, make
sure that the tire is fixed securely by
pushing it. If the handle is not fas-
tened tightly enough, or if the chain
is twisted,")
 IN CASE OF AN EMERGENCY163
3. Remove the bolts by turning them
counterclockwise with an open−end
wrench. Remove the wheel ornament.
CAUTION
Take due care in handling the orna-
ment to avoid unexpect")
 IN CASE OF AN EMERGENCY165
5. Position the jack at the correct jack
point as shown.
Make sure the jack is positioned on a
level and solid place.6. After making sure that no one is in
the vehicle, rais")
 168IN CASE OF AN EMERGENCY
Tapered
portion
CAUTION
Be sure to install the wheel nuts with
the tapered end facing inward. Instal-
ling the nuts with the tapered end
facing outward can cause wheel to
br")
 IN CASE OF AN EMERGENCY169
CAUTION
DWhen lowering the vehicle, make
sure all portions of your body and
all other persons around will not be
injured as the vehicle is lowered to
the ground.
DHave the w")