Page 51 of 529
51
1
Before driving
1-3. Adjustable components (seats, mirrors, steering wheel)
Front seats
Power seat (driver's side only)
Seat position switch
Seatback angle switch
Seat cushion (front) angle switch
Vertical height adjustment switch
Lumbar support switch
Page 52 of 529
52 1-3. Adjustable components (seats, mirrors, steering wheel)
Active head restraints
When the occupant’s back
presses against the seatback
during a rear-end collision, the
head restraint moves slightly for-
ward to help reduce the risk of
whiplash on the seat occupant.
Manual seatSeat position adjustment
lever
Seatback angle adjustment
lever
Vertical height adjustment
lever (driver’s side only)
Page 57 of 529

57
1-3. Adjustable components (s
eats, mirrors, steering wheel)
1
Before driving
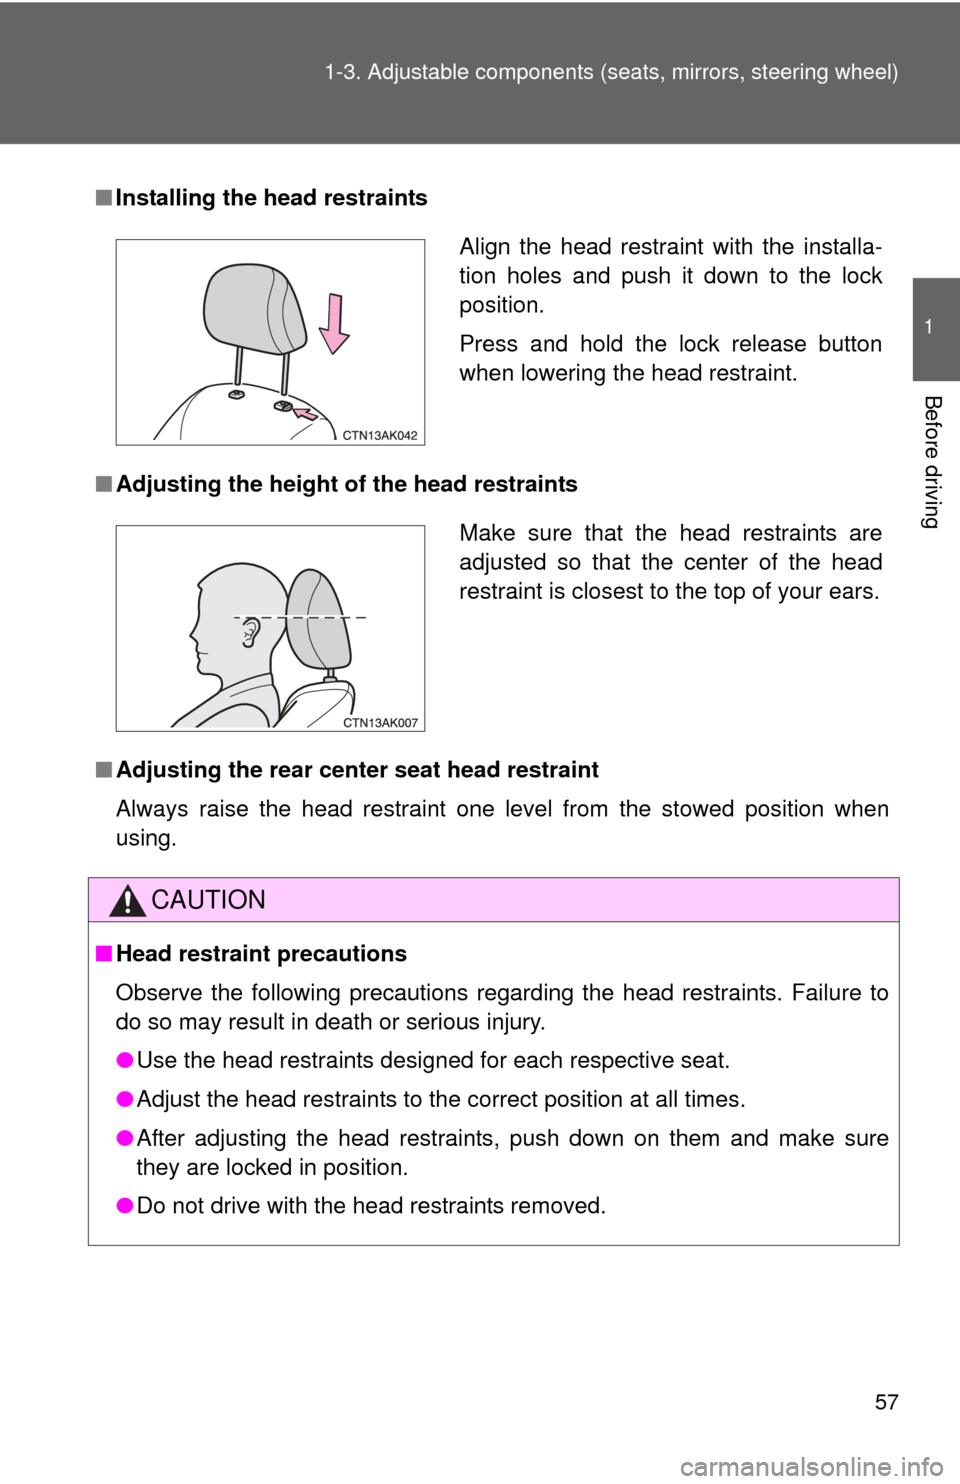
■Installing the head restraints
■ Adjusting the height of the head restraints
■ Adjusting the rear cent er seat head restraint
Always raise the head restraint one level from the stowed position when
using.
CAUTION
■ Head restraint precautions
Observe the following precautions regarding the head restraints. Failure to
do so may result in death or serious injury.
●Use the head restraints designed for each respective seat.
● Adjust the head restraints to the correct position at all times.
● After adjusting the head restraints, push down on them and make sure
they are locked in position.
● Do not drive with the head restraints removed.
Align the head restraint with the installa-
tion holes and push it down to the lock
position.
Press and hold the lock release button
when lowering the head restraint.
Make sure that the head restraints are
adjusted so that the center of the head
restraint is closest to the top of your ears.
Page 59 of 529
59
1-3. Adjustable components (s
eats, mirrors, steering wheel)
1
Before driving
Seat belt comfort guide (outside rear seats)
If the shoulder belt sits close to a person's neck, use the seat belt
comfort guide.
Pull out the comfort guide from
the pocket.
Slide the belt past the slot of the
guide.
The elastic cord must be behind
the seat belt.
■Adjusting the height of the belt (front seats)
Push the seat belt shoulder
anchor down while pressing
the release button.
Push the seat belt shoulder
anchor up.
Move the height adjuster up
and down as needed until you
hear a click.
STEP 1
STEP 2
Page 68 of 529
68 1-3. Adjustable components (seats, mirrors, steering wheel)
Adjusting the height of rear view mirror
Adjust the height of the rear view
mirror by moving it up and down.
■To prevent sensor error (veh icles with auto anti-glare inside rear view
mirror)
CAUTION
■ Caution while driving
Do not adjust the position of the mirror while driving.
Doing so may lead to mishandling of the vehicle and an accident, resulting in
death or serious injury.
To ensure that the sensors operate prop-
erly, do not touch or cover them.
Page 190 of 529

190 2-5. Driving information
Trailer Tongue Weight● A recommended tongue weight varies in accordance with the types
of trailers or towing as described below.
● To ensure the recommended values shown below, the trailer must
be loaded by referring to the following instructions.
• Tongue Weight
The gross trailer weight should be distributed so that the tongue
weight is 9% to 11%. (Tongue we ight /Gross trailer weight x 100
= 9% to 11%)
Gross trailer weight
Tongue weight
If using a weight distributing hitch when towing, return the front
axle to the same weight as before the trailer connection.
If front axle weight cannot be measured directly, measure the
front fender height above th e front axle before connection.
Adjust weight distributing hitch torque until front fender is
returned to the same height as before connection.
The gross trailer weight, gross axle weight and tongue weight
can be measured with platform scales found at a highway
weighing station, building supply company, trucking company,
junk yard, etc.
Page 195 of 529

195
2-5. Driving information
2
When driving
■
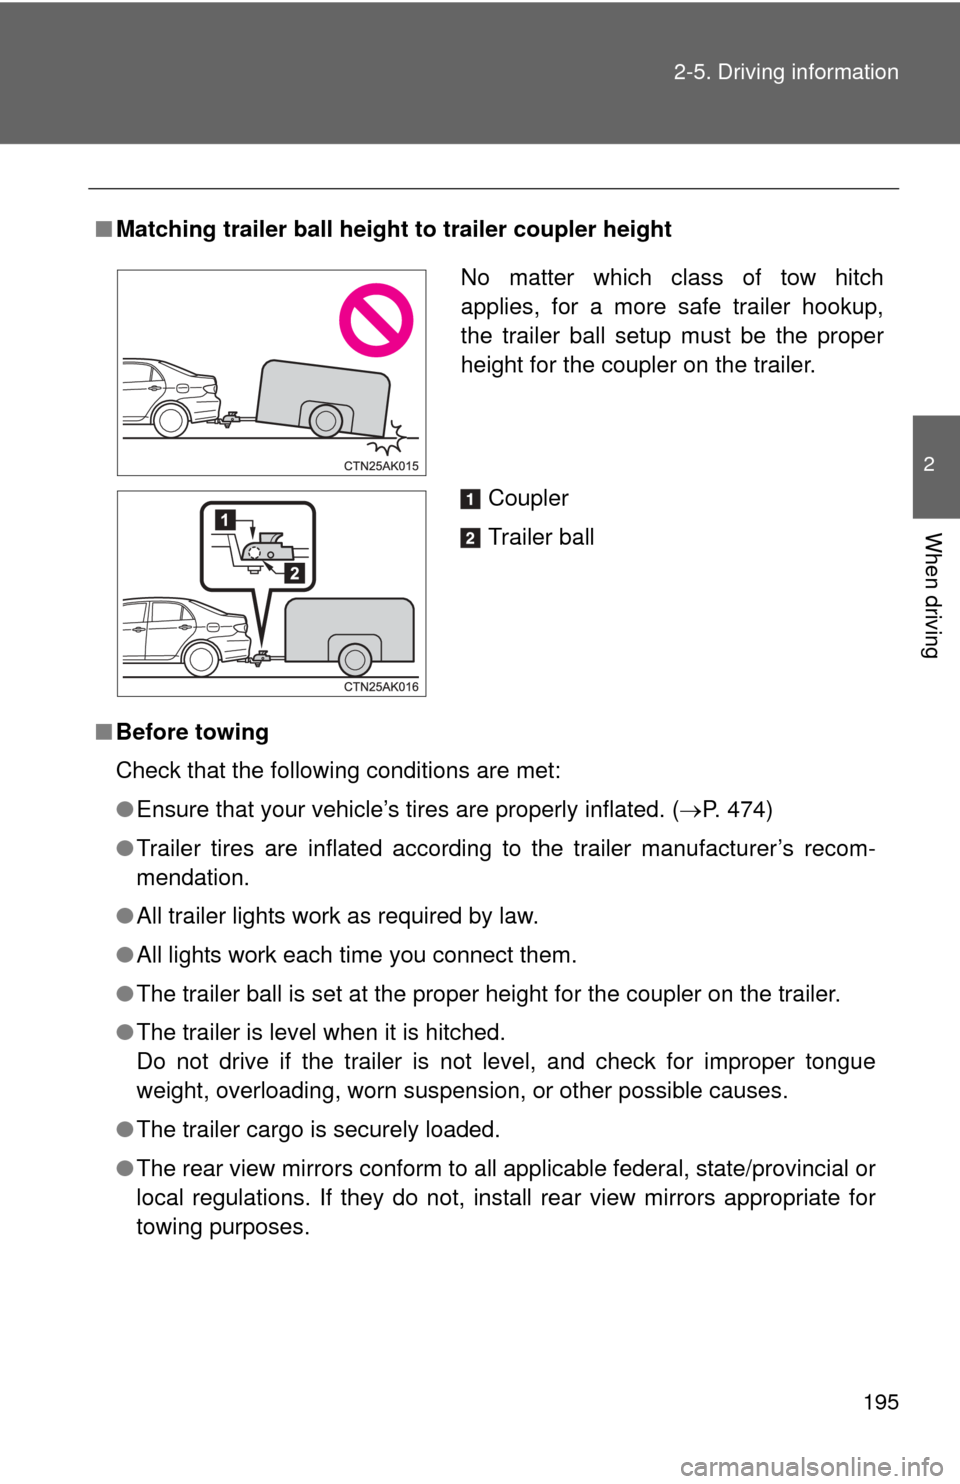
Matching trailer ball height to trailer coupler height
■ Before towing
Check that the following conditions are met:
●Ensure that your vehicle’s tires are properly inflated. ( P. 474)
● Trailer tires are inflated according to the trailer manufacturer’s recom-
mendation.
● All trailer lights work as required by law.
● All lights work each time you connect them.
● The trailer ball is set at the proper height for the coupler on the trai\
ler.
● The trailer is level when it is hitched.
Do not drive if the trailer is not level, and check for improper tongue
weight, overloading, worn suspension, or other possible causes.
● The trailer cargo is securely loaded.
● The rear view mirrors conform to all applicable federal, state/provincial or
local regulations. If they do not, instal l rear view mirrors appropriate for
towing purposes.
No matter which class of tow hitch
applies, for a more safe trailer hookup,
the trailer ball setup must be the proper
height for the coupler on the trailer.
Coupler
Trailer ball
Page 272 of 529
272 3-2. Using the audio system
■Adjusting the Automatic Sound Levelizer (ASL)
When “ASL” is selected, turning or to the right
changes the amount of “ASL” in the order of “LOW”, “MID” and
“HIGH”.
Turning or to the left turns “ASL” off.
ASL automatically adjusts the volume and tone quality according to vehi-
cle speed.
■Trademark owned by SRS Labs, Inc. (provided to the audio models
with SRS Labs technology)
The audio systems utilize SRS FOCUS
® and SRS TruBass® audio
enhancement technologies, under license from SRS Labs, Inc., in all modes
except AM radio mode.
FOCUS, TruBass, SRS and symbol are trademarks of SRS Labs,
Inc.
FOCUS and TruBass technologies are incorporated under license from
SRS Labs, Inc.
SRS TruBass
® enhances the perception of bass frequencies to provide
deep, rich bass response from any size speaker.
SRS FOCUS
® raises the audio image from non-optimally placed speakers
up to the natural listening height at ear level.