Page 160 of 328
160
2. SETUP
1Touch “Rotate Contact Images” .
2Select the desired orientation of the im-
age to be displayed.
3Touch “Save” .
1Touch “Default” .
2Touch “Yes”.
Screen buttonFunction
“Full Screen”
mode
When a call is received,
the hands-free screen is
displayed and it can be
operated on the screen.
“Drop Down”
mode
The message is dis-
played on the upper side
of the screen and it can
only be operated via the
steering wheel switches.
ROTATING CONTACT IMAGES
For PBAP compatible models, when
“Contact Image for Incoming Calls”
is set to “On”, images stored together
with phone numbers in the cellular
phone’s phonebook will be transferred
and displayed during the incoming call.
The orientation of the image can be
set.
INFORMATION
● Depending on the phone, this function
may not be available even if the phone
is PBAP compatible.
INITIALIZING THE SETTINGS
The settings can be initialized.
Page 193 of 328

193
1. AUDIO/VIDEO SYSTEM OPERATION
5
AUDIO/VIDEO SYSTEM
6. RADIO OPERATION (INTERNET RADIO BROADCAST)
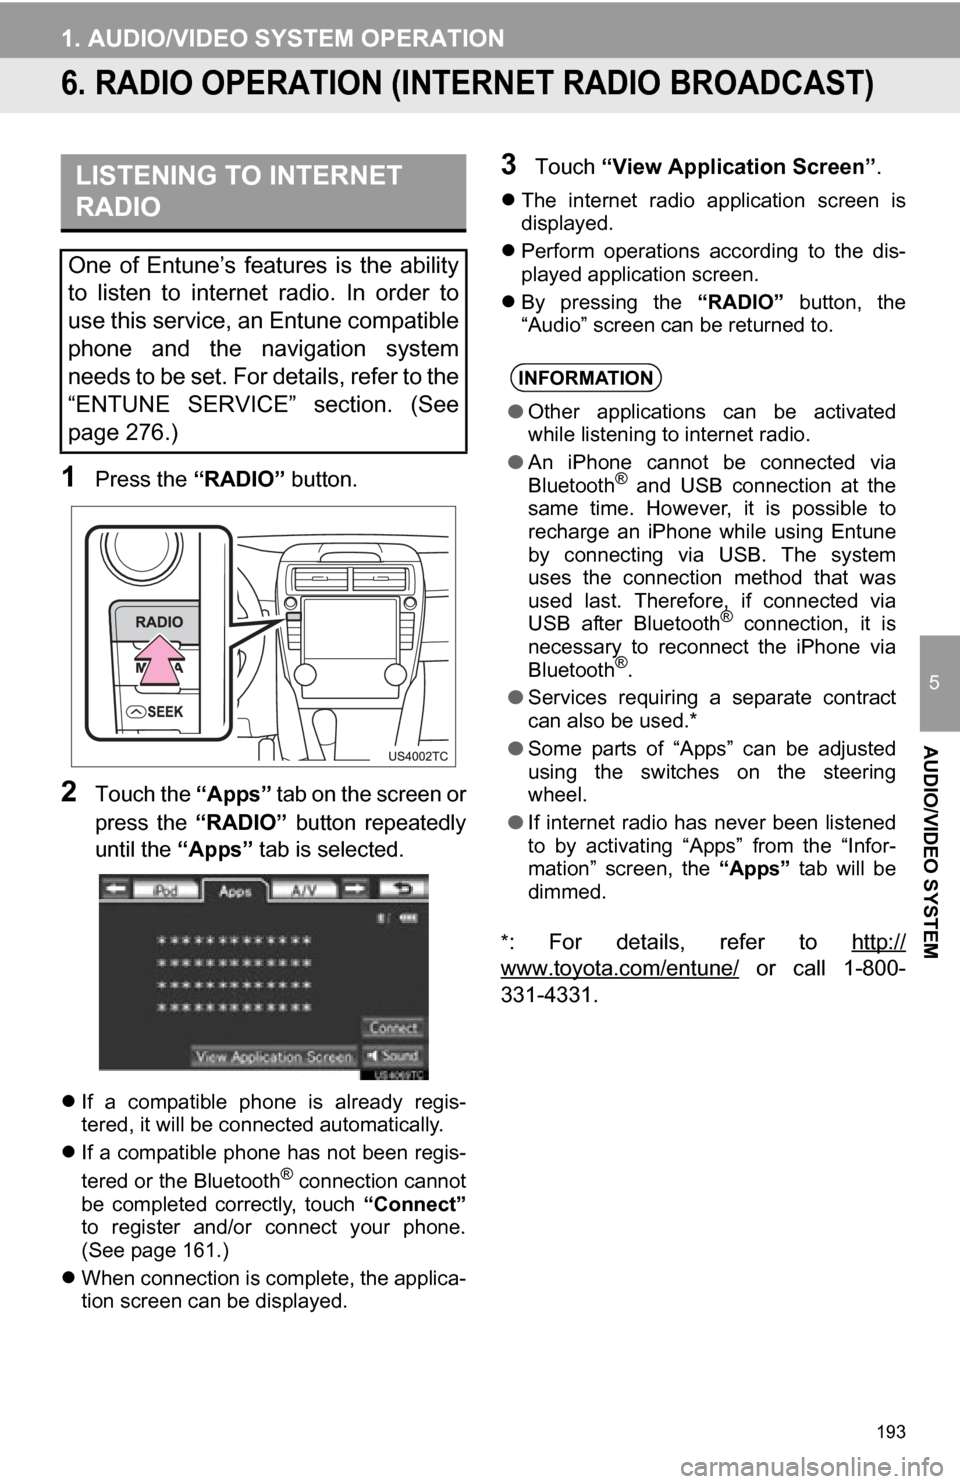
1Press the “RADIO” button.
2Touch the “Apps” tab on the screen or
press the “RADIO” button repeatedly
until the “Apps” tab is selected.
If a compatible phone is already regis-
tered, it will be connected automatically.
If a compatible phone has not been regis-
tered or the Bluetooth
® connection cannot
be completed correctly, touch “Connect”
to register and/or connect your phone.
(See page 161.)
When connection is complete, the applica-
tion screen can be displayed.
3Touch “View Application Screen” .
The internet radio application screen is
displayed.
Perform operations according to the dis-
played application screen.
By pressing the “RADIO” button, the
“Audio” screen can be returned to.
*
: For details, refer to http://
www.toyota.com/entune/ or call 1-800-
331-4331.
LISTENING TO INTERNET
RADIO
One of Entune’s features is the ability
to listen to internet radio. In order to
use this service, an Entune compatible
phone and the navigation system
needs to be set. For details, refer to the
“ENTUNE SERVICE” section. (See
page 276.)
INFORMATION
● Other applications can be activated
while listening to internet radio.
● An iPhone cannot be connected via
Bluetooth
® and USB connection at the
same time. However, it is possible to
recharge an iPhone while using Entune
by connecting via USB. The system
uses the connection method that was
used last. Therefore, if connected via
USB after Bluetooth
® connection, it is
necessary to reconnect the iPhone via
Bluetooth
®.
● Services requiring a separate contract
can also be used.*
● Some parts of “Apps” can be adjusted
using the switches on the steering
wheel.
● If internet radio has never been listened
to by activating “Apps” from the “Infor-
mation” screen, the “Apps” tab will be
dimmed.
Page 229 of 328

229
1. AUDIO/VIDEO SYSTEM OPERATION
5
AUDIO/VIDEO SYSTEM
11. AUDIO/VIDEO REMOTE CONTROLS (STEERING SWITCHES)
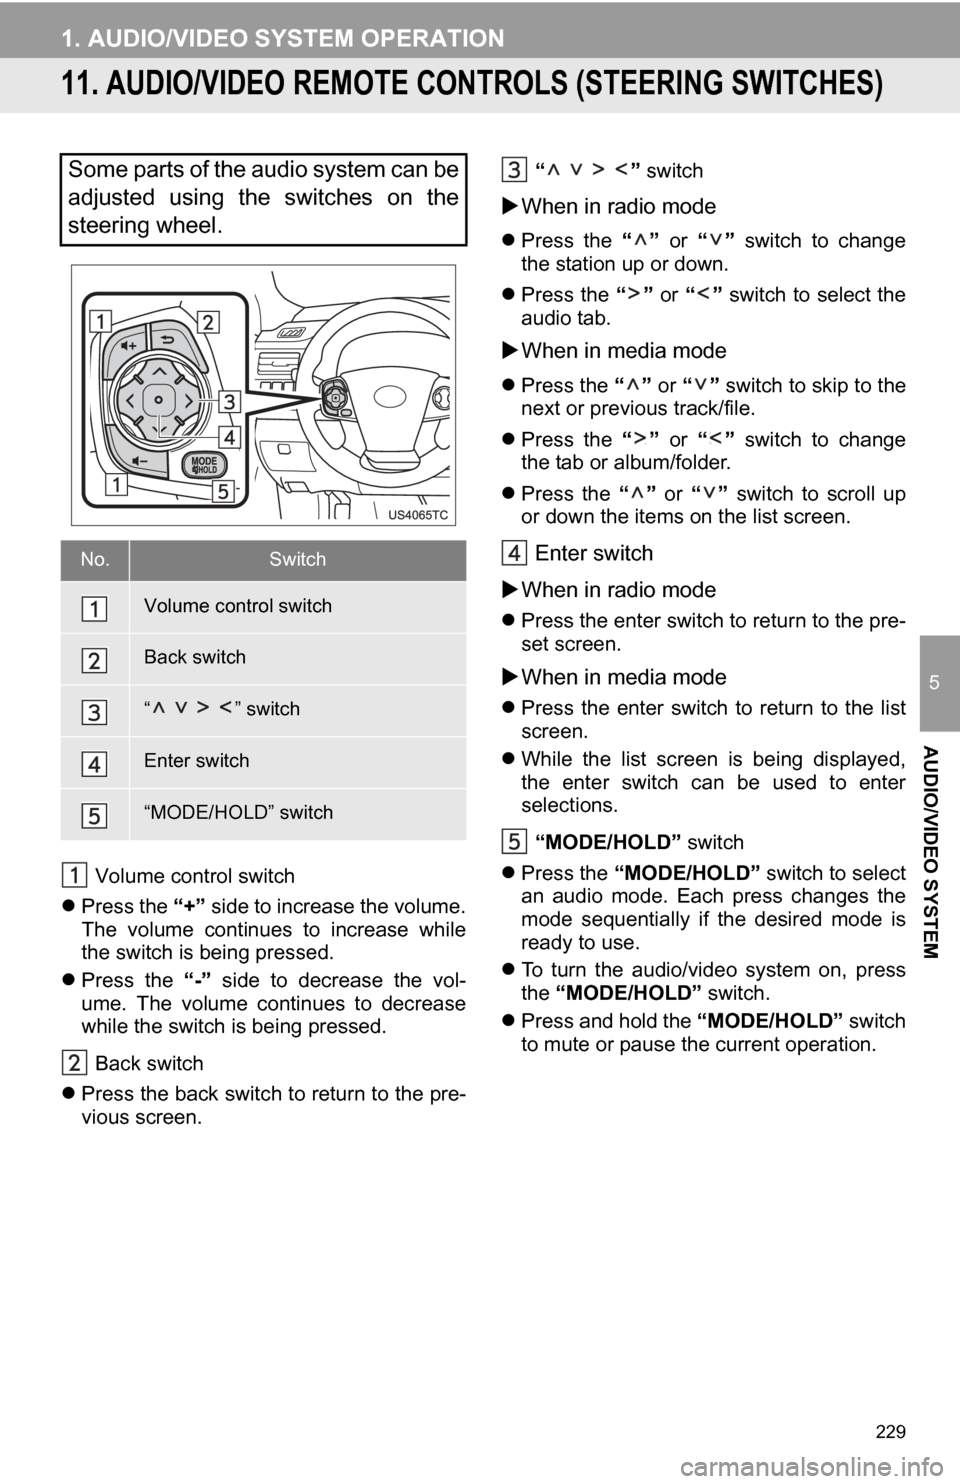
Volume control switch
Press the “+” side to increase the volume.
The volume continues to increase while
the switch is being pressed.
Press the “-” side to decrease the vol-
ume. The volume continues to decrease
while the switch is being pressed.
Back switch
Press the back switch to return to the pre-
vious screen. “ ”
switch
When in radio mode
Press the “” or “” switch to change
the station up or down.
Press the “” or “” switch to select the
audio tab.
When in media mode
Press the “” or “” switch to skip to the
next or previous track/file.
Press the “” or “” switch to change
the tab or album/folder.
Press the “” or “” switch to scroll up
or down the items on the list screen.
Enter switch
When in radio mode
Press the enter switch to return to the pre-
set screen.
When in media mode
Press the enter switch to return to the list
screen.
While the list screen is being displayed,
the enter switch can be used to enter
selections.
“MODE/HOLD” switch
Press the “MODE/HOLD” switch to select
an audio mode. Each press changes the
mode sequentially if the desired mode is
ready to use.
To turn the audio/video system on, press
the “MODE/HOLD” switch.
Press and hold the “MODE/HOLD” switch
to mute or pause the current operation.
Some parts of the audio system can be
adjusted using the switches on the
steering wheel.
No.Switch
Volume control switch
Back switch
“ ” switch
Enter switch
“MODE/HOLD” switch
Page 282 of 328
282
2. ENTUNE OPERATION
2. LINKING “APPS” AND NAVIGATION LOCAL FUNCTION
1Press the “INFO/APPS” button.
2Touch “Apps” .
3A screen indicating that updates are
being checked for will be displayed.
4When updating is complete, the main
menu screen will be displayed.
The screen shown above is only an exam-
ple. The actual screen may be different.
For details about the function and service
of each application displayed in the main
menu, refer to http://www.toyota.com/
entune/.
The navigation system’s setting a des-
tination and making a hands-free call
can be performed via “Apps” of En-
tune.
INFORMATION
●Some parts of “Apps” can be adjusted
using the switches on the steering
wheel.
Page 288 of 328

288
1. REAR VIEW MONITOR SYSTEM
1. REAR VIEW MONITOR SYSTEM OPERATION
1To display the rear view image on the
screen, place the shift lever in the “R”
position when the “POWER” <“EN-
GINE START STOP”> switch is in ON
mode. (Vehicles with
a smart key system)
To display the rear view image on the
screen, place the shift lever in the “R”
position when the engine switch is in
the “ON” position. (Vehicles without a
smart key system)
The rear view monitor system assists
the driver by displaying an image of the
view behind the vehicle while backing
up. The image is displayed in reverse
on the screen. This reversed image is
a similar image to the one on the inside
rear view mirror.
If you move the shift lever out of the “R”
position, the screen returns to the previ-
ous screen. Operating another function
of the navigation system will display
another screen.
CAUTION
●Never depend on the rear view monitor
system entirely when backing up.
Always make sure your intended path is
clear.
Use caution, just as you would when
backing up any vehicle.
● Never back up while looking only at the
screen. The image on the screen is dif-
ferent from actual conditions. Depicted
distances between objects and flat sur-
faces will differ from actual distance. If
you back up while looking only at the
screen, you may hit a vehicle, a person
or an object. When backing up, be sure
to check behind and all around the vehi-
cle visually and with mirrors before pro-
ceeding.
● Always check the vehicle surrounding
area, because the guide lines are ancil-
lary lines.
● The guide lines are ancillary lines and
do not change even if the steering wheel
is turned.
● Do not use the system when the trunk is
not completely closed.
● Use your own eyes to confirm the vehi-
cle’s surroundings, as the displayed
image may become faint or dark, and
moving images will be distorted, or not
entirely visible when the outside temper-
ature is low. When backing up, be sure
to check behind and all around the vehi-
cle visually and with mirror before pro-
ceeding.
● Do not use the system in the following
cases:
• On icy or slick road surfaces, or in
snow.
• When using tire chains or emergency tires.
• On an uneven road, such as a slope.