Page 363 of 750

3614-5. Using the driving support systems
UK_AURIS/AURIS_HV_EE (OM12E33E)
4
Driving
CAUTION
Stopping distance when the ABS is operating may exceed that of nor-
mal conditions
The ABS is not designed to shorten the vehicle’s stopping distance. Always
maintain a safe distance from the vehicle in front of you, especially in the
following situations:
When driving on dirt, gravel or snow-covered roads
When driving with tire chains
When driving over bumps in the road
When driving over roads with potholes or uneven surfaces
TRC may not operate effectively when
Directional control and power may not be achievable while driving on slip-
pery road surfaces, even if the TRC system is operating.
Do not drive the vehicle in conditions where stability and power may be lost.
When the VSC is activated
The slip indicator light flashes. Always drive carefully. Reckless driving may
cause an accident. Exercise particular care when the indicator light flashes.
When the TRC/VSC systems are turned off (except hybrid model)
Be especially careful and drive at a speed appropriate to the road condi-
tions. As these are the systems to ensure vehicle stability and driving force,
do not turn the TRC/VSC systems off unless necessary.
Replacing tires
Make sure that all tires are of the specified size, brand, tread pattern and
total load capacity. In addition, make sure that the tires are inflated to the
recommended tire inflation pressure level.
The ABS, TRC and VSC systems will not function correctly if different tires
are installed on the vehicle.
Contact any authorized Toyota dealer or repairer, or another duly qualified
and equipped professional for further information when replacing tires or
wheels.
Handling of tires and the suspension
Using tires with any kind of problem or modifying the suspension will affect
the driving assist systems, and may cause a system to malfunction.
Page 373 of 750
3714-6. Driving tips
UK_AURIS/AURIS_HV_EE (OM12E33E)
4
Driving
CAUTION
Driving with snow tires
Observe the following precautions to reduce the risk of accidents.
Failure to do so may result in a loss of vehicle control and cause death or
serious injury.
Use tires of the specified size.
Maintain the recommended level of air pressure.
Do not drive at speeds in excess of the speed limit or the speed limit spec-
ified for the snow tires being used.
Use snow tires on all, not just some wheels.
Driving with tire chains
Observe the following precautions to reduce the risk of accidents.
Failure to do so may result in the vehicle being unable to be driven safely,
and may cause death or serious injury.
Do not drive in excess of the speed limit specified for the tire chains being
used, or 50 km/h (30 mph), whichever is lower.
Avoid driving on bumpy road surfaces or over potholes.
Avoid sudden acceleration, abrupt steering, sudden braking and shifting
operations that cause sudden engine braking.
Slow down sufficiently before entering a curve to ensure that vehicle con-
trol is maintained.
Page 523 of 750
5216-3. Do-it-yourself maintenance
UK_AURIS/AURIS_HV_EE (OM12E33E)
6
Maintenance and care
CAUTION
When inspecting or replacing tires
Observe the following precautions to prevent accidents.
Failure to do so may cause damage to parts of the drive train as well as
dangerous handling characteristics, which may lead to an accident resulting
in death or serious injury.
Do not mix tires of different makes, models or tread patterns.
Also, do not mix tires of remarkably different treadwear.
Do not use tire sizes other than those recommended by Toyota.
Do not mix differently constructed tires (radial, bias-belted or bias-ply
tires).
Do not mix summer, all season and snow tires.
Do not use tires that have been used on another vehicle.
Do not use tires if you do not know how they were used previously.
Vehicles with a compact spare tire: Do not tow if your vehicle has a com-
pact spare tire installed.
NOTICE
Driving on rough roads
Take particular care when driving on roads with loose surfaces or potholes.
These conditions may cause losses in tire inflation pressure, reducing the
cushioning ability of the tires. In addition, driving on rough roads may cause
damage to the tires themselves, as well as the vehicle’s wheels and body.
Low profile tires (17-inch tires)
Low profile tires may cause greater damage than usual to the tire wheel
when sustaining impact from the road surface. Therefore, pay attention to
the following:
Be sure to use proper tire inflation pressure. If tires are under-inflated, they
may be damaged more severely.
Avoid potholes, uneven pavement, curbs and other road hazards. Failure
to do so may lead to severe tire and wheel damage.
If tire inflation pressure of each tire becomes low while driving
Do not continue driving, or your tires and/or wheels may be ruined.
Page 526 of 750
5246-3. Do-it-yourself maintenance
UK_AURIS/AURIS_HV_EE (OM12E33E)
When replacing wheels, care should be taken to ensure that they are
equivalent to those removed in load capacity, diameter, rim width and
inset
*.
Replacement wheels are available at any authorized Toyota dealer or
repairer, or another duly qualified and equipped professional.
*: Conventionally referred to as “offset”.
Toyota does not recommend using the following:
Wheels of different sizes or types
Used wheels
Bent wheels that have been straightened
Use only Toyota wheel nuts and wrenches designed for use with
your aluminum wheels.
When rotating, repairing or changing your tires, check that the
wheel nuts are still tight after driving 1600 km (1000 miles).
Be careful not to damage the aluminum wheels when using tire
chains.
Use only Toyota genuine balance weights or equivalent and a plas-
tic or rubber hammer when balancing your wheels.
Wheels
If a wheel is bent, cracked or heavily corroded, it should be
replaced. Otherwise, the tire may separate from the wheel or
cause a loss of handling control.
Wheel selection
Aluminum wheel precautions (if equipped)
Page 527 of 750
5256-3. Do-it-yourself maintenance
UK_AURIS/AURIS_HV_EE (OM12E33E)
6
Maintenance and care
CAUTION
When replacing wheels
Do not use wheels that are a different size from those recommended in the
Owner’s Manual, as this may result in a loss of handling control.
Never use an inner tube in a leaking wheel which is designed for a tube-
less tire. Doing so may result in an accident, causing death or serious
injury.
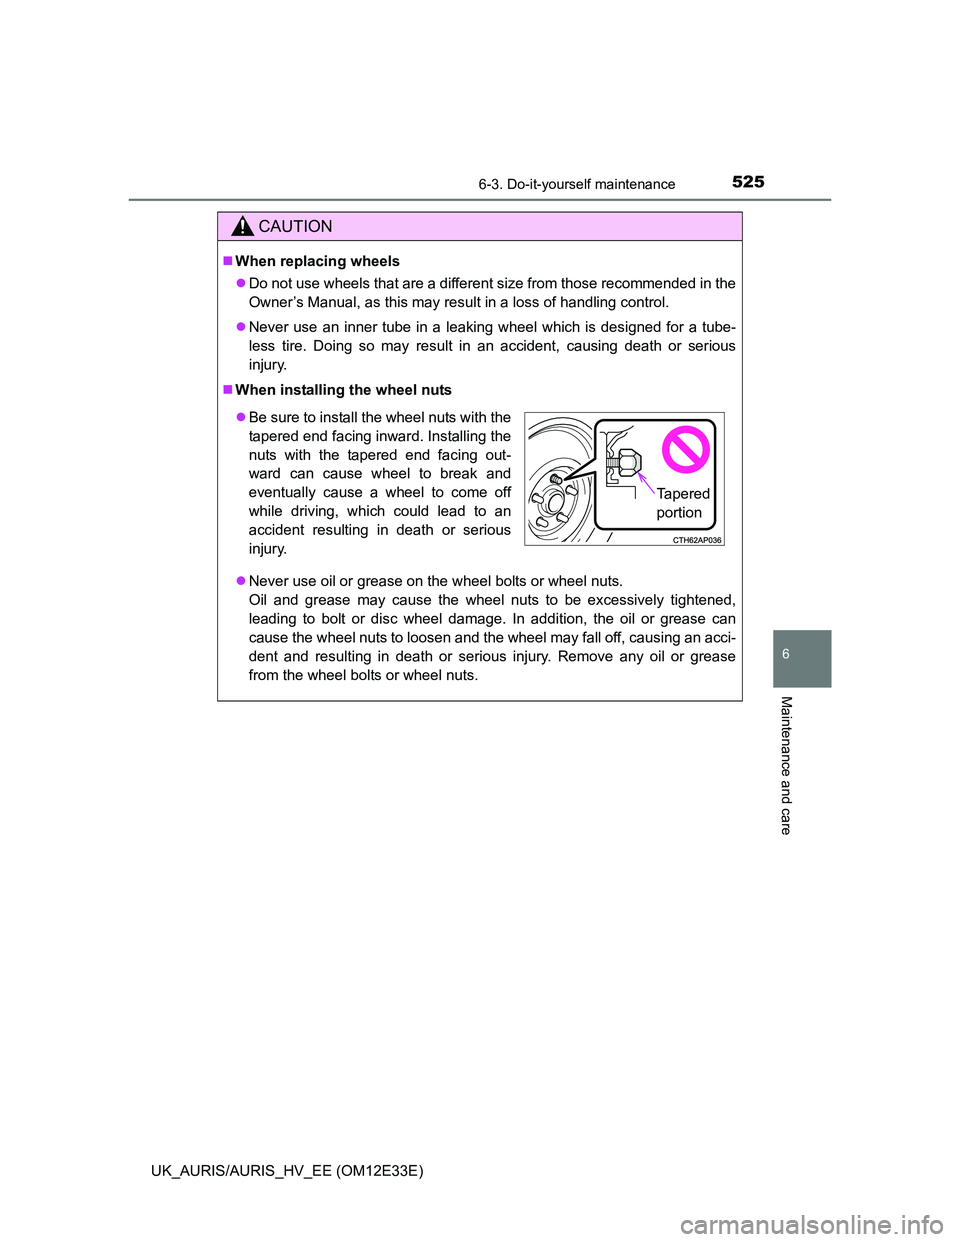
When installing the wheel nuts
Never use oil or grease on the wheel bolts or wheel nuts.
Oil and grease may cause the wheel nuts to be excessively tightened,
leading to bolt or disc wheel damage. In addition, the oil or grease can
cause the wheel nuts to loosen and the wheel may fall off, causing an acci-
dent and resulting in death or serious injury. Remove any oil or grease
from the wheel bolts or wheel nuts.
Be sure to install the wheel nuts with the
tapered end facing inward. Installing the
nuts with the tapered end facing out-
ward can cause wheel to break and
eventually cause a wheel to come off
while driving, which could lead to an
accident resulting in death or serious
injury.
Tapered
portion
Page 630 of 750
6287-2. Steps to take in an emergency
UK_AURIS/AURIS_HV_EE (OM12E33E)
Vehicles with a full-size spare tire
Jack handle
Towing eyelet
Wheel nut wrenchJack
Spare t i re1
2
3
4
5
Page 634 of 750
6327-2. Steps to take in an emergency
UK_AURIS/AURIS_HV_EE (OM12E33E)
Turn the tire jack portion “A” by
hand until the notch of the jack
is in contact with the jack point.
The jack point guides are located
under the rocker panel. They indi-
cate the jack point positions.
Raise the vehicle until the tire is slightly raised off the ground.
Remove all the wheel nuts and
the tire.
When resting the tire on the
ground, place the tire so that the
wheel design faces up to avoid
scratching the wheel surface.
4
5
Vehicles with a compact spare
tireVehicles with a full-size spare
tire
6
Page 637 of 750
6357-2. Steps to take in an emergency
UK_AURIS/AURIS_HV_EE (OM12E33E)
7
When trouble arises
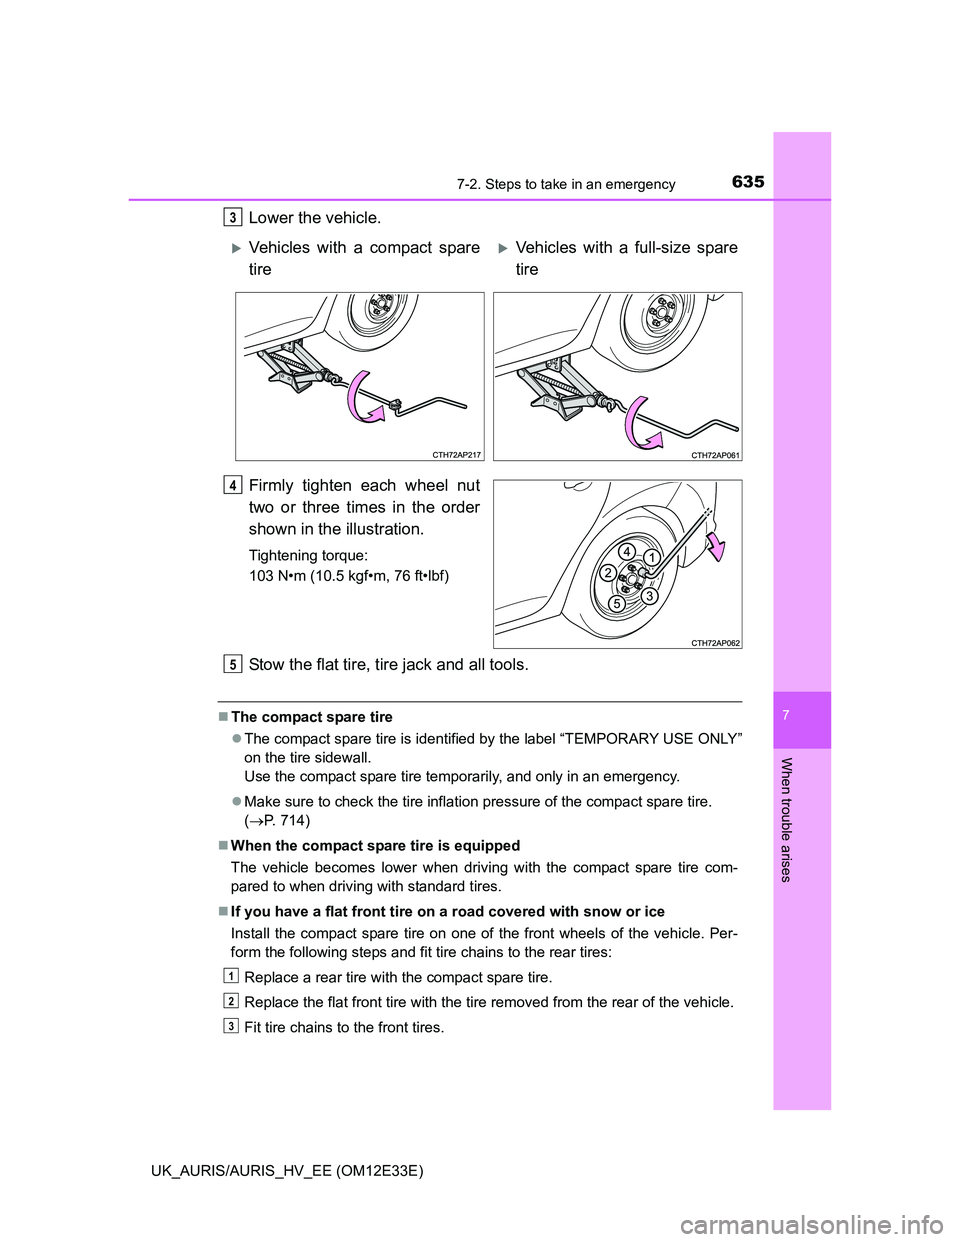
Lower the vehicle.
Firmly tighten each wheel nut
two or three times in the order
shown in the illustration.
Tightening torque:
103 N•m (10.5 kgf•m, 76 ft•lbf)
Stow the flat tire, tire jack and all tools.
The compact spare tire
The compact spare tire is identified by the label “TEMPORARY USE ONLY”
on the tire sidewall.
Use the compact spare tire temporarily, and only in an emergency.
Make sure to check the tire inflation pressure of the compact spare tire.
(P. 714)
When the compact spare tire is equipped
The vehicle becomes lower when driving with the compact spare tire com-
pared to when driving with standard tires.
If you have a flat front tire on a road covered with snow or ice
Install the compact spare tire on one of the front wheels of the vehicle. Per-
form the following steps and fit tire chains to the rear tires:
Replace a rear tire with the compact spare tire.
Replace the flat front tire with the tire removed from the rear of the vehicle.
Fit tire chains to the front tires.
3
Vehicles with a compact spare
tireVehicles with a full-size spare
tire
4
5
1
2
3